Tool kits

Hello
I am also a fan of good tools. Better to have less but definitely the best I can afford. Most mini lathes and milling machines are only suitable for wood. And if you want a piece of brass or aluminum, it will be difficult to keep the dimensions, because these mini are very delicate.
 
The same applies to me. I would like to procure a small milling machine and lathe, but space doesn't permit. My personal experience has taught me not to go for the cheap option, but spend wisely and look for good quality tooling, which will last longer and give good results.

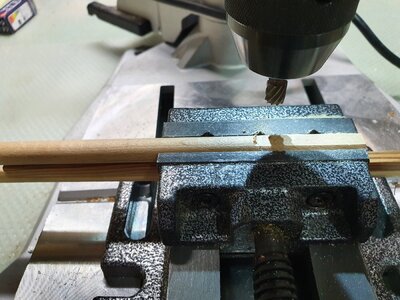
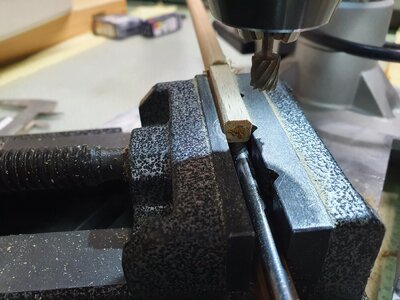
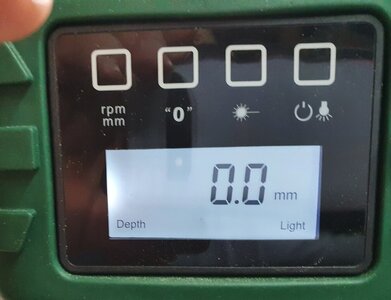
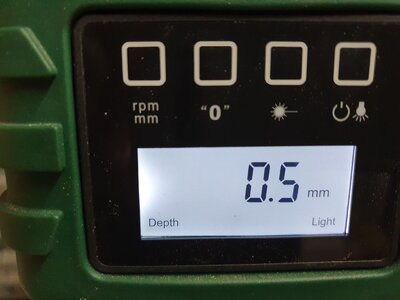
My next step in the build is to manufacture the long square on the end of the mast. To do this I will clamp a small mill from Dremel in the chuck of the pillar drill and with the mast fastened in the vice gently remove material on each side with a high chuck speed by moving the vice backwards and forwards carefully on the drill table until I reach the required dimension, having worked out beforehand how much is to be removed from each side to achieve the correct size of the square. The pillar drill has a digital depth stop.
When the first side of the square is finished turn the mast 90° in the vice, reclamp and remove the next amount. This ensures a near-perfect square, equi-spaced on the mast dia. The proviso is that the mast sits parallel in the vice. This method doesen't beat having a milling machine, though.
Happy modelling.
Trevor
I appreciate the step by step instructions, I understand your process. A picture of your setup might help others to understand who have difficulty with English.
 
I appreciate the step by step instructions, I understand your process. A picture of your setup might help others to understand who have difficulty with English.

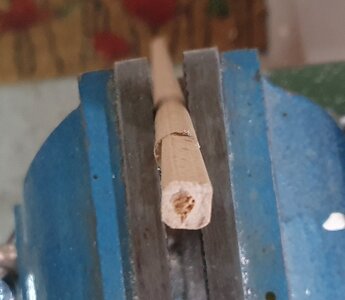
This is how I set it up taking all safety precautions, such as wearing safety glasses. The trick is not to move the vice too quickly! The following task is done before the mast is tapered.

I found that a maximum of 0,5 mm material from the mast per pass was ideal. That means for an 8 mm square from a 10 mm dia mast I removed 1 mm per side equating to two passes of the mill per side of the square.

The chuck speed was 2000 RPM but the speed can be higher. The cutter sharp. I put some packing pieces under the mast in the vice to ensure parallelity. Attention and care are required when approaching the marked line. The mill was moved onto the diameter of the mast and the digital depth gauge on the display set to zero. The vice moved away and the chuck lowered until a depth of 0,5 mm or less, depending on how much material one wants to remove, and the stop locked into position ensuring the mill did not go any lower. I moved the vice slowly in a backwards and forwards motion carefully until the end of the square was reached. I removed the mast and rotated it 90° and reclamped in the vice. This sequence repeated until the square was completed.
Just needs deburring and the job is done. This a practice piece and not the actual mast.

My next step in improving the set-up will be to fix a guide to the table to act as a stop for the vice and to add a clamp to the pillar to fix the drill head in position so that I have both hands free to hold and move the vice. At the moment one hand holds down the mill and the other guides the vice. I will post more photos of this set-up when these next steps have been accomplished.
After that the tricky bit will be to manufacture the smaller square at the front of the existing square. I will probably cut the smaller square by hand leaving a small amount all round for removal in the drill. To ensure the mill doesn't catch, I will grind down the outer diameter of the mill and leave only the tips to cut the material.

It's not ideal by a long shot but suits my needs not having a proper milling machine. The alternative is to do all the work by hand.
I would gladly accept any suggestions to improve the set-up, though.


Pillar drill as mill_1.jpgPillar drill as mill_2.jpgPillar drill as mill_3.jpgPillar drill as mill_5.jpg

Pillar drill as mill_4.jpg
 
This is how I set it up taking all safety precautions, such as wearing safety glasses. The trick is not to move the vice too quickly! The following task is done before the mast is tapered.

I found that a maximum of 0,5 mm material from the mast per pass was ideal. That means for an 8 mm square from a 10 mm dia mast I removed 1 mm per side equating to two passes of the mill per side of the square.

The chuck speed was 2000 RPM but the speed can be higher. The cutter sharp. I put some packing pieces under the mast in the vice to ensure parallelity. Attention and care are required when approaching the marked line. The mill was moved onto the diameter of the mast and the digital depth gauge on the display set to zero. The vice moved away and the chuck lowered until a depth of 0,5 mm or less, depending on how much material one wants to remove, and the stop locked into position ensuring the mill did not go any lower. I moved the vice slowly in a backwards and forwards motion carefully until the end of the square was reached. I removed the mast and rotated it 90° and reclamped in the vice. This sequence repeated until the square was completed.
Just needs deburring and the job is done. This a practice piece and not the actual mast.

My next step in improving the set-up will be to fix a guide to the table to act as a stop for the vice and to add a clamp to the pillar to fix the drill head in position so that I have both hands free to hold and move the vice. At the moment one hand holds down the mill and the other guides the vice. I will post more photos of this set-up when these next steps have been accomplished.
After that the tricky bit will be to manufacture the smaller square at the front of the existing square. I will probably cut the smaller square by hand leaving a small amount all round for removal in the drill. To ensure the mill doesn't catch, I will grind down the outer diameter of the mill and leave only the tips to cut the material.

It's not ideal by a long shot but suits my needs not having a proper milling machine. The alternative is to do all the work by hand.
I would gladly accept any suggestions to improve the set-up, though.


View attachment 205012View attachment 205013View attachment 205014View attachment 205016

View attachment 205015
That’s perfect. For those of us without machines we can figure out how to do this manually. Thumbsup
 
I found that it not too difficult to do it by hand
Lol, we’ll see once I get to this. Quality of the creation is always subjective and not too difficult for some is very difficult for others, especially for us new to modeling who have not experienced many of these things. o_O
 
Lol, we’ll see once I get to this. Quality of the creation is always subjective and not too difficult for some is very difficult for others, especially for us new to modeling who have not experienced many of these things. o_O
I use a new/sharp #11 x-acto blade and take my time (making sure not to bleed) ;)
 
Back
Top