Tree Nails on Ships and Ship Models

Joined
Nov 17, 2021
Messages
839
Points
318

Location
Columbia, SC
I will be getting the Bonhomme Richard deluxe cross section model, as so beautifully done here by Uwe and others, and couldn't find a thread dedicated to tree nails. I search shows a bit about them in several articles, which I've read, but thought I'd ask here about everyone's suggested/best/favorite method.

The BR is in 1/48 scale, which I consider ideal for tree nail details. I didn't bother on my 1/98 scale HMS Victory, but if I had at that scale, they'd be pin pricks. 1/48 scale is entirely different, and I love what I'm seeing on the BR models here as well as the incredible advertising photos they use.

The method's I've read about and am considering include:
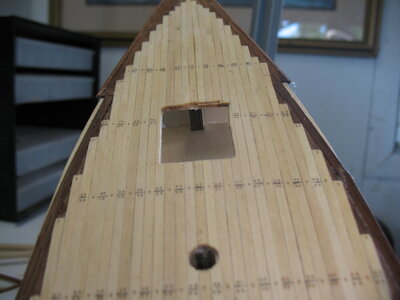
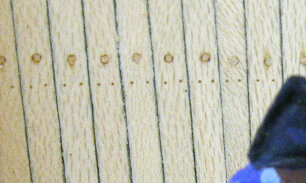
  1. Uwe's method of drilling 0.5 mm (0.020") holes, and filling them with wood putty. They look incredible, but looking at the process, there seems to be as much work sanding down each plank as preparing it. I'm a bit concerned some putty may stay in the grain, and, well, while I may try that, they look like too much work for me. One reader suggested putting tape on the planks before drilling and filling, to limit the mess, but I think someone said they had a hard time getting nice accurate holes that way. BTW, Uwe used 0.2mm copper wire, I think, for nails through the beams, and they look good too. Would copper have been used, thought, or would iron be more appropriate?
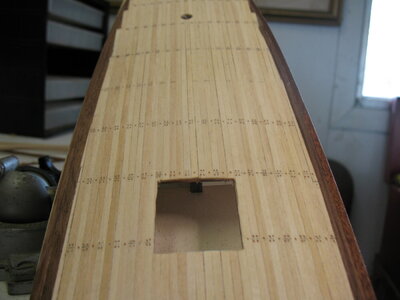
  2. Carlosys made an excellent model of the same kit, and apparently just drilled holes, without filling them. In the photos, they look great, and I would never have guessed that they weren't filled. I'm not sure if the holes were drilled through, deep or shallow, but once stained or varnished, that would highlight them nevertheless. This method is very tempting, if it looks as good in person.
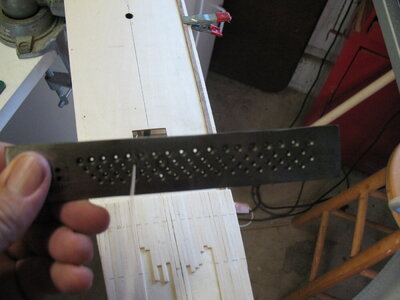
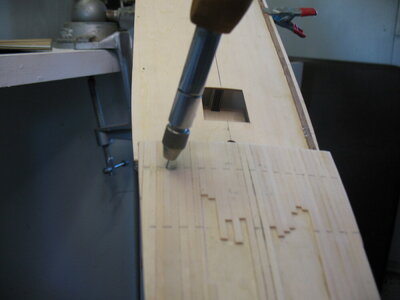
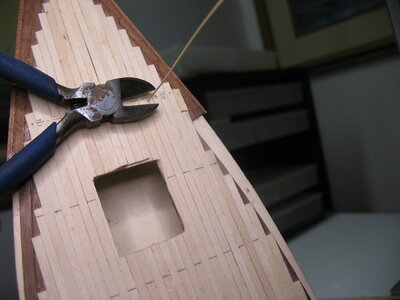
  3. Peter Vought has used the "Schwabian method" of drilling holes and installing toothpicks in them on the keel of his Yuanqing Bluenose, which are then cut off and sanded. TRUE tree nails. But it boggled my mine when I found some other say that each toothpick has to be sharpened first. He experimented with different sizes on this model, and I think ended up with 0.6mm, with 0.7mm in the keel.
  4. I have also seen a method where a sharp mechanical pencil was used inside a larger-than-necessary round hole template, with the outline of the tree nail "drawn" on the wood. I've tried something similar on another model, and seemed to have trouble with excess pencil lines that required removal and redoing. The result looks pretty accurate, if the tree nails were done with the same wood, and would be easier to do. As long as they don't get marked up, fade out or bleed into the wood on finishing.
  5. I was wondering myself about the possibility of using a very small carpenter's nail set. They make them down to 1/32" (0.8mm) in size. I tried pounding 3/32" (2.4mm) one into soft wood and it made a nice appearance of a defined ring, with a rounded center area representing the tree nail. Doing the same thing on walnut wasn't as visible. Any stain would tend to darken the ring appearance so that might work out. Something to try out on a scrap of pear once I get the kit.
  6. Another thought I just had now that might result in something similar to the nail set, but you could use a drill press for, is a piece of tubing with the outside diameter that you want the tree nail to appear as. It could be reamed out slightly with a drill, file or whatever, and maybe even teeth carved into it, so as to cut a small ring.
  7. Other methods which others have used or thought of.
As to size, the .5mm on a 1/48 scale mode looks appropriate to me. That's a correct size for a 24mm full size tree nail, or just under 1". To me, that sounds a bit small for outside planking and a bit large for decking, but that's just a SWAG (Scientific WAG). I've seen elsewhere on these forums a range of 7/8" for 1" thick planking to 1 1/2" for 6" thick. It does make sense that they would vary depending on the thickness of the material.

On inside (cabin structure) areas, I assume nails would be used rather than tree nails, the greater expense and time required for tree nails not being necessary for non-structural portions of the ship. Is that true? If so, pin/needle pricks, which would stain darker, would seem appropriate for those areas, should anything be used at all.

I had heard that tree nails on ships in the 1760-1850 era generally were plugs to protect an iron or other metal screw or bolt? Is that the case? I think older ships used treenails as attachments themselves, not to cover holes created to use other fasteners.

I have seen tree nails usually made of a contrasting color of wood, if only slightly, than the wood it is inserted into. Although too much contrast might look too much like dots. Interestingly, Wikipedia states about tree nails in ships that "However, when the treenail was a different wood species from the planking, it usually caused rot".

As to visibility of tree nails on on ships, in many pictures of the HMS Victory's decking, notably the top deck, it is very difficult to see any sign of the tree nails, while in other lower deck photos they are clearly visible. It's obvious from these photos that adding tree nails is a modeling thing that we like to see and that indicates a sign of great craftsmanship rather than a realistic representation. :)

Anyhow, that's what I think I know about tree nails and showing them on models. I'd love to hear ideas on their creating on models, especially on mine in the 1/48 scale range, as to methods and materials. Please feel free to correct any misinformation I have spread, as I am just learning about this feature.
 
All the methods you have itemised have considerable merit and work well, but I personally like the toothpick method myself.
 
All the methods you have itemised have considerable merit and work well, but I personally like the toothpick method myself.
So I see, by your Alfred-74, aka Porcupine. I have to admire both your patience and your results.

Dave Teel, your results and description are great as well. I'm just not sure I'm up to that level (or will live that long), even on just a cross-section model.

And both of your builds look incredible. I am amazed every time I come here of the quality of the builds.

I mentioned tubing above, and see that stainless hypodermic needle tubing is available in sizes that would be appropriate, so I wonder about cutting lengths of it and "sharpening" it to either hammer in, or "drill in". I think I will definitely have to attempt several of these methods in small scale with the wood supplied with the kit to help determine methodology, results and time involved. Just tried some center-punch and penciled-in versions tonight on softwood; not sure. Although I've seen nice results penciled in, doing so eliminates being able to sand the assembled hull or deck area, so I don't think that's the way for me to go.

It's interesting that while we would never be able to see treenails on an actual ship "at model distance" of say 50 feet for a 1/48 scale model, they look SO DARN GOOD when done well. They do seem to cry out for contrasting colors of material, though.
 
wooden treenails is more a modeling thing than actual ship building practice, iron spikes and copper rods were used so it depends if you are trying for historic accuracy and scale or are you taking artistic license and trying to show an effect.

The BR is in 1/48 scale, which I consider ideal for tree nail details. I didn't bother on my 1/98 scale HMS Victory, but if I had at that scale, they'd be pin pricks. 1/48 scale is entirely different, and I love what I'm seeing on the BR models here as well as the incredible advertising photos they use.

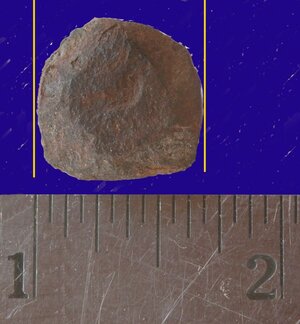
at 1:48 scale a planking spike would be so tiny you woud not see it. Here is a real planking spike. The head of the spike is 5/8 of an inch at 1:48 scale it is a tiny dot .008 thousands.

1421683479_105_FT19718_real_spike_.jpg1421683575_105_FT19718_actual_spike_head_.jpg

1418495594_105_FT19718_pic16.jpg
 
On inside (cabin structure) areas, I assume nails would be used rather than tree nails, the greater expense and time required for tree nails not being necessary for non-structural portions of the ship. Is that true? If so, pin/needle pricks, which would stain darker, would seem appropriate for those areas, should anything be used at all.
ok first treenails were not or should i say were seldom used as far back as the mid 1700 records show iron spikes were used NOT treenails.
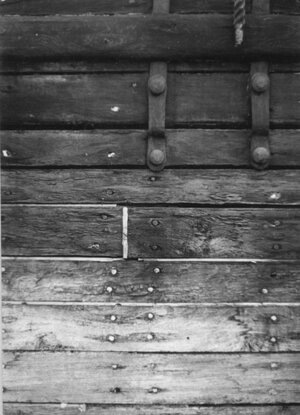
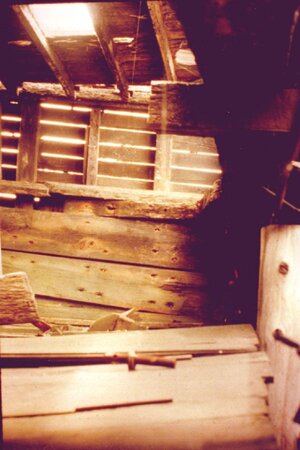
to answer you question nails were used here is the inside of a cabin on a wreck nails can clearly be seen

1419690846_105_FT19718_a19_.jpg
 
Out of scale makes a model look poka dotted a term i head was maritime measles out of scale can go wrong real fast. but on the other hand adding spikes at a reasonable scale adds to a model.

years ago i saw one of the best artistic interpretation of planking spikes on a model.

What one builder did was to use fine sterling silver wire. depending on the angle you view the model the silver refelected light and you can see the spike but move a little and the spike disappeared. The silver went from not seeing it to dull gray to a glimmer very nice.
 
Last edited:
at our museum model ship club we did testing on wood treenails and if they actually were effective for holding joinery. The resutls were because the wood tree nail was so small it added very little straight if any to joinery. So adding them on a model is more show than anything else.

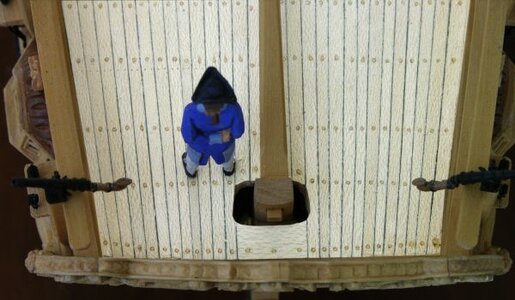
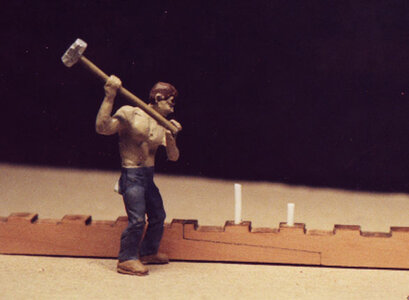
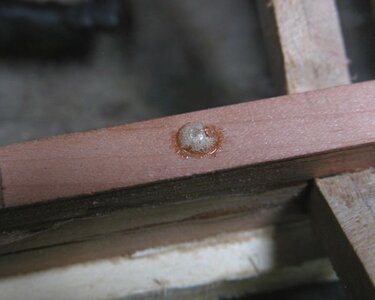
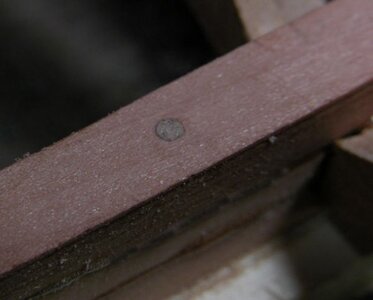
what i have done is to use plastic rods

1417794933_105_FT19718_a3.jpg

the problem is only white was available in the correct size so this is what i did
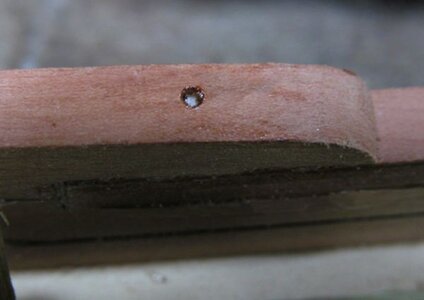
first drill a hole

1418398918_105_FT19718_k6_.jpg

then insert the plastic peg

1418399031_105_FT19718_k5_.jpg

used expanding glue that will seep down the peg and fill the gap

1418399096_105_FT19718_k8_.jpg

a quick swipe with fine sand paper and there you have it.

1418399176_105_FT19718_k9_.jpg
 
wooden treenails is more a modeling thing than actual ship building practice, iron spikes and copper rods were used so it depends if you are trying for historic accuracy and scale or are you taking artistic license and trying to show an effect.

at 1:48 scale a planking spike would be so tiny you woud not see it. Here is a real planking spike. The head of the spike is 5/8 of an inch at 1:48 scale it is a tiny dot .008 thousands.
Weren't tree nails then used to cover the iron spikes? I thought that was one of their main purpose. Certainly we see evidence of wooden treenails on both ship hulls and decks. And treenail sizes, from a table I've seen, run from 7/8" to 1 1/2" (0.018" to 0.031"). Those sizes are definitely visible. Pin pricks produced by a 0.025" pin are quite visible on a model I've found.

BTW, the head of a 5/8" spike in 1:48 scale would be 0.013" (033mm), not .008". I've drilled #80 holes, which are almost that exact size at 0.0135", and they're fairly visible.

Also BTW, I LOVE your gothic steam engine 3D model! How incredible it would be to build that! My son has several 3D printers, but has balked at my projects because they usually fail.
 
i read somplace in a book on shipbuilding the shipwright went through the trouble to HIDE the planking spikes. it showed the skill and craftsmanship of the builder. What was done is to cut plugs to cover the deck spikes that were selected for grain pattern so the plug would blend in with the planking.

As model builders we or some of use are doing the exact opposite and trying to make them stand out.
 
BTW, the head of a 5/8" spike in 1:48 scale would be 0.013" (033mm), not .008". I've drilled #80 holes, which are almost that exact size at 0.0135", and they're fairly visible.

your right
at 1:48 scale 1 inch =.020 1/2 an inch is .010 so 5/8 would be .013
 
Weren't tree nails then used to cover the iron spikes? I thought that was one of their main purpose. Certainly we see evidence of wooden treenails on both ship hulls and decks. And treenail sizes, from a table I've seen, run from 7/8" to 1 1/2" (0.018" to 0.031"). Those sizes are definitely visible. Pin pricks produced by a 0.025" pin are quite visible on a model I've found.

those sizes i think were for timbers not planking. in contracts 1 1/2 inch copper rods were used to join floor timbers to the keel. 7/8 rods were used in frame construction along with wooden treenails.


on decks wooden plugs were used on the hull some sort of putty or resin was used to cover the spikes
 
What type of expanding glue did you use? The only one I'm aware of is Gorilla glue, which seems ill-suited here.

yup that is what used
 
Also BTW, I LOVE your gothic steam engine 3D model! How incredible it would be to build that! My son has several 3D printers, but has balked at my projects because they usually fail.

thanks! it would be incredible to model the engine room as a mid section model. Right now i am working on the Tecumseth and that is getting close to the finish. Then a carving tutorial of the Halifax stern, i have my team of artists working on the 3D carvings and printing of a stern model of Hahn's Alfred THEN it will be all about the steamer Mississippi
 
A very timely post Signet. I have spent the last number of days trying to come up with a suitable solution for a 1:64 model Syren. I initially used a sharpened glue needle into the end grain of a piece of pine, which worked out quite well. The problem was at that scale the treenails worked out at 0.032” equating to 2”. On a test piece laid on the model they were too big and looked like measles. A smaller needle just bent and for me was impractical.

I tried a fine lead pencil in a 0.028” hole. It looked good but after staining the lead ran into and discoloured the basswood grain. Next, just a tiny hole with no wood treenail insert and no pencil. I sanded the test piece down but there were still rough edges to the hole. Staining left it looking even more ragged.

Next was very fine filler into 0.025” holes. Staining precluded that method because of grain discolouration adjacent to the hole. If I was painting the upper hull then that would be ok but what’s the point of filled treenail holes covered in paint?

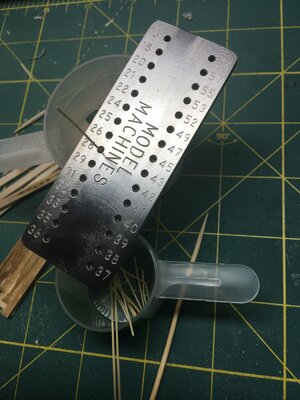
So, back to the tried and true method using bamboo through a draw plate. What a slow monotonous process that is but with patience I have better results. I can get down to 0.025” equating to 1.6 inches. That seems more reasonable for a treenail size.

My last consideration is to not do any treenailing and just stain the upper planking. There seems to be lots of debate on the effectiveness of treenails on small scale models. Some modellers do them, some don’t. At a larger scale I think it is probably a given to do them.

816566C9-6375-4F08-BDA7-079C7BA9353F.jpeg
 
I mentioned above in method 2 that Carlosys just drilled holes without putting putty or plugs or anything in. His build of the Bonhomme Richard shows pictures that look excellent, and are very hard to tell from drilled holes with treenails installed. Since this model represents a ship under construction, one could easily reason that this shows the build after hull and deck planks have been bolted/screwed in place, but have yet to have the treenails installed.
 
I mentioned above in method 2 that Carlosys just drilled holes without putting putty or plugs or anything in. His build of the Bonhomme Richard shows pictures that look excellent, and are very hard to tell from drilled holes with treenails installed. Since this model represents a ship under construction, one could easily reason that this shows the build after hull and deck planks have been bolted/screwed in place, but have yet to have the treenails installed.
I believe the problem I am faced with in just drilling holes, with nothing in them, is the structure of the basswood itself. It just doesn’t look “clean” to me after drilling. But maybe I should stop using a head magnifier :).

With cherry being harder with a tight grain I expect he gets a much better cut from the drill bit.
 
Thinking about all this more, I think we are talking about two different items (maybe more) when we say tree nails as used in models. True tree nails are used to CONNECT two pieces of wood together. The Penobscot Marine Museum has a nice article and picture on tree nails. Likewise, there are videos on traditional maritime skills that show them. I think these are true treenails, with no iron or copper bolt used, and was more popular in older ship construction, although I don't know when other methods begain.

In Alan McGowan's book HMS Victory, Her Construction, Career and Restoration, he says "Most of the deck and outer and inner planking was attached to the beams and frame timbers by means of treenails. These were long wooden dowels made from good-quality, straight-grained, well-seasoned oak, and of round section. The treenail was dipped in tallow and driven into a drilled hole by using a pin mail. The surplus ends were cut off and caulked to bell the ends slightly and prevent withdrawal or loosening. Very few treenails are being used in the restoration work except to hold large laminates together, and these are usually made from teak."

Now, what has been described to me as to standard hull and deck construction of the era is to drill and countersink the holes in the planks, drive in iron or copper screws or spikes, and then fill the larger hole with short wood plugs, or as Dave says above, filled with putty or resin. IMHO, these are NOT treenails They are simply plugs to protect the attachments from corroding. I've built furniture in this way, attaching the pieces with countersunk screws, then adding a piece of dowel to finish the hole, sometimes contrasting even rounded, other times cut from a matching piece of hardwood with a dowel/plug cutter and inserted so as to match the grain.

So, I think we have to ask ourselves if the items we are modeling for deck and hull plank attachments are in fact treenails (without any underlying hardware), or are simply plugs. I realize they may look the same in the end, especially on a model, but this helps determine their size, appearance and material for modeling purposes. What would have been used on the Bonhomme Richard?

For attachment of frame members, I believe the copper clench bolts were used below the waterline and wrought iron above. No plug would be used here, I think. Here I'm pretty sure Uwe just used copper wire on his frame members. But I think there almost certainly wouldn't be "treenails" in those members.
 
Back
Top