did you catch the mis spelling?after aboug 10-20 im donde
-

Win a Free Custom Engraved Brass Coin!!!
As a way to introduce our brass coins to the community, we will raffle off a free coin during the month of August. Follow link ABOVE for instructions for entering.
-

PRE-ORDER SHIPS IN SCALE TODAY!
The beloved Ships in Scale Magazine is back and charting a new course for 2026!
Discover new skills, new techniques, and new inspirations in every issue.
NOTE THAT OUR FIRST ISSUE WILL BE JAN/FEB 2026
You are using an out of date browser. It may not display this or other websites correctly.
You should upgrade or use an alternative browser.
You should upgrade or use an alternative browser.
Tying Ratlines - advice
- Thread starter peterhudson
- Start date
- Watchers 12
15 men on the dead mans chest..... yo ho ho and a bottle of rummmm Drink and the devil... done for the rest.... yo ho ho and a bottle of rum....There are 6 more versus.... look 'em up...
Has anybody tried any other knots than clove hitches for ratlines? I know that's the true replication, but does something else avoid the up and down waviness induced by the hitches at our scales? Or is it all down to stiffening with nail varnish / PVA to get them looking right?Elements & Practice said:RATLINGS are fastened horizontally to the shrouds, at regular distances, from the futtock-staff downwards, and small spars or boat-oars are seized to the shrouds, about five feet asunder, for the men to stand upon. The first ratling to be thirteen inches below the futtock-staff on the lower shrouds. The ratlings are fastened round each shroud with a clove-hitch, except at the ends, which have an eye spliced in and seized round the shroud. Each ratling is placed thirteen inches asunder. The fore and aftermost shroud are left out for the first six ratlings down from the futtock-staff; and like-wise the six lower ratlings next the dead eyes. The topmast-shrouds are rattled in the same manner; the first ratling thirteen inches below the futtock-staff, and rattled throughout. The swifters on the lower shrouds are then removed lower down, half way between the dead-eyes, and bowsed tight, there to remain.
Clove hitches are still the most popular knots used in models. If the model is very small, sometimes the ratlines can be passed though the shroud using a needle. Because thread defies gravity and the tension is far higher in scale models than real rope at full scale, watered down PVA is commonly used to freeze the lines in the desired, downward hanging loops, and also to prevent the clove hitches from coming loose.
There are many methods for ensuring that the ratlines come out as nice, even and level rows at equal distance apart from one another. Many use a white cardboard background with regular horizontal lines on it, inserted behind the shrouds while tying ratlines.
I use a wooden alignment jig that clamps onto the shroud and fits precisely between rows of ratlines. It has 300 grit sandpaper glued to the inside surfaces so once clamped onto the shrouds, it won't shift. I found that when tightening each clove hitch, you pull the thread away from the shroud straight toward you with a light tug while holding the shroud with needle pliers just above the knot, with the spacing tool just below the knot, then tug the line in a direction parallel with the ratline, in the direction you are working. The knot is small and tight. I tighten each knot as I go, and then slide them up or down on the shroud if they need straightening. The spacing tool makes sure that the row is mostly in the correct angle, but properly spaced between rows, so few adjustments are necessary. Every three rows, I check the height and location of the ratline to the channel, and compare that measurement to the ratline on the opposite side of the ship, so they line up. Use of the spacing tool made these measurements usually come within 1mm from port to starboard, so adjustments are quite small to match the ratlines. It's good to apply the thinned PVA glue to each row before making the next one, so none of your finished knots get loose. It took me about 200 knots to get a system down.
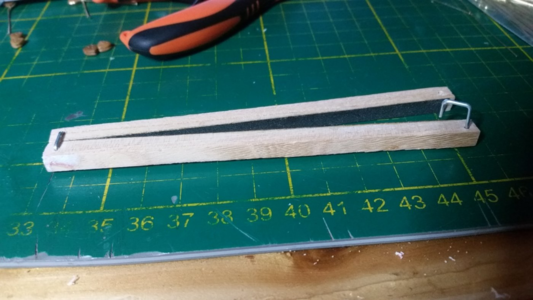
Below is the alignment jig in use, using clamps, before the jig was modified to use wire staples, making it much lighter and easier to use.
There are many methods for ensuring that the ratlines come out as nice, even and level rows at equal distance apart from one another. Many use a white cardboard background with regular horizontal lines on it, inserted behind the shrouds while tying ratlines.
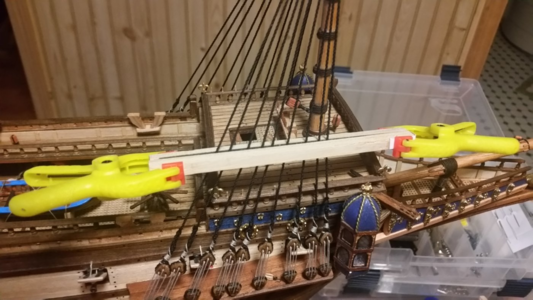
I use a wooden alignment jig that clamps onto the shroud and fits precisely between rows of ratlines. It has 300 grit sandpaper glued to the inside surfaces so once clamped onto the shrouds, it won't shift. I found that when tightening each clove hitch, you pull the thread away from the shroud straight toward you with a light tug while holding the shroud with needle pliers just above the knot, with the spacing tool just below the knot, then tug the line in a direction parallel with the ratline, in the direction you are working. The knot is small and tight. I tighten each knot as I go, and then slide them up or down on the shroud if they need straightening. The spacing tool makes sure that the row is mostly in the correct angle, but properly spaced between rows, so few adjustments are necessary. Every three rows, I check the height and location of the ratline to the channel, and compare that measurement to the ratline on the opposite side of the ship, so they line up. Use of the spacing tool made these measurements usually come within 1mm from port to starboard, so adjustments are quite small to match the ratlines. It's good to apply the thinned PVA glue to each row before making the next one, so none of your finished knots get loose. It took me about 200 knots to get a system down.

Below is the alignment jig in use, using clamps, before the jig was modified to use wire staples, making it much lighter and easier to use.

Thank you Kurt. I need to make a mark 2 of my tool with sandpaper on the inside. And I need to practice a lot!
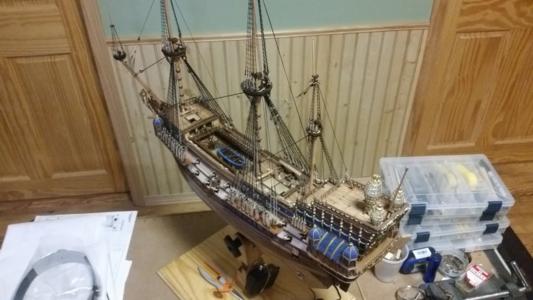
After the first 200 knots, you'll be a pro. Tip: mount your ship in a keel vice so you can work at a comfortable height with the ship's masts angles toward you. It gets really tiring holding both arms high up in the air trying to tie ratline knots! The keel vice in use below can tip the ship fore and aft as well as port and starboard. The ship was trapped in that vice for almost three years, only released when the ship was complete and display table was ready to accept the ship.Thank you Kurt. I need to make a mark 2 of my tool with sandpaper on the inside. And I need to practice a lot!
I see a lot of you guys using wax for rigging line, but it attracts dust even in a display case.
Its far better to run your lines through a candle flame to remove the fuzz.
Its far better to run your lines through a candle flame to remove the fuzz.
Yes, and on the top of it the beeswax covers most of the details of the line, the details, for which we fought so hard...I see a lot of you guys using wax for rigging line, but it attracts dust even in a display case.
Its far better to run your lines through a candle flame to remove the fuzz.
János
Simple. Don't use fuzzy line. If you use poly, keep it away from intense heat. I melted a backstay in half with a heat gun trying to dry some glue. Not fun.Yes, and on the top of it the beeswax covers most of the details of the line, the details, for which we fought so hard...
János
Hallo @peterhudsonI’m seeking some guidance from the wise. I am building the Caldercraft DIANA, I’ve completed the lower shrouds and about to start the ratlines - see attached. I intend to use clove hitches to secure my 0.25mm, stained, line. I wonder if anyone has a good technique for doing this at a steady, predictable pace - I’ve tried a couple of times but the tensioning is a little hit and miss across the horizontal And will look odd unless done correctly. Also how do you tie them neatly towards the top where the spacing between the shrouds is quite small? I know this will take several weeks but it would be good to know if there is a method which helps consistency. Thanks. Peter
we wish you all the BEST and a HAPPY BIRTHDAY

- Joined
- Oct 11, 2020
- Messages
- 10
- Points
- 38

Thank you very much - a bit modelling tonight beckons with a glass of fizz.
Happy Birthday! 

Adding to the techniques above I will show what I have done for my Bluenose Schooner shrouds and ratlines with is much less complex than those for ships of war or many shrouds. For a secure stable condition I do this flat on my work surface as a vertical condition with the shrouds bent around the mast top would be too flexible for my hands.after aboug 10-20 im donde
To do this I drew the shrouds and ratlines onto a board and drove small nails in both sides to anchor the ratline and also guide it across the shrouds as shown in this partially completed set of rfatlines. :
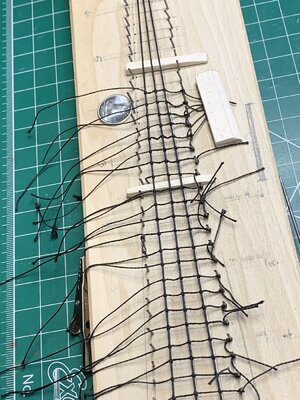
Not visible at the top is a dowel simulating the mast for which the shrouds' lines are looped and served when done. Here is a sequence of the work first securing a ratline to the outside nail with a simple slip knot:
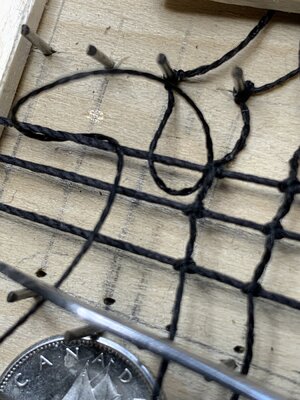
This secured line is then tied with a clove hitch over the first shroud and with small needle probes brought it into position guided by the lines and pulled tight. This process is repeated for the second shroud
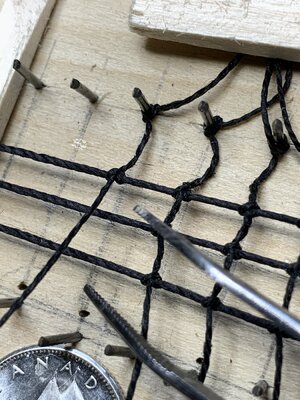

and as you can see to the right side those ratlines for each shroud, using the nails on the ending side or bottom in the view to guide the ratlines across the shrouds which can be adjusted by pushing the knot left or right as needed for alignment and adjusting the tension for the sag that is desired. When done a very small spot of glue with a toothpick secures each knot.
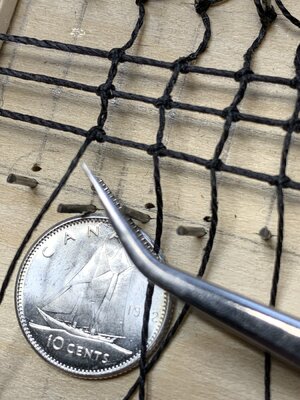

When all are done I serve the top narrow group around the dowel and have the long loose ends at the bottom secured with the small rod tied around each which is just above the deadeyes which are spliced to each shroud as a completed assembly that can be placed over the top of the lower mast.
Just my method for consideration and possible application for other conditions which may demand more shrouds' lines and sets of nails.
Rich (PT-2)
The above was the first time through with the bight served tight at the top before I placed it on the lower mast and behind the crane which was already in place. End result as I have posted over and over was the need to make a second set behind the crane with the mast boom, gaff, and sail bent. Challenge to hold everything in place and not dislodge the work in the cross trees. Second try also was wrong so now a third attempt. When these two fore lowers are done I will add the lower boom connection parts above the table and then either add the top mast and rigging or maybe stay with the much larger sail bent onto the lower main mast while the process is fresh in my mind. You can see the mast/sail secured at the top end of the jig.Adding to the techniques above I will show what I have done for my Bluenose Schooner shrouds and ratlines with is much less complex than those for ships of war or many shrouds. For a secure stable condition I do this flat on my work surface as a vertical condition with the shrouds bent around the mast top would be too flexible for my hands.
To do this I drew the shrouds and ratlines onto a board and drove small nails in both sides to anchor the ratline and also guide it across the shrouds as shown in this partially completed set of rfatlines. :View attachment 240802
Not visible at the top is a dowel simulating the mast for which the shrouds' lines are looped and served when done. Here is a sequence of the work first securing a ratline to the outside nail with a simple slip knot:
View attachment 240803
This secured line is then tied with a clove hitch over the first shroud and with small needle probes brought it into position guided by the lines and pulled tight. This process is repeated for the second shroudView attachment 240804View attachment 240804
and as you can see to the right side those ratlines for each shroud, using the nails on the ending side or bottom in the view to guide the ratlines across the shrouds which can be adjusted by pushing the knot left or right as needed for alignment and adjusting the tension for the sag that is desired. When done a very small spot of glue with a toothpick secures each knot.View attachment 240805View attachment 240805
When all are done I serve the top narrow group around the dowel and have the long loose ends at the bottom secured with the small rod tied around each which is just above the deadeyes which are spliced to each shroud as a completed assembly that can be placed over the top of the lower mast.
Just my method for consideration and possible application for other conditions which may demand more shrouds' lines and sets of nails.
Rich (PT-2)
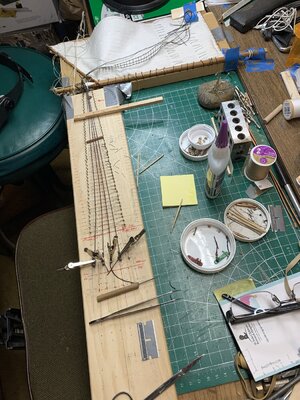
Now a closer view of the upper shrouds/rats area
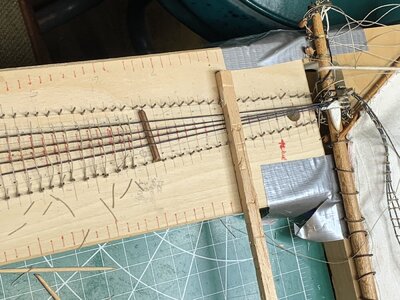
These were before I added the deadeyes onto the bottom of the shrouds below the shear pole.
I temporarily again stepped the mast to check the length of one side before starting on the other. I would only suggest this flat approach to those like me who not secure and stable to work vertically with the mast stepped and the shrouds down taut. Rich (PT-2)
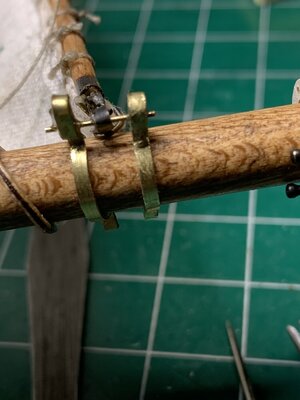
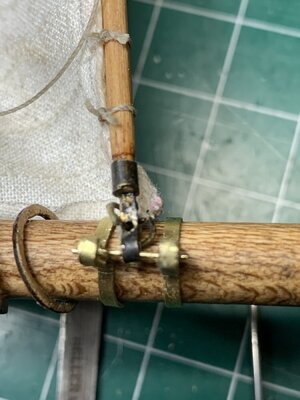
With the Foremast shrouds/rats completed I went to make the Foresail boom gooseneck fitting doing the brass strip bending on matching diameter tool to the mast size and crimping the foreside hinge ear and then soldering the vertical rod on to one side of the lower hoop and pinching it closed with a covering piece. Just about the same tor the upper hoop but no solder ing needed as it receives the rod. Two photos of that work on the mast where the sail/boom were previously set:The above was the first time through with the bight served tight at the top before I placed it on the lower mast and behind the crane which was already in place. End result as I have posted over and over was the need to make a second set behind the crane with the mast boom, gaff, and sail bent. Challenge to hold everything in place and not dislodge the work in the cross trees. Second try also was wrong so now a third attempt. When these two fore lowers are done I will add the lower boom connection parts above the table and then either add the top mast and rigging or maybe stay with the much larger sail bent onto the lower main mast while the process is fresh in my mind. You can see the mast/sail secured at the top end of the jig.
View attachment 251211
Now a closer view of the upper shrouds/rats area
View attachment 251212
These were before I added the deadeyes onto the bottom of the shrouds below the shear pole.
I temporarily again stepped the mast to check the length of one side before starting on the other. I would only suggest this flat approach to those like me who not secure and stable to work vertically with the mast stepped and the shrouds down taut. Rich (PT-2)
First is a view as I worked on it:
and another with the mast rotated to show the alignment of the boom and gooseneck
Now it is time to do the Main mast lower shrouds/rats so I dry stepped the main with the foremast stepped to get it off of my work area. I used a template string to check the length of the shrouds to place in my horizontal jig and after bending the alternating shrouds Stbd & Port, I will secure the respective shrouds together, install them in the jig and begin the rat line waltz again. . . .
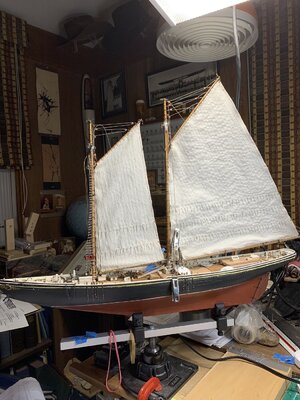 ;-)
;-)All of the sails are done with their own associated blocks and rigging, patiently waiting for my planned sequence of bending them onto the upper masts and stays associated between them and the bowsprit. I'll work inside out to get as much internal rigging and work done before closing them behind the shrouds/rats. Cat heads are planned at the end as I don't want to break them off in a sudden gale of careless motion with my right blind eye.
Rich (PT-2)
very clever indeed. Nice one.Adding to the techniques above I will show what I have done for my Bluenose Schooner shrouds and ratlines with is much less complex than those for ships of war or many shrouds. For a secure stable condition I do this flat on my work surface as a vertical condition with the shrouds bent around the mast top would be too flexible for my hands.
To do this I drew the shrouds and ratlines onto a board and drove small nails in both sides to anchor the ratline and also guide it across the shrouds as shown in this partially completed set of rfatlines. :View attachment 240802
Not visible at the top is a dowel simulating the mast for which the shrouds' lines are looped and served when done. Here is a sequence of the work first securing a ratline to the outside nail with a simple slip knot:
View attachment 240803
This secured line is then tied with a clove hitch over the first shroud and with small needle probes brought it into position guided by the lines and pulled tight. This process is repeated for the second shroudView attachment 240804View attachment 240804
and as you can see to the right side those ratlines for each shroud, using the nails on the ending side or bottom in the view to guide the ratlines across the shrouds which can be adjusted by pushing the knot left or right as needed for alignment and adjusting the tension for the sag that is desired. When done a very small spot of glue with a toothpick secures each knot.View attachment 240805View attachment 240805
When all are done I serve the top narrow group around the dowel and have the long loose ends at the bottom secured with the small rod tied around each which is just above the deadeyes which are spliced to each shroud as a completed assembly that can be placed over the top of the lower mast.
Just my method for consideration and possible application for other conditions which may demand more shrouds' lines and sets of nails.
Rich (PT-2)


