-

Win a Free Custom Engraved Brass Coin!!!
As a way to introduce our brass coins to the community, we will raffle off a free coin during the month of August. Follow link ABOVE for instructions for entering.
-

PRE-ORDER SHIPS IN SCALE TODAY!
The beloved Ships in Scale Magazine is back and charting a new course for 2026!
Discover new skills, new techniques, and new inspirations in every issue.
NOTE THAT OUR FIRST ISSUE WILL BE JAN/FEB 2026
You are using an out of date browser. It may not display this or other websites correctly.
You should upgrade or use an alternative browser.
You should upgrade or use an alternative browser.
USRC Harriet Lane Model Shipways 1:96 scale circa 1863 COMPLETED
Up through the war they were black and white on the inside
- Joined
- Jun 17, 2021
- Messages
- 3,184
- Points
- 588

I had to go look at my little HL model. I painted the boat hulls white, but they are mostly obscured by gray canvas covers. No way I'm going back to change them.  . At the USNA museum shop we made the launch and the whale boats for the ST. Lawrence (a Civil War era sloop of war) black. That was my intro project when I first came on board at the Academy. The St. Lawrence model is over 8' long on deck. Jerry was the project skipper then.
To the best of my knowledge, it still is a long way from finished 25 years, or so, on.
 . At the USNA museum shop we made the launch and the whale boats for the ST. Lawrence (a Civil War era sloop of war) black. That was my intro project when I first came on board at the Academy. The St. Lawrence model is over 8' long on deck. Jerry was the project skipper then.
To the best of my knowledge, it still is a long way from finished 25 years, or so, on.
- Joined
- May 25, 2020
- Messages
- 1,104
- Points
- 443

I used the masking tape method for the boat covers I learned on Pete's Flying Cloud build log. More later, shipmates. I have to get to a scholarship banquet in the next 60 mins and I still nead to shave my head, face and feed my dogs! 


 Can you tell that I really don't want to go?

- Joined
- Jun 29, 2024
- Messages
- 1,443
- Points
- 393

As usual, I’m late to the party on this subject. I have researched boat outfits listed in my copy of the. 1866 Navy Ordnance Instructions. The official boat outfit for small vessels was three cutters and one launch. The launch is important as it was the only boat capable of carrying a boat howitzer. Harriett Lanes’s cutters were too small to carry a howitzer. I understand that the double ended gig will replace one cutter.
I am enclosing lines drawings for a 30ft launch (the smallest) and a 24ft cutter. These are from my copy of the Navy’s 1900 boat book. Later than your model but very similar in appearance to Civil War era boats.

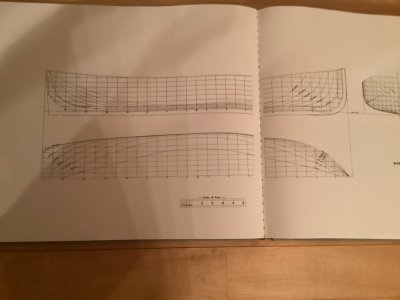
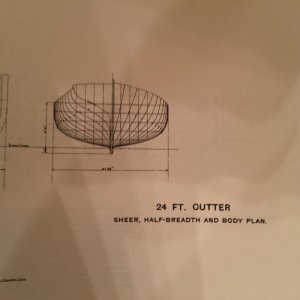
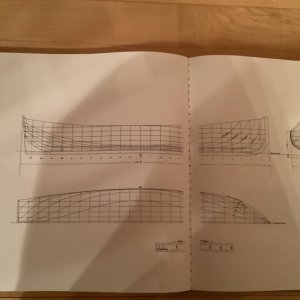
I am enclosing lines drawings for a 30ft launch (the smallest) and a 24ft cutter. These are from my copy of the Navy’s 1900 boat book. Later than your model but very similar in appearance to Civil War era boats.


- Joined
- May 25, 2020
- Messages
- 1,104
- Points
- 443

Roger! Thank you! It may be that my Harriet Lane carries a 30 foot launch  Even if she doesn't, all current and future builders will have the benefit of the wisdom from you and Jerry and Pete! I really appreciate your input!
Blessings. Peace. Gratitude.
Chuck
Blessings. Peace. Gratitude.
Chuck
- Joined
- May 25, 2020
- Messages
- 1,104
- Points
- 443

What ho, shipmates!
I mentioned above that I was going to use the masking tape method for the boat covers. This is from Pete's Flying Cloud log page 46 post #901

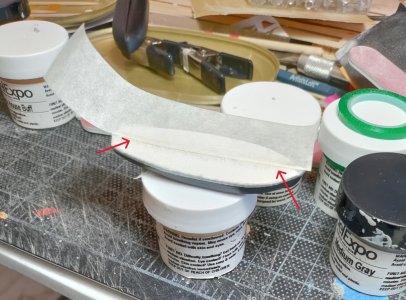
For the Harriet Lane boats, there is no need for the wire. The central keel is raised to provide the peak. Here are some pics of the process. In this pic, the first half is already applied. The red arrows point to the seam discussed above. Of course there is significant trimming needed to tailor the tape to the shape of the hull and the approximately 1/16th inch overlap. I used very sharp scissors to tailor the masking tape. After pressing the overlap to the sides of the boat I used a new #11 Exacto blade to do any final trimming. The tape burnished down very well - use the smooth handle of your Exacto knife for this.

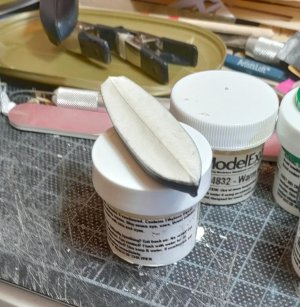
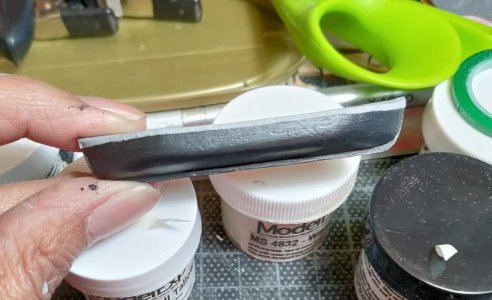
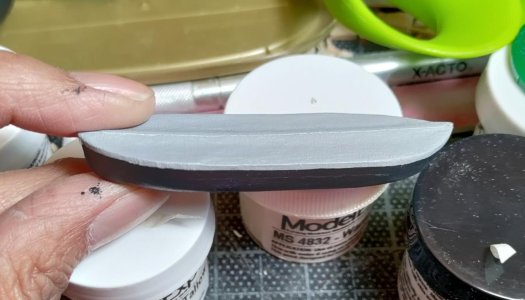
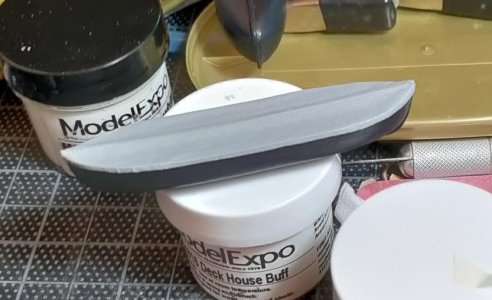
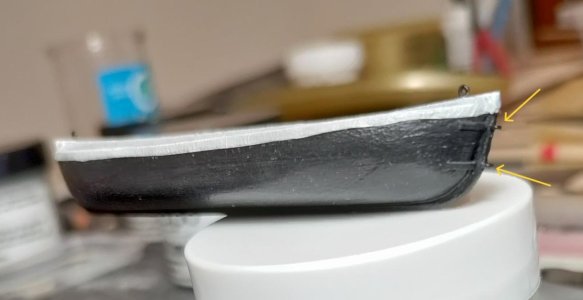
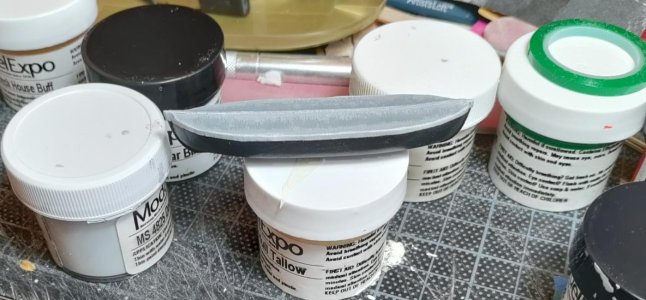
1st pic shows basic painted cover. 2nd and 3rd pics show my attempt to weather and add depth and highlights. I still need to insert eyebolts for the davit line blocks to attach to the boats. Also, if I can manage it in scale (or close) I'd like to add rudder attachment points as well.


I mentioned above that I was going to use the masking tape method for the boat covers. This is from Pete's Flying Cloud log page 46 post #901

For the Harriet Lane boats, there is no need for the wire. The central keel is raised to provide the peak. Here are some pics of the process. In this pic, the first half is already applied. The red arrows point to the seam discussed above. Of course there is significant trimming needed to tailor the tape to the shape of the hull and the approximately 1/16th inch overlap. I used very sharp scissors to tailor the masking tape. After pressing the overlap to the sides of the boat I used a new #11 Exacto blade to do any final trimming. The tape burnished down very well - use the smooth handle of your Exacto knife for this.


1st pic shows basic painted cover. 2nd and 3rd pics show my attempt to weather and add depth and highlights. I still need to insert eyebolts for the davit line blocks to attach to the boats. Also, if I can manage it in scale (or close) I'd like to add rudder attachment points as well.


- Joined
- May 25, 2020
- Messages
- 1,104
- Points
- 443

What ho, shipmates!
Now that I have boats, I need davits to hang the boats from. So, I took some 3/64th inch brass rod and experimented with soldering again. Here's the result. I'll keep experimenting - so far, as it turns out, I have been experimenting for this whole build and the next experiment seems to turn out better than the last
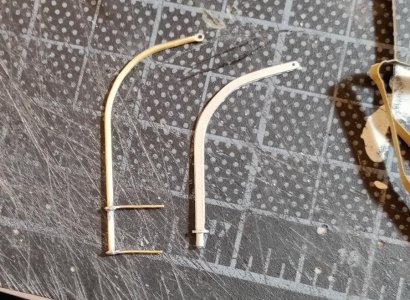
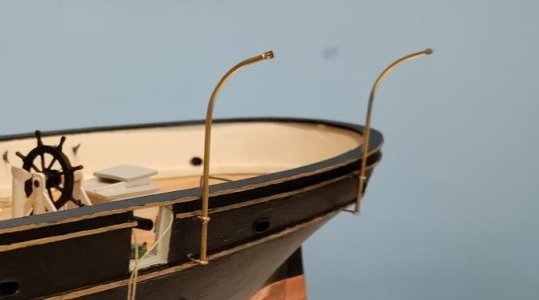
The first pic, is my first davit. I used brass wire that happened to come in some or other kit. Unfortunately, I bent the davit the wrong direction and had to redo it, but you get the general idea. The second pic is a pair temporarily in place for the aftermost boat. Note - I thought that I had the size and shape right using the kit supplied davit (in white metal first pic). When I first installed this pair and held a boat below them, the boat was "miles" from the side of the hull. So, I cut them back a bit and I think they'll do.
Blessings.
Chuck


Last edited:
Good morning Chuck. Wow plenty progress the past few days. Good luck deciding on your belay pins, rings etc configuration. I would do this sooner than later tho. Lovely work on the ships boats and cover. The small details like the gundeons make a difference for sure. Some serious modeling presented here- way to go Chuck. Cheers Grant
- Joined
- May 25, 2020
- Messages
- 1,104
- Points
- 443

Taking a moment before class to finally respond to this most interesting post. I think it's super cool that you and Jerry were working on models for the United States Naval Academy Museum! Just wanted to say that. It also explains a lotI had to go look at my little HL model. I painted the boat hulls white, but they are mostly obscured by gray canvas covers. No way I'm going back to change them.. At the USNA museum shop we made the launch and the whale boats for the ST. Lawrence (a Civil War era sloop of war) black. That was my intro project when I first came on board at the Academy. The St. Lawrence model is over 8' long on deck. Jerry was the project skipper then.
To the best of my knowledge, it still is a long way from finished 25 years, or so, on.
Thank you Pete!
Blessings.
Chuck
- Joined
- May 25, 2020
- Messages
- 1,104
- Points
- 443

Grant! Thank you my friend! I am mindful of needing to make sure I get all my eyebolts and cleats in aft before I start on anything else on the ship. I am sticking with davit fabrication for the now. I also had to order more belaying pins and cleats from Blue Jacket which arrived lickety-split. I also was short of hooks from @Dry-Dock Models & Parts . Someone out there has bought all of the 1/96 scale version 2 photo etched brass hooks!!!!Good morning Chuck. Wow plenty progress the past few days. Good luck deciding on your belay pins, rings etc configuration. I would do this sooner than later tho. Lovely work on the ships boats and cover. The small details like the gundeons make a difference for sure. Some serious modeling presented here- way to go Chuck. Cheers Grant
As to my experiment with soldering - I found that the solder doesn't want to liquify and create the weld very easily - unlike my experience with sweating copper plumbing pipe. I am having to use the side of the tip to get the solder to melt and then there's too much solder and a lot of sanding to try to clean things up. Any thoughts? I am going to turn up the heat on my unit as a first test. I think the tip is just not getting hot enough and, as we all know, it's just the tip
 So inappropriate. It's because I'm wearing a suit and tie.
Blessings. And, Grant, thanks again!
Chuck
St Lawrence was a mess, the mids tossed cigarette butts and trash in her for years, there was a bird skull inside, a snake skin, and a lot of caked on dust, dirt. and mummified animal droppings - Pete was fortunate to miss cleaning all that up as he was busy rebuilding a big flying boatTaking a moment before class to finally respond to this most interesting post. I think it's super cool that you and Jerry were working on models for the United States Naval Academy Museum! Just wanted to say that. It also explains a lotLooking at you Jerry!
Thank you Pete!
Blessings.
Chuck
This pic is how she looked when I was asked if I'd take on the job, I don't think I had agreed yet
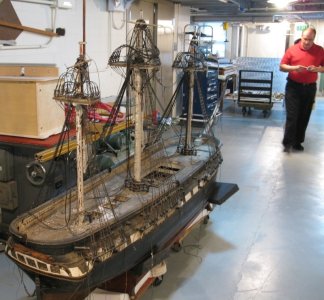 And how she looked around 1912ish?
When you start to think "scratch-building" is too hard, restoration and conservation are something else entirely.
- Joined
- Jun 17, 2021
- Messages
- 3,184
- Points
- 588

I never worked on the flying boat. That was John Didonato (et.al.). My first assignment was to Jerry on St. Lawrence. It was still being worked on under Deb Rowan, a rigging expert, until she left. After that I lost track. I resigned my commission on St. Lawrence after I took on the "El terrible", currently taken over by Larry Vallet, another rigging meister, after I left. Since then, I lost track, after posting an extensive photo survey of the shop on my last day there. That I posted here on SoS, where it is available on the appropriate forum on museums. Some photos of the St. Lawrence, as she appeared at that stage of development are included in that collection from more than a year ago. After the advent of the uncertainty of the current cuts to DoD funding, Larry told me that all the museum workshop volunteers bring all their tools and personal effects home with them after every session now, because they are not sure if they will be locked out the next time they return, even though their work is critical to the survival of the collection, and it is FREE, because they are VOLUNTEERS! But, hey, who needs to spend critical defense funds on MUSEUMS? Clearly a waste of public money for defense. 
(If this comment is considered too partisan or political for the Polity, you have my heartfelt, most humble, contrition. I hope it is not my last.
  )
)
Pete
(If this comment is considered too partisan or political for the Polity, you have my heartfelt, most humble, contrition.
 I hope it is not my last.
 Pete
Last edited:
- Joined
- May 25, 2020
- Messages
- 1,104
- Points
- 443

What ho, shipmates!
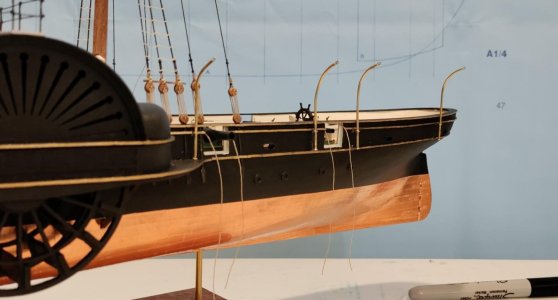
In his Flying Cloud log, Pete commented about each part becoming its own little model. This was borne out to me immediately by the davit fabrication project. I had a hell of a time with the soldering. Still not quite sure what I'm doing wrong, although increasing the heat helped make the tip of my iron work to melt the solder. And I kept forgetting to bend the curve outboard. Re-bending the brass left what had been smooth curves with some ripples. Then there was the problem of making a hole at the top of the davit for the upper block. I ruined a lot of drill bits until I learned to file that part almost paper thin so that I could practically punch through with a t-pin to make a divot so the bit wouldn't just skip around on the surface.
In any event, I was able to finish all of the davits. "Victory!" Not being Paul, @dockattner , referring to his abilities to make art from brass - the anchor for his Kingfisher is a wonder to behold, I was positive that trying to blacken my brass work would only lead to the inevitable step of painting. So I am planning to paint rather than chemically blacken the davits and cut out the extra step. Here is a picture of all of the davits (unpainted yet) on the port side. Hopefully, when they are black the glaring lack of uniformity will be subdued.
Blessings.
Chuck
Last edited: 12 minutes ago
In his Flying Cloud log, Pete commented about each part becoming its own little model. This was borne out to me immediately by the davit fabrication project. I had a hell of a time with the soldering. Still not quite sure what I'm doing wrong, although increasing the heat helped make the tip of my iron work to melt the solder. And I kept forgetting to bend the curve outboard. Re-bending the brass left what had been smooth curves with some ripples. Then there was the problem of making a hole at the top of the davit for the upper block. I ruined a lot of drill bits until I learned to file that part almost paper thin so that I could practically punch through with a t-pin to make a divot so the bit wouldn't just skip around on the surface.
In any event, I was able to finish all of the davits. "Victory!" Not being Paul, @dockattner , referring to his abilities to make art from brass - the anchor for his Kingfisher is a wonder to behold, I was positive that trying to blacken my brass work would only lead to the inevitable step of painting. So I am planning to paint rather than chemically blacken the davits and cut out the extra step.
Blessings.
Chuck

Last edited: 12 minutes ago
Last edited:
- Joined
- Jun 17, 2021
- Messages
- 3,184
- Points
- 588

I like using a torch for soldering jewelry sized parts (not that I do very often) but having worked for a goldsmith in one of my incarnations, I found there is nothing like having control over a little flame. Mini soldering torches and pressurized canned fuel can be acquired at the hardware store and, I suppose, online very cheaply. For you folks that want to fabricate brass parts out of brass rod that requires bending, it is best to anneal the rod by heating the area to be bent red hot and allow it to cool before each bend. This must be done for each individual bend because bending the rod work hardens it, so that the molecular structure must again be relaxed by heating prior to each bend, otherwise it becomes hard, stiff and brittle, prone to crimping and breaking. Annealing the area to be drilled achieves the same purpose. For soldering do not use acid flux.
BTW the davits look great!
 .
.
Another fussy issue with davits is that they require little cleats on the sides.
BTW the davits look great!

Another fussy issue with davits is that they require little cleats on the sides.
Last edited:


