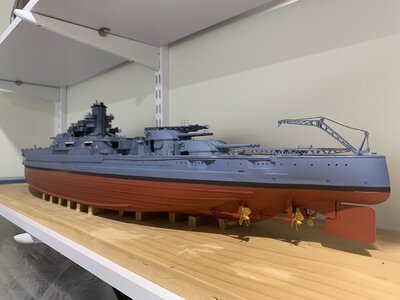
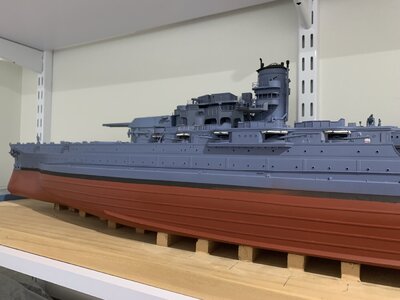
USS Arizona - 1/200 Build Log

After a nocturnal visit by the cat to my hobby room, I am putting a pause on my Arizona build. :rolleyes:
Let's just say, I'm going to need to source some more PE and make some repairs. Nothing major, but frustrating at this stage of the build.
She's back in dry dock for now.
 
Sounds like the cat was jeolous of the time you're spending with the model. They can see in the dark so you know it was no accident..... ROTF
 
After a nocturnal visit by the cat to my hobby room, I am putting a pause on my Arizona build. :rolleyes:
Let's just say, I'm going to need to source some more PE and make some repairs. Nothing major, but frustrating at this stage of the build.
She's back in dry dock for now.
Man that totally sucks. I have come to the decision that after bending a couple of my PE wrong I am going to buy the sheets I need to replace and just buy another Arizona model to put them on. I am just going to finish this one with the stuff provided in the model. I do like the size of the 200 scale. I am getting older and I am no where near steady enough for the 700 scale. I am also painting this one in the earlier color of haze grey #5. If you want to see some crazy designs of the camo ship paintings look at the USS Nebraska.
 
Man that totally sucks. I have come to the decision that after bending a couple of my PE wrong I am going to buy the sheets I need to replace and just buy another Arizona model to put them on. I am just going to finish this one with the stuff provided in the model. I do like the size of the 200 scale. I am getting older and I am no where near steady enough for the 700 scale. I am also painting this one in the earlier color of haze grey #5. If you want to see some crazy designs of the camo ship paintings look at the USS Nebraska.
Hey Jim,
Yeah, this is my second Arizona kit. I really messed things up on the first one and after seeing a lot of build logs, wanted to add more details and such. I will need to buy a couple more sheets to fix things, mainly railings and tripod related, but I'll get back to it next year. Getting old as well mate, not much to be done about it. Love the 1/200 scale and finding even the 1/350 Enterprise I'm working now a bit of a challenge on the PE side of things.
Take care
 
Well I really messed up on the railings on the guns so I know I will do another Arizona. I want to have 2 done up nicely. One as she was when she was launched and one the last day before she was sank. I really wish they had directions with the add on PE that told you the way to bend it. Some of the PE is tiny and if you fold it the wrong way when you try and fold it back POP you have 2 pieces. I never realized that super glue is a pain to use but it can be. Well I will get all my screw ups done on this one and then I will know. Now Paul's model makes me want to hide mine. His is good. Yours looked good also. I can only wish.
 
Well I really messed up on the railings on the guns so I know I will do another Arizona. I want to have 2 done up nicely. One as she was when she was launched and one the last day before she was sank. I really wish they had directions with the add on PE that told you the way to bend it. Some of the PE is tiny and if you fold it the wrong way when you try and fold it back POP you have 2 pieces. I never realized that super glue is a pain to use but it can be. Well I will get all my screw ups done on this one and then I will know. Now Paul's model makes me want to hide mine. His is good. Yours looked good also. I can only wish.
Hey Jim,

My first go at the Arizona was also the first ever model I used PE on; one of the many reasons I screwed it up as bad as I did. I'm a little more educated now on the ways of the Etch, but still have lots of trouble with small fine parts and bits that need curved bends and such. I struggled with the turret railings on my current build, to the point that one turret remains with the on kit moulded ones. I got a way with this by convincing myself that I'd likely be the only person to ever notice such fine detail in the first place. :D Completely agree that super glue is a pain, but I've found using small tubes with long narrow flow tips helps, as does putting some glue on a small 'disposable' surface, and using pointy end toothpicks to transfer glue to the PE which needs it. Also, I've found the Zip Kicker CE accelerant to be a useful aid; but used sparingly.

Good luck with your builds mate. I look forward to seeing you build logs.

Update: Also check out Kenneth's tutorial at Norwegian Modelling Bench for some great tips:
 
Last edited:
While my build of the 1/200 Titanic is my primary focus for now, I do have the Trumpeter 1/200 USS Arizona on the slips. This is actually my second attempt at creating my own memorial to the sailors and their ship, lost to the Japanese bombing of Pearl Harbour, Sun Dec 7th, 1941. I've visited the memorial at Pearl a number of times and it is both haunting and captivating, so I was determined to do this build justice. I really wasn't happy with the quality of my first attempt, so was lucky enough to gain financially authority to purchase a 2nd kit, and start again. :)

The re-release of this model was modified to produce a radio-controlled version, also released by Trumpeter, and this resulted in a couple of changes to the interior of the hull mold and some of the decking, but nothing too drastic in the grand scheme of things.

The hull of the model comes in two sections, which generally join quite well and are held together with screws fore and aft, in addition to gluing. Of course, like any two piece hull, there was a was of Tamiya putty required gap fill followed by some vigorous sanding. Once joined and fully primed, I added some additional details missing from the model, such as the keel strakes, hull risers over the torpedo bulge and the AVGAS pipe on the port side.


One big difference between the original kit and the updated one was the inclusion of a large hole in the amidships decking area, obviously to enable access to the RC equipments and running gear. The first of my kits had a complete deck, so I needed to modify this version of the model to allow for some minor interior details for the 5" casement guns and ensure a nice fit for the wooden deck. The 'enclosure' is by no means perfect, but it is covered up by the wooden deck, so no real concern.

Finally, for this entry I purchased the following upgrades to the kit:
  1. Mk 1 Design additional Upgrade Pack
  2. Mk 1 Design Wooden Decks
  3. Eduard Detail Sets Vols.1-6
  4. Master Models Main 14" Gun Barrels
  5. Master Models Secondary & AA Armament barrels.
Next post I'll touch on some upgrades to the superstructure, funnel build with PE and hull painting.
Hallo @Wedgie01
we wish you all the BEST and a HAPPY BIRTHDAY
Birthday-Cake
 
While my build of the 1/200 Titanic is my primary focus for now, I do have the Trumpeter 1/200 USS Arizona on the slips. This is actually my second attempt at creating my own memorial to the sailors and their ship, lost to the Japanese bombing of Pearl Harbour, Sun Dec 7th, 1941. I've visited the memorial at Pearl a number of times and it is both haunting and captivating, so I was determined to do this build justice. I really wasn't happy with the quality of my first attempt, so was lucky enough to gain financially authority to purchase a 2nd kit, and start again. :)

View attachment 270591
The re-release of this model was modified to produce a radio-controlled version, also released by Trumpeter, and this resulted in a couple of changes to the interior of the hull mold and some of the decking, but nothing too drastic in the grand scheme of things.

The hull of the model comes in two sections, which generally join quite well and are held together with screws fore and aft, in addition to gluing. Of course, like any two piece hull, there was a was of Tamiya putty required gap fill followed by some vigorous sanding. Once joined and fully primed, I added some additional details missing from the model, such as the keel strakes, hull risers over the torpedo bulge and the AVGAS pipe on the port side.

View attachment 270594View attachment 270595View attachment 270596

One big difference between the original kit and the updated one was the inclusion of a large hole in the amidships decking area, obviously to enable access to the RC equipments and running gear. The first of my kits had a complete deck, so I needed to modify this version of the model to allow for some minor interior details for the 5" casement guns and ensure a nice fit for the wooden deck. The 'enclosure' is by no means perfect, but it is covered up by the wooden deck, so no real concern.

View attachment 270597View attachment 270598

Finally, for this entry I purchased the following upgrades to the kit:
  1. Mk 1 Design additional Upgrade Pack
  2. Mk 1 Design Wooden Decks
  3. Eduard Detail Sets Vols.1-6
  4. Master Models Main 14" Gun Barrels
  5. Master Models Secondary & AA Armament barrels.
Next post I'll touch on some upgrades to the superstructure, funnel build with PE and hull painting.
Hallo @Wedgie01
we wish you all the BEST and a HAPPY BIRTHDAY
Birthday-Cake
 
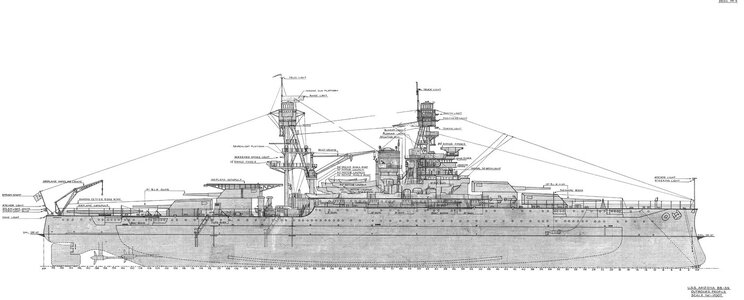
just noticed your build so posted some links that might be of help even at this stage as i see some manufacturer(not you) errors as in misshapen rudder & missing belt armor from the torpedo bulges to just past the rudder post.
BB-39 USS Arizona Booklet of General Plans (1941) https://archive.org/details/bb39bogp1941
BB-39 USS Arizona Technical Drawings (1930) https://archive.org/details/bb39ga1930/mode/2up

View attachment 417744

View attachment 417745
Hi David,
Many thanks for providing the drawings. I have a good set of 1/200 plans for the Arizona, but they didn't show the additional belt armour as depicted in the ones above. I'll be getting back to my Arizona in coming months; just trying to finish up a couple of other projects. I really should only work on one model at a time. :)
Cheers,
 
Back
Top