-

Win a Free Custom Engraved Brass Coin!!!
As a way to introduce our brass coins to the community, we will raffle off a free coin during the month of August. Follow link ABOVE for instructions for entering.
-

PRE-ORDER SHIPS IN SCALE TODAY!
The beloved Ships in Scale Magazine is back and charting a new course for 2026!
Discover new skills, new techniques, and new inspirations in every issue.
NOTE THAT OUR FIRST ISSUE WILL BE JAN/FEB 2026
You are using an out of date browser. It may not display this or other websites correctly.
You should upgrade or use an alternative browser.
You should upgrade or use an alternative browser.
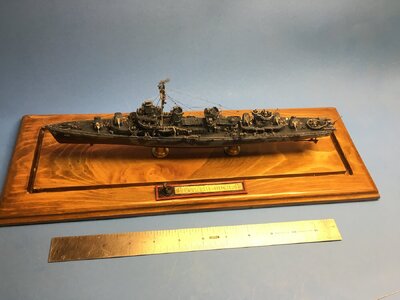
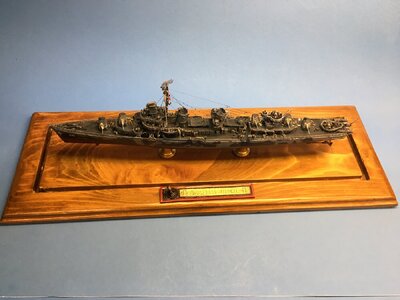
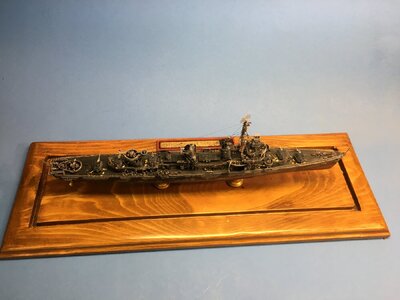
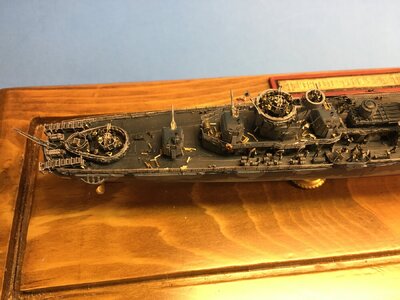
USS Fletcher DD-445, 1942 - Tamiya plastic kit of the USS Fletcher in 1/350 scale [COMPLETED BUILD]
- Thread starter Mikey25252
- Start date
- Watchers 15
- Joined
- May 8, 2021
- Messages
- 53
- Points
- 78

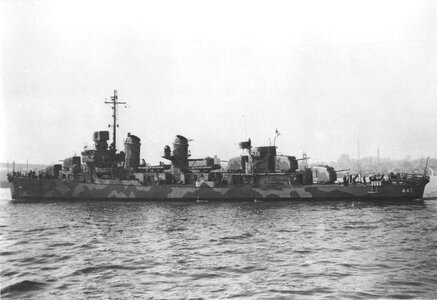
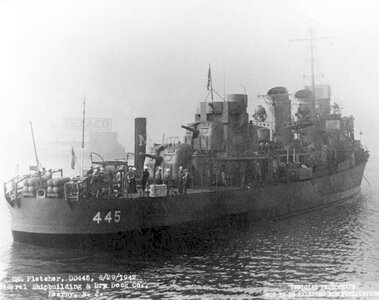
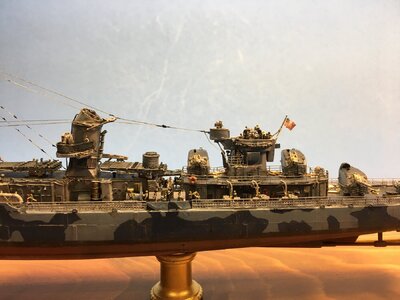
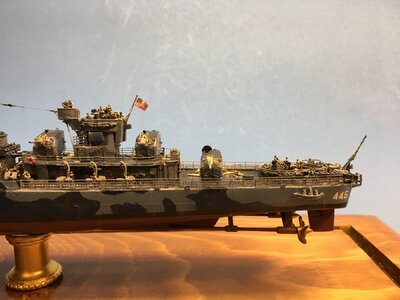
When a US warship is at sea the colors are flown from the mast or an ensign staff. Other Fletchers had an ensign staff on the back of the aft funnel. When I was on the Enterprise there was an ensign staff off of the top, aft of the beehive. In port when the ship is moored or anchored there is an announcement “The ship is moored/anchored, shift colors.” The national ensign is lowered from the ensign staff and run up on the staff at the stern. At the same time the jack is run up on the jack staff on the bow.
- Joined
- Jan 21, 2023
- Messages
- 372
- Points
- 138

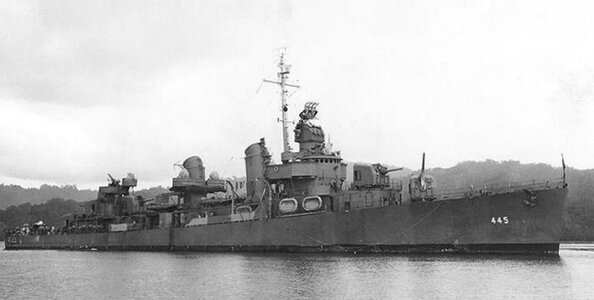
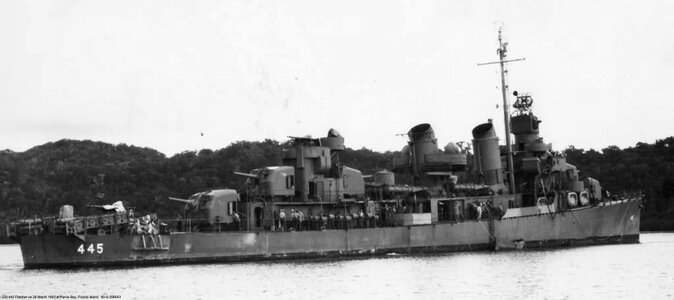
but where you have located that flag is not the proper position it as you aid,bow, mast & stern & that is neither. also it would interfere with the firing arc of that twin 40mm gun mount. none of the Fletcher class Booklet of General Plans i have on my computer shows a flag in that position as no flagstaff there.
- Joined
- May 8, 2021
- Messages
- 53
- Points
- 78

- Joined
- Jan 21, 2023
- Messages
- 372
- Points
- 138

top 2 pictures shows the flag & flagstaff but no guns in that tub wereas the bottom 2 pictures show guns but no flag & flagstaff which means the flag & flagstaff was temporary till the guns were put into that tub & the flag & flagstaff permanently removed.
- Joined
- May 8, 2021
- Messages
- 53
- Points
- 78

I agree but this is what I used to base the decisions for my build. You could also argue that the rigging isn't correct, or that the ship wouldn't have been painted like this in this weapons configuration. The model isn't entirely accurate but I like the finished look.
- Joined
- May 8, 2021
- Messages
- 53
- Points
- 78

Part 11
Completion. I finished it which sort of breaks a long running stalemate. The last time I worked on a model ship was the Lindberg 1/125 scale USS Melvin DD680. I was still a teenager around 1972. In an era where extra detail and upgrades were only available by making it yourself, I was determined to make a truly impressive model I had already substituted brass tubing for the 5 inch gun barrels and was working on the mast when life intervened.
(Actually I forgot about the 1/400 Revell/Monogram Enterprise CVN-65 which got relegated to the shelf of doom around 2010. Also unfinished and scrapped now.)
The 1972 draft lottery. I watched it with a good friend, my number was 44 or something like that. I had some not impressive grades in high school and hadn’t even taken the ACT or SAT. A college deferment wasn’t going to happen. I joined the Navy and went off to Boot Camp in September of 1973. I never finished that model and after maybe six years away from home my mom gave my sister permission to sell my modelling stuff for some fund raiser. I understand that it all sold quickly for good prices. I wasn’t too broken up about it then.
With this build I wanted to try using photoetch and resin details, I wanted to paint that camouflage scheme. I managed to not make the entire thing a mess of gluey blobs, although I had to do a lot of post clean up. I may have had to redo some things over several times before I was satisfied with the outcome. In the end that is what it comes down to, are you satisfied with the outcome? I guess I am although the next time I want to do better.
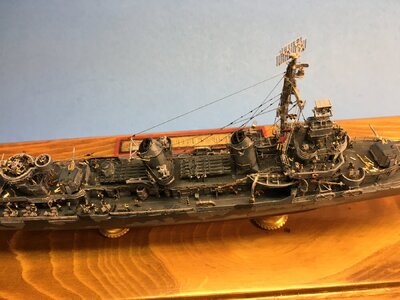
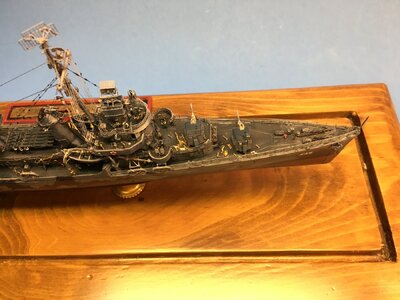

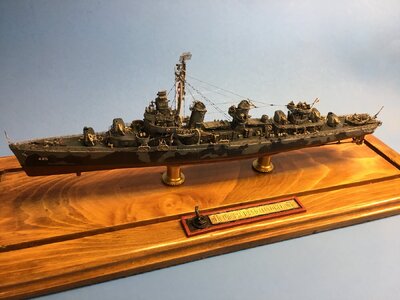
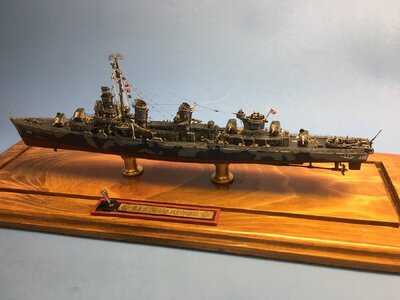
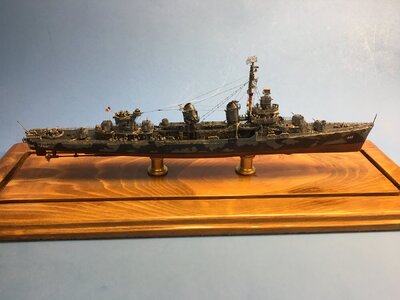
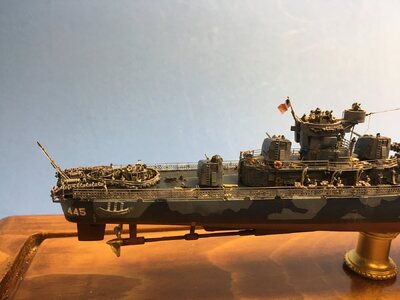
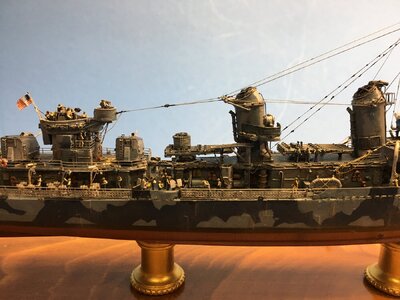
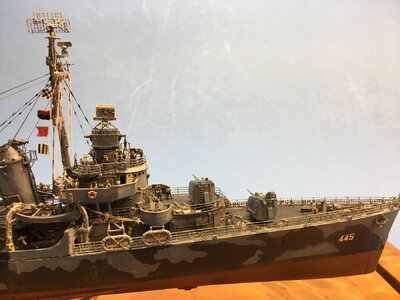
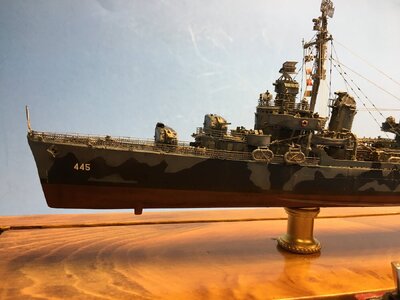
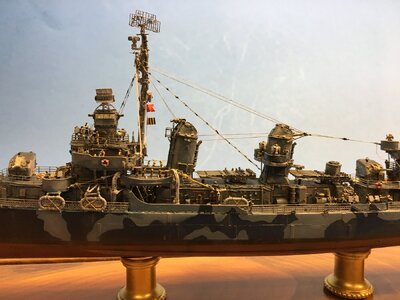
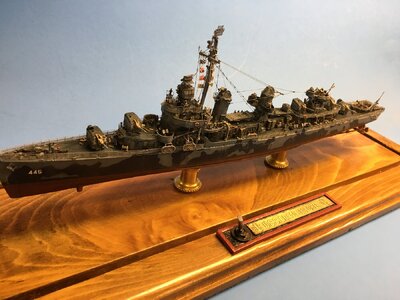
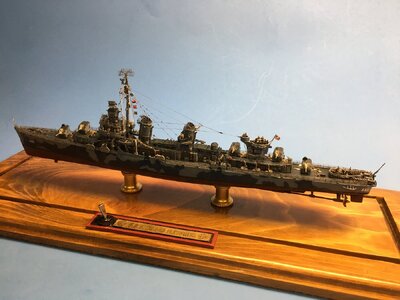
Thr End
Completion. I finished it which sort of breaks a long running stalemate. The last time I worked on a model ship was the Lindberg 1/125 scale USS Melvin DD680. I was still a teenager around 1972. In an era where extra detail and upgrades were only available by making it yourself, I was determined to make a truly impressive model I had already substituted brass tubing for the 5 inch gun barrels and was working on the mast when life intervened.
(Actually I forgot about the 1/400 Revell/Monogram Enterprise CVN-65 which got relegated to the shelf of doom around 2010. Also unfinished and scrapped now.)
The 1972 draft lottery. I watched it with a good friend, my number was 44 or something like that. I had some not impressive grades in high school and hadn’t even taken the ACT or SAT. A college deferment wasn’t going to happen. I joined the Navy and went off to Boot Camp in September of 1973. I never finished that model and after maybe six years away from home my mom gave my sister permission to sell my modelling stuff for some fund raiser. I understand that it all sold quickly for good prices. I wasn’t too broken up about it then.
With this build I wanted to try using photoetch and resin details, I wanted to paint that camouflage scheme. I managed to not make the entire thing a mess of gluey blobs, although I had to do a lot of post clean up. I may have had to redo some things over several times before I was satisfied with the outcome. In the end that is what it comes down to, are you satisfied with the outcome? I guess I am although the next time I want to do better.


Thr End
Last edited:
Very nicely done; I especially like the presentation complete with shell cases on the fantail.
- Joined
- May 8, 2021
- Messages
- 53
- Points
- 78

Thanks very much. What is that rating device on your chevron. I was in from 1973 to 1995. I was an ATCS.Very nicely done; I especially like the presentation complete with shell cases on the fantail.
- Joined
- Aug 14, 2018
- Messages
- 825
- Points
- 403

A great looking model, very nicely presented. I like it very much. JJ..
Congratulations also from my side - great looking model 
That is the OS (Operations Specialist) device. I served, primarily West Coast from 1975-1997 punched out as OSC.Thanks very much. What is that rating device on your chevron. I was in from 1973 to 1995. I was an ATCS.
- Joined
- May 8, 2021
- Messages
- 53
- Points
- 78

Thank you JackA great looking model, very nicely presented. I like it very much. JJ..
- Joined
- May 8, 2021
- Messages
- 53
- Points
- 78

Thank youCongratulations also from my side - great looking model
Wonderful work!Part 10
Assembly started by mounting the hull to the base and running the wiring up through the pedestals and out through the hole in the main deck. With everything loosely attached I lifted up the ship and put a dab of E6000 on both ends of the pedestals. I slowly tightened the nuts adjusting the positioning until the hull was oriented correctly and allowed the glue to set overnight. In the next session I covered the base with plastic wrap to ensure that during the assembly no spills or other misadventure would ruin the base.
View attachment 454340
View attachment 454339
View attachment 454342
View attachment 454343
I glued down the lowest level of the forward deckhouse and clamped it. While it was drying I used some black foam under the pilot hose deck and in the aft compartment to eliminate light leaks, I glued the bridge crew in place, (4 figures,) then the pilot house overhead to the pilot house and clamped it. I positioned the two assemblies close together and connected the wiring testing it one last time to ensure it worked. When everything was dry the wiring was carefully fed into the ship and the assembled pilot house was glued in place and clamped. Imagine my surprise when I tested the circuit again and now it did not work! Eventually I traced the problem to the switch and replaced it with a different type.
I moved on to all the ground tackle on the bow and installed the anchors, chain, pelican hooks and chain locker covers. Finally after some test fitting I realized I had to install the mast now. The inclined ladders were glued in place and then the struts for the 02 level overhang. There were some small parts to round out the ground tackle and the forward davits to position. I added the block and tackle for the forward davits. I moved on to the forward railing and next the jack staff. I added a piece of EZ Line to it for a halyard. I rigged the main mast signal flag halyards. The stbd outboard halyard was a piece of detail wire so I could add a flag hoist later. Then I added any standing rigging to the pilot house.
View attachment 454344
View attachment 454345
View attachment 454346
I could now add the midships and aft deckhouses, so these were glued ln place and clamped. Once the clamps came off I installed the vertical ladder from the 01 level midships deckhouse to the 02 level pilot house. I did the funnels and placed the searchlights on the aft funnel. I placed the torpedo tubes and added the wave breaks around the midship deckhouse ladders. The aft davits and the whale boats were installed and rigged. Then all the life rafts were placed.
View attachment 454347
View attachment 454348
There appear to be no lifelines on the midships deckhouse. Any time the torpedo tubes might be used the life lines could be folded down. I did install one bar lifelines and folded them over when the glue dried. If you look closely they are there. There were some additional hose and cord reels and the deck winch were now installed. I placed 4 more figures on after con and the final two parts of the aft deckhouse were installed. Then the rest of the standing rigging was added. I had no rigging diagram so this is an amalgam of photos of various ships. I found the multiple insulators on some photos of the Kidd and I liked them so they were added. This is black tube acrylic paint added with a small brush.
View attachment 454349
View attachment 454350
I moved on to the midships railing then the K-Guns, spare depth charge racks and the hoists. Next the aft gun tub, depth charge racks, smoke generators, aft railings and the ensign staff. At this point I snapped the mast off again. It is not as true as it was but at least I was able to put it together again. I wish I could come up with a sure fire way to prevent this but no “aha” moments have happened yet. Oh yeah I could just be more careful.
View attachment 454352
View attachment 454353
View attachment 454354
I added all the 5 inch mounts all pointing off to port. Next gunners were glued to 20 mm cannons, and 40 mm seat positions. I added the barrels and 2 ammo handlers for each mount. The crews serving the two directors were also glued to their units. I then installed all the 20 mm guns and amazed myself by not breaking any of them. Finally the 40 mm guns and directors were installed. There are approximately 75 total crew figures about the decks. These were all supplied with helmets and vests as if at general quarters. They were a neck stiffening job to paint but I limited painting to two hour sessions and I believe they came out nicely. The Mk37 director was assembled and installed. All the guns and directors are pointed out to port.
View attachment 454355\
View attachment 454356
View attachment 454357
View attachment 454358
Finally I cut equal lengths of 2 sizes of brass wire for 5 in powder charges and 40 mm casings. I dropped them on the deck randomly and fixed them in place with diluted Micro Flat and a white glue mix. I used a Hawk Graphics (D3519) signal flag decal sheet for the WW II ensign and a flag hoist of the ship’s call sign. I understand that call signs were usually only displayed coming in, at anchor or leaving port but I did it anyway. The decals were applied to plain aluminum foil, one side at a time, wrinkled a bit and glued in place. Fletcher’s call sign was November, Echo, Bravo, Golf.
View attachment 454359\
View attachment 454360
View attachment 454361
That finishes this post and I will add some shots of the completed ship in the final installment.
Having crew on the ship really finished it off!Part 11
Completion. I finished it which sort of breaks a long running stalemate. The last time I worked on a model ship was the Lindberg 1/125 scale USS Melvin DD680. I was still a teenager around 1972. In an era where extra detail and upgrades were only available by making it yourself, I was determined to make a truly impressive model I had already substituted brass tubing for the 5 inch gun barrels and was working on the mast when life intervened.
(Actually I forgot about the 1/400 Revell/Monogram Enterprise CVN-65 which got relegated to the shelf of doom around 2010. Also unfinished and scrapped now.)
The 1972 draft lottery. I watched it with a good friend, my number was 44 or something like that. I had some not impressive grades in high school and hadn’t even taken the ACT or SAT. A college deferment wasn’t going to happen. I joined the Navy and went off to Boot Camp in September of 1973. I never finished that model and after maybe six years away from home my mom gave my sister permission to sell my modelling stuff for some fund raiser. I understand that it all sold quickly for good prices. I wasn’t too broken up about it then.
With this build I wanted to try using photoetch and resin details, I wanted to paint that camouflage scheme. I managed to not make the entire thing a mess of gluey blobs, although I had to do a lot of post clean up. I may have had to redo some things over several times before I was satisfied with the outcome. In the end that is what it comes down to, are you satisfied with the outcome? I guess I am although the next time I want to do better.
View attachment 454413
View attachment 454414
View attachment 454415
View attachment 454416
View attachment 454418
View attachment 454419
View attachment 454420
View attachment 454421
View attachment 454422
View attachment 454423
View attachment 454424
View attachment 454425
View attachment 454426
View attachment 454427
View attachment 454428
View attachment 454429
View attachment 454430
View attachment 454431
View attachment 454432
Thr End
- Joined
- May 8, 2021
- Messages
- 53
- Points
- 78

Thank you RobWonderful work!

