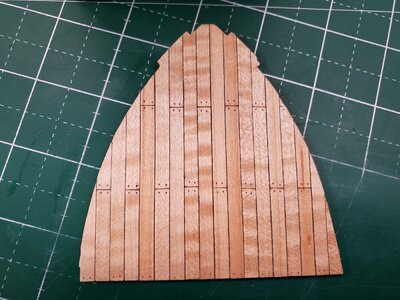
Here is an idea to consider for treenails at 1/75 scale…take a pointed tool and gently dimple the planking at the point you want a treenail. Not too deep…just a hint of a dimple or depression. Then, when your deck planking is finished, lay down a coating of semigloss (or matte) polyurethane. The poly will settle into the dimples and the plank edges to give the impression of treenails and edge caulking both without overwhelming the scale. The slight coloring of the poly as it settles in the dimples gives the perception that a tree nail was placed. This is all about perception. Scale is very difficult to maintain at 1/75…most everything we try to do is too big for scale! 
-

Win a Free Custom Engraved Brass Coin!!!
As a way to introduce our brass coins to the community, we will raffle off a free coin during the month of August. Follow link ABOVE for instructions for entering.
-

PRE-ORDER SHIPS IN SCALE TODAY!
The beloved Ships in Scale Magazine is back and charting a new course for 2026!
Discover new skills, new techniques, and new inspirations in every issue.
NOTE THAT OUR FIRST ISSUE WILL BE JAN/FEB 2026
You are using an out of date browser. It may not display this or other websites correctly.
You should upgrade or use an alternative browser.
You should upgrade or use an alternative browser.
VASA 1:75 - BILLING BOATS
- Thread starter nisse80
- Start date
- Watchers 18
-
- Tags
- billing boats vasa
Hi Paul!So, if we are talking treenails (wooden pegs), I would use 1.25" as their size. Convert that to mm and we have 31.75 mm. Now divide by 75 and you get 0.42 mm. On my current project the smallest I could use a drawplate to make a treenail was 0.54-0.56 mm (boxwood) but I am working at 1:48 so that's a 'go' for me.
There will be violations of scale on your model so maybe this variance won't bother you. Keep looking at build reports on the forum and see what you like - just remember to not fall in love with what someone can do at 1:32 or 1:48 and then try to replicate that at 1:75.
One way to make faux treenails might interest you. You drill a hole at your preferred size and then rather than filling that hole with a piece of wood you fill it with wood filler (be sure to use one that hardens) and then when the filler is dry you sand (better, scrape) the decking and you have a visual treenail. DO NOT ATTEMPT ANY OF THIS FOR THE FIRST TIME ON YOUR MODEL. Follow Daniel's advice and do some mock-up boards and see what works in your hands.
Well 0.42 mm is small indeed. I will make a sample first and see how it goes!
You are right about not falling in love with things you can make on bigger scale models. It can even make your ship look too cluttered if you try to make everything. So I have realized that I will experiment and try to keep it simple.
I will look into that!
Thanks again for your willingness to help Paul!
Nisse
Hi Daniel!Thats a great question Nisse. For me personally, considering my skill level at the time (Vasa was my second ship with double planked hull), a double planked hull is more forgiving in that you don't need to be super accurate laying down the first layer. You can apply wood filler to correct any hull shape irregularities and fill gaps (gaps that you will most certainly have to deal with) on your first try and sand it all out leaving a much better surface for a second layer. I did however encounter some unintended consequences of double planking which were a pain to overcome.
Having said that with practice you can become more confident and try a single planked hull. Well, the Vasa is a single planked hull by design. A hulls shape and the type of wood are all factors. Do you intend to have a natural wood or painted wood hull, again factors to consider. You really are going to have to jump in this full immersion style to really understand the challenges you are going to face with the Vasa's hull because she has a difficult hull IMHO. The decking was much easier for me.
Fortunately, Obeeche wood is very easy to work with. you will have to soak it and heat it to make some of the bends you will need. Good luck my friend.
Now I understand! Thank you Daniel!
Yes there are a lot of different factors that I am going to have to figure out! And to get the right shape makes me nervous everytime!
Soak it and heat it. Got it!
Thanks again Daniel for your support and help!
Nisse
Great tip Daniel!Hey Nisse, check the internet you tube for some really good pointers on Model Ship Wood Hull Planking. That was a great help for me.
Hi Daniel!Here is an idea to consider for treenails at 1/75 scale…take a pointed tool and gently dimple the planking at the point you want a treenail. Not too deep…just a hint of a dimple or depression. Then, when your deck planking is finished, lay down a coating of semigloss (or matte) polyurethane. The poly will settle into the dimples and the plank edges to give the impression of treenails and edge caulking both without overwhelming the scale. The slight coloring of the poly as it settles in the dimples gives the perception that a tree nail was placed. This is all about perception. Scale is very difficult to maintain at 1/75…most everything we try to do is too big for scale!
Great suggestion I am going to have to try that! And yes it is indeed all about perception at this scale!
Nisse
Hi Bill!This was done with a 0.5mm pen drill. Edged with #2 pencil. Jim Daniels is correct, it's often about perception at this scale. That's from my Endurance, 1:70 scale.
View attachment 383211
That is some beatiful craftmanship! I am very impressed by this! This is what I am striving towards!
Nisse
Hello everyone!
I have made a couple of samples (thats all that I had the time to do unfortunately)
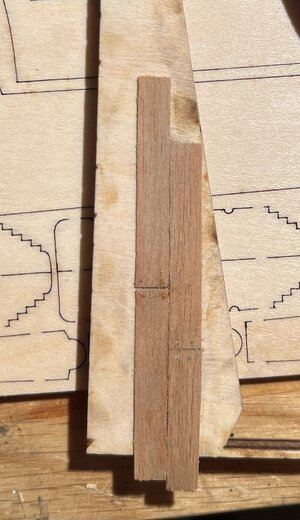
I hope you can be able to see in this picture. But I have made 2 different type of nails. The one on the left is better in my opinion. Did they use metal nails for the deck on the real Vasa? In that case I will probably make them darker.
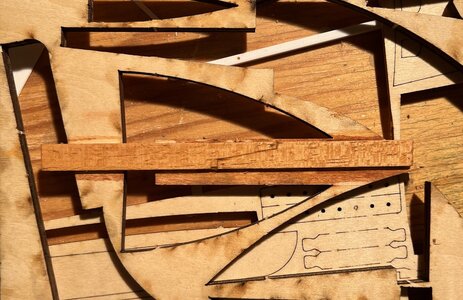
Here is the first prototype of the hull planking and my first try at a scarf joint. I have given the obechi wood a little bit of a darker wash and the put two nails in the corners of the scarf joint.
It was a fun experiment and I think this will turn out good!
All the best!
Nisse
I have made a couple of samples (thats all that I had the time to do unfortunately)

I hope you can be able to see in this picture. But I have made 2 different type of nails. The one on the left is better in my opinion. Did they use metal nails for the deck on the real Vasa? In that case I will probably make them darker.

Here is the first prototype of the hull planking and my first try at a scarf joint. I have given the obechi wood a little bit of a darker wash and the put two nails in the corners of the scarf joint.
It was a fun experiment and I think this will turn out good!
All the best!
Nisse
Last edited:
Hello Nisse and greetings from South Texas! Since the front row has filled up I'll take a chair in the second row. Looking forward to following your new project. Magic Mike
Hello everyone!
It is time for the next update. I have had some time to work on this project and I have made a bit of progress.
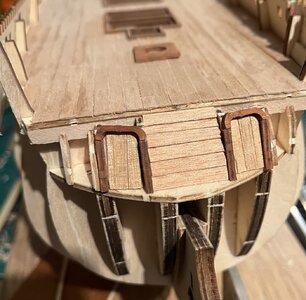

This is the bow which is quite far from being finished and looks a bit clunky now but this will be adressed later on.
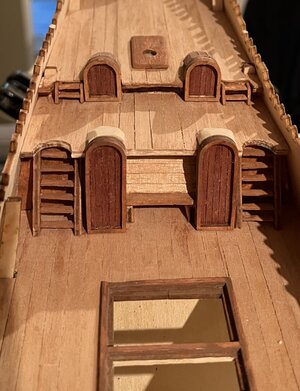
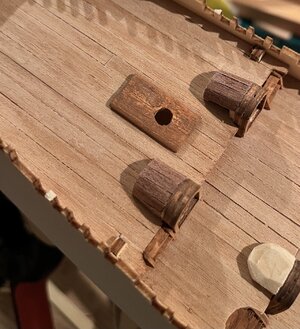
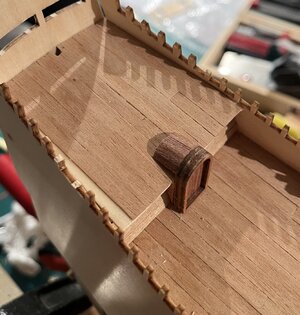
Here are the doors and ladders on the aft portion of the model. These are not completely done yet and I will have to make a bit of a touch up later. I want to place everything down even if it looks rough just so that I have an idea of how everything looks together. And then make everything look pretty later.
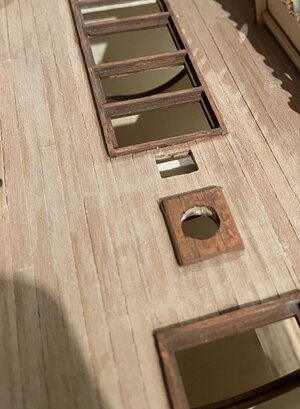
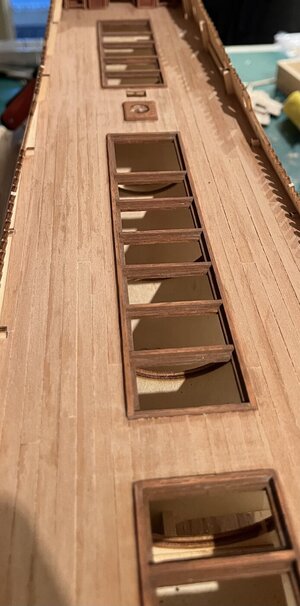
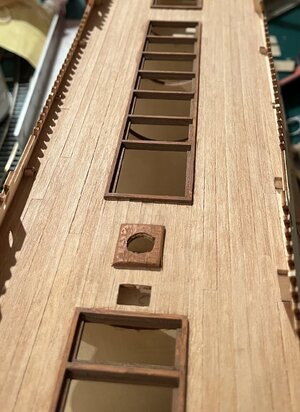
And here is the deck. There is a bit of sanding left and then I will have to put oil on it and then all the nails. So there is still a lot left!
To summarize, it looks rough now but I will make some touch ups later!
And your toughts is always appreciated!
All the best!
Nisse
It is time for the next update. I have had some time to work on this project and I have made a bit of progress.


This is the bow which is quite far from being finished and looks a bit clunky now but this will be adressed later on.


Here are the doors and ladders on the aft portion of the model. These are not completely done yet and I will have to make a bit of a touch up later. I want to place everything down even if it looks rough just so that I have an idea of how everything looks together. And then make everything look pretty later.


And here is the deck. There is a bit of sanding left and then I will have to put oil on it and then all the nails. So there is still a lot left!
To summarize, it looks rough now but I will make some touch ups later!
And your toughts is always appreciated!
All the best!
Nisse
Hello Nisse, you have made good progress and sounds like you have a solid strategy with all the deck furnishings. The doors and ladders are looking just fine.
At some point you're going to need to start the hull planking, your ship will spend quite a bit of time upside down during this procedure so be careful about how much you want to place up on the deck right now as it could get knocked off.
At some point you're going to need to start the hull planking, your ship will spend quite a bit of time upside down during this procedure so be careful about how much you want to place up on the deck right now as it could get knocked off.
Good morning Nisse. Lot of progress - you'll have plenty of time to clean things up - no rush. I will second Daniel on this - complete as many deck furnishings on the bench you can before committing them to the deck - especially since you have a lot of planking to do yet.Hello Nisse, you have made good progress and sounds like you have a solid strategy with all the deck furnishings. The doors and ladders are looking just fine.
At some point you're going to need to start the hull planking, your ship will spend quite a bit of time upside down during this procedure so be careful about how much you want to place up on the deck right now as it could get knocked off.
Hello Nisse, you have made good progress and sounds like you have a solid strategy with all the deck furnishings. The doors and ladders are looking just fine.
At some point you're going to need to start the hull planking, your ship will spend quite a bit of time upside down during this procedure so be careful about how much you want to place up on the deck right now as it could get knocked off.
Hello gentlemen!Good morning Nisse. Lot of progress - you'll have plenty of time to clean things up - no rush. I will second Daniel on this - complete as many deck furnishings on the bench you can before committing them to the deck - especially since you have a lot of planking to do yet.
Yes both of you are correct! I have started the planking of the hull and I will show some pictures when I have progressed further. I have made a ”stand” so hopefully the ship will not take unnecessary damage. I must confess that the planking is much more difficult than I had anticipated, but it is always fun with a challenge! I have also decided to do a double planking. The outer layer will be walnut which I think looks good with my current colour palette.
I have found myself struggling a bit with the planking of the bow. By that I mean what shape each plank should have. Is there anything that can make it easier for me or is my only option to look at pictures and try to make it as similar as possible?
All the best!
Nisse
Hello Nisse, If you have internet access look at YouTube videos on the subject as well as do a search in this forum, there is a world information on this subject.Hello gentlemen!
Yes both of you are correct! I have started the planking of the hull and I will show some pictures when I have progressed further. I have made a ”stand” so hopefully the ship will not take unnecessary damage. I must confess that the planking is much more difficult than I had anticipated, but it is always fun with a challenge! I have also decided to do a double planking. The outer layer will be walnut which I think looks good with my current colour palette.
I have found myself struggling a bit with the planking of the bow. By that I mean what shape each plank should have. Is there anything that can make it easier for me or is my only option to look at pictures and try to make it as similar as possible?
All the best!
Nisse
There are tricks and techniques that will help you tremendously. For me in the beginning hull planking was a most difficult procedure and still is. In the end you just have to jump in and do it.
Here are some resources that might help...

 www.modelerscentral.com
See attachments for even better help...

Planking Tips For Building a Model Ship | Modelers Central
Most beginners to Model Ship Building have some concerns regarding planking. Modelers Central provide all the Planking Tips For Building a Model Ship.
 www.modelerscentral.com
See attachments for even better help...
Attachments
How did you determine the distance between the bottom of the keel and the waterline? I cannot find a reference for this....yet.Good Luck
I have been working with the same ship for at last two years now and have done quite a lot of mistakes but I think I will finish it someday, I am not working with it every day so I don’t know when but it is a lot of fun and also a lot of frustrations, this is how far I’ve come and I surely will follow your progress
View attachment 382254


