Hi Paul, it would be really difficult for me to maintain spacing at the tie down points without it. Granted it does move back and forth during construction but early on I glue in certain pairs, and they serve as a 'return to' point. Once all lines are in, I adjust tension while using the batten as a spacing reference. Its kind of clumsy but works.
You are using an out of date browser. It may not display this or other websites correctly.
You should upgrade or use an alternative browser.
You should upgrade or use an alternative browser.
VASA 490 Build Log - Billing Boats, 1:75 [Completed Build]
- Thread starter Daniel20
- Start date
- Watchers 64
-
- Tags
- billing boats vasa
- Joined
- Jul 8, 2018
- Messages
- 885
- Points
- 403

Beautiful work Daniel!Hi Paul, it would be really difficult for me to maintain spacing at the tie down points without it. Granted it does move back and forth during construction but early on I glue in certain pairs, and they serve as a 'return to' point. Once all lines are in, I adjust tension while using the batten as a spacing reference. Its kind of clumsy but works.
That rigging looks fantastic but also very complicated.
- Joined
- Jan 9, 2020
- Messages
- 10,378
- Points
- 938

Dear Daniel. It is always a pleasure for me to view your latest updates. The crows' feet is something that is also waiting for me however much much more simple than on the VASA. I am in awe to see what you have achieved and even more so by the way that you set out achieving it. Your rigging work sets the bar very high!
Thank you, RonBeautiful work Daniel!
Thank you, Jan!That rigging looks fantastic but also very complicated.
Thank you, Heinrich. I have to wonder how the men actually rigged these crow's feet. Were they tight rope walkers on a steep incline, or did they slacken the forestay to the deck first for access? The critical path had to have been well thought out.Dear Daniel. It is always a pleasure for me to view your latest updates. The crows' feet is something that is also waiting for me however much much more simple than on the VASA. I am in awe to see what you have achieved and even more so by the way that you set out achieving it. Your rigging work sets the bar very high!
- Joined
- Oct 15, 2017
- Messages
- 986
- Points
- 403

Your rigging is great Daniel. But your bowsprit crows feet are beyond that. I don't see how you could achieve a better result! KUDOS mate!Good Saturday afternoon to everyone.
I am excited to share a rigging milestone on the mighty Vasa. The following photos show my version of the completed standing rigging. I chose the foremast and main mast 'backstays to originate at the underside of their respective topsail mast tops then traveling as a pendant down about even with the fore and main mast tops (one each side). From there they travel down to a single block hooked to their respective whale plates then terminate inside the bulwarks. This termination not yet a permanent location just yet (need to see what running rigging will be like first). At this time, I am omitting any mizzen backstays.
View attachment 313360View attachment 313361
Next you will see a production of the bow sprit mast backstay with the crow's feet. Most every rendition of these crow feet will show a minimum of 18 tie down points on the foremast stay. Mine only shows 12 tie downs as that is the billings interpretation (I know that is considered incorrect) which I am grateful for.
This particular back stay system sure seems like overkill as do the crow footed halyards. I'm sure the designers of this magnificent ship had proven sound
reasons.
View attachment 313362View attachment 313363View attachment 313364View attachment 313365View attachment 313366
Well, next comes the sails and the running rigging. I've been to the fabric store getting sewing supplies (talk about being a fish out of water) and getting ready for this.
I sure thank you all for stopping by and as always Happy Modeling.
I thank you very kindly Ken. Glad you stopped by.Your rigging is great Daniel. But your bowsprit crows feet are beyond that. I don't see how you could achieve a better result! KUDOS mate!
I got to meet Dan Blocker once as a youth in Colorado (sometime early 60's)
And a big welcome aboard.Really? Wow....he was a gentle giant, from what I've read and heard from other who had the chance to meet him. I grew to love him from Bonanza reruns when I was a kid. Glad I found your build log Daniel.
Hi Daniel, she is really becoming a stunning lady.
Especially keeping in mind the Billing boats kit is more basic then the deagostini kit. You are doing an excellent job.
Especially keeping in mind the Billing boats kit is more basic then the deagostini kit. You are doing an excellent job.
Thank you Maarten, Your complement, being a former Bilings Vasa builder yourself, is truly appreciated.Hi Daniel, she is really becoming a stunning lady.
Especially keeping in mind the Billing boats kit is more basic then the deagostini kit. You are doing an excellent job.
Very impressive Daniel, well doneGood Saturday afternoon to everyone.
I am excited to share a rigging milestone on the mighty Vasa. The following photos show my version of the completed standing rigging. I chose the foremast and main mast 'backstays to originate at the underside of their respective topsail mast tops then traveling as a pendant down about even with the fore and main mast tops (one each side). From there they travel down to a single block hooked to their respective whale plates then terminate inside the bulwarks. This termination not yet a permanent location just yet (need to see what running rigging will be like first). At this time, I am omitting any mizzen backstays.
View attachment 313360View attachment 313361
Next you will see a production of the bow sprit mast backstay with the crow's feet. Most every rendition of these crow feet will show a minimum of 18 tie down points on the foremast stay. Mine only shows 12 tie downs as that is the billings interpretation (I know that is considered incorrect) which I am grateful for.
This particular back stay system sure seems like overkill as do the crow footed halyards. I'm sure the designers of this magnificent ship had proven sound
reasons.
View attachment 313362View attachment 313363View attachment 313364View attachment 313365View attachment 313366
Well, next comes the sails and the running rigging. I've been to the fabric store getting sewing supplies (talk about being a fish out of water) and getting ready for this.
I sure thank you all for stopping by and as always Happy Modeling.

Hi Mark. Thank you for your kind words.Very impressive Daniel, well done
Great work Daniel! 
Good morning Daniel. The standing rigging on the Vasa is a complex task no doubt. Crow’s feetGood Saturday afternoon to everyone.
I am excited to share a rigging milestone on the mighty Vasa. The following photos show my version of the completed standing rigging. I chose the foremast and main mast 'backstays to originate at the underside of their respective topsail mast tops then traveling as a pendant down about even with the fore and main mast tops (one each side). From there they travel down to a single block hooked to their respective whale plates then terminate inside the bulwarks. This termination not yet a permanent location just yet (need to see what running rigging will be like first). At this time, I am omitting any mizzen backstays.
View attachment 313360View attachment 313361
Next you will see a production of the bow sprit mast backstay with the crow's feet. Most every rendition of these crow feet will show a minimum of 18 tie down points on the foremast stay. Mine only shows 12 tie downs as that is the billings interpretation (I know that is considered incorrect) which I am grateful for.
This particular back stay system sure seems like overkill as do the crow footed halyards. I'm sure the designers of this magnificent ship had proven sound
reasons.
View attachment 313362View attachment 313363View attachment 313364View attachment 313365View attachment 313366
Well, next comes the sails and the running rigging. I've been to the fabric store getting sewing supplies (talk about being a fish out of water) and getting ready for this.
I sure thank you all for stopping by and as always Happy Modeling.
Thanks Dean!Great work Daniel!
Good afternoon,
I have an interim update pertaining to sails.
My first attempt shows a need for much more practice.
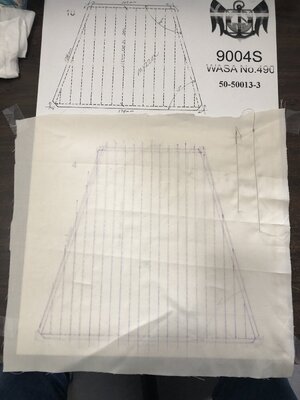
Tracing the outline with disappearing ink. The ink is supposed to last 20 hours but in reality, it last about 45min before disappearing.
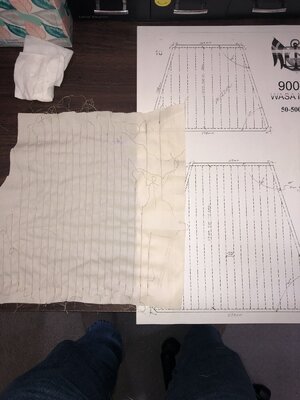
On the right you can see my first ever attempt at sewing a couple of stitching lines.

Here you can see the rapidly disappearing blue lines and a very puckered sail.

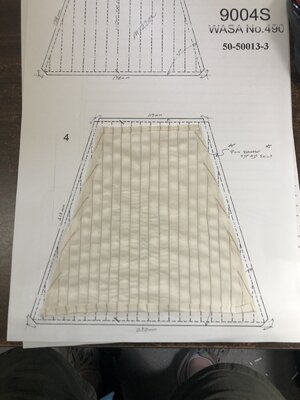
And finally, after using Paul's @dockattner advice with adhesive to make a hem, I get this which somehow has shrunk. Hmmmm....
Well, this is just a practice sail and as you all can see I need a lot more practice. Ha! Next, I will acquire a heat erasable pencil to mark with and hopefully be able to adjust the stitching so it won't pucker the material so bad.

Any and all suggestions welcome.
Thanks for checking in. Happy modeling.
I have an interim update pertaining to sails.
My first attempt shows a need for much more practice.
Tracing the outline with disappearing ink. The ink is supposed to last 20 hours but in reality, it last about 45min before disappearing.
On the right you can see my first ever attempt at sewing a couple of stitching lines.

Here you can see the rapidly disappearing blue lines and a very puckered sail.

And finally, after using Paul's @dockattner advice with adhesive to make a hem, I get this which somehow has shrunk. Hmmmm....
Well, this is just a practice sail and as you all can see I need a lot more practice. Ha! Next, I will acquire a heat erasable pencil to mark with and hopefully be able to adjust the stitching so it won't pucker the material so bad.

Any and all suggestions welcome.
Thanks for checking in. Happy modeling.
Hi Daniel, rather than drawing in the lines for the panels try using the foot of the sewing machine to track with the line just to the left of it - I was about 2 mm from it but closer will work too if you like sewing lines. Make sense? Plus, there is a tension adjustment on the machine (tensions the thread) that you might be able to play with to get fewer wrinkles. At the end of the day I just decided to live with mine - makes it look aged???


