I should be assembling this today.Dead wood, inner post, and stern post
Put together all the parts, and sand the deadwood according to the templates.
A bevel can also be sanded on the top of the stern post, the angle shall decreasing to flat as it goes towards the bottom.
View attachment 512237View attachment 512238View attachment 512239View attachment 512240View attachment 512241View attachment 512242
-

Win a Free Custom Engraved Brass Coin!!!
As a way to introduce our brass coins to the community, we will raffle off a free coin during the month of August. Follow link ABOVE for instructions for entering.
-

PRE-ORDER SHIPS IN SCALE TODAY!
The beloved Ships in Scale Magazine is back and charting a new course for 2026!
Discover new skills, new techniques, and new inspirations in every issue.
NOTE THAT OUR FIRST ISSUE WILL BE JAN/FEB 2026
- Home
- Forums
- Ships of Scale Group Builds and Projects
- Modelship Dockyard PoF HMS Enterprize 1774 - 1/48
You are using an out of date browser. It may not display this or other websites correctly.
You should upgrade or use an alternative browser.
You should upgrade or use an alternative browser.
Victor H.M.S. Enterprize Build Log
- Thread starter Modelship Dockyard
- Start date
- Watchers 20
- Joined
- Oct 14, 2020
- Messages
- 294
- Points
- 323

Looking forward to see your work!I should be assembling this today.
- Joined
- Mar 1, 2022
- Messages
- 692
- Points
- 308

Thanks for your kind answer. That's interesting.Hi Albert,
There were indication of such pattern from several sources, which some indicates three pieces of chocks while some indicates four pieces
Hi Victor. I see you also have a template for taper on the bottom of the keel at the sternpost. Is that template L6-2? There is no mention of it in the instructions.Dead wood, inner post, and stern post
Put together all the parts, and sand the deadwood according to the templates.
A bevel can also be sanded on the top of the stern post, the angle shall decreasing to flat as it goes towards the bottom.
View attachment 512237View attachment 512238View attachment 512239View attachment 512240View attachment 512241View attachment 512242
Thanks !
Thanks Allen and Alex.. My only reservation with the Enterprize (sic) is I have already done the Confederacy ,a great "kit" and another scratch built a frigate.. I am enamored with the Dry Dock quality .. to me, it's all about the joinery and playing with wood options . The work on the 1/30 Royal Caroline with pearwood , with my obligatory cut aways for interior details, will resume when we head to NY in two weeks. WOW! Now there are some prepositional phrases and dangling modifiers! Having said that , I'm primarily interested in Admiralty style ships now... IMHO, the E defines the best in true Admiralty style "kits" , within reason. Built European kits for years, but moved on.. Thanks Alex...now I'm really conflicted..Le Fleuron in the future? I'm pushing 77..hope it comes soon! The Admiral reminds me that we have a houseful of ships...I am donating some to the Hope Lodge in VT..
So here we are, still conflicted..and then there's the Ingermanland..what does one do? With impending tariffs, my hobby could force me into bankruptcy!
Yes, Alex, Ages of Sail is offering the Vic...
So here we are, still conflicted..and then there's the Ingermanland..what does one do? With impending tariffs, my hobby could force me into bankruptcy!
Yes, Alex, Ages of Sail is offering the Vic...
Addendum Corsair and others doing the E, great work..love the trendsetting idea of Victor building concurrently.
I am a bit late with my reaction, but this is a very nice initiative of you, Victor. To build this out of a released kit here in the Group Build area separately with the other. Very good for the interaction.Hello guys, this is Victor from Modelship Dockyard.
This is a new build log for the 1/48 HMS Enterprize. Unlike my previous posts, this thread represents more of a personal work rather than representing our brand. Therefore, unlike prior pilot builds , I will be building this model using the released kit, just like all other modellers.
Throughout the process, I will capture as many high-quality photos as possible. On one hand, this will showcase the appeal of the kit to more modellers, and on the other, it will assist modellers currently working on the project and addressing potential obstacles. I’ll also share insights from the build, ideas for enhancing details, and possibly include research knowledge content about historical or technical aspects. Later I will also develop the rigging section based on this model.
Compared to many previous kits of ours, the 1/48 scale HMS Enterprize is undoubtedly a challenging project. I’m delighted to embark on this journey with you all, and I hope we can all create outstanding works of craftsmanship.
I will let this post empty for photos just for now, and adding a little bit of unboxing images here.
You can find a unboxing made by Zoly here:
Unboxing - Hms Enterprize 1774 1:48 - Modelship Dockyard
The Enterprize was a 28-gun sixth-rate frigate of the Royal Navy. This class of frigate was extensively used in the American region, particularly in the Caribbean, to counter local privateers. For example, the Enterprize successfully captured a 22-gun American privateer in the area in 1782. Of...shipsofscale.com
We had a bit the same with building the Bluenose in a Group Build but not with a direct interaction with the company but with Heinrich @Heinrich in close contact with them. There we had ‘some issues’ which gave ‘some noise. But together we got out of it. Will follow this Group Build with great interest.
Regards, Peter
Last edited:
- Joined
- Oct 14, 2020
- Messages
- 294
- Points
- 323

Hi Corsair, Yes your are right, I mentioned L6-1 in the instructions and L6-2 works the same way, but on the bottom. It is optional to use that as L6-1 is acturally enough as a reference to taper this section. But more aid could make things a bit easier. Don't glue it to hard onto the parts as it might get difficult to get it down afterwards.Hi Victor. I see you also have a template for taper on the bottom of the keel at the sternpost. Is that template L6-2? There is no mention of it in the instructions.
Thanks !
- Joined
- Oct 14, 2020
- Messages
- 294
- Points
- 323

Hi Manning, All US buyers are likely not getting tariff from our kit prior to 2nd of May, we have already shipped many Enterprize kits and some other kits and so far it seems fine. I can't be sure after the 2nd of May, it depends on if there will be any further changes to the policy.Thanks Allen and Alex.. My only reservation with the Enterprize (sic) is I have already done the Confederacy ,a great "kit" and another scratch built a frigate.. I am enamored with the Dry Dock quality .. to me, it's all about the joinery and playing with wood options . The work on the 1/30 Royal Caroline with pearwood , with my obligatory cut aways for interior details, will resume when we head to NY in two weeks. WOW! Now there are some prepositional phrases and dangling modifiers! Having said that , I'm primarily interested in Admiralty style ships now... IMHO, the E defines the best in true Admiralty style "kits" , within reason. Built European kits for years, but moved on.. Thanks Alex...now I'm really conflicted..Le Fleuron in the future? I'm pushing 77..hope it comes soon! The Admiral reminds me that we have a houseful of ships...I am donating some to the Hope Lodge in VT..
So here we are, still conflicted..and then there's the Ingermanland..what does one do? With impending tariffs, my hobby could force me into bankruptcy!
Yes, Alex, Ages of Sail is offering the Vic...
- Joined
- Jan 10, 2022
- Messages
- 860
- Points
- 403

The stern parts look great Victor. Thanks for postingDead wood, inner post, and stern post
Put together all the parts, and sand the deadwood according to the templates.
A bevel can also be sanded on the top of the stern post, the angle shall decreasing to flat as it goes towards the bottom.
View attachment 512237View attachment 512238View attachment 512239View attachment 512240View attachment 512241View attachment 512242
Are you doing ok? It's been quiet for a while. 
Are there parts in these sheets that are specifically spacers to use for the shifts of the futtocks or are we just supposed to use some 1mm scrap from the parts?
Thank you for the reply..we can only hope the situation improvesHi Manning, All US buyers are likely not getting tariff from our kit prior to 2nd of May, we have already shipped many Enterprize kits and some other kits and so far it seems fine. I can't be sure after the 2nd of May, it depends on if there will be any further changes to the policy.
- Joined
- Jan 10, 2022
- Messages
- 860
- Points
- 403

I don't think there are specific parts, I may be wrong, but luckily l have lots of spare 1 mm stock from other kits. There are lengths in some of the ribs where the gaps are 2 mm, l can see this being a problem when sanding the bevels to fair the frames, as they could possibly move (bend slightly) when sanding. The pressure needed to sand should only be very slight, so maybe this will not happen. l have not got to this stage yet, maybe tomorrow, so has anyone who has faired their frames found this to happen? Do you need to use 2 mm spacers in these areas?Are there parts in these sheets that are specifically spacers to use for the shifts of the futtocks or are we just supposed to use some 1mm scrap from the parts?
Hi Shipwrights...
I have not found any 2 mm spacers. I'm using 1 mm spacers (from spare decking) and look at the frame plan to build the half frames. The online manual shows where and how to shift the futtocks (towards bow or stern), but since it's not 1:1, I don't use it to measure. It's easy to use 1 mm spacers on the lower futtocks.
The 2 mm shift that matters is the one between the top timbers. Seems that all frames that extend all the way to the top have 2mm spacing between the "A" top timber and the "B" top timber.
Even with 1 mm spacers lower down, the top timbers easily accept 2mm. I am not glueing the spacers between top timbers, just dry-fit. I think we'll know exactly how to space these once all the frames are constructed. According to the plan and online diagrams, it looks like the spacing between the two top timbers above each gunport is 1 mm, and the space between these timbers and the frame timber to its side may be 1.5 mm, but I haven't built any yet, The full frames fit exactly in the build jig's slot when the top-timbers are spaced spaced at 2mm. I think I'm right on this, Hmmmm ??. Gunpoirt measurments are more complicated. This is well illustrated on the paper frame plan and online instructions....
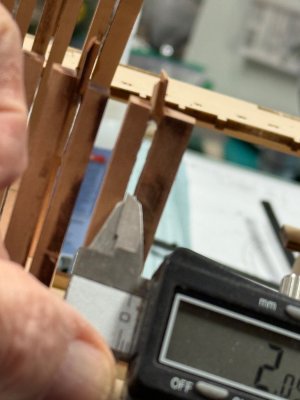
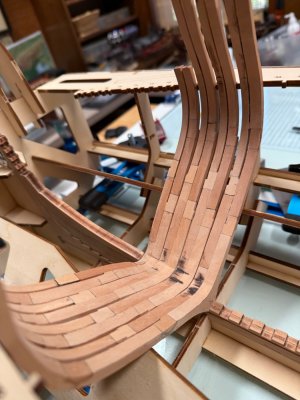
Here are the top timbers of frame 34, separated by 2 one-millimiter spacers. Second picture shows where I am so far; frames 37-34 dry-fitted on keel.
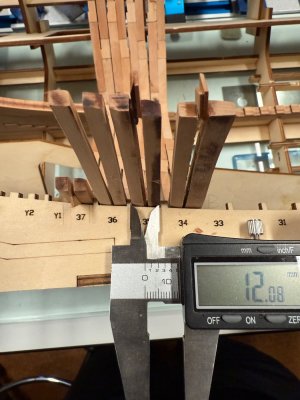
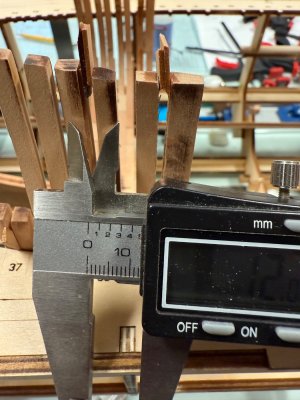
Frame 37 - 12mm slot. Frame 37 with 2 mm spacers same width as slot...
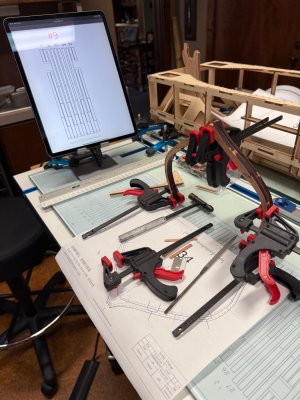
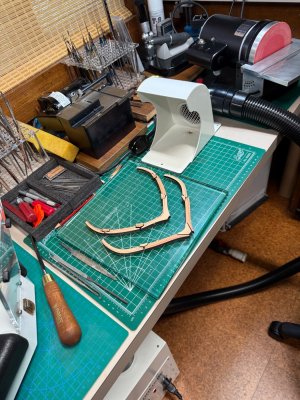
Rosas' Shipyard frame assembly area. Futtock and chock de-char/preparation area
I have not found any 2 mm spacers. I'm using 1 mm spacers (from spare decking) and look at the frame plan to build the half frames. The online manual shows where and how to shift the futtocks (towards bow or stern), but since it's not 1:1, I don't use it to measure. It's easy to use 1 mm spacers on the lower futtocks.
The 2 mm shift that matters is the one between the top timbers. Seems that all frames that extend all the way to the top have 2mm spacing between the "A" top timber and the "B" top timber.
Even with 1 mm spacers lower down, the top timbers easily accept 2mm. I am not glueing the spacers between top timbers, just dry-fit. I think we'll know exactly how to space these once all the frames are constructed. According to the plan and online diagrams, it looks like the spacing between the two top timbers above each gunport is 1 mm, and the space between these timbers and the frame timber to its side may be 1.5 mm, but I haven't built any yet, The full frames fit exactly in the build jig's slot when the top-timbers are spaced spaced at 2mm. I think I'm right on this, Hmmmm ??. Gunpoirt measurments are more complicated. This is well illustrated on the paper frame plan and online instructions....


Here are the top timbers of frame 34, separated by 2 one-millimiter spacers. Second picture shows where I am so far; frames 37-34 dry-fitted on keel.


Frame 37 - 12mm slot. Frame 37 with 2 mm spacers same width as slot...


Rosas' Shipyard frame assembly area. Futtock and chock de-char/preparation area
Last edited:
Since I have ample sheets of pear I just made it easy and ripped strips to use.I don't think there are specific parts, I may be wrong, but luckily l have lots of spare 1 mm stock from other kits. There are lengths in some of the ribs where the gaps are 2 mm, l can see this being a problem when sanding the bevels to fair the frames, as they could possibly move (bend slightly) when sanding. The pressure needed to sand should only be very slight, so maybe this will not happen. l have not got to this stage yet, maybe tomorrow, so has anyone who has faired their frames found this to happen? Do you need to use 2 mm spacers in these areas?
when glued I clamp the ribs tightly to insure best bond and have had zero failures when beveling, all done on the spindle sander which really exerts very light pressure to get the job done.
Tim
Ok, I have come to an issue with building frame #3.
I have the pieces for the bottom of the A side and the B side, and then there is a third one that I don't see on the frame plan and I don't see how it goes into the frame. Picture below to see the related size. The one on the bottom is for the bow side frame. The one above that is for the aft side frame. And the one on the top is the one I am questioning. There is also one of these for subsequent frames (I believe I saw one of these for frame 4 and possibly some others). Thank you for your help!
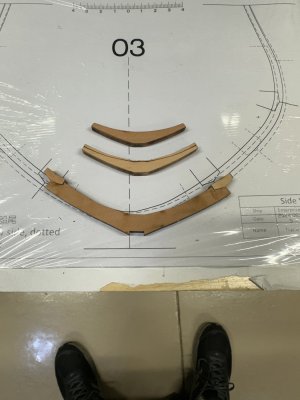
I have the pieces for the bottom of the A side and the B side, and then there is a third one that I don't see on the frame plan and I don't see how it goes into the frame. Picture below to see the related size. The one on the bottom is for the bow side frame. The one above that is for the aft side frame. And the one on the top is the one I am questioning. There is also one of these for subsequent frames (I believe I saw one of these for frame 4 and possibly some others). Thank you for your help!

Last edited:
- Joined
- Mar 29, 2021
- Messages
- 6
- Points
- 13

Tim you and Jeff have both mentioned your "spindle sanders", anyway you guys can tell me which ones you are using?Since I have ample sheets of pear I just made it easy and ripped strips to use.
when glued I clamp the ribs tightly to insure best bond and have had zero failures when beveling, all done on the spindle sander which really exerts very light pressure to get the job done.
Tim


