Those Obachi strips were 7,5 mm wide, so I assembled two 7,5 mm strips and one strip of about 3 mm in the middle. I was warned beforehand by your blogHi Ron. This was one of the challenges during my build. I used the walnut strips as per instructions but they simply did not fit into the available space. Glad to see yours went well.
-

Win a Free Custom Engraved Brass Coin!!!
As a way to introduce our brass coins to the community, we will raffle off a free coin during the month of August. Follow link ABOVE for instructions for entering.
-

PRE-ORDER SHIPS IN SCALE TODAY!
The beloved Ships in Scale Magazine is back and charting a new course for 2026!
Discover new skills, new techniques, and new inspirations in every issue.
NOTE THAT OUR FIRST ISSUE WILL BE JAN/FEB 2026
You are using an out of date browser. It may not display this or other websites correctly.
You should upgrade or use an alternative browser.
You should upgrade or use an alternative browser.
VOC retourschip Batavia AD 1628 built in oak
- Thread starter Ronmedge
- Start date
- Watchers 7
-
- Tags
- batavia kolderstok
Planking deck A
I decided to remove upper parts of frames 6,7 and 8 so that I could finish planking of this deck (not recommended in the Kolderstok instructions) when I planking at this position I will have to use clamping between frames 5 and 9. Maybe I wil regret my decision later Bit of a ‘shell first method’ at this position.
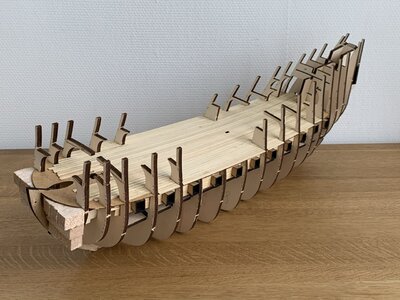
only between frames the maindeck 5 and 9 is completely visible. Between frames 9 and 13 this deck is only visible through the hatches on the Quarterdeck. Nevertheless I decided to plank the complete deck between frames 4 and 13.
I find the colour of Obachi a bit bleak so I treated the wood with a vinegar-steal wool solution included in the kit, supplied by Kolderstok. The resulting colour I find very satisfying. The ‘schaarstokken’ ( dont know the English words) became a shade darker.
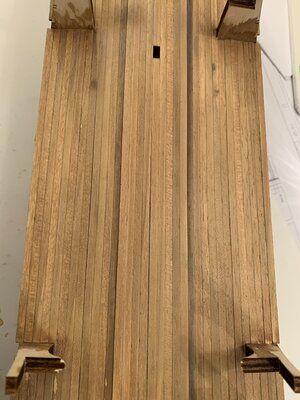
Because the vinegar-steal wool is solutable in water I finished the planking with mat stain.
To suggest caulking I colored the sides of each plank with a soft pencil 8 b. This gave a very subtle caulking effect not quite visible in the above picture.
The two closed hatches I will mount on top of the planking between the ‘schaarstokken’.
I decided to remove upper parts of frames 6,7 and 8 so that I could finish planking of this deck (not recommended in the Kolderstok instructions) when I planking at this position I will have to use clamping between frames 5 and 9. Maybe I wil regret my decision later

only between frames the maindeck 5 and 9 is completely visible. Between frames 9 and 13 this deck is only visible through the hatches on the Quarterdeck. Nevertheless I decided to plank the complete deck between frames 4 and 13.
I find the colour of Obachi a bit bleak so I treated the wood with a vinegar-steal wool solution included in the kit, supplied by Kolderstok. The resulting colour I find very satisfying. The ‘schaarstokken’ ( dont know the English words) became a shade darker.

Because the vinegar-steal wool is solutable in water I finished the planking with mat stain.
To suggest caulking I colored the sides of each plank with a soft pencil 8 b. This gave a very subtle caulking effect not quite visible in the above picture.
The two closed hatches I will mount on top of the planking between the ‘schaarstokken’.
Last edited:
- Joined
- Jan 9, 2020
- Messages
- 10,566
- Points
- 938

Dear Ron
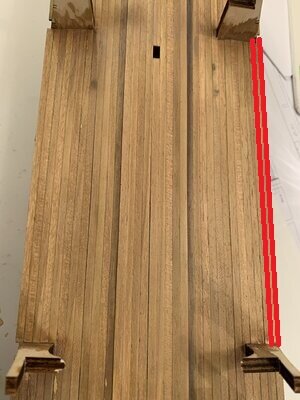
Just bear in mind that all around the edges, a "box" has to be built on which the strengthening part (verschansing) of the bulwarks (fortuining) comes later. For this deck, I did not remove the frames (spanten) but did plank right to the edge as you did. Afterwards I had to remove those planks again - so it was double work.
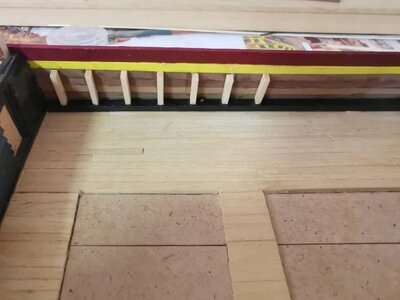
Here you can see the "Black box" I was referring to.
Then I learnt my lesson (see the picture of the forecastle deck where you can clearly see the unplanked edge where the verschansing will goes.
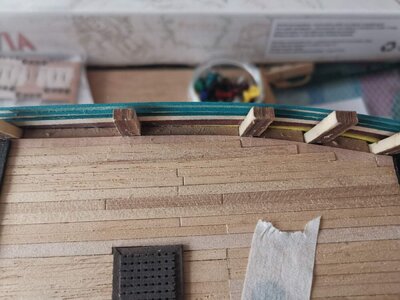
Another random thought while I'm here now. Make sure that the bulwarks markings on the bulkheads are clearly visible. I marked my lines on both sides so that they could be visible from the front and back. Those lines are worth their weight in gold when it comes to planking this hull.
Now back to your deck: It looks great! The steel wool vinegar solution certainly does the trick - I was too scared to try that!

Just bear in mind that all around the edges, a "box" has to be built on which the strengthening part (verschansing) of the bulwarks (fortuining) comes later. For this deck, I did not remove the frames (spanten) but did plank right to the edge as you did. Afterwards I had to remove those planks again - so it was double work.

Here you can see the "Black box" I was referring to.
Then I learnt my lesson (see the picture of the forecastle deck where you can clearly see the unplanked edge where the verschansing will goes.

Another random thought while I'm here now. Make sure that the bulwarks markings on the bulkheads are clearly visible. I marked my lines on both sides so that they could be visible from the front and back. Those lines are worth their weight in gold when it comes to planking this hull.
Now back to your deck: It looks great! The steel wool vinegar solution certainly does the trick - I was too scared to try that!
Dear Heinrich,Dear Ron
View attachment 187177
Just bear in mind that all around the edges, a "box" has to be built on which the strengthening part (verschansing) of the bulwarks (fortuining) comes later. For this deck, I did not remove the frames (spanten) but did plank right to the edge as you did. Afterwards I had to remove those planks again - so it was double work.
View attachment 187179
Here you can see the "Black box" I was referring to.
Then I learnt my lesson (see the picture of the forecastle deck where you can clearly see the unplanked edge where the verschansing will goes.
View attachment 187178
Another random thought while I'm here now. Make sure that the bulwarks markings on the bulkheads are clearly visible. I marked my lines on both sides so that they could be visible from the front and back. Those lines are worth their weight in gold when it comes to planking this hull.
Now back to your deck: It looks great! The steel wool vinegar solution certainly does the trick - I was too scared to try that!
Interesting discussion!
I decided to plank the whole Maindeck because I wanted to colour the deck with the steel wool- vinegar solution. Using this is a bit tricky like you said. I tried it beforehand on a piece of balsa wood. Left i painted with dark oak stain I might want to use for the hull, right the solution and the result in minutes:
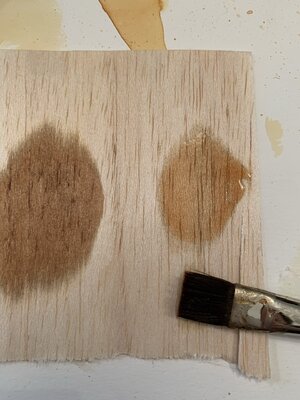
very thin and watery
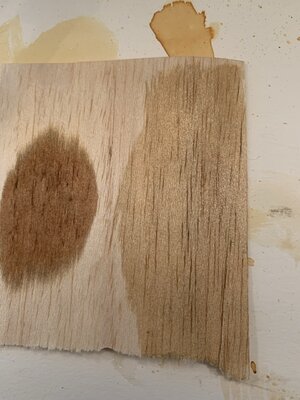
0 minutes
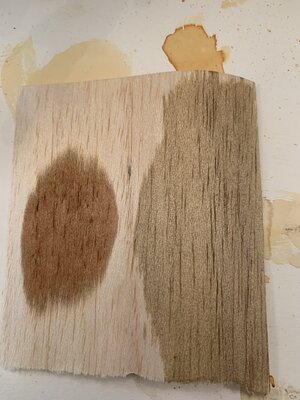
2 minutes
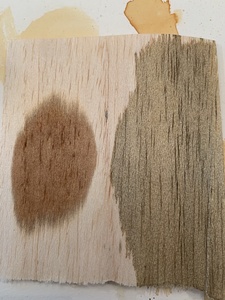
10 minutes
After about 10 minutes the wood will no longer darken.
Problem with this method is that you need to paint the whole surface at once and as evenly as possible. Finishing the deck planking after finishing the hull planking was not an option. The grayish colour compared to de dark oak stain I do like for the deck.
Last edited:
Dear Ron
View attachment 187177
Just bear in mind that all around the edges, a "box" has to be built on which the strengthening part (verschansing) of the bulwarks (fortuining) comes later. For this deck, I did not remove the frames (spanten) but did plank right to the edge as you did. Afterwards I had to remove those planks again - so it was double work.
View attachment 187179
Here you can see the "Black box" I was referring to.
Then I learnt my lesson (see the picture of the forecastle deck where you can clearly see the unplanked edge where the verschansing will goes.
View attachment 187178
Another random thought while I'm here now. Make sure that the bulwarks markings on the bulkheads are clearly visible. I marked my lines on both sides so that they could be visible from the front and back. Those lines are worth their weight in gold when it comes to planking this hull.
Now back to your deck: It looks great! The steel wool vinegar solution certainly does the trick - I was too scared to try that!
Box around the edges of the decks
During my last visit of the Batavia I made just one clear picture of the edges of the deck. I always regret making too little
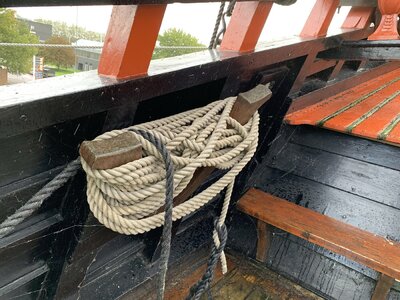
You see starboard site of halfdeck and spardeck. You can clearly see the (black) box at the edges. On the halfdeck it looks asif the box is placed on top of the deck planking. I was planning to assemble the box on top of the planking.
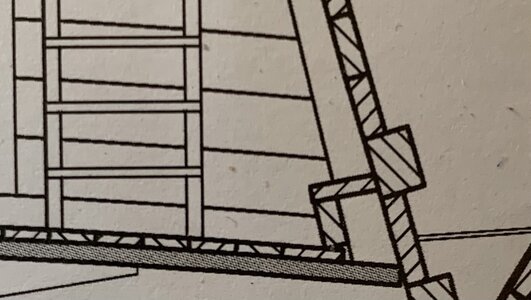
The drawing by Kolderstok indicate this:
And the drawing by Batavia’s shipwright Willem Vos indicate this:
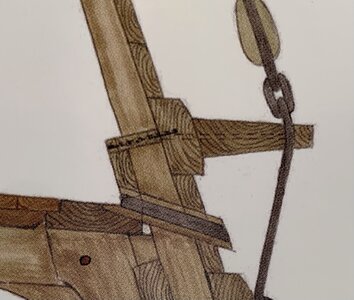
So model and replica show detail differences.
Last edited:
Yes, so do I.Looking at the two methods, I can understand Hans (Kolderstok's) reasoning perfectly.
Dear readers. Recently I bought a new house and it needs to be renovated, which by the way is also a hobby of mine. So for the coming months I will not upload new posts about the Batavia. For at least half a year it is building scale 1:1 for me! But I hope to see you in the new year.
O yes definitely Heinrich and so does the houseGood choice. She will not tolerate anything less that your full and undivided attention!

