-

Win a Free Custom Engraved Brass Coin!!!
As a way to introduce our brass coins to the community, we will raffle off a free coin during the month of August. Follow link ABOVE for instructions for entering.
-

PRE-ORDER SHIPS IN SCALE TODAY!
The beloved Ships in Scale Magazine is back and charting a new course for 2026!
Discover new skills, new techniques, and new inspirations in every issue.
NOTE THAT OUR FIRST ISSUE WILL BE JAN/FEB 2026
You are using an out of date browser. It may not display this or other websites correctly.
You should upgrade or use an alternative browser.
You should upgrade or use an alternative browser.
freecad is easy to learn, requires no subscription and you can design practically anything with it. you will need a slicer program ( I use Lychee ) to make your drawings a reality, and of course, a 3-d printer. I recommend a resin printer over a filament as you can get much sharper detail with it. The resin is also available in a water based format if, like me ,you don't have the room for an alchohol based wash station.
I've tackled Blender for the past year now, learning from trial and error and YouTube videos for the purpose of making 3-D models for resin printed ship model parts. Blender has excellent modelling and sculpting tools, but the challenge is locating and learning the modelling tools which are mixed in with all sorts of other tools you generally won't need, such as animation tools. The modelling tools are more diverse and numerous than many other simpler programs, making the effort to learn them well worth it. If you stick to it, you slowly learn your way around and modelling gets faster.
I haven't tried FreeCAD.....does it export .OBJ or.STL 3D files?freecad is easy to learn, requires no subscription and you can design practically anything with it. you will need a slicer program ( I use Lychee ) to make your drawings a reality, and of course, a 3-d printer. I recommend a resin printer over a filament as you can get much sharper detail with it. The resin is also available in a water based format if, like me ,you don't have the room for an alchohol based wash station.
- Joined
- Nov 29, 2023
- Messages
- 51
- Points
- 58

Yes!

 www.freecad.org
It also features NURBS, which are useful for fast, easy sculpting when making organic shapes, -as opposed to hard surface modeling, which is the first technique to master.

FreeCAD: Your own 3D parametric modeler
FreeCAD, the open source 3D parametric modeler
It also features NURBS, which are useful for fast, easy sculpting when making organic shapes, -as opposed to hard surface modeling, which is the first technique to master.
- Joined
- Nov 29, 2023
- Messages
- 51
- Points
- 58

Slicing "drawings" might not be the best term. Drawings are 2D. Slicers use 3D objects (in multiple formats).freecad is easy to learn, requires no subscription and you can design practically anything with it. you will need a slicer program ( I use Lychee ) to make your drawings a reality, and of course, a 3-d printer. I recommend a resin printer over a filament as you can get much sharper detail with it. The resin is also available in a water based format if, like me ,you don't have the room for an alchohol based wash station.
Your recommendations for resin printing over filament (FDM) printers is exactly the reason I ditched FDM printers: superior detail that rivals injection-molded plastic parts. I've used water-washable resin to good effect, too.
Like yours, my work area is small as well and I came up with an IPA-based, resin cleaning method that works for me.
One of the most common misconceptions is you have to have a cleaning station with enough IPA to submerge the part containing an impeller to clean it thoroughly. Printer manufacturers want to sell cleaning stations!
I went through a lot of IPA (91% works the best) before discovering placing my parts in a 6" deep plastic container (large enough to place the build plate inside) used for food storage works well without having to ever submerge the part.
I take the build plate with the parts still attached and place it parts-side-up in the container and use a spray bottle to thoroughly apply IPA over the interiors/exteriors of the parts and build plate. If there are tiny details like holes or inscribed areas, I change the nozzle position from spray to stream -to flush out any resin still hiding in them. Then I use a 1" wide, six-inch foam brush, (available at any hardware store) to give each part a gentle cleaning. (Never use a toothbrush on an uncured part or risk leaving scratches.) I spray the parts again, letting them sit for no more than three minutes, since IPA dissolves resin over time.
I have an identical container adjacent to the IPA container with the hottest water I can get out of the faucet in my deep sink. I place the build plate in it with the water level just high enough (about 3/4) to cover the build plate and let it sit for three minutes. The hot water expands the build plate a miniscule amount and softens the support rafts to allow easy part removal with a thin-bladed metal paint scraper used at a 45-degree angle. Each part pops off into the water, and you can see the resin cloud it a little bit. I use a U-shaped dental tool to hook the supports and place each part back in the IPA container, and spray them again, finishing up with the foam brush, then place them back in the water to remove more of the IPA.
I went from using a half a quart of IPA (and over time, it gets contaminated, but that's another story.) to a few ounces, which evaporates quickly when I pour it over paper towels in my plastic-lined trash can next to the bench and set it outdoors. The savings when buying IPA are significant. As much as I print, I go through about three quarts a year.
A small ultrasonic cleaner works well to clean the parts more if needed. Cleaning .020 mm holes, this way is excellent. (A 12" Branson tabletop cleaner has served me well for years.) -This beats having to drill them out by hand if you discover one isn't as deep/clean as it should be - don't ask how I know this.
Once I'm satisfied with the results, the parts get blown dry with an air compressor, (an airbrush with moisture trap works great and doesn't contain the moisture contained in canned air which can leave a white film on an undried part if exposed to UV light -even in my garage.) I place the parts on paper towels and let them dry for an hour before UV curing.
The Arizona sun takes the place of my curing station most of the time - even on a clear, winter day. In the summer, most parts cure in an hour or two. Using ABS-like resin, I've left press-fit parts in 110-degree heat for hours with no tolerance interference issues. Great stuff and reasonable at $30 a bottle.
Like most beginners, I made a lot of costly mistakes while developing this cleaning/curing workflow, and have posted it on 3D printing Facebook sites with lots of thanks from others who were tired of buying IPA by the gallon. I'm not a fan of storing any more flammables in my garage than necessary , and this suits my needs without taking up too much of the limited space I have in a corner of my garage. I have a large bench with two 46" wide rolling workbenches stored under it when I need to perform more than one task. As a submariner, I'm adept at making the most use of a limited amount of space!
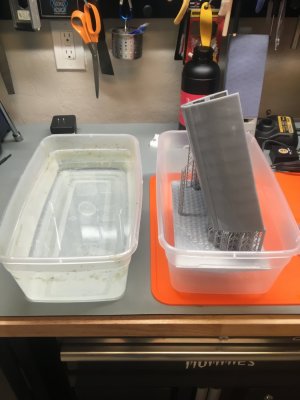
Here's a shot to illustrate my long-winded explanation. If this helps someone, my work is done.
PS: Since looking at this photo in high-res on the big screen, I'm adding this as an edit to avoid any confusion that I would probably have if I was viewing it for the first time.
The cleaner container on the right is the IPA "wash" side. When I'm done cleaning my parts, I wipe the container down with IPA-soaked paper towels, since I have to clean the build plate anyway with a couple of full sheets. For general resin clean-up of tools, drips, and small areas, I use much-smaller squares cut by folding two paper towels into progressively smaller squares, sliced at the folded seams. This is far cheaper than using lint-free, lab-quality, KimWipes or something similar. It's all going in the trash eventually.
The left-side container is the rinse water area. The waxy build-up is residual resin that half-cured and didn't make it out of the container when it was drained. I prioritize drying and curing the parts as soon as they're washed, leaving dealing with the rinse water until the end, maybe an hour later.
Every so often, I'll clean off the waxy build-up with paper towels and IPA to make it look like new again.
The orange, silicon mat protects the most-likely area for resin drips to land if I get spastic, inattentive, or both. Another, lives quietly under the printer. They're cheap insurance since I wouldn't want resin dripping onto the floor. These are from WhamBam:

Slap Mat
SLAP MAT is a thick silicone mat designed to protect your worksurface from 3d printing and other crafts.
www.whambamsystems.com
Last edited:
I have tried the regular resin, but for me, the ease of the water based resin is a no-brainer .Since I live in a condo with no utility sink I have to use the hall washroom (wife won't let me use the ensuite ). All I have to do is run it under the tap with cool water, a blow dryer to remove any leftover resin from holes and low areas, and dry with a paper towel. A bit of time under a u.v. light and they are ready to prime and paint.
Well....my M5s motherboard bit the dust....have one on order but its coming from China so it'll probably be here.... someday. So. I decided to upgrade while I wait on parts and bought a BIG printer! Should be fun!
Decided to test it to check detail and resolution and am very impressed. Picture shows Test Cube from the older printer and two from my new printer. Largest cube was printed last August, the two smaller cubes printed yesterday on the new printer. It did very very well! Also pics of older printer vs newer printer to give you an idea as to size differences.....
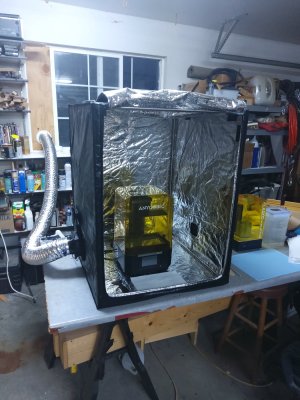
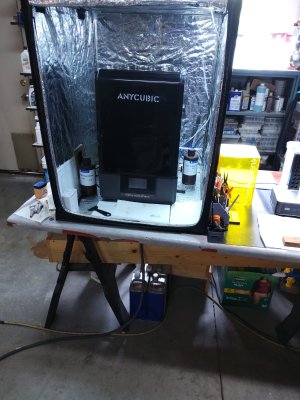
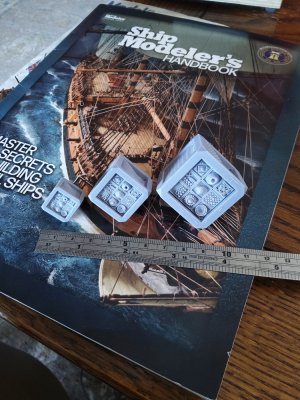
Decided to test it to check detail and resolution and am very impressed. Picture shows Test Cube from the older printer and two from my new printer. Largest cube was printed last August, the two smaller cubes printed yesterday on the new printer. It did very very well! Also pics of older printer vs newer printer to give you an idea as to size differences.....


Last edited:
- Joined
- Oct 9, 2020
- Messages
- 2,249
- Points
- 488

yes it does. what do you do with obj files? I use stl for my slicer program.I haven't tried FreeCAD.....does it export .OBJ or.STL 3D files
.OBJ and .STL both import to my slicer. .OBJ files retain more object information than .STL files, such as color info.yes it does. what do you do with obj files? I use stl for my slicer program.
- Joined
- Nov 29, 2023
- Messages
- 51
- Points
- 58

For large projects, (a complete ship for example) I convert all of my CAD files to OBJ format, then import the OBJ files into my slicer.
Once I'm satisfied with the printed output, (this may take several revisions) I save the final printed revisions as STLs in a separate "Final Print and Project Files" folder which includes the STLs and slicer projects, pre-sliced and ready to print.
If I need to print a complete ship years later, having all of the files organized and ready to send to a printer is a big time-saver!
I downloaded and installed FreeCAD yesterday. It seems to have a fairly steep learning curve just to make a simple cube, no embellishments, etc., or have I just not read enough of the instructions yet? I have a Crealty slicer (4.8.2) and would like to know how to print items before I resume work on my VASA.
- Joined
- Oct 9, 2020
- Messages
- 2,249
- Points
- 488

the instructions are not the best. Yes it is full of features which make it hard to learn. I don't even use 1/4 of the stuff you can do with it. I purchased a book off of Amazon for this purpose.I downloaded and installed FreeCAD yesterday. It seems to have a fairly steep learning curve just to make a simple cube, no embellishments, etc., or have I just not read enough of the instructions yet? I have a Crealty slicer (4.8.2) and would like to know how to print items before I resume work on my VASA.
- Joined
- Oct 9, 2020
- Messages
- 2,249
- Points
- 488

you need to learn how to export your part into an STL or OBJ file which the slice program can read.
How much did the book cost and is it worth the expense?the instructions are not the best. Yes it is full of features which make it hard to learn. I don't even use 1/4 of the stuff you can do with it. I purchased a book off of Amazon for this purpose.
- Joined
- Oct 9, 2020
- Messages
- 2,249
- Points
- 488

I am generally speaking. They cound be found on Amazon. I thought they were worth it. All depends on how you learn things, I guess. I think there are youtube videos out there as well. I also happen to like books.How much did the book cost and is it worth the expense?
- Joined
- Nov 29, 2023
- Messages
- 51
- Points
- 58

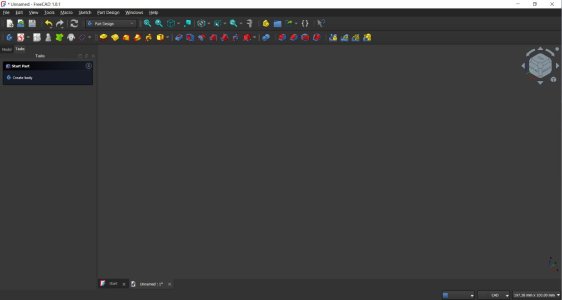
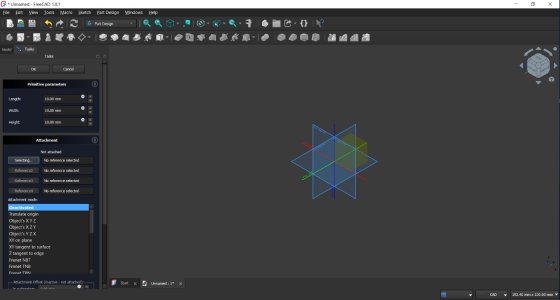
I just downloaded FreeCAD and it's pretty standard UI-wise. Went to the first page and selected the Box primitive. The second screen creates a primitive - it just needs the parameters entered to get the desired dimensions.I downloaded and installed FreeCAD yesterday. It seems to have a fairly steep learning curve just to make a simple cube, no embellishments, etc., or have I just not read enough of the instructions yet? I have a Crealty slicer (4.8.2) and would like to know how to print items before I resume work on my VASA.
There are four things usually taught on the first day of a formal modeling class that apply to self-learning:
1) Learn how the app organizes files. Learn its file types and folder storage locations.
2) Learn where Primitives, (simple geometric shapes) live in the UI. Primitives are the standard building blocks in any modeling 3D program. The Box is typically the first primitive taught. All other primitives work essentially the same.
3) Understand how to change the display views, zoom, scroll, and pan in a Perspective view using the mouse.
4) Know how to select/de-select an object and its components, (Polys, Edges and Points).
#s 3 & 4 are actions you will perform constantly when modeling. Know them, live them, love them -right away! Muscle memory takes over quickly if you just practice them for a few hours. Once committed to memory, you concentrate on other things like workflow, which you will develop to match your needs over time.
Knowing how tools operate backwards and forwards is the foundation for creating your own workflows. When I get stuck, I change my workflow and it usually gives me the result I want.
Constant practice is the only way to learn a 3D app to produce objects in a timely and efficient manner. I spent six months trying to learn on my own and had a hundred bad habits to un-learn starting on my first day of Modeling class. I looked over at the kid sitting next to me and he was manipulating the display in a way I hadn't seen before. He showed me how and I cut my modeling time by 75% the first day! (I didn't know what I didn't know.) The students could be just as informative as the instructor sometimes.
Once you know the basics of an app, online training is more useful, but the quality of the lessons can be very hit-or-miss -depending on the instructor. Find out who the acknowledged "experts" are for the app you want to learn, and stick with them.
Whenever I learn a new app, I watch a video example, then write the entire video into a procedure, using screenshots to support the written tutorial. Knowing its bullet-proof and self-explanatory, (for me, the "Why?" is just as important as the "How-to") I can review the lesson and jump back into the app months later.
Learning any 3D app is just as much a mindset as a skill set.
CC
I agree with your opinion of Solidworks, and use it for all of my 3D modelling. A full functioned legal version of Solidworks 2024 is available for hobbyists for $USD50 per year.SolidWorks is a terrific, full-featured CAD program -it was used in many of the places I worked, but at thousands of dollars a seat, (and an annual fee) it's far too expensive for those without deep pockets and the commitment to master it. Nearly all major US companies involved in production have switched to a digital pipeline for the reasons you stated above. Student editions are economical but have requirements to download it - like proving you're a student or Vet; and the subscription has a finite lifespan.
Fusion fills that space for many, at a fraction of the price and has a free version, -though slimmed down in capability. Most of those capabilities are unnecessary for the majority of modelers anyway.
Other modelers prefer Blender since it's free and continually evolves with its open-source architecture. I'm not a fan of the UI, but that's just me.
The glue, tools, paint, mess and occasional noise, (mostly cursing, in my case) doesn't start until the design work is finished.
CC
Check the solidworks website. It can be PC based or cloud based. It does have a steep learning curve, but there is plenty of tuition on YouTube.
I am a professional user of SolidWorks, and use it for my business, as well my boat designs. However, although I am a big fan of SolidWorks, and use it every day, I think there are simpler, and better, solutions, for hobbyists.
In particular, with more and more modellers owning 3D-printers, and looking to make organic shapes for period ship decorations, I think one should look at learning to draw in Maya or Z-brush. SW is terrible for organic shapes, even boat hulls, and there are much better solutions out there. Whether you pay $50 a month for an online version, or thousands for a stand-alone version, your learning curve will be hundreds and hundreds of hours.
On the flip side, there are zillions of people like me who use SW to create items that are, or were, manufactured with conventional machining. You can ask a SW user to create parts that are machined conventionally, but there are very few, reputable, people out there who can create organic shapes for modellers.
If I were starting today, I would definitely look into Maya or Z-brush.
Now, if you do want to learn something like SW, get yourself a 1960s Engineering Drawing book and practice, practice, practice! Those books are amazing.


