
-

SUBSCRIBE TO SHIPS IN SCALE TODAY!
The beloved Ships in Scale Magazine is back and charting a new course for 2026!
Discover new skills, new techniques, and new inspirations in every issue.
NOTE THAT OUR NEXT ISSUE WILL BE July/August 2026 -

Win a Free Custom Engraved Brass Coin!!!
As a way to introduce our brass coins to the community, we will raffle off a free coin during the month of August. Follow link ABOVE for instructions for entering.
You are using an out of date browser. It may not display this or other websites correctly.
You should upgrade or use an alternative browser.
You should upgrade or use an alternative browser.
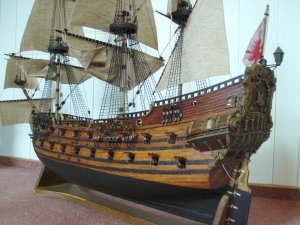

Think gonna make ship like this or is Black not realistic? Its most of the time White or copper.
Do you mean the hull under the waterline?
Definietly copper sheating was not invented in this time!
HMS Alarm in 1761 got the first sheating - so historical a coppered hull on your model would be not correct.
Than there is the so called "white stuff" and the "black stuff" as prevention against shipworm etc.
Even older than the sheathing methods were the various graving and paying techniques. There were three main substances used: White stuff, which was a mixture of whale oil, rosin and brimstone; Black stuff, a mixture of tar and pitch; and Brown stuff, which was simply brimstone added to Black stuff. It was common practice to coat the hull with the selected substance, then cover that with a thin outer layer of wooden planking.
taken from wikipedia:
https://en.wikipedia.org/wiki/Copper_sheathing
The waterline is usually the line marked by the water level, if the ship is laying in water fully loaded -> definitely on both sides !!Tnx for Your time and advice. Gonna paint it black then. How do i create a good waterline. How high and the same at both sides?
The black stuff should be than slightly higher than the waterline, because of waves and the inclination of the ship during sailing in the wind.......I am not sure, maybe 0,3 to 0,5 meter.....
The waterline, which is the basis for this should be marked in the drawings, usually in every complete drawing it is marked and shown
Last edited:
Due to the fact, that I made today one post about the SS Great Britain in the "Today in History"-Topic .....
The exhibition of the SS Great Britain is a very good example to make the waterline and the hight of a corrosion protection of a hull visible
The ship is much more modern, than yours, but the principles are the same
The ship is in a drydock moored and the waterline, better her the level of the water the ship would swim is shown with a roof of glass, so visitors get an impression how the ship would look like, when it is in water, but can also visit the underwater area, looking the screw, rudder, the sheating etc.
From above "water"


under the waterline


I hope, that this is explaining the situation
The exhibition of the SS Great Britain is a very good example to make the waterline and the hight of a corrosion protection of a hull visible
The ship is much more modern, than yours, but the principles are the same
The ship is in a drydock moored and the waterline, better her the level of the water the ship would swim is shown with a roof of glass, so visitors get an impression how the ship would look like, when it is in water, but can also visit the underwater area, looking the screw, rudder, the sheating etc.
From above "water"
under the waterline
I hope, that this is explaining the situation
I can not stop.......looking at the replica of the Hermione in France (which I will visit in October by the way)
During construction, without masts and other weights, means definitely empty and out of water because of light weight

fully loaded and ready for sailing


During construction, without masts and other weights, means definitely empty and out of water because of light weight
fully loaded and ready for sailing

Hi Pat, I have been reading and enjoying your build, you are doing a good job with it. The planks would be visable, the Blackstuff was painted on. On a model it is useful because it hids any blemishes like glue marks but you can still see the planking.
Cheers Andy
Cheers Andy
- Joined
- Jul 29, 2017
- Messages
- 895
- Points
- 343

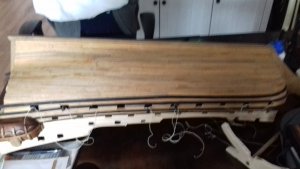
Ik had a lot of problems with the hull. The man in bought this kit from had done the first layer of planking. With limewood. But he had bent the wood so much that when i wanted to glue a piece of wood on it and pushed a little nail in it it broke even with little bit pushing. Also the cannon ports are sometimes 5 mm off . Het glued in the first deck without placing cannons. Now i have to work upwards deck by deck with the planking because the ports are to low. Its a good learning school but i never buy a kit that some one else started. It was cheap but this is sometimes anoying.
- Joined
- Jul 29, 2017
- Messages
- 895
- Points
- 343
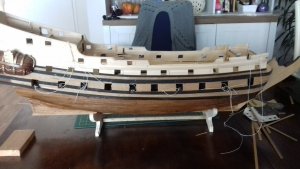
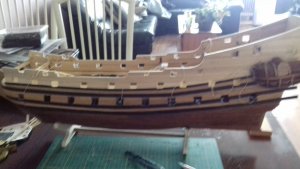
Gave the hull some walnot varnish and i think i keep it this way .in give it a little sanding once more to make it all smooth. Happy that i have put ropes around the cannons because as you can see they fell into the ship. Now going to build up the planking deck by deck so that the cannons fit in the ports. The photos are taken with telephone so not to clear but saving for camera although in never make private pictures. Thanks for looking.
Attachments
- Joined
- Jul 29, 2017
- Messages
- 895
- Points
- 343
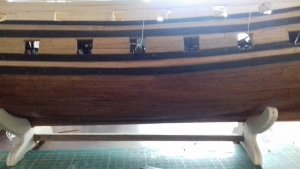
Problem... the whole back of the ship is 3 cm to high. The man who built it with the first planking had made a plan for himself so it was easyer with planking. Think i have to make every space between the figurines and windows each a little bit bigger or make a plank between spaces to fill it up. Dont want to take 3 cm of the top of the Stern.