Thanks Brian.great work and an excellent build log Stephen.

Cheers,
Stephen.
 |
As a way to introduce our brass coins to the community, we will raffle off a free coin during the month of August. Follow link ABOVE for instructions for entering. |
 |
 |
The beloved Ships in Scale Magazine is back and charting a new course for 2026! Discover new skills, new techniques, and new inspirations in every issue. NOTE THAT OUR FIRST ISSUE WILL BE JAN/FEB 2026 |
 |
Thanks Brian.great work and an excellent build log Stephen.


Your level of detailing and craftsmanship is great, Stephen. Nice to see the production steps.Sideways Step or two.
I haven’t had much time lately and currently it looks like I won’t have much time in the near future for hobby work, now mainly due to the Admiral being quite ill, although I did make some progress before the current situation arose. Add to that I have just recently had a bilateral hernia operation.
As mentioned in the last post I was intending to make a jig for producing custom mouldings and work on making some solid carbide micro carving tools. Well I have made the moulding jig but haven’t made any micro carving tools yet, part of the reason for slow progress is I rebuilt my little tool-post grinder this took awhile. I will post photos in the Purchased shortly ago/ something new in the workshop thread.
I know I indicated I would be working on the Bulwarks and I did get the parts I have made out and had a look at them then decided it would be best to put that on hold until I had done a few other jobs that included fitting the bilge and circulating pump out-flows, making and fitting the circulating pump intake and smoothing off the brass pins on the brass rubbing strakes.
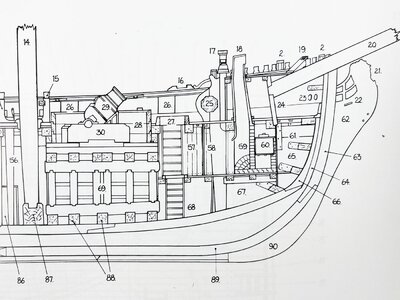
Neither the bilge and circulating pump out-flows or the circulating pump intake are marked on the plans so for these I rely on the Tree to Sea book page 125 for a description on where they are fitted also sketches of what they might look like were invaluable.
View attachment 353737View attachment 353738View attachment 353739
The circulating pump intake was a fitting that I nearly decided to not make as no one will likely see it, but the challenge of trying to make one got to me.
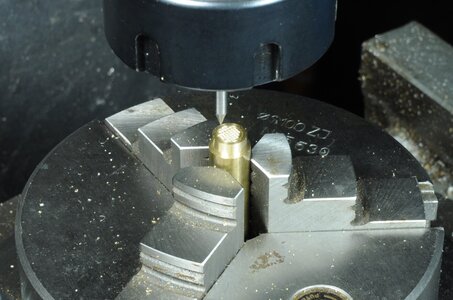
I started with a 2D cad drawing to play around with the hole spacing then machined up a brass blank and used an engraving tool as a centre drill, as the smallest centre drill I have is far too big for the .4mm holes.
View attachment 353740
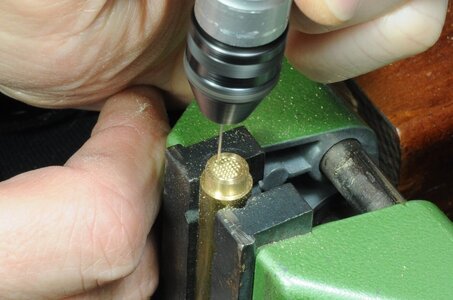
The holes were spaced out on the mill. Then drilled .4mm by hand, with the aid of an Optivisor. Next some shape was put into the end on the lathe using a form tool and parted off.
View attachment 353741View attachment 353742View attachment 353743
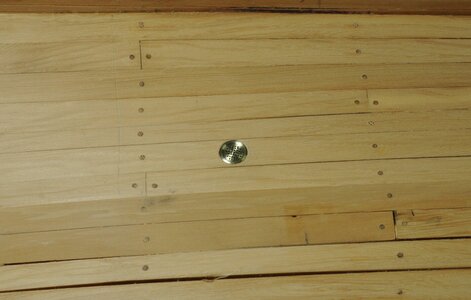
A suitable sized hole was made in the appropriate strake.
View attachment 353744View attachment 353745
The circulating pump and bilge out-flow had already been made so all that was needed to do is cut a piece out of the centre rubbing strake and drill a couple of holes, unfortunately after cutting the brass strake it proved very difficult to remove and I subsequently damaged the plank. With the benefit of hindsight what I should have done at this point is cut out the damaged piece and replace it (which I did eventually) this would have been the best approach, instead I went ahead and drilled the 2 holes, then made the repair only to find out the making the holes very cleanly was very hard, should have realised this.
View attachment 353746View attachment 353747
Thanks for the having a look, more to come.
Again I welcome constructive comments.
Cheers,
Stephen.
Thank you Shota,Dear Steven
Thanks a lot for the detailed explanation accompanied by pictures that help to understand. I really like posts like this that make us learn new ways of creating and upgrade our abilities.
Wishing your admiral & you a full and speedy recovery.
Great appreciation Shota


Thanks Heinrich,Dear Stephen. I am sorry to hear that your Admiral is not well and also about your hernia operation. I can only hope and pray that your wife will recover soon and free up some time for you.
What I appreciate so much about your build is the sheer attention to detail. Here you have created a lot of extra work for something that as you say will be scarcely seen, and yet you still did it! Then of course there is your skill when it comes to the metal work - something I can only envy you. I look forward to when this section is completed and the outer brass fittings are in place.
Thank you Stephan.Hope it will be soon better for you and your admiral.
Wish you both a speedy recovery
Thanks Uwe,Not often the pump intake is shown on a model - although most ships had such an opening - f.e. also my Granado should have one
Good that you have reminded me with your post - Very good executed btw
Thanks Peter,Your level of detailing and craftsmanship is great, Stephen. Nice to see the production steps.
Regareds, Peter
Yes she hadThanks Uwe,
I am surprised that the Granado would have an intake.
Cheers,
Stephen.


Awesome work Stephen,Sideways Step or two.
I haven’t had much time lately and currently it looks like I won’t have much time in the near future for hobby work, now mainly due to the Admiral being quite ill, although I did make some progress before the current situation arose. Add to that I have just recently had a bilateral hernia operation.
As mentioned in the last post I was intending to make a jig for producing custom mouldings and work on making some solid carbide micro carving tools. Well I have made the moulding jig but haven’t made any micro carving tools yet, part of the reason for slow progress is I rebuilt my little tool-post grinder this took awhile. I will post photos in the Purchased shortly ago/ something new in the workshop thread.
I know I indicated I would be working on the Bulwarks and I did get the parts I have made out and had a look at them then decided it would be best to put that on hold until I had done a few other jobs that included fitting the bilge and circulating pump out-flows, making and fitting the circulating pump intake and smoothing off the brass pins on the brass rubbing strakes.
Neither the bilge and circulating pump out-flows or the circulating pump intake are marked on the plans so for these I rely on the Tree to Sea book page 125 for a description on where they are fitted also sketches of what they might look like were invaluable.
View attachment 353737View attachment 353738View attachment 353739
The circulating pump intake was a fitting that I nearly decided to not make as no one will likely see it, but the challenge of trying to make one got to me.
I started with a 2D cad drawing to play around with the hole spacing then machined up a brass blank and used an engraving tool as a centre drill, as the smallest centre drill I have is far too big for the .4mm holes.
View attachment 353740
The holes were spaced out on the mill. Then drilled .4mm by hand, with the aid of an Optivisor. Next some shape was put into the end on the lathe using a form tool and parted off.
View attachment 353741View attachment 353742View attachment 353743
A suitable sized hole was made in the appropriate strake.
View attachment 353744View attachment 353745
The circulating pump and bilge out-flow had already been made so all that was needed to do is cut a piece out of the centre rubbing strake and drill a couple of holes, unfortunately after cutting the brass strake it proved very difficult to remove and I subsequently damaged the plank. With the benefit of hindsight what I should have done at this point is cut out the damaged piece and replace it (which I did eventually) this would have been the best approach, instead I went ahead and drilled the 2 holes, then made the repair only to find out the making the holes very cleanly was very hard, should have realised this.
View attachment 353746View attachment 353747
Thanks for the having a look, more to come.
Again I welcome constructive comments.
Cheers,
Stephen.
Thanks for that Uwe,Yes she had
two elmtree pumps next to main mast for the bilge #56
and two pumps close to mizzen for sea suction #80
View attachment 353764 View attachment 353765
View attachment 353767
Unfortunately I do not have the cross section photo with me, but if it is of some interest I can post it later on

Thank you Daniel,I love your dedication for detail and your metalwork
I hope to hear you and your admiral are in better health soon
Kind regards,Daniel
