Yet Another Revell 1:96 USS Constitution Build Log...

Update 004:
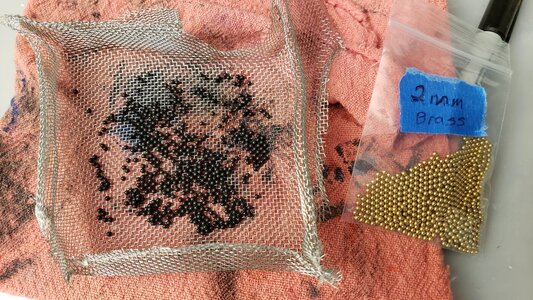
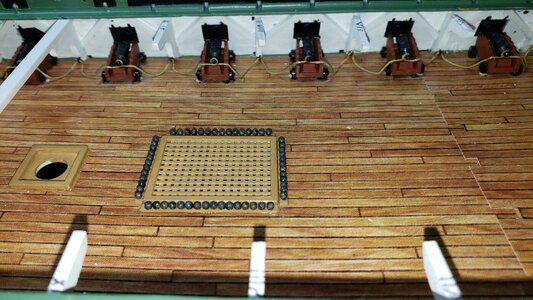
Almost done with the gun deck's shot storage. I ended up using a chemical blackener (Birchwood Casey Brass Black) on some 2mm brass ball bearings and they turned out nice. Unfortunately I didn't have enough bearings to finish off the gun deck so I've ordered more. I'm now awaiting an "arms shipment" from China.

2023-01-06 19.03.05.jpg
 
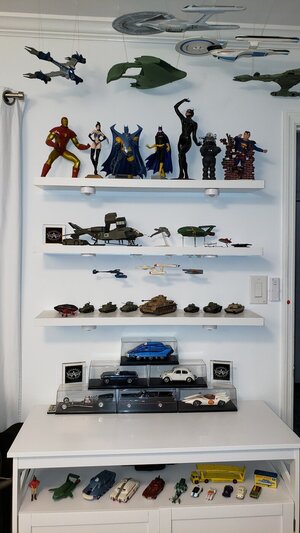
That is kinda cool! Is the Batmobile behind it? And is that a Don Garlitz "Swamp Rat" top fuel dragster? As for your thread sizes on the "Connie", my kit never had the large or medium sizes you have. I only found them in some attempted models I ran across at a sale. Needless to say, I replaced as many stay lines as I could manage. She looks a lot better. I removed the few ugly plastic sails and now am making my 9th sail to install.
 
That is kinda cool! Is the Batmobile behind it? And is that a Don Garlitz "Swamp Rat" top fuel dragster? As for your thread sizes on the "Connie", my kit never had the large or medium sizes you have. I only found them in some attempted models I ran across at a sale. Needless to say, I replaced as many stay lines as I could manage. She looks a lot better. I removed the few ugly plastic sails and now am making my 9th sail to install.
Thanks! Yes, that is the '66 TV Batmobile but the dragster is the Tom Daniel's T'rantula (old Monogram kit from the '60s). Here's the entirety of that display:
2023-01-08 13.20.10.jpg
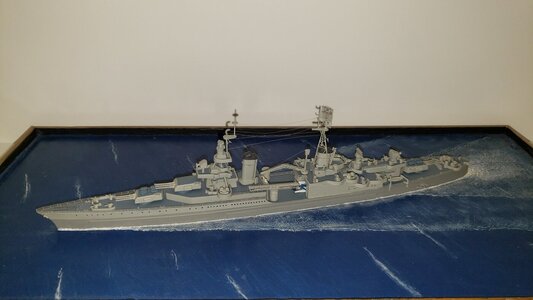
And here's my only completed model not featured there, an actual ship (gasp!). 1:700 scale USS Indianapolis:
2023-01-08 13.31.25.jpg
 
Last edited:
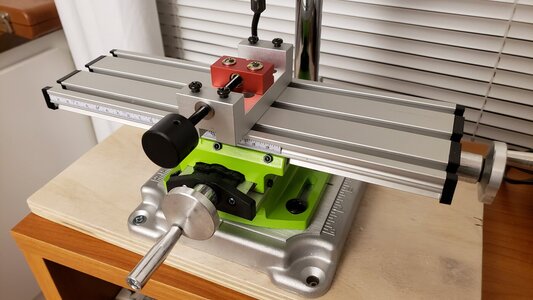
My ship has come in! It was a slow boat from China carrying an order of 2mm brass ball bearings. I'm whipping up another batch of cannonballs for the Constitution now. Also, I've added a precision milling table to my Dremel drill press and micro-vise. This setup will come in handy for making the 3x3-shot storage racks on the spar deck.

2023-01-13 14.11.58.jpg
2023-01-12 23.23.57.jpg
 
Update 005:
The more I looked at the paper decking on the gun deck, the less I liked it. Sooo. I removed it. And I did it without removing the cannons or their rigging. It wasn't easy and there are some repairs needed now, but it was worth it to get the ScaleDecks wooden deck installed it its place.

2023-03-05 11.08.56.jpg
(BTW, Tamiya X-20A acrylic thinner does a decent job of loosening 3M Super 77 adhesive spray.)

2023-03-17 01.27.32.jpg

Now I can get back to building instead of shelving the whole thing out of disgust.
 
... likely to end in frustration, tears, and cursing. Or quietly fade away in shame. ;]
Hi, my name's Richard and I'm a modelholic. (Others: "Hi, Richard.")
I'm in the process of a second attempt to build the ubiquitous Revell 1:96 USS Constitution kit.
My first attempt was in 1970. I received the first kit for Christmas at the age of 12. I think my parents got it from the Sears catalog for $13. I actually made pretty decent progress on it although not a lot of quality in my work. I had gotten all the way up to the final step in the main assembly: Inserting the three masts. After that it would be rigging, rigging, rigging.

I got the fore mast in without any problem. When I tried to insert the main, it turned out to be a tight fit. So, 12-year-old that I was, I forced it. The spar deck broke and collapsed into the gun deck, damaging that as well. The main mast shattered and most of the yards broke. In the melee, the fore mast and a great deal of the spar deck details also suffered damage. Being only 12, I gave up the entire project in disgust and threw it away.

Fast forward to 2005. I had re-entered the hobby after many years. Thanks to friends and fellow modellers in my local IPMS chapter, I was developing some decent modelling skills. I'd won a few trophies for builds entered in regional contests. My confidence was high so I decided to give the Constitution another go. Another Christmas, another kit (then around $80) and a slew of reference materials. I started planning my shipbuilding redemption, even making a trip to Boston to shoot many detailed photos.
Then came a late-life career change, from Computer Engineer to Independent Filmmaker. I sold the lion's share of my expansive kit collection to finance equipment for my new endeavor. But not the Revell Constitution kit. Since it was partially started, I kept that, carefully packing it away.

Fast forward again to 2020. My wife and I decided to retire, leave Atlanta, and move to Hilton Head Island. I had already abandoned filmmaking in favor of writing by that time. Making movies takes a village and I can write a novel by myself in my underwear. Four books published so far, so that is working out well and there's no reason to stop due to retirement. The main benefit of "retiring" is that I can once again devote time and energy (and $) to modelling. So, out came the Connie.
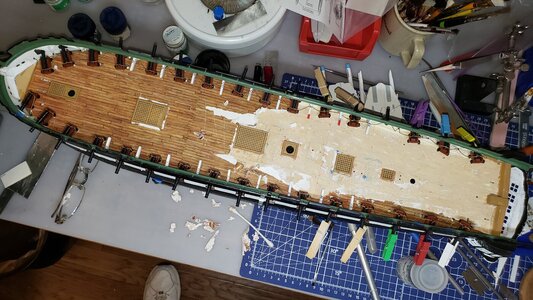
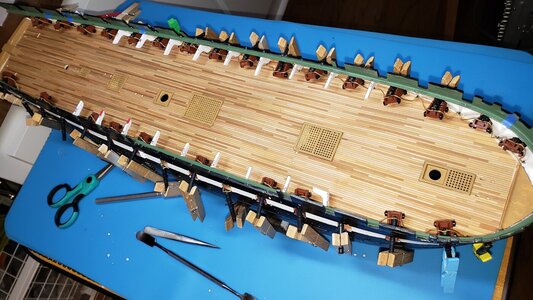
And that's where our present-day story begins. As you can see, I've gotten as far as assembling the hull and rudder, as well as some interior and exterior painting. After visiting the Constitution IRL, I decided to add some structural details on the gun deck. I may have been overly ambitious on this deck, since it will be hard to see once the ship is complete. I also committed to building a semi-realistic series of beams to support the spar deck. I say I'm committed because I cut away the lugs/tabs that were meant to support the spar deck, so I'm stuck with that decision.

And that's where I'll kick off this build log. I doubt I'll make lightning progress. My goal is to fill the display shelf above my newly-constructed workbench with something I'm halfway proud of but I'm in no hurry.
Hallo @Greysteele
we wish you all the BEST and a HAPPY BIRTHDAY
Birthday-Cake
 
I'm joining the watch party! I need the inspiration. I've got 2 of these kits stashed away. I started one but it's sitting in a box waiting for me to get back to it and finish painting the copper portion of the hull. I did a dry fit of the transom but it was a horrible fit and I'd have to fill it with gobs of putty and sand and file and fill and sand and file and fill and so I put it down for a bit about 6 years ago.

Yes, mine was a terrible fit too. No amount of tape or clamps were sufficient to take out the various gaps and warps. As this was my first model build in 55 years, this was a bit frustrating. I got it together as best I could and yes, used putty. First, however, I cut some narrow slivers from another model kit I had purchased but decided not to built. I fit these slivers into the gaps between hull and deck and glued them down. This formed a good base for the putty. Matching the putty surfaces to the deck was my biggest challenge.

The Connie is almost done and while I am happy, I have learned much to help on my next project - building two Cutty Sarks at once, one with sails and one standing rigging.

I am also considering taking down some of the rigging from the Connie and restringing it. Patience!
 
I love the fact that I am not the only one who did this model. In the late eighties my sister and brother bought it for me basically as a joke, because when I was kid, I built model cars and stuff. Once I started on it, I have had a good time putting it together. At one point in my journeys, I ran across a man selling stuff and bought a brand-new USS Connie in box with two others in-completed hulls and stuff. Once I sifted, through those parts I found rigging lines that completely looked like much better and the correct diameter for all my stay lines. Yanked those lines off and replaced them. Looks much better. How did my model end up with lines looking so small and incorrect? Do not know. Must have been made on a Friday. I pulled off five plastic sails, after fifteen years or so, because they looked like poop and remade them and now, I am up to fourteen sails completed.

Continue on my young man
 
Grey, the rigging shown looks like what came with the kit is marginal at best, if you have a fabric store, a Hobby Lobby or a Walmart, check out a brand of thread called Coats and Clark Button and carpet thread. they make several shades of black and brown and tan. It's tough stuff and you cannot break it without hurting your fingers. https://www.joann.com/p/coats-andam...utm_term=sewing supplies thread Coats & Clark

click the above link and let the picture enlarge, check out the weave pattern.


Also, on the larger diameter lines needed for Forestays and backstay, go to the Yarn section and look for crochet type threading, once you wax it down, the size and scale is perfect and its WAY tougher than the plain cotton rigging the kit provides.
 
... likely to end in frustration, tears, and cursing. Or quietly fade away in shame. ;]
Hi, my name's Richard and I'm a modelholic. (Others: "Hi, Richard.")
I'm in the process of a second attempt to build the ubiquitous Revell 1:96 USS Constitution kit.
My first attempt was in 1970. I received the first kit for Christmas at the age of 12. I think my parents got it from the Sears catalog for $13. I actually made pretty decent progress on it although not a lot of quality in my work. I had gotten all the way up to the final step in the main assembly: Inserting the three masts. After that it would be rigging, rigging, rigging.
View attachment 327170View attachment 327171View attachment 327172
I got the fore mast in without any problem. When I tried to insert the main, it turned out to be a tight fit. So, 12-year-old that I was, I forced it. The spar deck broke and collapsed into the gun deck, damaging that as well. The main mast shattered and most of the yards broke. In the melee, the fore mast and a great deal of the spar deck details also suffered damage. Being only 12, I gave up the entire project in disgust and threw it away.

Fast forward to 2005. I had re-entered the hobby after many years. Thanks to friends and fellow modellers in my local IPMS chapter, I was developing some decent modelling skills. I'd won a few trophies for builds entered in regional contests. My confidence was high so I decided to give the Constitution another go. Another Christmas, another kit (then around $80) and a slew of reference materials. I started planning my shipbuilding redemption, even making a trip to Boston to shoot many detailed photos.
View attachment 327175View attachment 327176View attachment 327177
Then came a late-life career change, from Computer Engineer to Independent Filmmaker. I sold the lion's share of my expansive kit collection to finance equipment for my new endeavor. But not the Revell Constitution kit. Since it was partially started, I kept that, carefully packing it away.

Fast forward again to 2020. My wife and I decided to retire, leave Atlanta, and move to Hilton Head Island. I had already abandoned filmmaking in favor of writing by that time. Making movies takes a village and I can write a novel by myself in my underwear. Four books published so far, so that is working out well and there's no reason to stop due to retirement. The main benefit of "retiring" is that I can once again devote time and energy (and $) to modelling. So, out came the Connie.
View attachment 327182
And that's where our present-day story begins. As you can see, I've gotten as far as assembling the hull and rudder, as well as some interior and exterior painting. After visiting the Constitution IRL, I decided to add some structural details on the gun deck. I may have been overly ambitious on this deck, since it will be hard to see once the ship is complete. I also committed to building a semi-realistic series of beams to support the spar deck. I say I'm committed because I cut away the lugs/tabs that were meant to support the spar deck, so I'm stuck with that decision.

And that's where I'll kick off this build log. I doubt I'll make lightning progress. My goal is to fill the display shelf above my newly-constructed workbench with something I'm halfway proud of but I'm in no hurry.
View attachment 327186
Did you finish your Constitution?

If so, do you have time for a question from a newbie builder?
 
Back
Top