YQ Bluenose— TomV

Joined
Jan 19, 2021
Messages
22
Points
58

This is the first build log I have done. Since I’m a newcomer to POF kits, and since so many others have set out their techniques in such great detail already, the plan here is to post my progress accompanied by questions as they arise. I appreciate everyone’s help as I move ahead with this build, as always.


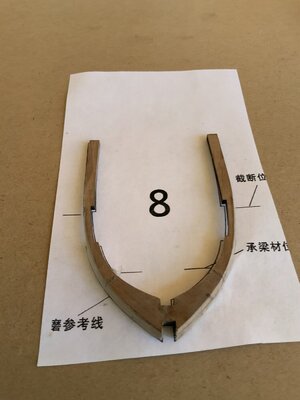
After all the helpful tips about assembling the frame pieces, I started with frame #8. Was able to assemble the frame using the template and the clamping techniques that others have described.

The angle of the bevel and amount to remove on this first plank took a bit getting used to, as did the best way to remove wood from the plank. I saw the various techniques that others had used, everything from using a dremel to only using sandpaper by hand.

I stayed away from the dremel for this first plank, used a diamond file followed by 220 sandpaper.

Happy with the result on this first frame, not perfect but the others to follow should improve.
1616249760217.jpeg
 
I did not remove the char before assembly, but think I will remove it beforehand on the others.

What is the best way to remove the char? Are you guys just sanding it off? Or using files?
 
Hi Tom,
Nice to see the starting of your build-log. A warm welkom!
About your char question:
I start with a scalpen knife, because it gives me a lot of control.
Then by the last stripes of chat I take my files. A diamond-file and a ‘normal’ file.
At the and some sanding / polish.
On the standing parts where are no bevels, I scrap it with the scalpel.

Regards, Peter
 
I've used, not necessarily in this order, small needle files in various shapes, perma grit files in fine and medium, PSA sandpaper of various grits - stuck on to basswood sticks, sanding blocks of wood or aluminum, Dremel tool with a drum or disk, small diamond files, you name it. Whatever works for you. I settled in to the fine perma grit files, basswood sticks with PSA paper stuck on them and the aluminum sanding blocks for the most part, depending an the part and place I'm sanding. Be prepared for finger cramps on the hand that holds the part, or use some sort of gripping device. I'll take a picture of all the stuff later and send.
 
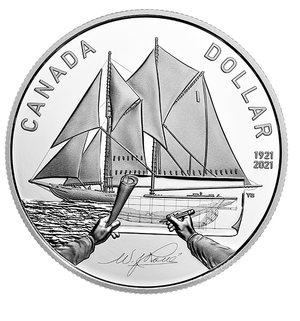
Okay everyone....something a wee bit "off-topic".....sort of. For your Bluenose model display....... The Royal Canadian Mint is introducing a new Proof Silver Dollar in commemoration of the 100th anniversary of the launch of the original Bluenose:
1616881433871.png


https://www.mint.ca/store/coins/proof-silver-dollar-–-100th-anniversary-of-embluenoseem-2021-prod3720017

Enjoy!
 
This is the first build log I have done. Since I’m a newcomer to POF kits, and since so many others have set out their techniques in such great detail already, the plan here is to post my progress accompanied by questions as they arise. I appreciate everyone’s help as I move ahead with this build, as always.


After all the helpful tips about assembling the frame pieces, I started with frame #8. Was able to assemble the frame using the template and the clamping techniques that others have described.

The angle of the bevel and amount to remove on this first plank took a bit getting used to, as did the best way to remove wood from the plank. I saw the various techniques that others had used, everything from using a dremel to only using sandpaper by hand.

I stayed away from the dremel for this first plank, used a diamond file followed by 220 sandpaper.

Happy with the result on this first frame, not perfect but the others to follow should improve.
Hallo @TV101
we wish you all the BEST and a HAPPY BIRTHDAY
Birthday-Cake
 
Okay everyone....something a wee bit "off-topic".....sort of. For your Bluenose model display....... The Royal Canadian Mint is introducing a new Proof Silver Dollar in commemoration of the 100th anniversary of the launch of the original Bluenose:
View attachment 223620


https://www.mint.ca/store/coins/proof-silver-dollar-–-100th-anniversary-of-embluenoseem-2021-prod3720017

Enjoy!
Yes, I bought mine last month from the BN II store just before they ran out there but have a new stock for sale. Rich (PT-2)
 
Belated because of China-time difference - so apologies. A hearty congratulations on your birthday Tom! May you have a beautiful year ahead that you can spend with family and loved ones. May it be a year that is laced with plenty of model shipbuilding, but above all - a year of health!
 
This is the first build log I have done. Since I’m a newcomer to POF kits, and since so many others have set out their techniques in such great detail already, the plan here is to post my progress accompanied by questions as they arise. I appreciate everyone’s help as I move ahead with this build, as always.


After all the helpful tips about assembling the frame pieces, I started with frame #8. Was able to assemble the frame using the template and the clamping techniques that others have described.

The angle of the bevel and amount to remove on this first plank took a bit getting used to, as did the best way to remove wood from the plank. I saw the various techniques that others had used, everything from using a dremel to only using sandpaper by hand.

I stayed away from the dremel for this first plank, used a diamond file followed by 220 sandpaper.

Happy with the result on this first frame, not perfect but the others to follow should improve.
Hallo @TV101
we wish you all the BEST and a HAPPY BIRTHDAY
Birthday-Cake
How is your Bluenose going? Maybe you show us some update.....
 
Back
Top