ZEEHAEN 1639, 1:37.5, Dutch fluit from Dutch Explorer Abel J. Tasman by Marcus

Joined
Mar 11, 2020
Messages
154
Points
143

The Zeehaen, a Dutch fluit used by the Dutch explorer Abel Tasman. But first some historical background information of a Fluit.

Shipbuilders, skippers and other curious people, from near and from far, travelled to Hoorn in Noord Holland to look at the new ship. A prominent merchant, Pieter Janszoon Liorne, had turned his view of the ideal merchant vessel into reality. By the end of the sixteenth century there existed a ship type called a fluit, which had some specific characteristics.

Seen from the side a fluit looks just like any old three-masted sailing ship. The mainmast and the foremast have square sails and the aftermost mizzenmast has a triangular lateen-sail occasionally supplemented with some smaller sails on the bowsprit and mizzenmast.

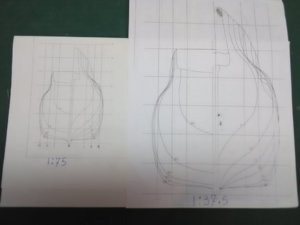
The particularities of the fluit’s hull become apparent when seen from above or from astern. From above the outline of the hull appears as a rectangle box with slightly rounded corners. Seen in cross section the sides of the hull slope inwards, so-called ‘tumble-home’, which result in very narrow upper works. The rounded lower parts of the stern are crowned by a narrow flat transom, giving it a pronounced pear-shape. It might be that this shape, which stern-on gave the impression that the after works looked something like a thinly shaped glass, a flute, is the origin of the name.

The Dutch fluit was a classic merchant ship of the 17th century. It was built to be economical in operation, carrying the largest cargo and smallest crew possible. The rigging was designed to be sailed and operated with proportionally small crews (12 to 13) , and its narrow upper deck was designed to evade Danish customs dues when passing through the sound in to the Baltic, where duties were levied according to the size of the breadth of the deck.

There are several reasons for building a hull of this shape. Keeping the center of gravity low is perhaps the most obvious. The idea that the hull shape of the fluit was adjusted to cut costs probably derives from the general reputation of the Dutch merchants at the time. Creating a ship type that kept costs to a minimum becomes just another way to confirm their superiority and skill when it came to making profit.

The fluit was a total success. From the end of the 16th century to the mid 18th century fluits were amongst the most common type of merchant vessels in Northern Europe and the Baltic Sea. In the Dutch Golden Age, 80% of the ocean going vessels were fluits and were built at an average of 400 to 500 annually. They were easy and cheap to build thanks to standardization of design as well as a technological improvements, such as the sawmill, which was invented by the Dutch.

The fluit was a ‘multi-purpose’ vessel, a ship that with slight adjustments could meet a wide range of demands. Even if the term embraces a range of ships which share some important characteristics, there are variations with important differences. The size of fluits varied considerably. The smallest versions, sometimes referred to as the boot, were 86 feet at most (around 24m), whereas the largest versions were 140 feet (just over 39 m) and larger. Variations of the basic concept did not only affect the size, but included some special features connected to the trades in which these ships were used.

Noortsvaarders or Houthaalders - Woodhauler was developed with ports in the bow and stern for loading long beams and timbers, They were of about 300-350 tons, with simple hulls and an armament of small guns.

Ostervaarders, especially designed for the shallow harbours of the Baltic Sea.

Fransvaerders, Spaensvaerders and the Straetsvaerders, so called because they were used in the trade with France, Portugal or Spain and the Mediterranean (through the straits). From the exterior, they differed from the other varieties through the beakhead

The Vereenigde Oost-Indische Compagnie, VOC, (United East India Company), employed a number of fluits.

Fluits were also used as whalers which are easy to distinguish in depictions as they have davits on the sides for lifting whaling boats.

Next, a biography about Abel Tasman
 
Abel Janszoon Tasman Biographical Note

Abel Janszoon Tasman (c. 1603-1659) was born in Lutjegast, near Groningen, in the Netherlands. Not long after his marriage in 1632, he sailed to the East Indies and in 1634 he was the mate on a vessel sailing from Batavia to Ambon. He spent two years in the Moluccas seas, before returning to the Netherlands in 1637. In the following year, accompanied by his wife, he left the Netherlands permanently and settled in Batavia.

Between 1639 and 1641 he commanded a number of expeditions to Japan, China, Formosa and Cambodia and acquired a reputation as a competent commander of long-distance expeditions.

In 1642 the Governor-General and Council of the East Indies resolved that Tasman should command a major exploring expedition to determine the extent and coastline of New Holland. He was to proceed to Mauritius and then sail eastwards at 52-54 degrees S. lat., a latitude never sailed before. He would then sail eastwards as far as the longitude of New Guinea and the Solomon Islands to establish if there were any lands at that latitude.

He was also directed to examine the northern coast of New Holland and ascertain if a passage south divided the west coast of Cape York from the coast of New Holland to the west. Sailing in the yacht "Heemskerck, burthen 120 tons, and the fluit "Zeehaen, 200 tons.

Tasman discovered the southern coast of Tasmania, which he named Anthony Van Diemens Landt, and the western coasts of New Zealand, which he named Staten Landt.

Landings at both places were very brief and the Batavian authorities later expressed concern that he had not fully examined the lands and people that he had encountered. Tasman then sailed north to Tonga and Fiji and returned to Batavia around the northern coast of New Guinea.

In 1644 Tasman commanded the Limmen, Zeemeeuw and Bracq on a second voyage to New Holland. Leaving Banda in February 1644, he sailed along the southern coast of New Guinea, but failed to discover Torres Strait. He then charted the Gulf of Carpentaria and the northern and western coasts of Australia as far as North West Cape.
The expedition covered a huge stretch of coastline, but because it sailed some distance from the coast it failed to establish that Croker, Melville and Bathurst and various other islands were in fact islands. Tasman was a member of the Council of Justice of Batavia in 1644-48. In 1648-49 he led a fleet of ships with the intention of attacking Spanish vessels in the Philippines, but the expedition had only limited success. In his last years he was a merchant in Batavia.

Next, some information on the book and plans.

(If you got this far.... Thank you for reading

Marcus
 
Title - The ships of Abel Tasman.
Author - Ab Hoving
Plans - Cor Emke

The book includes detailed information about the voyages, many pictures of the two ships as models and various paintings, detailed instructions of how the models are build whicth is the "shell-first" method, and an appendix of all the dimensions of the parts that make the models.

_87817180_FluitZeehaen1693.thumb.jpg.7960b65d77d48e7dd987bec919b8daf5_7027851665468739827.jpg

Detailed plans (21 sheets) of both ships (Zeehaen - fluit and Heemskerck - war yacht) in the scale of 1:75.

CD-Rom has all the plans in the following scale. 1:50, 1:87. 5, 1:100, and 1:150.
It also contains all the pictures in the book, tables with measurements and rigging pictures.

Marcus
 
Hallo Maarten,
I thought of doing shell-first, but I am not ready yet. I am a very unconventional builder. The present built is a combo of POB and POF with the tall area near the taffrail shell-first.
I started the Zeehaen a year ago and will post the rest of it in coming weeks. I have it on modelshipworld.
Ab Hoving has been a great help to me in this built.

Marcus
 
Hallo Marcus

This is absolutely great to see another Dutch ship being built. Thank you for the very informative introduction. Is there any reason why the Zeehaen in particular has received such prominence? With Maarten also planning to build a Fluyt, we will have three Dutch ships (that I know of) being built concurrently (even though Maarten says his fluyt is still time away!).

Looking forward to the rest of your log and progress.

Kind regards-Heinrich
 
There's great coverage of the Dutch fluit ships in Cogs, Caravels, and Galleons (Conway History of the Ship), ed. by Richard Unger, with a whole chapter dedicated to the fluit. I am very interested to watch this build as well and have been eying the Abel Tasman book. Any chance of a full review on that book?
Also, does anyone out there do a good kit of a fluit?
 
Hi Eric. Kolderstok - the same Dutch company who produced my Batavia - is in the process of developing a model of the Fluyt.

Kind regards - Heinrich
 
Hallo Marcus

This is absolutely great to see another Dutch ship being built. Thank you for the very informative introduction. Is there any reason why the Zeehaen in particular has received such prominence? With Maarten also planning to build a Fluyt, we will have three Dutch ships (that I know of) being built concurrently (even though Maarten says his fluyt is still time away!).

Looking forward to the rest of your log and progress.

Hello Heinrich,
17th century Dutch merchant ships is my main interest and it is what I built. From the Merchant book by Hoving and Emke, I built a Boyer (Inland Coastal trader) which turned out pretty good. This ship was a challenge as there were only 3 references on this ship out there

I was thinking of building a Cat as the next build to get a feel for what building a fluit would be like. Skipped that thought and went straight for the Fluit.

The Fluit is unique in that there are so many variations a d I like a challenge when I built a ship. Furthermore, I built what very few other people have built.
Ab Hoving told me that building a Fluit is a major challenge. Planking bends both lengthwise and widthwise. Other builders of Fluits on several European sites gave up after they could not get the stern and taffrail correctly.

Marcus
 
There's great coverage of the Dutch fluit ships in Cogs, Caravels, and Galleons (Conway History of the Ship), ed. by Richard Unger, with a whole chapter dedicated to the fluit. I am very interested to watch this build as well and have been eying the Abel Tasman book. Any chance of a full review on that book?
Also, does anyone out there do a good kit of a fluit?

I could probably do a review on this book, plans and cd. Thanks for the mention of the book. I will look into that.

I think it was Mantua, the had a kit of a whaler fluit.

Marcus
 
The Build
The paper plans are in the scale of 1:75. I am going to double the scale to 1:37.5 and the reason for this is that I want to built a large ship with lots of details. I have built many small Dutch vessels, so I am due for a big one.
03 Fluit, Zeehaen.jpg

I took the body plans of the Fluit and copied them at twice the size on the printer. Made 12 templates and added another 8 so that I have a total of 20.
03 Fluit, Zeehaen.jpg

There is a bulkhead every 38mm.
Took some computer Styrofoam and cut two long rectangular pieces from it. Made a slit every 38mm and slipped the templates in there designated slots, from #5 to #95.
06 Fluit, Zeehaen .jpg

Looking at all the bulkheads in a row gives me a good idea of the lines of the Fluit. These are extra steps and works for me. I did this as well with the Boyer and that ship came out great.
05 Fluit, Zeehaen .jpg

Used quarter inch ply and drew each template on the wood.
Next step will be to cut out the frames with the scroll saw.

Note: sorry about the low resolution pictures. It will get better.
Marcus
 

Attachments

  • 02 Fluit, Zeehaen.jpg
    02 Fluit, Zeehaen.jpg
    55.7 KB · Views: 13
I messed up in the last post with the pictures.

Finished rough cutting the 20 bulkheads out of 5mm thick Baltic birch.
07 Fluit, Zeehaen cut frames.jpg

08 Fluit, Zeehaen frames cut .jpg

The keel is in 2 pieces and I will use Nicolaas Witsen book (Shipbuilding in the Dutch golden age) , the one Ab Hoving translated, to create this.
Been looking through that same book and will use many of the examples in creating the various items for the fluit. This is a great way for me to learn how Dutch ships were built in the 17th century.


On a different note. I belong to the local woodworkers club and I get all my wood for ship building from the woodworkers. Their cut-offs are the pieces I cut to size for my ships. Besides building ships I do a lot on the Scrollsawing, such as puzzles, puzzle boxes and plain boxes. I donate most of the items to the club and they sell that at craft fairs.


Put all the bulkheads in a wooden clamp with computer foam in between them. This setup will give me an idea of the forms of the fluit.
09 Fluit, Zeehaen bulkheads side.jpg
Side view

10 Fluit, Zeehaen bulkheads stern.jpg
Stern view

11 Fluit, Zeehaen bulkheads bow.jpg
Bow view

The foam will be replaced with balsa. All the balsa will be 34mm long between each bulkhead and that is what is next.

Creating the taffrail and where the tiller goes into the ship is going to be a difficult exercise.
When I build a ship the most difficult area is the bluff bow (yacht Mary and the Utrecht and the Boyer from the17th century Dutch merchant ships book).

Belt sanded balsa blocks which are all 34mm wide and fit in between the bulkheads.

12 Fluit, Zeehaen balsa sanding.jpg
I inherited this monstrosity from a cabinet maker. If I don't watch what I am doing, the wood disappears in no time.

Balsa spacers in between the bulkheads.
13 Fluit, Zeehaen balsa spacers .jpg

14 Fluit, Zeehaen mid line .jpg

Marcus
 
Glued the balsa spacers in between the bulkheads. Started with glueing 2 bulkheads and 2 balsa spacers.
15 Fluit, Zeehaen glue bkhds.jpg

Once the glue was dry, glued the two's together and ended up with 4 large pieces. Glued again the pieces together which resulted I 2 large pieces.
16 Fluit, Zeehaen bulkheads glu.jpg
17 Fluit, Zeehaen bulkheads glu.jpg

All bulkheads and spacers have been glued together. All bulkheads have been reinforced with extra wood.
18 Fluit, Zeehaen strengthen bulkheads .jpg

Paper template of each bulkhead so I can figure out how to place the decks. I will make a notch on the inside of the bulkheads.
19 Fluit, Zeehaen align paper copy.jpg

Did some preliminary sanding especially the Stern and the bow. I want to get a visual of the curvature of both and with some sanding I can get that. Sorry, not focued
Stern and bow.
20 Fluit, Zeehaen prelim. sanding.jpg

Next I made templates of scrap wood for the bow. One piece for the X axis and one piece for the Y axis. The empty spaces will be filled with balsa.
21 Fluit, Zeehaen bow curve .jpg

Did the same for the Stern but only for the Y axis and will be filled with balsa and sanded to get the curve
22 Fluit, Zeehaen stern curve.jpg

Next took the individual paper templates, one for each bulkhead, lined them up, clamped them to each bulkhead. Now I can mark where all the decks go.
23 Fluit, Zeehaen temp to mark decks.jpg

Marked both sides of the bulkheads where the different decks go.
24 Fluit, Zeehaen deck markings.jpg

Deck templates are made from maple and cherry veneer.
25 Fluit, Zeehaen deck templates .jpg

Slowly shaping the stern and will do the same for the bow.
26 Fluit, Zeehaen shaping strrn.jpg

Marcus
 
Glued balsa wood in between the bulkheads and started to shape the outside of the hull with very coarse sandpaper.
32 Fluit, Zeehaen built up side.jpg

33 Fluit, Zeehaen sanding hull.jpg


Sanded the outside of the hull which is now 90% complete.
The stern will probably be the most difficult part. In the last month I have been looking at pictures of Fluits. In books and the Net. Staring at the curvature of the stern. I need to be able to visualize it in my head.

Temporarily attached the stem, keel and stern to the ship. I need a decent fit before I permanently glue the pieces in place.
34 Fluit, Zeehaen stem temporary.jpg

35 Fluit, Zeehaen keel temp.jpg

36 Fluit, Zeehaen stern temp.jpg


Completed the sanding of the hull to its required shape and glued in the stem post, keel and stern piece.
39 Fluit, Zeehaen stem glued.jpg

38 Fluit, Zeehaen stern piece glued.jpg

From the above pictures on can see the extreme curves of both the stern and the bow. Should be a fun project planking them.

Rough cut the top of the railings.
40 Fluit, Zeehaen rough cut.jpg

The next step is to figure out where the wales are going to be. This is very important. Once wales are installed the rest of the planking is easy.
Marcus
 

Attachments

  • 40 Fluit, Zeehaen rough cut.jpg
    40 Fluit, Zeehaen rough cut.jpg
    166.7 KB · Views: 8
WONDERFUL HISTORY LESSON, I TO HAVE AN INTEREST IN DUTCH SHIPS, ONE OF FANTASY BUILDS IS TO DO 4 types OF X SECTIONS (DUTCH, ENGLISH< FRENCH AND AMERICAN, SHOWING THE DIFFERENCES OF EACH, JUST A FANTASY RIGHT NOW, TO MANY IRONS IN THE FIRE, WHERE CAN I GET THE HOVING BOOK ON ABEL TASMAN. THANKS Don
 
Guesstimated where the lower wale will be installed and marked it with narrow tape. The 3 lower wales are 6mm wide and 6mm apart from each other. The 2 upper wales are 10mm apart from each other.
Lower wales green, pink and blue tape. Upper wales purple and brown tape.
041 Fluit, Zeehaen tape guide for wales.jpg042 Fluit, Zeehaen tape Temps for wales.jpg

Next exercise is to completely soak several pieces of walnut and bend them according to the flow of the tape and use as many pins needed until the wood is dry. Once the wood is dry, remove tape and glue the wale in place.

Wale installation.
So that the wale would follow the curve of the Fluit, I created 1cm long blocks with a hole in it. The hole is for a push pin.
043 Fluit, Zeehaen setup for wale.jpg

I line up a block to where the bottom edge of the walnut plank is to be. All blocks are push pinned Into a bulkhead.
044 Fluit, Zeehaen pin setup for wale.jpg

Then I get 2 pieces of 2mm thick by 6mm wide by 50cm long walnut planks (soaked for several days in water) and slowly bend and push against the block each of the plank along the curve of the Fluit. The planks overlap and somewhere I lay them on top of each other and cut several notches so they will lay tightly together.
045 Fluit, Zeehaen wale install at stern.jpg046 Fluit, Zeehaen install wale at bow.jpg

Installing wales is the most challenging part of building the Fluit. Once that is done, the rest of the planking will be easy to install.
Marcus
 
Back
Top