ZEEKOE a Dutch 74ft Katt in Scratch 1/66

Joined
Sep 17, 2018
Messages
569
Points
308

Location
Berlin/Germany
Hello Friends,

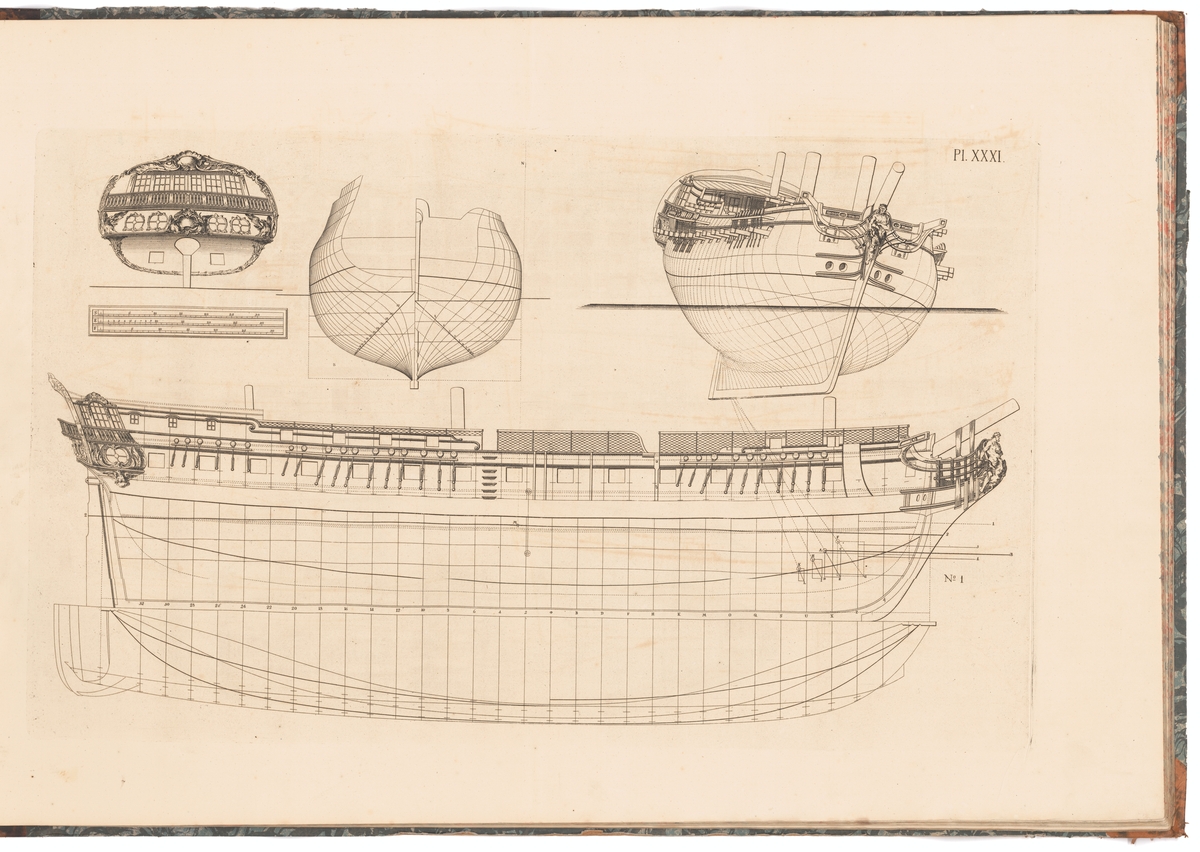
based on the ideas of a Katt ship groupbuild I so start my Trial&Error threat in here with a 1/66 copy of the af Chapman plan set of a smaller (74 brit.ft) Katt from the ANM


plate XX drawing N°28 we do have a not two complex project
IMG_20211008_083056.jpg
So I did choose a less komplex model with it`s two masts - and a scale by the Dutch 1/66 (as one Dutch foot has had eleven inches) closest to my stanard scale of 1/64 and the hull has a flush deck with a tiller and windlass - so there is not too much and complex deck furniture. The dimensions of the windlass (I will copy from the other Katts in the plates XX-XXVII and useing the small pointed lines for the construction of a staircase´s superstructure. ZEEKOE will get a proper binnacle and I do think about copying from the Ancre monography of a contemporary ship a nice bank next to the main mast.

I looked arround for a proper name fitting to the project´s nature and did remember her:

Seekuh-auf-Hochzeitsreise-Die-beiden-Se.jpg
As a ZEEKOE is in english seacow we have a very patient and calm patron in our side looking in my downfalls and retrials with consideration the are alos the baroque source for the mermaids stories - Rubens would have painted them and as a bathtube wasn `t en voge grey was a well known colour of the skin... ;-) So her calm "temprament" is all we do need for this project and due to this I was adviced to start with a smaller project with no big obstacels in it I do rush in and do get wrecked... as so often before,

IMG_20211008_091607.jpg

The lines are typical for a Katt but without the typical "dog-ear" in the upper frames - so I am able search arround for some distinguish carvings or paintings. And over the five row of windows - so this will give a special part of this threat to the design and my thoughts on the carvings and applications possibly incorporated in such a small and humble layout.
Edit: Sadly I picked out the wrong lines these here we're for the other Katt.

My thoughts on the scale are the following as 1/66 means a foot is 4,61818 mm long - so we do get a Stem to Stern length of 341,52mm for the hole hull - so it is not the biggest ship at all. my idea is to build her as a very easy humble collier between the English coal habours and the Dutch citys. So there is no reason for much decoration but typical to the baroque timeframe it is a bit of decor - mainly painted. to imitate some humble kind of carvings on the transom.


IMG_20211008_083129.jpg
Brigg rigg (N°4) and as Katt's masts are straight webare able to set only two elevations of yards. So everything will stay quite simple and straightforeward.
 
Last edited:
Back from the copyshop I am. So I sized the drawing up to

IMG_20211008_194025.jpg
1/66 by the use of 139% got my bulkheads ready by mirrowing, cutting and glueing all together.

Polish_20211008_193716505.jpg

So I also enlarged the transom up to 200% to get a resionable "sandbox" due to some aestetical additives... :)

What I figured out we're two aspects in this closer quater deck view:
Polish_20211008_195447300.jpg
I. There are three steps in the Deck I have to deal with - thinkinking I so remember some Details in The Chapelle book "The American Fishing Schooners" - a carved bar...

II. There must have been a ladder to enter the deck from a boat - but what is the right construction for a late XVIIIth century Dutch collier?
 
Last edited:
Okay when you take a closer look to the deck's run there are more than three steps - let's got from stem to stern


IMG_20211008_234431.jpg
At the windlass the deck's end is at it's stem side's end.

IMG_20211008_234325.jpg
The very next stair is the biggest one more than 1 1/4 of the shown deck is rised.

IMG_20211008_234331.jpg
Directly after there is the stair at the cabin's bulkhead.

IMG_20211008_234335.jpg
On the start of the staircase (haven't got the right vocabular) there the deck does rise again.

IMG_20211008_234343.jpg
Here the tiller and a suddenly very strong stanchion I do think is to hold some block for the rigg of the tiller. Or a bar to avoid any rising of the rudder out of it hinges? (It is resionable that it is straight as the area of turning doesn't rise due to the fixed position of the hinges.)

IMG_20211008_234409.jpg
Here the questionable stairs to the deck - any rope-ladder may be enough?
 
Last edited:
On the stem of XX N°28 there is
IMG_20211009_134335.jpg
this detail to be found WE can figure out a Front viel of a similar arrangement on the Snow-Katt (Plate XIX N°27)'s bow:
IMG_20211009_134407.jpg

So it is not too complex to copy this Item to the Brigg-Katt I so show.
 
Ideas for a building of the hull

First ideas after an illness-weekend in bed when you cannot think a single thing due to a headd(r)ake.


IMG_20211011_071110.jpg
I dealt with my doodling Sheet for half an hour figuring out what is necessary at the bulkheads...
IMG_20211011_071142.jpg
...then I went to the waterlines (WL) getting them distingushed from the constructions lines (some 45° in the lines plan).


IMG_20211011_071149.jpg
My recent idea is to make all the pices singulary - so starboard bulkhead minus half the centerboard strength and portside bulkhead minus half the centerboard strength, too. All got rectangular by the filling of the space between the WaterLines I, II and III with spacers formed from the top view by reducing the length and depth to the centerboard and bulkhead. By this I may get a quite heavy but handsome hull block on what adding a stem, keel and stern isn't such a flimpsy action to do. Also the drilling for the stand's stanchions isn't that complex.
 
Thanks a lot, Adi, the model will be a Bit Special die to some features making IT Standing apart from the common rest.

So there will be a "braitorturing to think about" ;-) in particular about the last formers aft. As they are of great intrest for the shape and do cause some trouble

Polish_20211011_141157083.jpg
in particular due to the three extreme dog-legs or edges in the lines plan as the define sa very special curvature in the hull's side - a bit like a bread (dt. Blechsicke) - making the after part quite complex...


Also it does look as it is not too easy to get a reasonable planking in there - even I will have a very close looking of the run of the wales in this very region of the hull.

Polish_20211011_142847629.jpg
These shot die of dashes in the sideview's lines may my give the top of the dog-legs to us?

Perchace a copy of the linesplans onto a pice of frostpapier may be very helpfull...
 
Last edited:
Transom's doodling design...
Polish_20211011_192059175.jpg

...a bit of handrail, flag Mast,
So on my way Back Home I so spent one hour in Tube. So I do have some time for model building ;-)

Polish_20211011_191523925.jpg
here shoe's application and a first seacow doodling. Annoying me and forcing me into old print's research about pictures of baroque seacows...
So let's have some fun collecting gaphics of animals and fairytale figures side by side...

There are dugongs With a dolfin like tail and round ended tails sea cows (what knowledge you do archive by modelbuilding) that are to be distinguished from each other.
Polish_20211012_042951573.jpg

090519003ea2f2cc5278c3d3a11870b3--water-animals-baby-prints.jpgb333598cb5834748ad8ec70f02b5a1f3.jpg9f888b78245b43829d32d75db49af7d5.jpg

Here my best finding:
Polish_20211011_193559336.jpg

Also a link how to draw her:

But I am unshure how to bent her in a way she does look interesting, artical drawn as baroque figure and looking close to her prototype.
 
Last edited:
The next part is draw the deck's layers into the lines drawings. So I do need to copy the side view's hights of the distance decks - keel's top by a pair of compasses.

Sounds easy in the first but doesn't seem to be too easy

Polish_20211012_062758672.jpg
onto this greyish shaded copies - as with the transom's handrail - so let's try it out!
 
Good morning looking arround for decor for the transom...
IMG_20211013_072630.jpgIMG_20211012_063641.jpgIMG_20211007_061849.jpgIMG_20211007_061809.jpg
Here some ideas I collected but I am Not really satisfyed...

Polish_20211013_084920132.jpg
I found the perfect colouring in EXPERIMENT 1774 a 50-gun ship.
Any helpful ideas are warmly welcome.
 
Last edited:
Some doodling scetches for keeping my ideas for ZEEKOE in mind and on the paper.

I want to make best use of the given lines by af Chapman:

FB_IMG_1634624225735.jpg

And so I think about laying recangular support surface piced "WL-Line" onto the centerboard and the bulkheads.
FB_IMG_1634624215938.jpg
So I hope to get a rectangular skeleton. Cutting out the thickness reduced pices between the bulkheads called "WL-Layers" from the WL-plan will give them a support in these Square-Liners die to this the hole construction is rectangular and stiff - hopefully.
FB_IMG_1634624219380.jpg
My second change is my trial to get rid of the risk of getting a "hungry horse"-effect Ab Hoving told about when the paper in hanging inside between the bulkheads. This is thought to be done by packing the space between the WL-Layer with cut-off of corrugated cardboard so a layer of diagonal paper stripes can be added, plastered and sanded.I think about painting the paper layer to avoid moistrage sneaking from the putty into the inner hull doing it's damage over the time.

What do the more expirienced builders-do think about this idea?

So let's getting started into unknown terrain.
 
This weekend I did gardening work (being annoyed by this leaf streaming tree in the morning!) and got rested a bit by staying calm with a book. So you can imagine the Work in the Yard was little - my only progress was to cut out the three waterlines.
IMG_20211024_092643.jpg

And they there only rough cut with a pair of scissors this because I decided to glue the three Waterline Layers onto 2mm cardboard for better results in measurement. I thought about it deeply and want to scratch the lines with a scalpell directly through/in the drawing for higher exactness and the drawing will become a basic line for further cutting of notches to start from.
 
Last edited:
ZEEKOE is making more a Kind of a silent progress but the idea of the three waterlinelayers does work so far. Here some of the pictures specially made this morning for SoS.

IMG_20211026_064905.jpg
As all the cut out layers do fit into the stand's underside I decided to give them a place to rest over theory "A Day's Wait" (greatest Hemmingway shortstory b.t.w.) in there.

I named the WL-Layers after Greek Letters so they are able to become a combination of Greek letter plus stem- or sternside bulkhead's Latin letter and the starboard or port side so the full abriviation would be for example: "Alpha/M/STB" meaning the stem side layer before bulkhead M in the waterline or layer Alpha on the starboard side. (As I do think about a hull and a second rigged model l do really hope this slightly baroque luxurious naming will be a very coinage of my brain later on.)

IMG_20211026_065028.jpg
Gamma, the lowest layer will get the side stanchions (upsidedown L-shaped) to avoid any listing of the hull.

IMG_20211026_065059.jpg
Beta - the mid layer thought to be the end of the Drill holes for the masts' and the stand's pair of stanchions.
IMG_20211026_065123.jpg
Alpha the waterline does fit nicely.

IMG_20211026_065214.jpg
The all do fit to the main former's linesplan - and I did photograph it on the stand's wood due to the grey shades in the copies playing with the wood's honey coloured grain (what doesn't become obvious in the recent pictures).

IMG_20211026_065253.jpg
Also I found in a small iceboat -I projected earlier- in the Chapman's ANM with some contemporary decoration to be slightly bent to be added to the transom's top.
 
Last edited:
Die to my tests with the copies done onto transperent paper I figured out the short dashes above the wales do not fit to the dogleg in the frames -

IMG_20211011_071132.jpg
But what they are for? Are they for the very outstanding line - being bent to fit the deck's run? (Here the old notation of the WL-layers with Roman numbers.)

Edit: This night I purchased some ten sheets of 2mm/0,078" DIN A3 bookbinding (card) board.
 
Last edited:
While waiting my 2mm cardboard

IMG_20211028_195748.jpg
I did some doodlings planing the packing the filling of ZEEKOE between the WL-layers (DARK) from my movingboxes.

IMG_20211028_195807.jpg
I still do think about avoiding the geathering of moistring in there when the plaster is applied on the surface before sanding and planking.
Is it helpful to add in there some salt or rice?
 
What does this row of dashes Tell US?

20211030_085619.JPG
The are resulting into a bent line raising from the edge of the horse shoe transom down close to waterline rising (at the very end sharply) to the top of the hull at stem tell us?

And can I simply/stupidly copy them one to one into the lines plan? Using a pair of compasses making dashes in the right hight over the WaterLine rectangular to the CenterLine?
 
Last edited:
Hello Chris,

You picked a nice simple project to give paper a try. I like your extensive considerations, they are part of the fun. But I'm an impatient man myself and in your place by now (a month after you started this thread) I think I would have finished the model :).
A few remarks that may be of some use for you:

You are worrying about the influence of moisture on the card and paper. Don't worry. As long as you keep your models out of the shower no harm is to be expected.

You ordered 2 mm card. That is beautiful material, but you will probably get into some trouble in cutting. In your place I would have chosen 1 mm card for easy cutting and double that where necessary. Keep in mind that the cut has to be correct right from the start, because sanding or making changes will always leave traces. No harm done though, you can always discard the part if you don't like it. And every new phase of the build gives you enough opportunities to hide the mistakes you made in the previous.

The best thing to do is use a very sharp blade. Those break-off knives are ideal, because you have a nice clean cut in a second by removing the old tip. Don't press the knife too much, follow the lines and cut several times rather than force your way through it.

You ask about the dashes in Chapman's drawing. I don't know what they stand for, but I suspect it has something to do with his way of constructing the plan. Perhaps they indicate the widest part of the frame? Anyway, don't bother, for your build they are of no visible use.

Keep me posted, I like your project.
Good luck,
Ab
 
Back
Top