
agree you can get a set of dental picks on ebay aus for $5-$20 but the offer is highly appreciated

-

SUBSCRIBE TO SHIPS IN SCALE TODAY!
The beloved Ships in Scale Magazine is back and charting a new course for 2026!
Discover new skills, new techniques, and new inspirations in every issue.
NOTE THAT OUR NEXT ISSUE WILL BE MARCH/APRIL 2026 -

Win a Free Custom Engraved Brass Coin!!!
As a way to introduce our brass coins to the community, we will raffle off a free coin during the month of August. Follow link ABOVE for instructions for entering.
- Home
- Forums
- Ships of Scale Group Builds and Projects
- HMS Alert 1777 1:48 PoF Group Build
- HMS Alert 1777 1:48 Group Build Logs
You are using an out of date browser. It may not display this or other websites correctly.
You should upgrade or use an alternative browser.
You should upgrade or use an alternative browser.

Hi Jim, do you expect it can be blown out with compressed air? Saves me a lot of time scraping all these sheets of timber.So...folks, I was looking into my kit box to make an inventory and came across that each CNC board required cleaning from CNC dust. I recall, Uwe already mentioned this in his post. I took one board and decided to clean using a simple tool made on-the-fly. Here is how the board looks without cleaning.
View attachment 172979
and macro images, just to have an idea of t to deal with.
View attachment 172980
View attachment 172981
View attachment 172982
A simple tool I made works just fine.
However, It took me almost 40 minutes to clean one board. With this speed, it will take forever to clean them all. So I thought, it should be a better way, to clean the debris. I took my favorite brass brush and ....miracle! It does a really good job get out sawdust. Brass wires don't scratch the wood but have enough power to remove the wood chips. Take a look at those tools.
The brass brush doesn't clean 100%, but it does remove close enough. Whatever left, I use my tool to finish it all. Here is how it does look when clean.
View attachment 172990
View attachment 172991
View attachment 172992
I love this macro, it gives you an idea of a very uniform timber. The color of the timber is almost like Pear.
* One word of caution, do. When using the 'tool' (not the brush) apply very light pressure when removing debris, excessive force may destroy the nicely made edges. If you plunge the tool too deep, it will be hard to 'scoop' sawdust out, take less amount per scoop, specifically at the curve and slot areas.
...and now, I will clean all the boards, so they will be ready later.
to be continued... thanks for your interest.

The answer could be yes and no! Honestly, I didn't have a compressed air to try. But my vacuum cleaner is useless. Here is what i found: some boards is relatively easy to clean by running brass bristle back and forth. Most of sawdust will be gone, and you would need only to clean some spots. Some boards require only manual removal using the tool I made or dentists tool Trident mentioned in his post.Hi Jim, do you expect it can be blown out with compressed air? Saves me a lot of time scraping all these sheets of timber.
P.S. with compressed air the dust will be everywhere, but... I save this cncdust for later use....you never know when you might need it
")

Hey Guys,
Glad you are getting your kits and no problem with you starting. Why torture yourself. More info for me when I get mine. Soon I hope.
Glad you are getting your kits and no problem with you starting. Why torture yourself. More info for me when I get mine. Soon I hope.
Many thanks to all who are interested in this build log, for your comments and 'likes'
All the CNC boards are cleaned from sawdust, and we are moving to the actual kit assembly. Well... not quite the ship herself, but... The building JIG, or Berth how Trident Model called in the manual.
The instruction suggested starting with keel assemble but I made a decision and started with the jig first. The entire berth construction was made from the MDF board, residents on 4 boards, all laser cut. Please note: you will need to mark the parts before removing them from the boards. This can be easily done using the end pages of the instruction manual.
The entire assembly is not difficult. Pictures in the manual are self-explanatory and great help. Just follow each figure and don't skip to the next step until you complete the previous. However, I'd like to point out how carefully you have look at the instruction manual pictures. Below, is the image from page 9 (instruction manual 3.2). At first glance, nothing unusual, but if you pay close attention, parts CL48, CL12, CL13, CL14, and CL4 has to be glued (Fix with glue). However, parts CL15 - not! This is very important, as it will save you the hassle later in the build, parts explicitly CL15. At the later stages in the build, it plays an important role when you have to release the hull from the berth.

Do not glue parts CL15

Here are some photos of different assembly steps


Most parts were glued together. Pay close attention to figures where it said 'Fix with Glue'. However, some parts are just assembled. Interesting locking mechanism introduced in this kit (see below)

The parts where actual frames will rest are not glued!


A few gotchas I wan to mention. When assembling 4 main columns: Parts CL28 and CL29 (page 9, fig.3.5) play close attention and make sure the part CL29 always facing the long side of the baseboard M10, while CL28 always facing the short. It does show this but on the next page (p.10)

Below photo will explain the assembly on page 11 (fig. 3.9) Parts CL16 and CL17 (left and right sides)


To be continued, until then Thank you for the interest!
All the CNC boards are cleaned from sawdust, and we are moving to the actual kit assembly. Well... not quite the ship herself, but... The building JIG, or Berth how Trident Model called in the manual.
The instruction suggested starting with keel assemble but I made a decision and started with the jig first. The entire berth construction was made from the MDF board, residents on 4 boards, all laser cut. Please note: you will need to mark the parts before removing them from the boards. This can be easily done using the end pages of the instruction manual.
The entire assembly is not difficult. Pictures in the manual are self-explanatory and great help. Just follow each figure and don't skip to the next step until you complete the previous. However, I'd like to point out how carefully you have look at the instruction manual pictures. Below, is the image from page 9 (instruction manual 3.2). At first glance, nothing unusual, but if you pay close attention, parts CL48, CL12, CL13, CL14, and CL4 has to be glued (Fix with glue). However, parts CL15 - not! This is very important, as it will save you the hassle later in the build, parts explicitly CL15. At the later stages in the build, it plays an important role when you have to release the hull from the berth.
Do not glue parts CL15
Here are some photos of different assembly steps
Most parts were glued together. Pay close attention to figures where it said 'Fix with Glue'. However, some parts are just assembled. Interesting locking mechanism introduced in this kit (see below)
The parts where actual frames will rest are not glued!
A few gotchas I wan to mention. When assembling 4 main columns: Parts CL28 and CL29 (page 9, fig.3.5) play close attention and make sure the part CL29 always facing the long side of the baseboard M10, while CL28 always facing the short. It does show this but on the next page (p.10)
Below photo will explain the assembly on page 11 (fig. 3.9) Parts CL16 and CL17 (left and right sides)
To be continued, until then Thank you for the interest!
Attachments

Many thanks Jim  It is much appreciated from my side when experienced builders like you, Uwe and others makes such comprehensive building logs. I guess some of it might be trivial to other masters and veterans but to me it is of high value. Should prevent a rookie like me from making too many mistakes. At least that is my hope.
It is much appreciated from my side when experienced builders like you, Uwe and others makes such comprehensive building logs. I guess some of it might be trivial to other masters and veterans but to me it is of high value. Should prevent a rookie like me from making too many mistakes. At least that is my hope.Looks like a Da Vinci machine, impressive.
Thanks Poul,I guess some of it might be trivial to other masters and veterans but to me it is of high value. Should prevent a rookie like me from making too many mistakes. At least that is my hope.
This is the intent of the group build, where each of us share the construction process and learn from each other. If members will found those logs helpful - then mission accomplished.
")
...and the smell of a burning MDF ( from laser cut) across the roomLooks like a Da Vinci machine, impressive.
I know you have been waiting a long time for this Jim, can’t wait to see your build. It’s going to be awesome.
Yep, Mike!!! It should be lots of fun! Thanks for joining!!I know you have been waiting a long time for this Jim, can’t wait to see your build. It’s going to be awesome.
- Joined
- Dec 31, 2017
- Messages
- 300
- Points
- 228

While the jig has sections that don’t need to be glued so that they can easily be taken apart, I don’t see any reason not to use glue to strengthen structures where necessary. The jig can be cut apart when the ship is ready to be removed since it’s made from soft material that you can cut apart without too much trouble. Clever design, though.Many thanks to all who are interested in this build log, for your comments and 'likes'
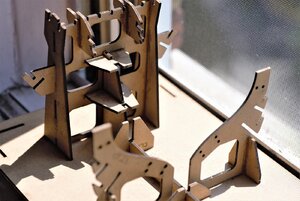
All the CNC boards are cleaned from sawdust, and we are moving to the actual kit assembly. Well... not quite the ship herself, but... The building JIG, or Berth how Trident Model called in the manual.
The instruction suggested starting with keel assemble but I made a decision and started with the jig first. The entire berth construction was made from the MDF board, residents on 4 boards, all laser cut. Please note: you will need to mark the parts before removing from the boards. This can be easily done using the end pages of the instruction manual.
The entire assembly is not difficult. Pictures in the manual are a self-explanatory and great help. Just follow each figure and don't skip to the next step until complete the previous. Here are some photos of different assembly steps.
View attachment 173975
View attachment 173976
View attachment 173977
View attachment 173978
View attachment 173979
Most parts were glued together. Pay close attention to figures where it said 'Fix with Glue'. However, some parts are just assembled. Interesting locking mechanism introduced in this kit (see below)
View attachment 173980
The parts where actual frames will rest are not glued!
View attachment 173982
View attachment 173983
A few gotchas I wan to mention. When assembling 4 main columns: Parts CL28 and CL29 (page 9, fig.3.5) play close attention and make sure the part CL29 always facing the long side of the baseboard M10, while CL28 always facing the short. It does show this but on the next page (p.10)
View attachment 173984
Below photo will explain the assembly on page 11 (fig. 3.9) Parts CL16 and CL17 (left and right sides)
View attachment 173986
View attachment 173987
To be continued, until then Thank you for the interest!
Kurt Konrath
Kurt Konrath
I am sure it says somewhere why not to glue, why tempt Fate and follow instructions.
Of course we do need someone to deviate and come back and say it was wrong! Hope it’s not you!
That was my area of expertise for a while, being the messed up kit as I jumped ahead thinking as a rookie I knew better than the master builders who write instructions!
Of course we do need someone to deviate and come back and say it was wrong! Hope it’s not you!
That was my area of expertise for a while, being the messed up kit as I jumped ahead thinking as a rookie I knew better than the master builders who write instructions!
It's has to be a reason for it, thought. I didn't go that far to check, but...I always trying to think a couple steps ahead, it helps visualize the process.While the jig has sections that don’t need to be glued so that they can easily be taken apart, I don’t see any reason not to use glue to strengthen structures where necessary. The jig can be cut apart when the ship is ready to be removed since it’s made from soft material that you can cut apart without too much trouble. Clever design, though.
- Joined
- Apr 1, 2019
- Messages
- 484
- Points
- 373
Our next kit will try to make partial frame with plywood, which has reduced the overall weight of kit. Try to reduce the transportation cost. The next kit is in the process of technical verification. Due to many unique designs, it will be announced in the fashion when the design is mature. Thank you very much
Hello Trident Model, while the plywood reduced overall kit weight, it does subject to temperature influences. Keel assembly template came deformed...It is not a problem at all, just so you know.Our next kit will try to make partial frame with plywood, which has reduced the overall weight of kit. Try to reduce the transportation cost. The next kit is in the process of technical verification. Due to many unique designs, it will be announced in the fashion when the design is mature. Thank you very much
Greetings folks!! Hope all is well, and we will finish building the jig, The major work was already completed and photos of the process you've seen in the previous post.
Before I will post the final photos, I want to review and make my comments.
- Have a good sharp knife. I use the Olfa brand, with snap-off blades. This knife is really handy when you will cut small tabs holding the parts in the MDF boards. Some of the parts, the laser didn't cut thru. Cutting with a knife is a big challenge, I use my jewelers saw to cut out.
- One of my recommendations is to sand the end of the tabs before inserting them in the holes. This will give a good starting point. Before putting the glue - try a 'dry fit' first.
- I use Elmers's Wood glue max, I love this wood for MDF boards it is designed for incide\ouside use, which means it will adhere to climate influences. Any wood glue will do the job, just don't use CA
- Read the instruction, and don't skip the pages. Look a few steps ahead so you know what's next.


View from the top, without frames holder

View from the side

and top

Front view


Well...folks, this was fun and relatively quick. It is sturdy enough and ready to accept the keel! Did I say keel? We will build the keel next. Thank you for your interest and valuable comments. To be continued
Before I will post the final photos, I want to review and make my comments.
- Have a good sharp knife. I use the Olfa brand, with snap-off blades. This knife is really handy when you will cut small tabs holding the parts in the MDF boards. Some of the parts, the laser didn't cut thru. Cutting with a knife is a big challenge, I use my jewelers saw to cut out.
- One of my recommendations is to sand the end of the tabs before inserting them in the holes. This will give a good starting point. Before putting the glue - try a 'dry fit' first.
- I use Elmers's Wood glue max, I love this wood for MDF boards it is designed for incide\ouside use, which means it will adhere to climate influences. Any wood glue will do the job, just don't use CA
- Read the instruction, and don't skip the pages. Look a few steps ahead so you know what's next.
View from the top, without frames holder
View from the side
and top
Front view
Well...folks, this was fun and relatively quick. It is sturdy enough and ready to accept the keel! Did I say keel? We will build the keel next. Thank you for your interest and valuable comments. To be continued
These images look like a Dino skeleton in a coffin Lol
Last edited:
