Nice work Jim, looking forward to mine.
-

Win a Free Custom Engraved Brass Coin!!!
As a way to introduce our brass coins to the community, we will raffle off a free coin during the month of August. Follow link ABOVE for instructions for entering.
-

PRE-ORDER SHIPS IN SCALE TODAY!
The beloved Ships in Scale Magazine is back and charting a new course for 2026!
Discover new skills, new techniques, and new inspirations in every issue.
NOTE THAT OUR FIRST ISSUE WILL BE JAN/FEB 2026
- Home
- Forums
- Ships of Scale Group Builds and Projects
- HMS Alert 1777 1:48 PoF Group Build
- HMS Alert 1777 1:48 Group Build Logs
You are using an out of date browser. It may not display this or other websites correctly.
You should upgrade or use an alternative browser.
You should upgrade or use an alternative browser.
Gentlemen and Ladies (of cause) Thank you for the interests, your valuable comments, and likes! 
The longitudinal structure along the centerline at the bottom of a vessel's hull, on which the rest of the hull is built, in some vessels, extended downward as a blade or ridge to increase stability. Does anyone guess what this all about???
I am sure you give the correct answer, it is the Keel.
Part 2: Assemble the keel, false keel and all the components associated with it.
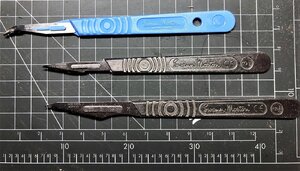
We will need scalpel and sharp blades #11. Also, I used one of the disposable scalpels (I found in my stash) with a curved blade. I did found it very useful when releasing the 'rising wood' part from the timber board.
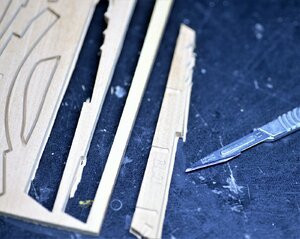
- When releasing parts from the timber board always cut along the outer edge of the board. Special care should be taken when releasing the 'Rising wood or hog' part (multiple notches), avoiding accidental 'nocking' the edges.
- Always move the scalpel away from yourself. The parts holder is reasonably thin and doesn't require too much force.
- Once the parts released, press firmly and hold it against the flat hardwood (don't use rubber mat) and cut along the edges until the parts are clean. Personally, I suggest testing on the straight parts (without the notches) to get an idea. Once you get the 'Aha' moment it will be easy for the rest.
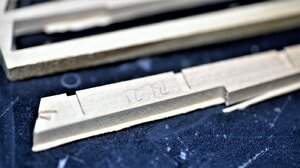
Alright, enough words. let's move on. Page 4 instruction manual. Part BL16, BL17, and BL18. All together those parts will form a 'Deadwood'. They need to be lightly sanded, without destroying the edges.
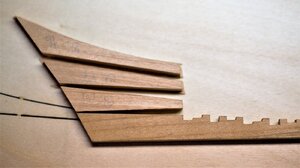
Again, I have to complement Trident Model: we have a template CL52 (on M12 board. The test kit for Uwe review comes with the MDF board template. My kit came with a plywood board. This template will help archive the correct positioning\gluing all of the Keel elements.
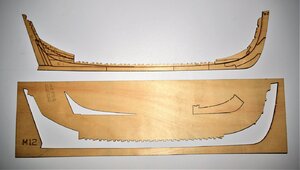
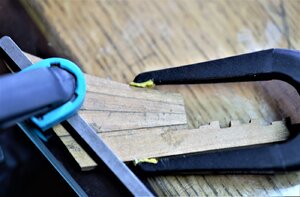
When all three pieces cleaned, test a 'dry fit': position into the template, it should be a precise fit. If needed lightly sand and test fit again. One more element requires for this assembly - rising wood (part BL11). All the notches have to be cleaned so they fit in the notches on the template. After you are completely satisfied with the fit, proceed to glue all parts (in the template). Once the glue set, carefully remove from the template and using various clamps position on the absolutely flat surface, for example, glass. Leave it until the glue completely dry.
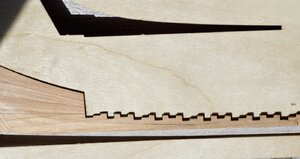
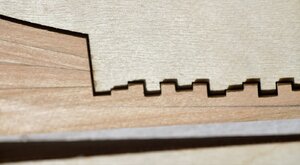
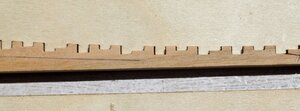
Once the glue set, remove from the template and using clamps position on an absolutely flat surface until it is completely dry.
To be continued...
The longitudinal structure along the centerline at the bottom of a vessel's hull, on which the rest of the hull is built, in some vessels, extended downward as a blade or ridge to increase stability. Does anyone guess what this all about???
I am sure you give the correct answer, it is the Keel.
Part 2: Assemble the keel, false keel and all the components associated with it.
We will need scalpel and sharp blades #11. Also, I used one of the disposable scalpels (I found in my stash) with a curved blade. I did found it very useful when releasing the 'rising wood' part from the timber board.

- When releasing parts from the timber board always cut along the outer edge of the board. Special care should be taken when releasing the 'Rising wood or hog' part (multiple notches), avoiding accidental 'nocking' the edges.
- Always move the scalpel away from yourself. The parts holder is reasonably thin and doesn't require too much force.
- Once the parts released, press firmly and hold it against the flat hardwood (don't use rubber mat) and cut along the edges until the parts are clean. Personally, I suggest testing on the straight parts (without the notches) to get an idea. Once you get the 'Aha' moment it will be easy for the rest.


Alright, enough words. let's move on. Page 4 instruction manual. Part BL16, BL17, and BL18. All together those parts will form a 'Deadwood'. They need to be lightly sanded, without destroying the edges.

Again, I have to complement Trident Model: we have a template CL52 (on M12 board. The test kit for Uwe review comes with the MDF board template. My kit came with a plywood board. This template will help archive the correct positioning\gluing all of the Keel elements.

When all three pieces cleaned, test a 'dry fit': position into the template, it should be a precise fit. If needed lightly sand and test fit again. One more element requires for this assembly - rising wood (part BL11). All the notches have to be cleaned so they fit in the notches on the template. After you are completely satisfied with the fit, proceed to glue all parts (in the template). Once the glue set, carefully remove from the template and using various clamps position on the absolutely flat surface, for example, glass. Leave it until the glue completely dry.


Once the glue set, remove from the template and using clamps position on an absolutely flat surface until it is completely dry.

To be continued...
whaaaaaaa i want my ship..... 


Not only you!
no movement on behallf ems or auspost yet... ems suggest 47 on average to AUS, i wouldn't hold you breath on an anytime yet!
JIm, what do you use for the black lines / caulking ?
AliExpress standard statement on shipping:no movement on behallf ems or auspost yet... ems suggest 47 on average to AUS, i wouldn't hold you breath on an anytime yet!
"Due to a sharp slowdown of global logistics efficiency, the buyer protection time has been extended to 90 days instead of the previous 60 days. Please wait for the order with kind patience. Your understanding is highly appreciated."
Great question, Poul. I use a 'B' type black pencil. I don't want the caulking to be prominent. I planed to use black paper, but didn't find the needed thickness. The one I have is 0.8mm.JIm, what do you use for the black lines / caulking ?
GUESS WHAT I HAVE MINE.GOD BLESS STAY SAFE DON
Great news, Don! I know, you are busy with other projects lately, Do you plan to start a build log?GUESS WHAT I HAVE MINE.GOD BLESS STAY SAFE DON
Thanks Maarten, I am also waiting for yours!Nice work Jim, looking forward to mine.
Looks great Jim. Man the CNC is nice. Laser cut is nice but boy is it messy cleaning all that char.
Congratulations danielw.
My Alert is waiting for the second week in Beijing.
My Alert is waiting for the second week in Beijing.
congrats Daniel, aus post notification? mine still shows china
Thank you All for your valuable comments and interest in this build log. First and foremost I wish you all receive your kits as soon as possible without delay so we will build this beautiful kit together! Until then...I will be more than glad to share my findings and hopefully, it will help while you build your Alert.
...continue from the post #52
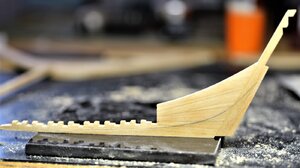
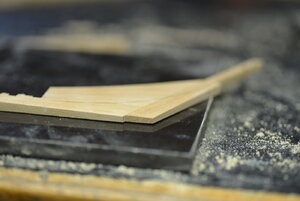
Once Deadwood assembly completely dried, lightly sand\scrape the leftover glue. The next step is to glue the 'Inner post' (Part BL19) and one piece from 'Sternpost' (Part 20). This should be no brainer as we will use the same template jig CL52 when we glue the deadwood.
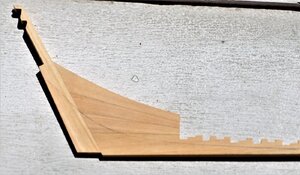
Pay attention to the black pencil line going from the top of the inner post crossing the deadwood and ending at the rising wood. That's right, you got it! This is 'Bearding line' it is established using the template CL53
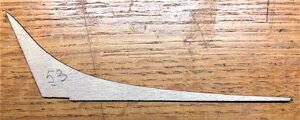
Template to establish a 'Bearding line' (CL53)
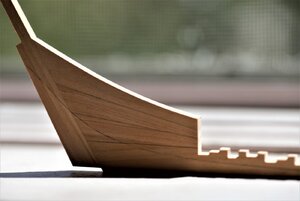
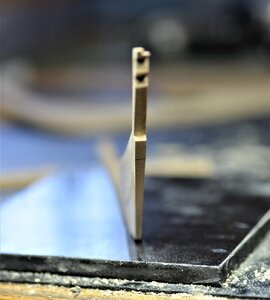
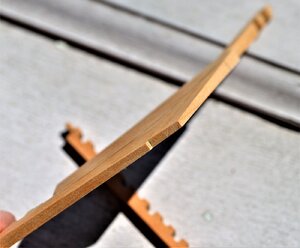
Once you trace the bearding line (both sides), take a sanding tool and shape as shown in the instruction. Basically, on top, where the bearding line starts should be 5mm, at the bottom it should be 2.5mm. I used self-made sanding sticks, in Russia, we called them 'Suharick's'.
Thank you for the interest, to be continued...
...continue from the post #52
Once Deadwood assembly completely dried, lightly sand\scrape the leftover glue. The next step is to glue the 'Inner post' (Part BL19) and one piece from 'Sternpost' (Part 20). This should be no brainer as we will use the same template jig CL52 when we glue the deadwood.

Pay attention to the black pencil line going from the top of the inner post crossing the deadwood and ending at the rising wood. That's right, you got it! This is 'Bearding line' it is established using the template CL53

Template to establish a 'Bearding line' (CL53)

Once you trace the bearding line (both sides), take a sanding tool and shape as shown in the instruction. Basically, on top, where the bearding line starts should be 5mm, at the bottom it should be 2.5mm. I used self-made sanding sticks, in Russia, we called them 'Suharick's'.


Thank you for the interest, to be continued...
Great instructions and tutorial.Thank you All for your valuable comments and interest in this build log. First and foremost I wish you all receive your kits as soon as possible without delay so we will build this beautiful kit together! Until then...I will be more than glad to share my findings and hopefully, it will help while you build your Alert.
...continue from the post #52
Once Deadwood assembly completely dried, lightly sand\scrape the leftover glue. The next step is to glue the 'Inner post' (Part BL19) and one piece from 'Sternpost' (Part 20). This should be no brainer as we will use the same template jig CL52 when we glue the deadwood.
View attachment 175396
Pay attention to the black pencil line going from the top of the inner post crossing the deadwood and ending at the rising wood. That's right, you got it! This is 'Bearding line' it is established using the template CL53
View attachment 175388
Template to establish a 'Bearding line' (CL53)
View attachment 175404
Once you trace the bearding line (both sides), take a sanding tool and shape as shown in the instruction. Basically, on top, where the bearding line starts should be 5mm, at the bottom it should be 2.5mm. I used self-made sanding sticks, in Russia, we called them 'Suharick's'.
View attachment 175405
View attachment 175406
View attachment 175407
View attachment 175408
Thank you for the interest, to be continued...
I really appreciate how you don't just talk about it, you actually show us- for example: you post a picture of Template for 'Bearding line' (CL53) separately.
This Alert log is setting the bar very high. Thank you


