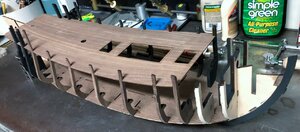
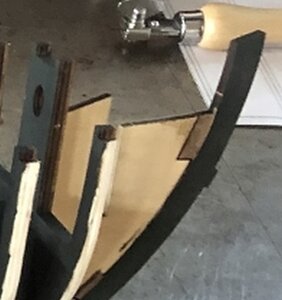
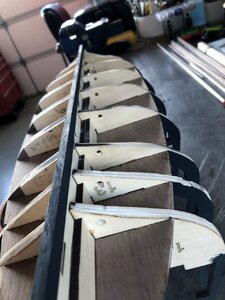
Black Pearl 1:50 ZHL

Joined
Jul 22, 2019
Messages
288
Points
323

Location
Western Colorado, USA
When I decided to get back into ship modeling, I looked around and got really excited about the Black Pearl. Like many I was confused by the vast array of prices and kits that all kind of looked the same but maybe not. At any rate I took a shot at one of the cheaper kits, not really expecting much, and well that’s what I got, was not much.

I’d highly recommend people just go to ZHL if you’re looking for a kit of the Black Pearl. All of those off brand and unbranded kits on ebay etc are junk. Many are missing so many parts I don’t think you could actually produce a ship without adding parts.

After discussing it with the Admiral I decided to buy the ZHL all scenario version. I’m not going to bother with unboxing etc. If you haven’t seen it there’s a video on the ZHL site of what is in the box. This is the kit I received. This is what ZHL calls the "All Scenario Version" They also have the "All Sealed Version" which I beleive is this kit without the interior, and the "Golden Version" which is a smaller scale.
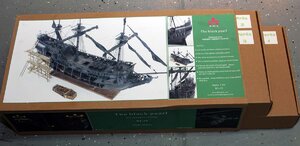
BP-001.jpg

I’m building two ships right now. One is the scratch build of the Danish bomb vessel Den Gloende, and the other is this one. Sometimes scratch building gets to feeling pretty tedious and I just like to build a kit. I learned this about me from my work in the train hobby. This project is also why my bomb vessel isn't moving along very fast.

The Admiral has declared this the priority. I actually started on this a while back and then kind of lost my motivation then picked it up again. I’ll be catching the log up over the next few weeks as I took the photos and notes as I went along. I also wanted to be ahead of the log some on the build because I go astray from the instructions at time and that way I’ll be able to tell people if what I’m doing is a mistake before they get to where I am in the build.

This build log is going to be probably be overly detailed about minor things and boring to the more experienced modelers, but I decided being as a lot of people get excited, and start with a kit like this, I would pretty much do the log step by step.

I’m going to hijack my own thread for minute, so you know where I’m coming from. I’m not one to get offended, and I’m always open to suggestions and constructive criticism. I will probably drive some builders crazy because of not making more of an effort to achieve perfection. My personality is such that I have to get something done. I’m simply not capable of spending 5 years building 1 model. As far as my skill level goes I’m probably average for a wood ship modeler. So if you’re looking for a master to learn from that isn’t me. That’s the explanation for most of the things I will likely skip or take short cuts on.

So, having said that, this isn’t the right way to build this model, it’s just my way. I learned long ago there isn’t a correct way to make something, just preferences and reasons and this build log will show mine and why I did what I did.

I’m also a tool junky, I think that was hereditary from my grand father. I have been building something pretty much all the time since I was around 8 years old. The point of that is I might use a lathe, milling machine, Byrnes table saw etc. for some parts of this build. When I do that I’ll go ahead and throw out how you could do it without all the fancy tools. The fancy tools are nice and often save time, but you can do what you need to for building a kit like this with simple hand tools and some patients. I built my Constitution without any power tools and it came out pretty nice. I often find myself doing things with a hand saw, chisel, or hobby knife instead of my mill for instance because it’s less hassle to just do it by hand.

So back to regularly scheduled programming,

I started going through the manual like normal and there are definitely a lot of pretty pictures, and they seemed like good instructions. So I started working on the model.

Step 1; This is about how long it took me to decide the instructions maybe aren’t exactly all that great. I think the photos pretty well show what needs to be done but I question some of the order of the photos, and have already found some useful notes that they could have added.

The photos in the manual appear to show putting the bulkheads on the keel parts before putting the keel together or maybe taking the keel back apart etc. it’s really all kind of confusing, so here’s what I did.

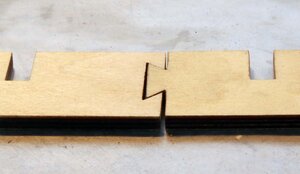
First thing I did was glue the backbone together. The joints on the laser cut sections were pretty loose. You can see that here.

Edit: I cleaned up the joints and glued them tightly together. This resulted in my keel being about 2mm short. This showed up when I tried test fitting the gun deck. I don’t know that I would do anything different if I had to do it over. Just wanted to note that you won’t want to clean it up making it even shorter just glue it together. The length from the front of frame 4 to the very back part I think should be 645mm, mine is 643mm. I had to trim some of the slots at the rear of the gun deck to get it to fit. I quite honestly don’t know if my keel is short or if the other laser cutting is just off a bit.
BP-002.jpg

I placed wax paper under the wood to keep the glue from sticking on my steel work bench. I use the steel work bench because it is really flat, and glued the parts together. It’s kind of hard to see but I used the brass clamps to clamp the pieces of the backbone to a steel straight edge, on the far side of the photo, to make the bottom of the backbone straight. Then put weights on it to keep it flat.

BP-003.jpg

More to come tomorrow.
 
Last edited:
A very good start of the model and also the building log - I will follow with big interest.
It is good to have enough weights (and clamps) - you can never have too much.....
 
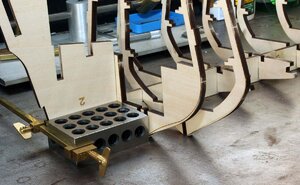
Next up was attaching bulkheads and frames. In the photo below you can see the extra laser line on the bulkhead. The instructions don’t say anything about it but there are 4 bulkheads that are marked like this, two on each end. I looked at how a plank would lay across these bulkheads and decided to go ahead and sand them roughly to match the taper before putting them on the keel. This will get the rough fairing done ahead of time if I’m right. We’ll see later on if that was a mistake.

Edit: The extra lines are indeed fairing lines, so I would recommend doing the rough sanding at this point so you don’t have so much to do later. You can see the frames in the front have been sanded to an angle on the edge as well in the last photo in this post.

BP-004.jpg

I used 1-2-3 Blocks and clamps to make sure the bulkheads were 90 degrees to the backbone. The instructions don’t say anything about it, but in order for the laser cut parts to fit as the build progresses, the keel and bulkheads really need to be square to each other, and properly aligned. I’ve noticed in a lot of the builds there are gun ports etc. that don’t seem to line up very well. I’m guessing that is mostly a case of people not aligning the parts when they glue them together in the earlier parts of the build. I even saw one log where the builder said he wished he would have glued the frames in square.

Edit: I was to some extent wrong about things not lining up. Some of it may be bad construction, but there are parts that simply don’t fit very well. That doesn’t mean it isn’t worth taking the time to build everything square. Most parts will still fit better if the build is square.

Side Note: For those that don’t know 1-2-3 blocks are used a lot in machining, and they’re super useful for all kinds of things they’re not made for. Weights for about anything, making stuff square etc. They’re usually less than $20 US a pair and just handy to have around. They’re called 1-2-3 Blocks because they are exactly 1” X 2” X 3”.

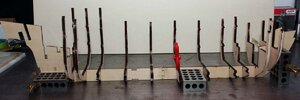
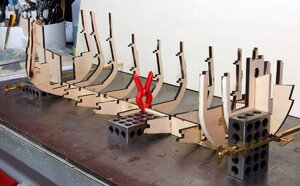
The fit was a little loose on some of the frames but there is a tab in the center that matches up with the backbone. It’s being held inline with the red clamp in the center of this photo. I carefully glued each frame one at a time and made sure it was square with the 1-2-3 block and centered on the keel. There is a fairly loose fit on the keel in some places so you need to pay close attention to ensure the frame isn't tilted on the keel.

BP-005.jpg

BP-006.jpg

Clamping the 1-2-3 blocks to the keel ensured the keel is perpendicular to the surface of the work bench. I'll type more up tomorrow.
 
Looking very good - and you are doing it well, to be sure to have everything square - very important for the future work.

BTW: I like your clamps in brass color very much !!!! and also the 1-2-3 blocks .....
 
Taking my seat to watch! Many thanks for starting the log. :)
Next up was attaching bulkheads and frames. In the photo below you can see the extra laser line on the bulkhead. The instructions don’t say anything about it but there are 4 bulkheads that are marked like this, two on each end. I looked at how a plank would lay across these bulkheads and decided to go ahead and sand them roughly to match the taper before putting them on the keel. This will get the rough fairing done ahead of time if I’m right. We’ll see later on if that was a mistake.

Edit: The extra lines are indeed fairing lines, so I would recommend doing the rough sanding at this point so you don’t have so much to do later. You can see the frames in the front have been sanded to an angle on the edge as well in the last photo in this post.

View attachment 178174

I used 1-2-3 Blocks and clamps to make sure the bulkheads were 90 degrees to the backbone. The instructions don’t say anything about it, but in order for the laser cut parts to fit as the build progresses, the keel and bulkheads really need to be square to each other, and properly aligned. I’ve noticed in a lot of the builds there are gun ports etc. that don’t seem to line up very well. I’m guessing that is mostly a case of people not aligning the parts when they glue them together in the earlier parts of the build. I even saw one log where the builder said he wished he would have glued the frames in square.

Edit: I was to some extent wrong about things not lining up. Some of it may be bad construction, but there are parts that simply don’t fit very well. That doesn’t mean it isn’t worth taking the time to build everything square. Most parts will still fit better if the build is square.

Side Note: For those that don’t know 1-2-3 blocks are used a lot in machining, and they’re super useful for all kinds of things they’re not made for. Weights for about anything, making stuff square etc. They’re usually less than $20 US a pair and just handy to have around. They’re called 1-2-3 Blocks because they are exactly 1” X 2” X 3”.

The fit was a little loose on some of the frames but there is a tab in the center that matches up with the backbone. It’s being held inline with the red clamp in the center of this photo. I carefully glued each frame one at a time and made sure it was square with the 1-2-3 block and centered on the keel. There is a fairly loose fit on the keel in some places so you need to pay close attention to ensure the frame isn't tilted on the keel.

View attachment 178175

View attachment 178176

Clamping the 1-2-3 blocks to the keel ensured the keel is perpendicular to the surface of the work bench. I'll type more up tomorrow.
What do you think about build slips like those that Billing Boats puts out? It has a vertical jig to line up bulwarks at 90 degrees.
 
What do you think about build slips like those that Billing Boats puts out? It has a vertical jig to line up bulwarks at 90 degrees.
Hello Victator, I have never build a single model from Billing Boats, not sure how this jig will work. But I am sure they tested thoroughly before considering in production., IMHO
 
I suspect the build slip would be too small for the half frames, but don't know. I have never used any of those jigs. That's not good or bad, just means I don't have anything to draw an educated opinion on.
 
I suspect the build slip would be too small for the half frames, but don't know. I have never used any of those jigs. That's not good or bad, just means I don't have anything to draw an educated opinion on.
Yeah. It looks like your keel doesn’t stick out enough and your bulwarks soho high enough in the middle of them to insure a right angle.
 
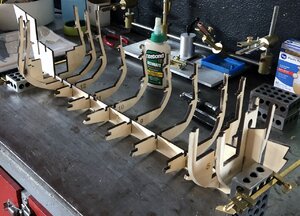
In this photo notice there are gaps along the keel on some of the frames. These gaps are for 4 pieces that strengthen the keel when glued in place.

BP-009.jpg

These parts might, force the frames to be lined up pretty good, but I wouldn’t want to rely on that. Also; due to the fact they you have to glue that frames to the keel before putting these on. If the frames aren’t already aligned pretty well it might be impossible to put these parts on at all.

In some places these fit really tight and I had to sand the slots, and in others there are gaps on both sides. You can see the gap on the starboard side between the keel and frame just forward of the blue clamp. There is an equal gap on the opposite side.

BP-007.jpg

Did I miss a clamp anywhere?

BP-008.jpg

After that was dry I fit the lower deck, nothing special on this step, it pretty much slid rite in after a light sanding of the notches in the deck, with everything put together square.

BP-010.jpg

Little overkill on the weights but they were handy. For some reason the plans make a real point in telling you to make sure the deck is all the way down on the bottom of the frame all the way from end to end. Good advice but seems pretty self explanatory to me. At any rate I was happy to do as told. There's probably 30 pounds of metal on the deck.

BP-011a.JPG

I came to the decision that I was going to just pretty much build this to the instructions. You can skip the following paragraph if that's all your interested in. The paragraph below is just some thoughts I had at this point in the build.

Side notes: At this point I got to thinking about the interior of the ship and enhancements a person could make. I immediately decided it would be nice if ZHL didn't cut the slots in the deck for the jail cell walls. If you're a ship guy, like most of the guys on this site, you don't have to look at this model long to decide the whole interior layout doesn't make much sense. About half of the lower level is made up of jail cells. That's a lot of wasted space and space is at a premium. Being as this isn't a real ship the important thing is that it presents to laymen as having an interior with supplies and skeletons etc. I think it does that well in stock form. However; It could be made more interesting and more realistic looking by reconfiguring the lower deck and adding a shot locker, stove, sail repair area, pumps, etc. Being as this kit is a diversion from scratch building for me I opted not to put a lot of effort into customizing the interior. Though I will do some and maybe even more on the gun deck.
 
Last edited:
I am planning on doing the complete build with sails. The only thing I'm not sure about are some of the figures and the fruit stand Items. I could be wrong but I'm guessing the vegetables in boxes are actually taken from a O gauge railroad fruit stand.

Once again the pictures in the manual seamed to be in a rather odd order but I finally decided it was time to put the opposite side frames in place. The question that came to my mind was how to be sure the starboard frames (Walnut ones) are the correct distance from the port frames. There’s some definite potential for problems down the road here if you’re very far off.

The instructions point out that the floor beams for the gun deck don’t fit tight on the frames, so you can’t just put everything together tight. Be warned if you do put the frames on so they are tight with the beams the deck absolutely will NOT fit. After studying the instructions for a while, I decided that best approach was to get out the main deck and place it on the top, and then use that to space the frames. After gluing each frame I placed a rubber band on the top of the deck from starboard frame to port frame to set the spacing.

I took a photo of that but couldn’t find it. I made a new photo a couple days later with the deck in place. I just placed rubber bands across the top when I glued the walnut frames, hopefully that makes sense. Do not attach the deck at this point obviously it's just to get the spacing right.

Image_4272.jpg

I sanded the laser char off the walnut frames that will be exposed. Still wasn't entirely sure how I was going to finish this but more on that later.

I then painted all of the plywood that I thought might be visible in the back and ends of the inside black.

BP-013.jpg
Originally my plan was to go with a 2 tone scheme and I might still do that, but when I glued the keel and stem pieces on. The middle and end pieces were dramatically different colored, and the joints were pretty loose. I had to putty the joints to smooth them out and then painted all of those parts black to hide the joints and the mismatch. I’ve ordered some ECO friendly black stain, because I don’t like working with anything toxic, and will probably go with a much darker appearance. Rite now I’m thinking this will be full on weathered. It’s probably just as well as the admiral prefers the darker color scheme.

Note: You can see the black keel in the picture above this post but I decided to sand it to make a more weathered appearance later, I'm definately not going for the stark black appearance.

When attaching the keel and stem pieces the instructions tell you to trim the sides of the tabs that go into the plywood. It isn’t clear about the top of the stem but looking forward in the instructions that one should be trimmed as well. The instructions call out sanding the tabs down. I recommend doing a stop cut and carving it off on each side for a cleaner line. You can look this up on a basic wood carving tutorial if you don’t know how to do it. It takes less time and produces a cleaner part. The walnut parts extending into the plywood false keel below is what I'm talking about, they should be the same thickness and centered on the plywood.

BP-013A.jpg

I drilled holes through the bulkheads under the deck to run the wires for the lighting through. Once again the photos in the instructions are kind of all over the place but it’s clear the holes could be done even before attaching them to the keel if you wanted too. This is something that could also be added in the laser cutting of the kit by the manufacturer.

BP-015.jpg

That's it for today need to do an update on my Bomb vessel.
 
I am planning on doing the complete build with sails. The only thing I'm not sure about are some of the figures and the fruit stand Items. I could be wrong but I'm guessing the vegetables in boxes are actually taken from a O gauge railroad fruit stand.

Once again the pictures in the manual seamed to be in a rather odd order but I finally decided it was time to put the opposite side frames in place. The question that came to my mind was how to be sure the starboard frames (Walnut ones) are the correct distance from the port frames. There’s some definite potential for problems down the road here if you’re very far off.

The instructions point out that the floor beams for the gun deck don’t fit tight on the frames, so you can’t just put everything together tight. Be warned if you do put the frames on so they are tight with the beams the deck absolutely will NOT fit. After studying the instructions for a while, I decided that best approach was to get out the main deck and place it on the top, and then use that to space the frames. After gluing each frame I placed a rubber band on the top of the deck from starboard frame to port frame to set the spacing.

I took a photo of that but couldn’t find it. I made a new photo a couple days later with the deck in place. I just placed rubber bands across the top when I glued the walnut frames, hopefully that makes sense. Do not attach the deck at this point obviously it's just to get the spacing right.

View attachment 178582

I sanded the laser char off the walnut frames that will be exposed. Still wasn't entirely sure how I was going to finish this but more on that later.

I then painted all of the plywood that I thought might be visible in the back and ends of the inside black.

View attachment 178586
Originally my plan was to go with a 2 tone scheme and I might still do that, but when I glued the keel and stem pieces on. The middle and end pieces were dramatically different colored, and the joints were pretty loose. I had to putty the joints to smooth them out and then painted all of those parts black to hide the joints and the mismatch. I’ve ordered some ECO friendly black stain, because I don’t like working with anything toxic, and will probably go with a much darker appearance. Rite now I’m thinking this will be full on weathered. It’s probably just as well as the admiral prefers the darker color scheme.

Note: You can see the black keel in the picture above this post but I decided to sand it to make a more weathered appearance later, I'm definately not going for the stark black appearance.

When attaching the keel and stem pieces the instructions tell you to trim the sides of the tabs that go into the plywood. It isn’t clear about the top of the stem but looking forward in the instructions that one should be trimmed as well. The instructions call out sanding the tabs down. I recommend doing a stop cut and carving it off on each side for a cleaner line. You can look this up on a basic wood carving tutorial if you don’t know how to do it. It takes less time and produces a cleaner part. The walnut parts extending into the plywood false keel below is what I'm talking about, they should be the same thickness and centered on the plywood.

View attachment 178588

I drilled holes through the bulkheads under the deck to run the wires for the lighting through. Once again the photos in the instructions are kind of all over the place but it’s clear the holes could be done even before attaching them to the keel if you wanted too. This is something that could also be added in the laser cutting of the kit by the manufacturer.

View attachment 178591

That's it for today need to do an update on my Bomb vessel.
Jodie, I was wondering what I was going to do with those wires to keep them out of harm's way. This is a good idea.
 
Back
Top