Build Log - HMS Surprise 1:75th Scale Mamoli

Joined
Dec 23, 2020
Messages
12
Points
58

As a complete novice at model making, I started this a few days ago. I’m a big fan of the Patrick O’Brian Aubrey Maturin books and y wife bought me the kit as an anniversary present back in August as a project for the winter months. I thought the New Year was the perfect time to make a start.
I’d already poured over the plans, had a look at some of the logs on this site, particularly TKAM’s, and bought a few bits of essential kit like a slip, a nail nailer, a decent knife set, glues etc.
It seems that the first major task with this kit is to try and make sense of the instructions! The body of the instructions are in some sort of mangled English and the sequential parts list is Italian. The material to use for each stage has to be cross referenced to a key on a separate page and some of the quantities and measurements don’t seem to make any sense at all e.g. at stage 20 the Tavolata (Deck Planking I pressure to the non Italian among us) is shown as requiring quantity of 1 (when there are clearly loads of planks on the diagram) measuring 0, 5x4. 0, 5x4??? Can anyone tell me what that means?
Also, there is no indication of what the different woods provided are e.g. the Deck planking is shown as being LG, which according to the key = Tanganyika wood. I have no idea what Tanganyika wood looks like.
However..... the quality of the materials is very good and I am progressing enthusiastically using a mixture of deduction, Google Translate, guesswork, research, other people’s logs and common sense!

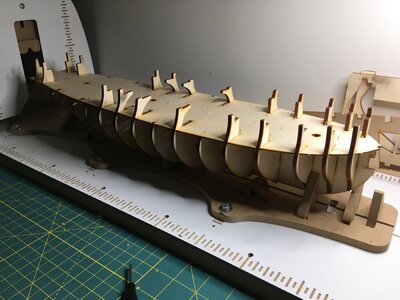
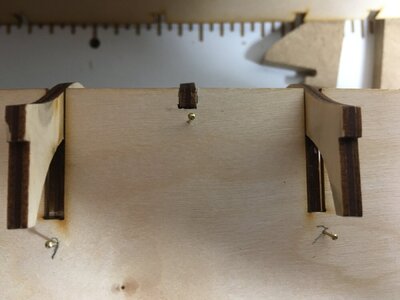
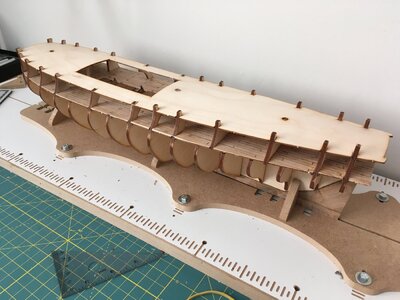
So far I’ve got to stage 19 i.e. false gun deck glued down and all has gone quite smoothly so far. The parts are good quality and generally fit together well although a couple of the frames needed minor trimming to fit. The Hobbyzone building slip was very useful for squaring things up. One minor issue was that there should be notches in the false gun deck to accommodate pegs at frame 7. These were missing so I had to cut them myself (see photo).F933295E-8961-4112-A6C1-4C6324D75BE9.jpegD16312E1-794B-4D25-8842-3488CB543E9F.jpeg58623FAC-EC6E-4EF8-95BE-7C683B6CB3F5.jpeg
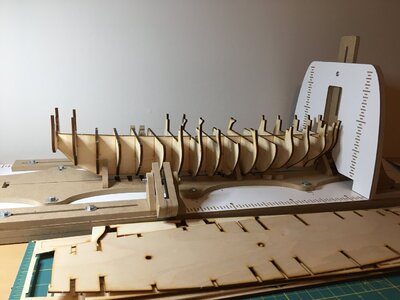
I used half driven nails to hold the deck tight down on the frames as per the instructions and I now have a very solid structure.

Next challenge is planking the gun deck. Now ....... which is the right wood to use..... how much and what measurement?
 
Well, I don't see any of the more experienced builders chiming in, so I will risk some advice...

When it says "0,5 x 4" -- for example -- European style is to often use a comma where North Americans and others would use a decimal point. So, this means wood strips 0.5mm thick x 4mm wide. I am on my first kit, but a simpler one maybe. The various planks were labelled, but also I could deduce what was what by their thickness. You often have to use a bit of detective work. I see tanganyika mentioned often on these threads, someone here can advise, or you can sort and label them by process of elimination. As to how much to use, once you know which strips are which, you use what you need, being economical as possible. Generally there is an allowance for cutting, trimming and errors.

On this first hull planking of mine I was sure I would run out because I was scrapping a few strips at first, but I settled down, someone talked me off the ledge, and I ended up with a few leftover. And you become comfortable with the notion that, if it so happens that you need to order more strips, so you order more strips. They are not costly and you can get them in many sizes to match what you have.

I assume this is double planked? And are you painting the outer layer? I painted mine below the waterline. If you run out and have to use a different colour wood below the waterline, it will be painted, but even if not, if you do one strip on one side and one on the other, as recommended, and keep them symmetrical with matching colour on each side, it will look fine.

Have you got a good book like "Ship Modeling Simplified" by Frank Mastini to guide you? It will help with planking. There are many different approaches to planking, bending, nailing and gluing. Pick an easier, more achievable method and follow it. Also, don't forget, your first layer on your first hull is your apprenticeship. You can sand, patch and fill. And put the lessons learned to good use on the second layer that shows. You still need a nice, smooth base layer to plank over, but it is more forgiving in how you get there.

How will you bend the planks?
Many thanks Tangopapa for your tips and comments. I think I’ve got to grips with the measurements and wood recognition now. So far so good. I’ve got the wood all bundled up with labels. Yes, it is a double plank build and I seem to have loads of soft wood for the first layer and it looks like there’s plenty for the second. I’m intending to bend the planks by soaking as per the instructions to start with. If that proves a problem I’ll get myself a plank bender of some sort. I think this planking guide looks pretty good: https://www.modelerscentral.com/blog/planking-tips-for-building-a-model-ship/
I‘ll also look for the one you recommended.
 
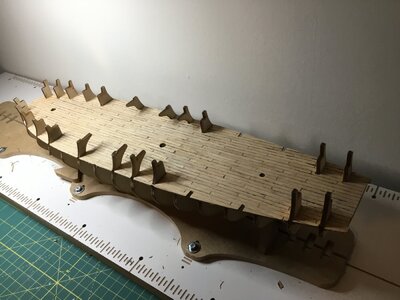
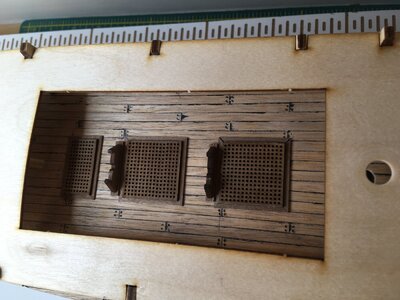
Managed to identify the various woods and measurements OK and have now completed the Gun deck (I think it should more correctly be termed the Upper Deck) planking. It’s a good job that most of it will be hidden as it it is definitely an apprentice piece! Lessons learned:
  • be more meticulous about measuring the length of the planks
  • find a more efficient way of applying glue. Too mush of it got on the surface of the planks
  • don‘t use a marker pen for the plank caulking. It runs and makes a mess. Use a soft pencil instead
However, after a good sanding, the overall effect is good although I doubt Jack Aubrey would stand for such a dirty deck!

As has been mentioned in other build logs, there‘s no mention of fitting the keel, bow stem or stern post so I decided to fit these next rather than carrying on with fitting gratings etc to the deck as per the instructions. So far I have the bow stem and keel fitted. I’m now about to fit the stern post. Looks like I’m going to have to do some trimming and/or filling as, having ensured that the bow stem is positioned exactly right and fitted the keel tight to it, the keel is protrudes slightly beyond the stern post. Interesting!
A7030DFB-0259-484A-854F-CF03266C222A.jpegimage.jpg
 
With some models the sternpost and bow has to be fitted after planking. So read your manual carefully.
Christian
 
Thanks Christian. I think I’m ok fitting the stern post and bow stem at this stage as although the instructions don’t mention anything about fitting them or the keel, the illustrations show them all in place from the start. In particular the planking illustrations show them in place.
 
Good start! I think you will find this model quite a challenge for a newbie. I've been working on mine since last September and have started rigging. Sometimes I get impatient and have to go back and fix things, so go slow and plan ahead before gluing anything. I concur with G about the stem and stern posts, and suggest doing the ram and rudder when the planking is done.
Here are a few more ideas that may be helpful:
1. Don't be too fussy about the first planking. It is good practice for the second layer and won't show.
2. Decide if you want to paint the lower hull or leave a wood finish.
3. I mostly use Medium CA+ (Zap-A-Gap) glue with a small Flexi-Tip.
4. The plans are not exactly 1:1 scale so you are wise to measure carefully.

Am looking forward to following your build log and hope you learn a lot and enjoy the process and stay healthy.
 
1. Don't be too fussy about the first planking. It is good practice for the second layer and won't show.
Hello JayRay, Don't underestimate the first layer of planking, and while I agree it is a good practice, I disagree about 'don't be too busy.

@Awkward It is suggested to lay down the first layer as the one and only. Calculate the number of planks needed and measure their tapers close to the bow and stern. Check if there any needs for steelers. But don't forget about the fairing bulkheads first. This will be a good base before the planking started.
 
Many thanks for the advice @Jimsky and @JAYRAY. For good or ill I've gone ahead and glued the keel, stern post (after a bit of filling to make it fit properly) and bow stem. I won't be fitting the rudder or the ram until after the planking is complete. As for the hull planking I internd to be as meticulous as possible on both the firsgt and second layers as I believe that if the first layer is shoddy then the second will be more difficult to get right. However, next stage is the gun deck gratings, boat cradles and the supports for the top decks.
 
Hi I don't have a lot of experience and am getting back into modelling after a 25 year brake. My first and only ship I completed was a Mamoli Rattlesnake nearly 30 years ago, no internet back then so I had to work through the problems myself. Now there is lots of people to help you through this forum. I found the instructions back then where hard to understand but the illustrations where very good. The materials are a process of elimination not many different types of wood are the same size if they are then go by colour or quantity vernier calipers are a big help for measuring pieces. Aways dry fit parts and look at the next few steps before gluing. I use a brush and PVA for planks and make sure the sides are glued. It's much easier to make the rabbet before attaching the keel. I enjoyed making my Rattlesnake it had lots of little things wrong that I could see but but nobody else was worred about.
 
Hi I don't have a lot of experience and am getting back into modelling after a 25 year brake. My first and only ship I completed was a Mamoli Rattlesnake nearly 30 years ago, no internet back then so I had to work through the problems myself. Now there is lots of people to help you through this forum. I found the instructions back then where hard to understand but the illustrations where very good. The materials are a process of elimination not many different types of wood are the same size if they are then go by colour or quantity vernier calipers are a big help for measuring pieces. Aways dry fit parts and look at the next few steps before gluing. I use a brush and PVA for planks and make sure the sides are glued. It's much easier to make the rabbet before attaching the keel. I enjoyed making my Rattlesnake it had lots of little things wrong that I could see but but nobody else was worred about.
Thanks Tony. Good advice.
Something is worrying me now. Having checked the instructions from end to end I have glued the keel, bow stem and stern post as it’s clear from the diagrams that this is to be done prior to hull planking.
BUT.... What on earth is a rabbit apart from something I’m rather partial to fried? And what relevance does it have to the keel? Help!!
 
Aha! Thanks Jim. Looks like Ive made life more difficult by fitting the keel first.
 
As the matter of fact. a lot of kits manufacturers don't make a rabbet for their models. Until you grasp all the small nuances of building models it is advisable to follow the kit instructions manual. This is the way they design and test, we assume it is optimal for the given kit. Once you gain experience, you can build your own way and may no longer require kits... ;)
 
Thanks again Jim. Always good to hear from a fellow Floyd fan; I presume you are from your profile pic.
I’ll take care to think this rabbet thing through thoroughly again before I do anything rash
 
Well I’ve cracked on with marking the trenals, fitting the hatch gratings and the boat cradles and the top deck. All pretty straightforward although getting the deck support frames uniform was a bit of a fiddle. I reduced the length of the uprights by about a millimetre to start with as there was far too much cross camber on the deck using the instruct measurement. Then it was trial and error, gluing the frames, cutting the uprights out and altering the lengths and gluing up again until it all came nicely together.
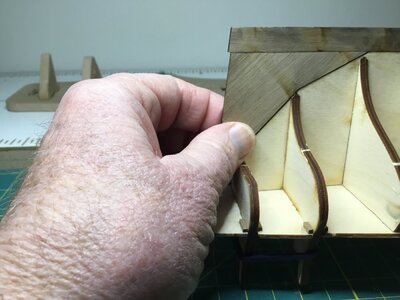
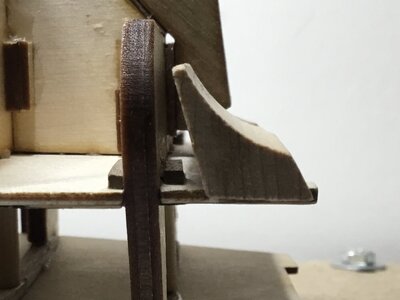
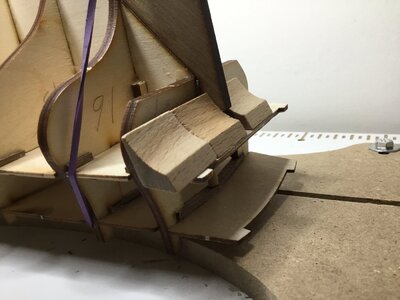
Next comes the transom. The instructions on how to fit this are confusing to say the least. After along time pondering I think I’ve worked it out. Firstly the cutouts on the bottom of the transom don’t marry up with the protruding lugs on the gun deck stern end. I’ve therefore extended the cutouts inwards to fit. The blocks that go beneath the transom did’t seem to fit in any way but when I finally realised which way up they are supposed to go and butted them against the transom, there was the 2mm gap between the block and frame 17 that the instructions refer to. The blocks protrude quite a way from the sides of the deck and C64FCBD8-8B17-4720-900D-4854651EDB61.jpegBFAE708F-1D9D-4E1E-A75C-229B25EDEBE9.jpeg9277A4FD-A1EC-4F46-8C39-9468EE0E56F0.jpeg203D3CAC-2FEC-4FEB-934B-8E0FCB3C4406.jpegwill need a lot of faring. I’ve decided to ignore the instructions and glue on the blocks then fit the transom after faring as I can’t see how the faring could be done without risking damage to the transom.
 
Hello JayRay, Don't underestimate the first layer of planking, and while I agree it is a good practice, I disagree about 'don't be too busy.

@Awkward It is suggested to lay down the first layer as the one and only. Calculate the number of planks needed and measure their tapers close to the bow and
Well I’ve cracked on with marking the trenals, fitting the hatch gratings and the boat cradles and the top deck. All pretty straightforward although getting the deck support frames uniform was a bit of a fiddle. I reduced the length of the uprights by about a millimetre to start with as there was far too much cross camber on the deck using the instruct measurement. Then it was trial and error, gluing the frames, cutting the uprights out and altering the lengths and gluing up again until it all came nicely together.
Next comes the transom. The instructions on how to fit this are confusing to say the least. After along time pondering I think I’ve worked it out. Firstly the cutouts on the bottom of the transom don’t marry up with the protruding lugs on the gun deck stern end. I’ve therefore extended the cutouts inwards to fit. The blocks that go beneath the transom did’t seem to fit in any way but when I finally realised which way up they are supposed to go and butted them against the transom, there was the 2mm gap between the block and frame 17 that the instructions refer to. The blocks protrude quite a way from the sides of the deck and View attachment 217177View attachment 217178View attachment 217179View attachment 217180will need a lot of faring. I’ve decided to ignore the instructions and glue on the blocks then fit the transom after faring as I can’t see how the faring could be done without risking damage to the transom.

stern. Check if there any needs for steelers. But don't forget about the fairing bulkheads first. This will be a good base before the planking st
 
Hi from annot to much OLD timer. Have just seen your start of the build. NOT only but nearly everybody are adding the Gundecks as fast as possible- coming from the plan- the only reason for, as far I can see, is to hold the Bulkheads square. There are many and very cheap parts on the market to ensure that. Closing your Ship that early, you will only give yourselves problems later on, as you can do anything or very difficult under the DEcks. With more than 40 plus when building, I made a cardboard piece of the Decks, and then outside this to a dobbel side glueing Tape. Here you can now work in piece -sanding, chalking -be careful here- so you do not make it all the planks. Afterwords with a very sharp Razor Blade or piece of Cristal you now scratch from the bow towards the stern (all ways same direction) then medium sandpaper first, then a very fine at the end. Add one or 2 layers of Barniz.(lack or Ferniz)
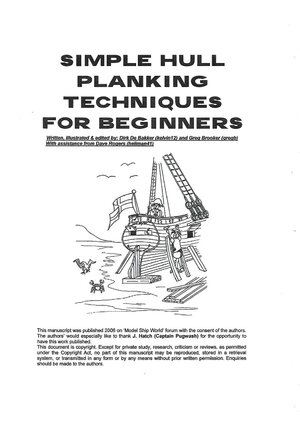
Finally, I recommend to read the Paper "Simple planking for Beginner" it is on the NET, but I will try to send you a PDF file. you will need a program acrobat reader or others to open it. just click on the title, and it will open. The very 1Th Planking to do correctly will save you many problems later- filling out incorrect part, hard sanding, and very important use both Bow and Stern Fillers, and IBSRT THE KEEL as early possible
 

Attachments

  • 221-Scan_0001.jpg
    221-Scan_0001.jpg
    159.7 KB · Views: 12
  • plankingprojectbeginners.pdf
    1.9 MB · Views: 15
Back
Top