
It looks good Scott. Congrats.Jeff, The guy you are talking about on Youtube is John Aliprantis. Here is the link to his channel. https://www.youtube.com/channel/UCvNxDG6MgbFikbTM89Hod2g
I pay a lot of attention to his techniques. One thing about him is that he seems to really stick to the instructions.
For the last several days I have been focused on framing the gun ports. 58 gun ports that need to be framed so that a total of 232 little strips of wood. Each has to be carefully glued in etc etc... Sheesh. John Aliprantis spent 2 hours per side where it took me more like 5 or 6 hours per side.
Painted the bottom with some satin varnish.
Here's what she looks like this evening.
View attachment 215264

-

SUBSCRIBE TO SHIPS IN SCALE TODAY!
The beloved Ships in Scale Magazine is back and charting a new course for 2026!
Discover new skills, new techniques, and new inspirations in every issue.
NOTE THAT OUR NEXT ISSUE WILL BE MARCH/APRIL 2026 -

Win a Free Custom Engraved Brass Coin!!!
As a way to introduce our brass coins to the community, we will raffle off a free coin during the month of August. Follow link ABOVE for instructions for entering.
You are using an out of date browser. It may not display this or other websites correctly.
You should upgrade or use an alternative browser.
You should upgrade or use an alternative browser.
Montanes by OcCre 1:70
- Thread starter Scott Shilling
- Start date
- Watchers 27
ok - over on Bilal's Montanes build log I asked for some advice on how to create the grove down the middle of a 2mm by 2mm rubbing strake. Got plenty of great advice!! Turns out you can purchase a sort of scraping tool that you can use or you can make one with a utility knife blade. I checked out the local hobby shop and they had no idea what I was talking about. Even when I showed them the pictures of one. BTW - this is a big hobby shop and to my dismay they do not support wooden model ships builds. Oh well.
So I made one with a utility knife blade. I recruited my brother in law and away we went. We found that the 2mm slot with a tooth in the middle was just too challenging so what we did instead is make a slot that was more like 3mm with a tooth then I ran the rubbing strake through at an angle. It worked great!!
Special thanks to Bilal for letting me post on his build and special thanks to "docattner" for the wonderful suggestions.
Once I get the technique down pat I'll get them made and glued on accordingly.
Couple pics below.
Good job Scott. Congrats.ok - over on Bilal's Montanes build log I asked for some advice on how to create the grove down the middle of a 2mm by 2mm rubbing strake. Got plenty of great advice!! Turns out you can purchase a sort of scraping tool that you can use or you can make one with a utility knife blade. I checked out the local hobby shop and they had no idea what I was talking about. Even when I showed them the pictures of one. BTW - this is a big hobby shop and to my dismay they do not support wooden model ships builds. Oh well.
So I made one with a utility knife blade. I recruited my brother in law and away we went. We found that the 2mm slot with a tooth in the middle was just too challenging so what we did instead is make a slot that was more like 3mm with a tooth then I ran the rubbing strake through at an angle. It worked great!!
Special thanks to Bilal for letting me post on his build and special thanks to "docattner" for the wonderful suggestions.
Once I get the technique down pat I'll get them made and glued on accordingly.
Couple pics below.
View attachment 217379View attachment 217380View attachment 217383

Hi all. Here is an update. And another decision. The instructions call for painting the top area of the upper back section of the sides of the boat red and black. There's a mouthful. After some discussion with my wife we decided to only paint the rubbing strakes black with the gold trim. BTW - all of the painting on the model will be handled by the spouse. One, she's good at it and two that gets her some skin in the game as well. Once we get these painted we'll step back and have look.
Over on another forum a modeler built a Montanes with the same no paint approach.
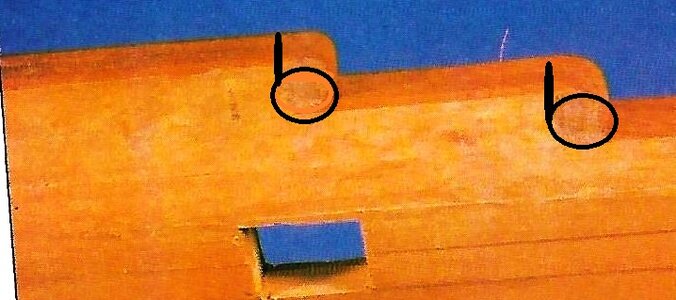
Finished gluing on the strakes and the upper railings (not sure what to call them). Using my hand made scraper I was able to put a nice grove down the middle of the strakes and of course lost some more blood. Should have put a piece of tape across the unused section of the razor blade. Duh!! oh well.
Those 2 by 3 by 8 little pieces to round down to the next level were murder for me, so I just tossed in a lot of glue because they needed a ton of sanding to make them look nice. After sanding they look just fine.


Over on another forum a modeler built a Montanes with the same no paint approach.
Finished gluing on the strakes and the upper railings (not sure what to call them). Using my hand made scraper I was able to put a nice grove down the middle of the strakes and of course lost some more blood. Should have put a piece of tape across the unused section of the razor blade. Duh!! oh well.
Those 2 by 3 by 8 little pieces to round down to the next level were murder for me, so I just tossed in a lot of glue because they needed a ton of sanding to make them look nice. After sanding they look just fine.
It in fact quite easy to make these half-round Pieces. Take Wooden stock used for making Masts. Cut a circular Pieze with 1 or 2mm more on each side. Now You cut out -after measuring -a piece and glue it in Place. Now -with a Dremel or bigger drill -first with a bigger bore 1-2 mm in, then with a minor Bore you mage the Drill right in the Center a litter deeper. I am not for a moment ready to find the images I have tomorrow or over the next few days, you will have. We old Guy from the STONE AGE we had to find many solutions as there are NO KITS without failure and problems. I have -now reired build from early 1960 with only Billing Boats on the Market. Am I fact giving advise and to two other builders of Montañes.Hi all. Here is an update. And another decision. The instructions call for painting the top area of the upper back section of the sides of the boat red and black. There's a mouthful. After some discussion with my wife we decided to only paint the rubbing strakes black with the gold trim. BTW - all of the painting on the model will be handled by the spouse. One, she's good at it and two that gets her some skin in the game as well. Once we get these painted we'll step back and have look.
Over on another forum a modeler built a Montanes with the same no paint approach.
Finished gluing on the strakes and the upper railings (not sure what to call them). Using my hand made scraper I was able to put a nice grove down the middle of the strakes and of course lost some more blood. Should have put a piece of tape across the unused section of the razor blade. Duh!! oh well.
Those 2 by 3 by 8 little pieces to round down to the next level were murder for me, so I just tossed in a lot of glue because they needed a ton of sanding to make them look nice. After sanding they look just fine.
View attachment 218332View attachment 218333View attachment 218334View attachment 218337
Good morning Scottola, nice and tidy work, congratulations.
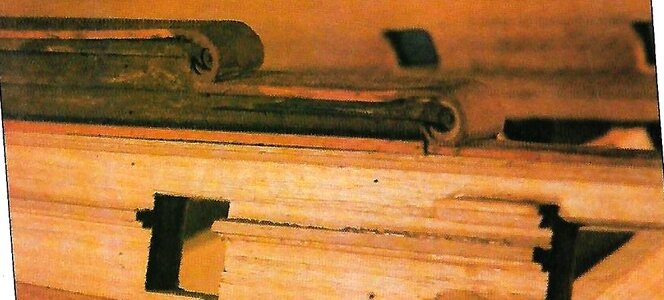
Let me show you how I managed to do the "roleos" in my Nepo. Some pictures...


Some explanation:
Due to the rotary machine, many imperfections arose, so you have to use some putty to fix the imperfections.
It is important to soak the wood in alcohol prior to use the chisel.
Be careful in making the internal shape not to spoil the whole work.
Greetings
Jaime
Let me show you how I managed to do the "roleos" in my Nepo. Some pictures...
Some explanation:
Due to the rotary machine, many imperfections arose, so you have to use some putty to fix the imperfections.
It is important to soak the wood in alcohol prior to use the chisel.
Be careful in making the internal shape not to spoil the whole work.
Greetings
Jaime
I will not discuss this with Jaime. The time different more than 10 Years As mentioned before I use apart from a Mast Stock, slightly with Ø diameter- 1-2 mm bigger, but from side to side the mm as planked on top (Regala). This mas made in 1992. As you can see my drawing is not that good nor the programGood morning Scottola, nice and tidy work, congratulations.
Let me show you how I managed to do the "roleos" in my Nepo. Some pictures...
View attachment 218807View attachment 218808View attachment 218809View attachment 218810View attachment 218811View attachment 218812View attachment 218813View attachment 218814View attachment 218815View attachment 218816View attachment 218817
Some explanation:
Due to the rotary machine, many imperfections arose, so you have to use some putty to fix the imperfections.
It is important to soak the wood in alcohol prior to use the chisel.
Be careful in making the internal shape not to spoil the whole work.
Greetings
Jaime
Attachments
Got it!! I was playing around with a chunk of an old dowel rod and was not sure how to best approach this. With the advise I just received here I'll go ahead and see what I can do. Now that I see what you guys did with the side of the thing I feel more comfortable swapping them out.
Meanwhile I started working on the bow. Pretty challenging but I am working my way forward. I am really really really disappointed with OcCre and their decision to use cheap plywood for their precut walnut parts. The stuff is not very user friendly because it falls apart easily. I suppose if I was just going to paint it black then maybe ok. But we made the decision to use stains instead. We'll just have to see how it turns out. I purchased a blank of walnut just incase I have a total failure with one of these.
Oh Oh. The gold paint on the strakes is hard to see as we have not painted everything black. To make it stand out a bit more we'll add a pinch of yellow.
Below are some of the bow construction pics.

Thanks for the support Paul.
Continuing on. I've got the spouse working on the bow staining and painting. This should be completed this evening. In the mean I continue to press on and started occupying myself with the grids. Not overly difficult but a bit time consuming. I am using medium thick CA only on the bottom side of these. The decision now is do I add some stain to the sapeli or leave it as is.
Pic three grid needs to have cannon balls on it. that will get done this evening as well. Need to decide on whether or not to paint the cannon balls black.
My intention is to complete all grids this evening and get them glued into place.
Pics below:


Witaj Scottola
Ja w moim Montanes zrobiłem tak jak na zdjView attachment 219621View attachment 219622Pozdrawiam Mirek
HI TO BOTH OF YOU. The ship is both marvellous builds -I am in doubt if I could do it better today. Pant o No paint is up to each builder - I am of the OLD SCHOOL and has been living among all types of ships. they were and still are all paint- a few with clear LACH to have the wood seen. the paint is and was to conserve the wood against wind and weather.
HI TO BOTH OF YOU. The ship is both marvellous builds -I am in doubt if I could do it better today. Pant o No paint is up to each builder - I am of the OLD SCHOOL and has been living among all types of ships. they were and still are all paint- a few with clear LACH to have the wood seen. the paint is and was to conserve the wood against wind and weather.
MREK FROM POLAND HAS DONE A VERY BEAUTIFUL PAINTING ON THE bow partHI TO BOTH OF YOU. The ship is both marvellous builds -I am in doubt if I could do it better today. Pant o No paint is up to each builder - I am of the OLD SCHOOL and has been living among all types of ships. they were and still are all paint- a few with clear LACH to have the wood seen. the paint is and was to conserve the wood against wind and weather.
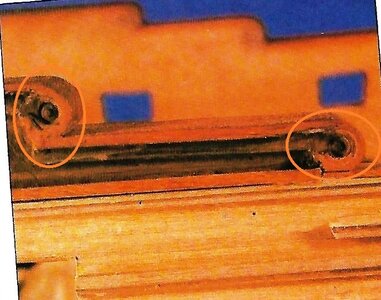
These models can drive a person coo-coo!! I need to start looking forward a lot more at these pictures and instructions. Take parts 102 and 103. I was very careful to get these two parts curved perfectly and lined up. Then I stuck on the 1X3mm white limewood blanks. Ok looks pretty good so they get sanded and prepped so I can put on the wire highlighting. When I started on the top wire I realized something was amiss. parts 102 and 103 are TOO BIG!! I am not going to rip them out so I'll just adjust the wire highlighting to make it work. Sheesh.
Ok - enough venting.
I like how Mirek went about this. So I'll spend some time having a good look and see if his approach makes sense on our model.
Pics below


Ok - enough venting.
I like how Mirek went about this. So I'll spend some time having a good look and see if his approach makes sense on our model.
Pics below
I have also run-aground of the "needed to look ahead" thing. Those of us with little experience are obviously the most vulnerable...and have the fewest tools in our tool box for easy remedies. I feel your pain!
NO DOUBT THAT YOU HAVE FOLLOWED THE INSTRUCTION MANUEL HERE. GENERALLY, BETWEEN THE TWO MAIN PART, SPACE IN BETWEEN THEM SHOULD BE FILLED UP WITGH A PIECE OF, FITTING IN HERE AND ROUNDED ON THE EDGE-I build it about 20 years ago, so much water has to the SeaI have also run-aground of the "needed to look ahead" thing. Those of us with little experience are obviously the most vulnerable...and have the fewest tools in our tool box for easy remedies. I feel your pain!
Sorry for the Block letter -need to change my computer or brain
Anyway, the build looks good. so do not give, just ask
- Joined
- Dec 9, 2019
- Messages
- 1,011
- Points
- 443

Witaj ScottolaTe modele mogą doprowadzić osobę do gruchania !! Muszę się bardziej niecierpliwić na te zdjęcia i instrukcje. Weź części 102 i 103. Bardzo uważałem, aby te dwie części były idealnie zakrzywione i ustawione w jednej linii. Następnie utknąłem na białych bloczkach z drewna lipowego 1X3mm. Wygląda całkiem nieźle, więc są szlifowane i przygotowywane, żebym mógł założyć podświetlanie drutu. Kiedy zacząłem na górnym przewodzie, zdałem sobie sprawę, że coś jest nie tak. części 102 i 103 są ZA DUŻE !! Nie zamierzam ich wyrywać, więc po prostu dostosuję podświetlenie drutu, aby działało. Do licha.
Ok - wystarczy wentylacji.
Podoba mi się, jak Mirek to zrobił. Więc spędzę trochę czasu, dobrze się przyjrzawszy i sprawdzę, czy jego podejście ma sens w naszym modelu.
Zdjęcia poniżej
View attachment 219996View attachment 219997View attachment 219998
Wszystko robisz bardzo dobrze .Ja w miejsce rurki dawałem drzewo 2x2 mm gruszy moczyłem ją w wodzie ok 30 minut i pomału wyginałem jak na zdjęciach w mojej relacji. Na części 97 i 143 naklejałem fornir odrysowany od tych części trochę pomniejszone, jeśli nie masz forniru może być karton 0,5 mm
Powodzenia uwierz w siebie wszystko robisz bardzo ładnie
Pozdrawiam Mirek
Witaj Scottola
Wszystko robisz bardzo dobrze .Ja w miejsce rurki dawałem drzewo 2x2 mm gruszy moczyłem ją w wodzie ok 30 minut i pomału wyginałem jak na zdjęciach w mojej relacji. Na części 97 i 143 naklejałem fornir odrysowany od tych części trochę pomniejszone, jeśli nie masz forniru może być karton 0,5 mm
Powodzenia uwierz w siebie wszystko robisz bardzo ładnie
Pozdrawiam Mirek
an update: I wrapped up the bow. the grate on that took me hours and hours and I still need to loop back and do some repair work. So I'm giving it a break and started working on the deck features. Fiddly but fun.

