more info pleaseCorrect Brian!
-

Win a Free Custom Engraved Brass Coin!!!
As a way to introduce our brass coins to the community, we will raffle off a free coin during the month of August. Follow link ABOVE for instructions for entering.
-

PRE-ORDER SHIPS IN SCALE TODAY!
The beloved Ships in Scale Magazine is back and charting a new course for 2026!
Discover new skills, new techniques, and new inspirations in every issue.
NOTE THAT OUR FIRST ISSUE WILL BE JAN/FEB 2026
You are using an out of date browser. It may not display this or other websites correctly.
You should upgrade or use an alternative browser.
You should upgrade or use an alternative browser.
HMS Royal Caroline kit ZHL 1/30
- Thread starter Maarten
- Start date
- Watchers 112
-
- Tags
- royal caroline zhl
Hope it will be discounted!Correct Brian!
Last edited:
Hallo Maarten,Next to my current HMS Alert build I am still working on my RC in the background.
Currently some testing on tarring ropes with actual Stockholmer tar, the product that was originally used to tar the ropes, but also the hull of ships.
I had already tested some solid stockholmer tar but one of the issues it is nearly impossible to dillute it with turpentine to get a lower consistency. After a little more searching I found horse hoof tar which is available in a spray can. This is diluted stockholmer tar which can be sprayed onto the rope.
View attachment 192047
To have minimum loss I sprayed it into a small container and submerged a clear hemp colour test rope into it.
After submerging for 1 night this real tarred rope is the result.
View attachment 192048
Followed by a few hours drying this is the end result.
View attachment 192049
For complete ropes submerging works the best, smaller parts of rope can easily be treated with a small paint brush.
the rope is looking very good and realistic - Independent of the smell, I think it is more important, if the tar could pollute the timber with loosing colour. How is the rope, when you touch it? Does it getting really dry?
Hallo Karl Ingwer,It's a model to read in, one can spend hours with it. Thanks for showing!
Some decades ago I had contact with Dr. Sergio Bellabarba, Milan, and I got the blueprints from him. Since then I am fascinated from this ship.
Karl I.
this would be a great project for you - the Royal Caroline in scratch ....... Oh JA
and?it WOULD..., but I AM (!) 81 years now!
So you have still a lot of years to build - Enjoy
Sorry Maarten to get off topic, but I think it is important to convince Karl Ingwer .......
Count me in if Karl Ingvar and Uwe are starting a group build. Preferably in 24:1  Does your blueprint also contain each frame? I've read Gene Bodnars RC build log several times but Im scared already by the thought of lofting the frames.
No problem. By the way 81 is just a number. I would say go for it.Thanks for your optimism!
Sorry Maarten, it's just a small private talk.
Karl Ingwer
Hi Uwe,Hallo Maarten,
the rope is looking very good and realistic - Independent of the smell, I think it is more important, if the tar could pollute the timber with loosing colour. How is the rope, when you touch it? Does it getting really dry?
Hallo Karl Ingwer,
this would be a great project for you - the Royal Caroline in scratch ....... Oh JA
The rope feels dry and if pulled through a piece of paper it is slightly brownish.
Additional drying if needed can be done by adding some siccative.
to Poul:
the Bellabarba blueprints from 1977 show the usual body/frames plan, not the single frames separated.
All drawings are in 1:48, in the "Anatomy ..." they are often in 1:96. Of course there are some other differences.
Greetings
Karl Ingwer
the Bellabarba blueprints from 1977 show the usual body/frames plan, not the single frames separated.
All drawings are in 1:48, in the "Anatomy ..." they are often in 1:96. Of course there are some other differences.
Greetings
Karl Ingwer
Guess every horse sports shop will sell it, plenty of those hereBoy I really like that idea with the tar @Maarten , thats really cool. I'll have to get myself some of that
any farm and homeGuess every horse sports shop will sell it, plenty of those here
Hello Maarten, One of the kits discrepancy I have found is the Bulkheads actually shouldn't go all the way down into the Keels Slots. The Keels veneer coverings are actually to scale per AOS. I am currently in the stage of preparing the keel with the Rabbit & Bearding Line. I am getting ready here soon to start a build log and show pics of what I am doing and was wondering if you recall if you were frustrated with the frames, ect.Yes finally finished the tree nailing on my RC, 6.000 wooden cocktail pins have been added to the hull and the last can be seen in the picture below. Now it is time for some progress and I have started the addition of the cherry wood layer to the keel. The caulking between the keel parts is simulated in the model by adding additional laser burned lines in the cherry feneer. These laser lines I have additionaly coloured with a common black pencil. The caulking between the edges of the keel parts has been simulated by colouring the edges with a black marker. To finish the hull I have decided not to use any varnish but to rub the hull with bee wax and polish to a nice vinish. The effect of the wax is realy beautiful putting the focus on the grain of the wood with a satin gloss. After bee waxing the hull I have to repaint the whales as the turpentine in the bee wax is dissolving the black paint on the nails of the whales.
In the coming weeks I hope to start with the cabins as I plan some days of around the Christmas days.
Above a real tree nails from an anchor from the 17th or 18th century. The anchor is in our garden and was fished from the bottom of the North Sea 18 years ago, it is in perfect condition and shows the treenailing used to attach the achor stock. The tree nail is a wooden pen with a smaller tapered wooden pen in the middle. This anchor is about 2,5 mtrs and is 650 kg weight. It could be the size of Royal Carolines anchors. Sorry it is litted for Christmas at the moment.
A large part has to be removed from the keel veneer, I do this by first rougly cut of the major part and then using my grinder stone.
The aft part of the keel veneer has to be cut in less then half as I have changed the stern of the vessel.
In the model kit the lower part of the keel on the aft is also covered by veneer, this is incorrect and should be covered with planks, so I changed this in the model. There is sufficient of planks available in the kit to do this and gives to my opinion a better look and feel.
Finally the hull is polished with clear bee wax to get a nice finish.
The top whale in the pictures is a temporary one, this will be replaced by the carved whale in the near future.
Now I have to polish the rest of the hull with bee wax, repaint the whales and then start with the cabins. See you next time.
View attachment 32022View attachment 32023View attachment 32024View attachment 32025View attachment 32026View attachment 32027View attachment 32028View attachment 32029View attachment 32030View attachment 32031View attachment 32032View attachment 32033View attachment 32034View attachment 32035View attachment 32036
-Rick
Hi Rick @modelshipbuilder65
I do nor recal to be un happy with the frames. There is only an error in the false keel, the stern has to be corrected as otherwise the rudder cant be fitted in a later stage.
Looking forward to your blog, back into memory lane.
I do nor recal to be un happy with the frames. There is only an error in the false keel, the stern has to be corrected as otherwise the rudder cant be fitted in a later stage.
Looking forward to your blog, back into memory lane.
- Joined
- Jul 9, 2018
- Messages
- 128
- Points
- 133

still perpetually in awe!!! the more i looked here, the more i realized that there is no way i could do justice to building this kit.....i'd need another couple of lifetimes to develop the skill and patience that you have.....cheers....vic
Last edited:
Hi Vic, have you ordered yours already?still perpetually in awe!!! the more i looked here, the more i realized that there is no way i could do justice to building this kit.....i'd need another couple of lifetimes to develop the skill and patience that you have.....cheers....vic
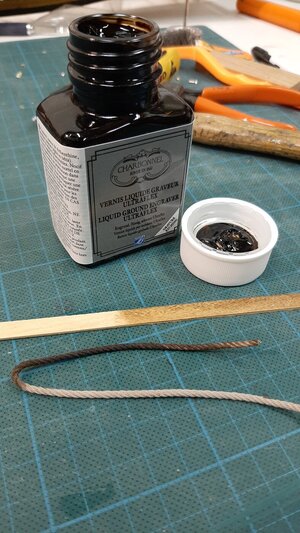
Thx to @mati.n I found a new perfect product for tarring my ropes.
I have tested real Stockholmer tar which is more difficult to work with.
Mati uses bitumen of judea for tarring ropes. He dillutes it and finally uses a top layer to reduce static electricity atracting dust to the poly rope.
Here in the Netherlands I couldn t find clear bitumen of Judea but found maybe an even better solution.
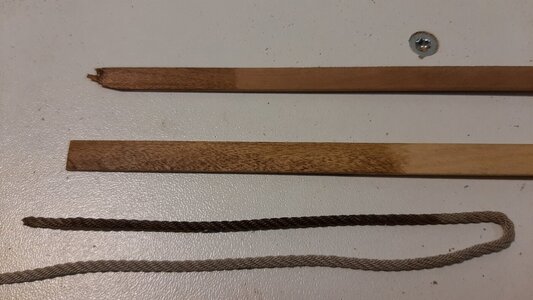
What I found is etching primer which contains bitumen of judea but also beewax, so it tarres the rope and seals it with beewax.
The product is from Charbonell called liquid etching ground.

It dries quickly and is very simple to apply, even with a brush.
Cabinet makers use it also for aging furnature, so also made a test on wood, it gives a wonderfull warm coloring which I keep in mind for my next build.

I have tested real Stockholmer tar which is more difficult to work with.
Mati uses bitumen of judea for tarring ropes. He dillutes it and finally uses a top layer to reduce static electricity atracting dust to the poly rope.
Here in the Netherlands I couldn t find clear bitumen of Judea but found maybe an even better solution.
What I found is etching primer which contains bitumen of judea but also beewax, so it tarres the rope and seals it with beewax.
The product is from Charbonell called liquid etching ground.

It dries quickly and is very simple to apply, even with a brush.
Cabinet makers use it also for aging furnature, so also made a test on wood, it gives a wonderfull warm coloring which I keep in mind for my next build.


