Thank you Dean. I love the finish you used. What is it?Looking good. Just make sure the frame is fully seated into the keel. If you have to, make a small mark in pencil at the end of the frame slot and keel slot. Even if they are fully seated, the edge of the frame may never reach the rabbet edge. Mine didn’t and was not an issue when planking the hull.
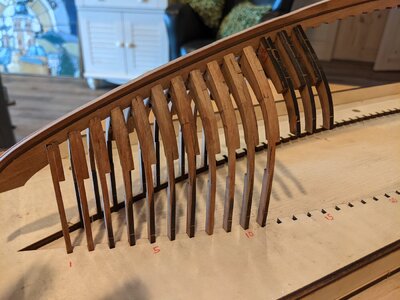
Here is pic of my frames seated in the keel, for reference...
View attachment 228864

-

SUBSCRIBE TO SHIPS IN SCALE TODAY!
The beloved Ships in Scale Magazine is back and charting a new course for 2026!
Discover new skills, new techniques, and new inspirations in every issue.
NOTE THAT OUR NEXT ISSUE WILL BE July/August 2026 -

Win a Free Custom Engraved Brass Coin!!!
As a way to introduce our brass coins to the community, we will raffle off a free coin during the month of August. Follow link ABOVE for instructions for entering.
- Home
- Forums
- Ships of Scale Group Builds and Projects
- Bluenose PoF Group Build
- Bluenose Group Build Logs
You are using an out of date browser. It may not display this or other websites correctly.
You should upgrade or use an alternative browser.
You should upgrade or use an alternative browser.

Thanks, I used Polyurethane satin clear.Thank you Dean. I love the finish you used. What is it?
- Joined
- Jan 26, 2021
- Messages
- 44
- Points
- 68

There's a happy little boy in Boyne City today.
This is my third attempt at scale model boat building. The first was the "Alabama" kit from Mamoli. Not a good choice for me. Poor instructions and materials. Previous experience with model ship building definitely required. I spent months trying to figure things out before donating it to Waste Management. I would have been much better off with a beginners kit. My bad.
My second attempt involved more research before purchasing the Model Shipways US Syren Brig. I was able to download and review instructions before purchasing, a key decision maker. It seemed doable so I went for it. Instructions were very well done and the materials better than the Mamoli kit, but the builder still sucked. Too many little gun and sweep ports to cut out..... with the wrong tools. Gluing was a messy disaster and the rigging plans gave me headaches. I did finish the POB frame, planking, copper, cannons, masts and some painting. Much better, but not good enough. It is on display, and looks okay at 15 feet.
Here I go with build number three, so please bow your head and say a quick prayer for YuanQing Bluenose #036.....the knife and scalpel are coming out.
Here's a photo where I plan to display ole #036 (wife permitting).


Second that.Looking good. Just make sure the frame is fully seated into the keel. If you have to, make a small mark in pencil at the end of the frame slot and keel slot. Even if they are fully seated, the edge of the frame may never reach the rabbet edge. Mine didn’t and was not an issue when planking the hull.
Here is pic of my frames seated in the keel, for reference...
View attachment 228864
All the time spent on making the keel/frame notches accurate saves time spent on sanding the hull, and truing the assembly.
I like to trust the CAD design.
But, it does not include the manufacturing, My keel ended up too thick for the frame notches. Filing is not accurate.
I wish I had made a jig for the frame assembly for accurate keel/keelson alignment.
Also, keep I mind that the laser cutter does not leave a true edge. Just look at the difference between the front and back of the carriers. The laser burns the entry side more than the exit.
Btw, I love your post and beam house.
There is something about heavy timbers.
IMHO (a option): as I showed in my build-log (post 223), first glue both bottom parts of the frame. Then you can use and handle them easily by dry-fit on the keel and keelson.Second that.
All the time spent on making the keel/frame notches accurate saves time spent on sanding the hull, and truing the assembly.
I like to trust the CAD design.
But, it does not include the manufacturing, My keel ended up too thick for the frame notches. Filing is not accurate.
I wish I had made a jig for the frame assembly for accurate keel/keelson alignment.
Also, keep I mind that the laser cutter does not leave a true edge. Just look at the difference between the front and back of the carriers. The laser burns the entry side more than the exit.
Btw, I love your post and beam house.
There is something about heavy timbers.
The space between the notched can then be filed and sanded to the proper size.
The sides of the notches in the keel and keelson must be angled to 90 dgr. Because of the slightly crooked laser cut.
After that, you can also glue the frames front and back separate or part by part. Just the method you prefer.
And I agree with Dean, the tip of the notches ends not to the rabbet.
Regards, Peter.
Last edited:
Hello Peter,IMHO (a option): as I showed in my build-log (post 223), first glue both bottom parts of the frame. Then you can use and handle them easily by dry-fit on the keel and keelson.
The space between the notched can then be filed and sanded to the proper size.
The sides of the notches in the keel and keelson must be angled to 90 dgr. Because of the slightly crooked laser cut.
After that, you can also glue the frames front and back separate or part by part. Just the method you prefer.
And I agree with Dean, the tip of the notches ends not to the rabbet.
Regards,
I like your idea of assembling the bottom pieces and dry fitting them to the keel. I also added the stern side pieces to the bottom pieces while clamped to the paper pattern. I think that will help with alignment of the remaining two side pieces, which I suppose could be added while the bottom is mounted in the keel.
Attachments
Last edited:
IMHO (a option): as I showed in my build-log (post 223), first glue both bottom parts of the frame. Then you can use and handle them easily by dry-fit on the keel and keelson.
The space between the notched can then be filed and sanded to the proper size.
The sides of the notches in the keel and keelson must be angled to 90 dgr. Because of the slightly crooked laser cut.
After that, you can also glue the frames front and back separate or part by part. Just the method you prefer.
And I agree with Dean, the tip of the notches ends not to the rabbet.
Regards,
After fitting the bottom on the keel, I glue the rest of the parts on the drawings. That gives the best alignment in the wifth for the top parts.Hello Peter,
I like your idea of assembling the bottom pieces and dry fitting them to the keel. I also added the stern side pieces to the bottom pieces while clamped to the paper pattern. I think that will help with alignment of the remaining two side pieces, which I suppose could be added while the bottom is mounted in the keel.
Your parts on the keel in the jig look fine.
Regards, Peter
Couple questions for the experts.
I'm trying to test fit the frames in the keel and cannot figure out how to attach the frames to the keel without having to lift the keel up (and have the frames fall back out). Do I need to come up through the bottom of the jig, meaning I need to remove part of the plywood stiffener for access from below?
Also, when is the final sanding on the interior of the frames best accomplished; before installing frames in keel or after like the exterior?
Attachments
Canoe21
Lawrence

Hello Ron, Welcome aboard the Great YQ Bluenose build Group. I see that you are well on your way to building a fine ship that you can display with pride on your fire place mantel. Just one word and that is Please do take your time, this is a Hobby and not a Job. By doing so, dry fitting your frames many times and you will even be please your results with much pride.
Regards Lawrence
Regards Lawrence
Last edited:
Hi Ron,Couple questions for the experts.
I'm trying to test fit the frames in the keel and cannot figure out how to attach the frames to the keel without having to lift the keel up (and have the frames fall back out). Do I need to come up through the bottom of the jig, meaning I need to remove part of the plywood stiffener for access from below?
Also, when is the final sanding on the interior of the frames best accomplished; before installing frames in keel or after like the exterior?
When using only the jig, I think it is not possible to attach the frame whitout lifting the jig.
2 options:
1st: turn is around and clamp the keel in a clamp divice. But you wrote: the frames fall out. The jig won’t held.
But I also don't recommend it, because it’s hard to keep everything straight, flat and angled;
2nd: make a rotating jig like Eugene did:
YUANQING BLUENOSE _ E J - Eugene Schmidt
Lower line in bow frames is for the lower beams on inside of the bow. Upper line is cut off line. Don’t really need to mark that because it’s basically 2mm below the upper part of the notch. In addition when you cut the jig off, you cut it 10mm above that line and file or sand flush upper part...
shipsofscale.com
If the only problem is that the frame fall back out, perhaps use by the dry-fit a peace of paper in the slightly too spacious seam, to clamp them around the keel/in the jig.
‘Removing the char’ and ‘final sanding’ are 2 stages. I have removed the char before dry-fit the frames. Because I find it myself pretty hard to remove the char. A lot of cutting, filing and sanding. Not easy to do with the frames on the keel and in the jig.
The final sanding I will do when I had glued the frames on the keel and in the jig. But that is fine-tuning.
Hopefully it will help you by finding you building-proces.
Regards, Peter
Last edited:
When I built my frames, I beveled them up to the provided line. Final fairing inside and out will be done after all are glued to the keel and jig.Couple questions for the experts.
I'm trying to test fit the frames in the keel and cannot figure out how to attach the frames to the keel without having to lift the keel up (and have the frames fall back out). Do I need to come up through the bottom of the jig, meaning I need to remove part of the plywood stiffener for access from below?
Also, when is the final sanding on the interior of the frames best accomplished; before installing frames in keel or after like the exterior?
I put the frames in the jig to hold as I built them. I did not use the keel at that point.
When it was time to glue the frames into the keel, I test fit and adjusted frames 1 and 49 and glued to the keel. Then I glued them to the jig once attached to keel.
After that, I removed the lower stiffener board to add all frames from below. Each frame I test fit and adjusted, then glued in the keel, working from frame 2 all the way to frame 48. 50-55 are half frames that can be done at anytime after the keel and frames 1 and 49 are glued to the jig. Hope that makes sense.
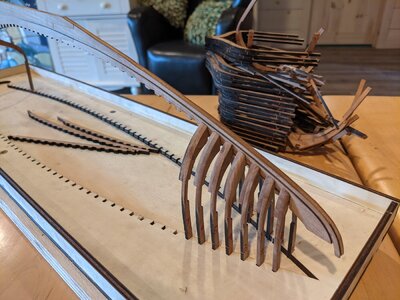
Updating my progress.
All frames assembled and installed. I think I broke every frame....twice.
Lower cross beams 66 through 83 are dry fit as shown on photo.
Question; are these cross beams suppose to extended past the frames on the exterior. Hard to see on the photo, but frames 75 through 83 extend about 1/8" from each side of the frames. I'm wondering if I did something wrong or do they get sanded down?
Thank you.
Ron

Without be in the build or addressing this question of the extent of the crossing members past the frames I don't see any structural need for that. Just a passing thought based only upon structural aspects of framing as an architect. They do not appear in the framing drawings presented in Bluenose II, Saga of the Fishing Schooners, pp 40 - 42. Rich (PT-2)Updating my progress.
All frames assembled and installed. I think I broke every frame....twice.
Lower cross beams 66 through 83 are dry fit as shown on photo.
Question; are these cross beams suppose to extended past the frames on the exterior. Hard to see on the photo, but frames 75 through 83 extend about 1/8" from each side of the frames. I'm wondering if I did something wrong or do they get sanded down?
Thank you.
Ron
Cross beams are not supposed to extend past the frames exterior. But as you said, you can sand them flush when you fair the hull. Be cautious though, if you break one loose, it will be much more difficult to glue in place later.Updating my progress.
All frames assembled and installed. I think I broke every frame....twice.
Lower cross beams 66 through 83 are dry fit as shown on photo.
Question; are these cross beams suppose to extended past the frames on the exterior. Hard to see on the photo, but frames 75 through 83 extend about 1/8" from each side of the frames. I'm wondering if I did something wrong or do they get sanded down?
Thank you.
Ron
")
Hallo Ron alias @RonkoGreeting everyone!
I've been spying on you all for a while now, I suppose it's time to come out of hiding.
I have enjoyed watching the fine craftsmen here from around the world share their amazing skills so kindly and graciously. Very uplifting to see a diverse group of people come together for a common interest to share their passion.
I'm going to give this Bluenose the best effort I can and I'm sure to be asking many questions along the way.
Ron - Boyne City, MI
we wish you all the BEST and a HAPPY BIRTHDAY

Happy Birthday Ron!
Happy Birthday!!
Happy Birtday, Ron 

Regards, Peter
Regards, Peter
Hallo @RonkoGreeting everyone!
I've been spying on you all for a while now, I suppose it's time to come out of hiding.
I have enjoyed watching the fine craftsmen here from around the world share their amazing skills so kindly and graciously. Very uplifting to see a diverse group of people come together for a common interest to share their passion.
I'm going to give this Bluenose the best effort I can and I'm sure to be asking many questions along the way.
Ron - Boyne City, MI
we wish you all the BEST and a HAPPY BIRTHDAY