-

Win a Free Custom Engraved Brass Coin!!!
As a way to introduce our brass coins to the community, we will raffle off a free coin during the month of August. Follow link ABOVE for instructions for entering.
-

PRE-ORDER SHIPS IN SCALE TODAY!
The beloved Ships in Scale Magazine is back and charting a new course for 2026!
Discover new skills, new techniques, and new inspirations in every issue.
NOTE THAT OUR FIRST ISSUE WILL BE JAN/FEB 2026
You are using an out of date browser. It may not display this or other websites correctly.
You should upgrade or use an alternative browser.
You should upgrade or use an alternative browser.
Kingfisher 1770 1:48 POF [COMPLETED BUILD]
- Thread starter dockattner
- Start date
- Watchers 146
Don’t get discouraged Paul, it’s all new. So work slow and take a little off at a time, and test fit each time. Is there no full scale plans for you to determine proper angles, etc.?
- Joined
- Mar 1, 2023
- Messages
- 147
- Points
- 213

Paul, since you have been checking on my progress on La Salamandre, I thought I should say I have been following your Kingfisher with much interest.
I have been thinking about many of the things you have actually been doing - caulking, sanding frames, bolts/treenails, rabbets - and your log has helped a lot. Hopefully, I might be able to return the favour one day.
I am sorry to see you have had a few recent frustrations, if I could use that term, but I am sure you will rise above them. I certainly wish I had bought that modeller’s “undo” button (apparently it works the same way as the one on a computer) when I had the chance…
I have seen these 'builder's aids' provided on some of the better (newer) POF kits on the forum. They look like a great addition and demonstrate that the manufacturer is doing what they can to help the modeler succeed. In my case I just lack the experience to even know what I don't know (or don't know how to do) - if that makes sense. I'll figure it out (or notUtterly unfamiliar with your build, but one of my grievances with the BN POF is the lack of part fixtures, locating the parts properly. I don't count part features as such. Understandably, kit manufacturers will not want adding more effort/cost into their kits than necessary, but since you're building from scratch, you should be able to add fixtures to the tool for critical features. Another option might be to create some form boards, which allow you to check various contours.
And occasionally one cannot in all conscience continu to build with what you've gotten.
Thanks Christian. I won't give up (I say that today - yesterday I wasn't so sure).Paul,
don't give up. I use since one year also an CNC. The only difference beteeen your build and my is, that I also have to think about the preparation of the parts, the jig, necessary tolerances and so on. The rest is exactly the same work as you are doing. After preparing the parts, there is no difference to a scratch build.
The stern and also the stem are the most complicated parts of the whole build.
So don‘t give up. You are doing a great job.
In some ways having the parts pre-cut is a wonderful blessing. But as I mentioned in another post they are cut slightly oversized and figuring out how much to remove isn't always easy. I know Remco (Remcohe) stopped using the kit provided parts after a while for this very reason.
I have some limited drawings provided with the kit - and have been supplementing those with materials from other sources. Unfortunately I don't always know what to look for and get ahead of myself in the building process.Don’t get discouraged Paul, it’s all new. So work slow and take a little off at a time, and test fit each time. Is there no full scale plans for you to determine proper angles, etc.?
Indeed, I have the same problem. Two steps forward, one step back and then the ”RO-OH” moment when everything goes to ……Unfortunately I don't always know what to look for and get ahead of myself in the building process.
Jan
Hi Paul, yes it's a small battle we have to fight. I can only agree with Christian that the stern and stem are the more difficult parts, but for me the stem was sheer madness, it was only after the 4 times that I had found an acceptable one. You're definitely doing the right thing by just taking a break. When I look at your pictures everything looks pretty good.
Paul, now you know why I went from a complicated model (SR) to a solid hull model. I’m regressing to second childhood.
Paul,
You're jumping light years ahead of your amazing Vasa with this new project. Very excellent work!!
You're jumping light years ahead of your amazing Vasa with this new project. Very excellent work!!
- Joined
- Oct 23, 2018
- Messages
- 886
- Points
- 403

what do you mean with oversized? I prepared my frames 0.2 mm thicker than necessary to hame alittle bit of wood to egalize some tolerances. At the joints I reduced the thicknes to create room for the glue. Without this space every frame will be a few 1/10 mm to big.
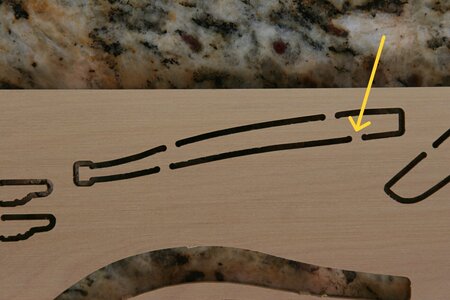
When Mr. Hunt CNC cut the billets he cut the parts slightly oversized, and the modeler must adjust each piece to get it down to the correct size. In the instructions he explains that you can 'see' the amount of oversizing by noting the dimple created when the milling head dropped into the wood. The modeler then must sand the piece down to the dimple to get to the correct dimensions.what do you mean with oversized?
For example, see the image below (a tiller?). The yellow arrow indicates the dimpling. After removing the part from the billet I will then need to sand down the part to remove the dimple. On a tiller it hardly matters - but on pieces that are size critical it can be tricky to remove the right amount of wood on every cut surface. I've gotten into the habit of counting sanding strokes to add a bit of reproducibility.

Anyway, I hope that answers your question.
Dimple = tab. Welcome to the world of CNC
Unless I’m missing something in your nomenclature. To me a dimple is a depression.
Unless I’m missing something in your nomenclature. To me a dimple is a depression.
Not the tab connecting the part to the billet. I'm referring to the depression (dimpleTo me a dimple is a depression.
 ) created by the cutting head... You can see one on each side of the tab...
- Joined
- Oct 23, 2018
- Messages
- 886
- Points
- 403

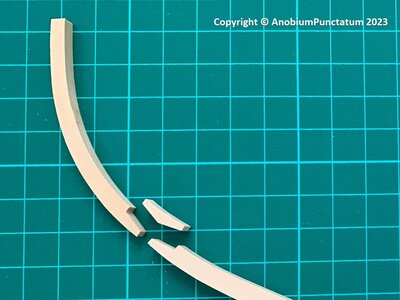
Now I understand, what you mean Paul. The small circle at each notch I have also after cutting the parts. By me it is less but visible. It's by me part of the 2/10mm I made the frames wider than necessary.
In the moment I would say that you do not need to think about this. I would only fair the frame parts until the rests of the small notches are no longer visible. The rest you can best sand after glueing all frames to the keel. For this follow Antscherls suggestions.
You are building your model by hand and if the frames in the end are 1/10mm thicker or thinner than given by the design, no one will see. Or do you think that the former shipbuilds do not have small tolereances?
Edit: In the picture you can see this notch after prefairing the long toptimber of one frame of my Alert project.

Last edited:
- Joined
- Oct 17, 2020
- Messages
- 1,691
- Points
- 488

Now I understand, what you mean Paul. The small circle at each notch I have also after cutting the parts. By me it is less but visible. It's by me part of the 2/10mm I made the frames wider than necessary.
In the moment I would say that you do not need to think about this. I would only fair the frame parts until the rests of the small notches are no longer visible. The rest you can best sand after glueing all frames to the keel. For this follow Antscherls suggestions.
You are building your model by hand and if the frames in the end are 1/10mm thicker or thinner than given by the design, no one will see. Or do you think that the former shipbuilds do not have small tolereances?
Edit: In the picture you can this notch after prefairing the long toptimber of one frame of my Alert project.
View attachment 367754

- Joined
- Oct 23, 2018
- Messages
- 886
- Points
- 403

Hi Frank,
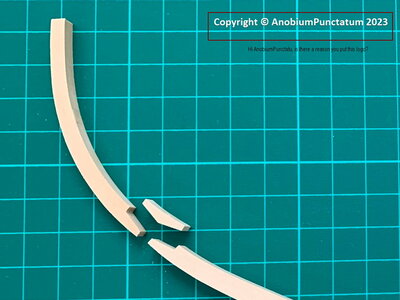
yes, it has two resons. I was a few years really active on Modellmarine.de. There we signed also our pictures. You will be really surprised how often it happend that you found these pictures on other web pages. The second and main reason has to do with the German law. Some years ago the owner of a German forum gets lots of trouble and has to pay some money because one of the users has published pictures which were from a book (I did not know the correct source anymore) without any hint that it was not his own work.
With this small logo I show and say that I made the picture.
- Joined
- Oct 17, 2020
- Messages
- 1,691
- Points
- 488

Hi AnobiumPunctatu, Thanks for replying, I'm not updated on these things, Thanks again, FrankHi Frank,
yes, it has two resons. I was a few years really active on Modellmarine.de. There we signed also our pictures. You will be really surprised how often it happend that you found these pictures on other web pages. The second and main reason has to do with the German law. Some years ago the owner of a German forum gets lots of trouble and has to pay some money because one of the users has published pictures which were from a book (I did not know the correct source anymore) without any hint that it was not his own work.
With this small logo I show and say that I made the picture.


