Boom goes the bomb!
-

Win a Free Custom Engraved Brass Coin!!!
As a way to introduce our brass coins to the community, we will raffle off a free coin during the month of August. Follow link ABOVE for instructions for entering.
-

PRE-ORDER SHIPS IN SCALE TODAY!
The beloved Ships in Scale Magazine is back and charting a new course for 2026!
Discover new skills, new techniques, and new inspirations in every issue.
NOTE THAT OUR FIRST ISSUE WILL BE JAN/FEB 2026
You are using an out of date browser. It may not display this or other websites correctly.
You should upgrade or use an alternative browser.
You should upgrade or use an alternative browser.
HMS Enterprise 1774 POF 1:48.
- Thread starter GrantTyler
- Start date
- Watchers 85
-
- Tags
- caf model enterprise
Hi Allan. I had to have a chuckle - I don’t think I will be doing to much kit bashing with this kit. I’m just going to try a build a POF model reasonably well. Cheers GrantThanks Grant. So some kit bashing if we want to have the figurehead as in Marshall print.... Oh well.....
Allan
Boom goes the bomb!
 - True story Paul. I thought I had it so sorted and then that little gap appeared….… BOOM
 - once I work those little triangles we won’t even notice. Cheers Grant
- Joined
- Sep 10, 2024
- Messages
- 1,024
- Points
- 393

I don't think you messed up. From the looks of the timbers in the jig, you had the choice of making the tops of the timbers flush or the bottoms, but not both. I would have picked the tops as well. It doesn't look like there was enough meat at the bottom of those two (and some others) to begin with.Even with a “BOMB” of a jig I still messed up two timber bevels.
I did the same thing. No one noticedonce I work those little triangles we won’t even notice
Ha, those little 'Jig Gremlins' like to jump out of nowhere and laugh their a.. off at you, I will have one coming up in my next post too!
Good evening Russ. I agree, it’s not a mess up….more like I got everything seemingly perfect until they had to be put together. There probably was enough meat and I just took too much off, even tho I thought I was being conservative. I’m actually very happy with the outcome so far but it is early days. Cheers GrantI don't think you messed up. From the looks of the timbers in the jig, you had the choice of making the tops of the timbers flush or the bottoms, but not both. I would have picked the tops as well. It doesn't look like there was enough meat at the bottom of those two (and some others) to begin with.
Good evening Paul. You mean you are only human after allI did the same thing. No one noticed.
 Reminds me of one of my favourite songs by a SA band called the Parletones-“ I’m only human after all”. Cheers Grant
Good evening Daniel. We should make those guys walk the plank at least.Ha, those little 'Jig Gremlins' like to jump out of nowhere and laugh they’re a.. off at you, I will have one coming up in my next post too!
 . Cheers Grant
I really like how it's turning out!! I'm already looking forward to when I start assembling my frames by keel)))Good afternoon everyone.
What I learned from reading every build log (completed or otherwise) is that everyone built the hawes timbers out of the jig. No instructions and this seemed logical so I went for it.
The first cant frame and hawse timbers. Prelim sanding done but I will wait for all the frames to be done to finalise the sanding.
View attachment 508671
Even with a “BOMB” of a jig I still messed up two timber bevels. I have cut and inserted a rectangle filler wood piece - I will trim and sand these when glue is dry - will be awesome when doneRED ARROWS.
View attachment 508672View attachment 508673
To ensure correct fitting I use the C section of the jig :
View attachment 508674
I had loads of fun and pretty happy so far….holding thumbs.
Cheers Grant
Perhaps not ‘conforming the rules’ but the outcome with all those curves fits very nice in the jig, Grant. Have confidence in your own skill and you really gonna love this type of build.Good afternoon everyone.
What I learned from reading every build log (completed or otherwise) is that everyone built the hawes timbers out of the jig. No instructions and this seemed logical so I went for it.
The first cant frame and hawse timbers. Prelim sanding done but I will wait for all the frames to be done to finalise the sanding.
View attachment 508671
Even with a “BOMB” of a jig I still messed up two timber bevels. I have cut and inserted a rectangle filler wood piece - I will trim and sand these when glue is dry - will be awesome when doneRED ARROWS.
View attachment 508672View attachment 508673
To ensure correct fitting I use the C section of the jig :
View attachment 508674
I had loads of fun and pretty happy so far….holding thumbs.
Cheers Grant
Regards, Peter
Good morning Peter. Thanks for your vote of confidence. This jig once built has very little room to play with (probably a good thing) but I couldn’t see how I could make these Hawes timbers and first cant frame in that small space- my outcome appears good however we all know what “appears” didPerhaps not ‘conforming the rules’ but the outcome with all those curves fits very nice in the jig, Grant. Have confidence in your own skill and you really gonna love this type of build.
Regards, Peter
 . Cheers Grant
Hi Grant,Good morning Peter. Thanks for your vote of confidence. This jig once built has very little room to play with (probably a good thing) but I couldn’t see how I could make these Hawes timbers and first cant frame in that small space- my outcome appears good however we all know what “appears” did. Cheers Grant
I think you have the correct approach. I had a hard time putting those timbers in with the building rig in place. I wish I had done it the way you are planning.
AR
Good evening Alex. I am sort of guessing a lot here. As fantastic as this kit is designed I am finding certain aspects difficult to bring together. The transom structure is also something which has me in a state of uncertainty as to how best to proceed. It is super fun however that concern of this could go totally “pear shaped” lingers long into the nightHi Grant,
I think you have the correct approach. I had a hard time putting those timbers in with the building rig in place. I wish I had done it the way you are planning.
AR
 . We will find out one way or another if I’m doing it right or not. The instructions as you know don’t really assist too much. Non the less my enjoyment factor is really high. Cheers Grant
Good morning
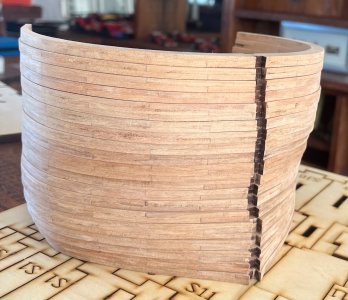
A very boring post: I am plodding along putting the frames together : 50% done of the “square frames”.

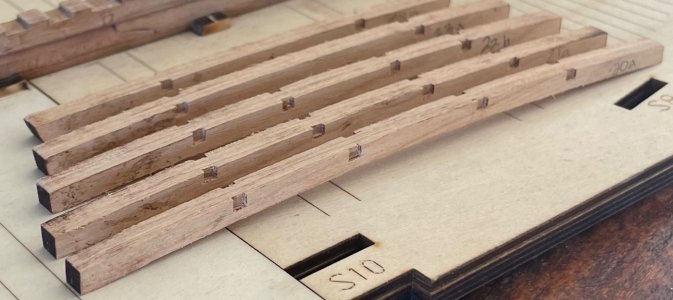
When I get bored of frames I cut out some notches on the beams. I don’t have any fancy milling machines etc so it is up to a chisel blade…..1mm deep (supposedly )
)

One thing I know is that I am going to be doing so much wood sanding and finishing on this model.
Cheers Grant
A very boring post: I am plodding along putting the frames together : 50% done of the “square frames”.

When I get bored of frames I cut out some notches on the beams. I don’t have any fancy milling machines etc so it is up to a chisel blade…..1mm deep (supposedly
 )
)
One thing I know is that I am going to be doing so much wood sanding and finishing on this model.
Cheers Grant
- Joined
- Mar 1, 2022
- Messages
- 694
- Points
- 308

Hi Grant. Are those beams of solid wood? I can't guess from your pics. Thanks in advance! Cheers.Good morning
A very boring post: I am plodding along putting the frames together : 50% done of the “square frames”.
View attachment 509672
When I get bored of frames I cut out some notches on the beams. I don’t have any fancy milling machines etc so it is up to a chisel blade…..1mm deep (supposedly)
View attachment 509673
One thing I know is that I am going to be doing so much wood sanding and finishing on this model.
Cheers Grant
Very cool. Today I will start working on solid frames. It is always interesting to watch such work.Good morning
A very boring post: I am plodding along putting the frames together : 50% done of the “square frames”.
View attachment 509672
When I get bored of frames I cut out some notches on the beams. I don’t have any fancy milling machines etc so it is up to a chisel blade…..1mm deep (supposedly)
View attachment 509673
One thing I know is that I am going to be doing so much wood sanding and finishing on this model.
Cheers Grant
……… When I get bored of frames I cut out some notches on the beams. I don’t have any fancy milling machines etc so it is up to a chisel blade…..1mm deep (supposedly)
View attachment 509673
One thing I know is that I am going to be doing so much wood sanding and finishing on this model.
Cheers Grant
No mill but impressive hand-i-matic notches with that chisel
- Joined
- Aug 8, 2019
- Messages
- 5,579
- Points
- 738

true story...A very boring post
- Joined
- Dec 3, 2022
- Messages
- 1,547
- Points
- 488

Thanks Grant. So some kit bashing if we want to have the figurehead as in the Marshall print.... Oh well.....
Allan
Keep dropping hints, Allan. You'll turn him into a woodcarver by the time it's finished.
I am plodding along putting the frames together
They look very good to me, very consistent.
You know, it's the plodding parts of this hobby of ours that I find so difficult. Framing, planking, gun rigging and so forth become production engineering - factory work. Assembling the thousand pieces of a plastic tank's tracks is an example from another genre, or rigging the ignition wires on a B-17. How do you plod on while maintaining your usual high standards? I tend to get sloppy, distracted or simply avoid the workbench until all interest in the project drains away.
This is one of those questions that seem to be about modelling but actually concern our full scale lives. I'm struck by your photos of beautifully completed boats in the setting of a beautiful house while my rather scruffy vessels (mostly uncompleted) are perfectly framed by my scruffy little flat. Our models become self-portraits to those who know how to look at them.
 (and also a little bit of

