• LUCZORAMA SHIPWRECK SCAVENGER HUNT GIVEAWAY. 4 Weeks of Fun • 1 Legendary Prize ((OcCre’s Fram Ship)) • Global Crew Welcome!
    **VIEW THREAD HERE**

USS Constitution by Model Shipways. - First Build Log

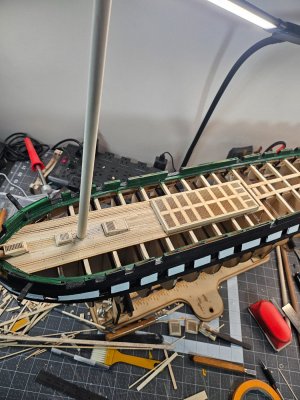
Started the deck planking work. Had the hatch comings in place, but not glued in just yet. While it looks easy, to me this has been a nightmare because I had to make many tweaks along the way and following the practicum, I realized there were a lot of inaccuracies in the practicum because it's based on Bob Hunts exact model size and and variances in the wood for the deck planking. There doesn't appear to be enough wood for the deck, or at least the 1/16x3/32 strips. There are two similar sizes in the kit and one has dark edges as if it were a pure laser cut and the other like any other strip of wood. Bob claims that a slightly large strip in the kit is acceptable and could be used as is, or shaved slightly down to the. I'm still debating this while I ordered some wood from a hobby shop. The strips of wood have very minute variances in width that it isn't apparent until you've laid many. There is tapering, but no where near the level Bob explains based on the strips size we're recommended to use. I found my self constantly measuring from the centerline throughout because I would need to add some type of filler to make up for the extra space. The number of planks from the centerline to to the waterways by the transom is supposed to be a total of 25, but I found this not to be true at all. Having 24 on either side of the centerline in this area is not even close. Anything outside of those planks are what gets tapered, but nothing more. Although I'm almost finished with laying the planks, it still takes an eternity so everything looks remotely correct. I think many builders got creat8ve to make the deck look good like a deck, but not perfectly in numbers and sizes as you would think. Anyway, I'm patiently waiting so I can start sanding and staining the deck and get that pice over with and then touch up what I've already painted and then some. Until next time...20250530_123823.jpg20250530_123831.jpg
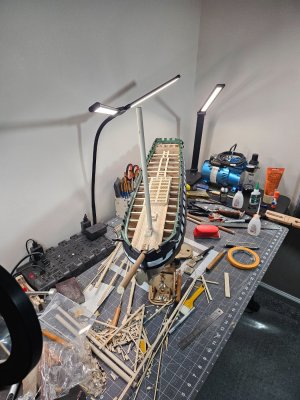
 
Started the deck planking work. Had the hatch comings in place, but not glued in just yet. While it looks easy, to me this has been a nightmare because I had to make many tweaks along the way and following the practicum, I realized there were a lot of inaccuracies in the practicum because it's based on Bob Hunts exact model size and and variances in the wood for the deck planking. There doesn't appear to be enough wood for the deck, or at least the 1/16x3/32 strips. There are two similar sizes in the kit and one has dark edges as if it were a pure laser cut and the other like any other strip of wood. Bob claims that a slightly large strip in the kit is acceptable and could be used as is, or shaved slightly down to the. I'm still debating this while I ordered some wood from a hobby shop. The strips of wood have very minute variances in width that it isn't apparent until you've laid many. There is tapering, but no where near the level Bob explains based on the strips size we're recommended to use. I found my self constantly measuring from the centerline throughout because I would need to add some type of filler to make up for the extra space. The number of planks from the centerline to to the waterways by the transom is supposed to be a total of 25, but I found this not to be true at all. Having 24 on either side of the centerline in this area is not even close. Anything outside of those planks are what gets tapered, but nothing more. Although I'm almost finished with laying the planks, it still takes an eternity so everything looks remotely correct. I think many builders got creat8ve to make the deck look good like a deck, but not perfectly in numbers and sizes as you would think. Anyway, I'm patiently waiting so I can start sanding and staining the deck and get that pice over with and then touch up what I've already painted and then some. Until next time...View attachment 523028View attachment 523029
Great start on the deck, I took the easy way out by planking the whole deck and fixing the hatches on top of the planks.
I don't remember having a shortage of planks but there was some inconsistencies in the width.

Tony
 
Started the deck planking work. Had the hatch comings in place, but not glued in just yet. While it looks easy, to me this has been a nightmare because I had to make many tweaks along the way and following the practicum, I realized there were a lot of inaccuracies in the practicum because it's based on Bob Hunts exact model size and and variances in the wood for the deck planking. There doesn't appear to be enough wood for the deck, or at least the 1/16x3/32 strips. There are two similar sizes in the kit and one has dark edges as if it were a pure laser cut and the other like any other strip of wood. Bob claims that a slightly large strip in the kit is acceptable and could be used as is, or shaved slightly down to the. I'm still debating this while I ordered some wood from a hobby shop. The strips of wood have very minute variances in width that it isn't apparent until you've laid many. There is tapering, but no where near the level Bob explains based on the strips size we're recommended to use. I found my self constantly measuring from the centerline throughout because I would need to add some type of filler to make up for the extra space. The number of planks from the centerline to to the waterways by the transom is supposed to be a total of 25, but I found this not to be true at all. Having 24 on either side of the centerline in this area is not even close. Anything outside of those planks are what gets tapered, but nothing more. Although I'm almost finished with laying the planks, it still takes an eternity so everything looks remotely correct. I think many builders got creat8ve to make the deck look good like a deck, but not perfectly in numbers and sizes as you would think. Anyway, I'm patiently waiting so I can start sanding and staining the deck and get that pice over with and then touch up what I've already painted and then some. Until next time...View attachment 523028View attachment 523029
Good afternoon. Looking great, very good progress. Cheers Grant
 
And...the deck planks are getting there...unfortunately I had to order more strips of wood, 1/16 x 3/32. As I mentioned earlier, there were two types with of wood strips in this size in the kit. It appeared to be a mix of balsa and bass woods, so there is a mild variance in size when I measure what's from the centerline to port and from the centerline to starboard. The practicum recommended using 1/16 x 5/32 if I'm corrected if the modeler prefers it and using them mainly in the midships area where the most tapering is required. I chose to just buy some more wood instead to keep things uniform. The practicum also discusses the 25 strips in the center starting from the after part of the main hatch coming, which would be tapered between 1/16 and 1/32 ending at the transom. I feel this is somewhat negligible, especially with variances in the width of the strips already in the kit. I personally do not think it is necessary to taper the center when it appears to be required in the midships area towards the transom. The strips are very thin in the first place, unless they absolutely need to be tapered. The plan sheet also is not very clear regarding the width of the planks and appear slightly wider with no taper in the center group of 25 planks. Anyway, should I redo this part of the deck, or let it go and flow into the build?
 
Well, my wood strips finally made it. I will say this though, these are 1/16 x 3/32 fresh cut out of basswood. The wood in the actual kit does not compare, and each strip in the kit had a minute variation, that it changes the actual number of planks that the practicum states there are. However, at the end of the day, I'm not going to tear up the deck and redo it unless something is completely off. It still looks good, and no one is going to count how many planks there are from the centerline to port or starboard...maybe unless you're submitting it in a competition, or someone like Rain Man, lol. I will be sanding my butt off when the planks are in because of the slight difference in the height of thickness of the planks. Once the deck is sanded, then it will be stained based on the recommendation in the practicum, which looked awesome in the pictures, but mine whack at it will probably be like a 5-year-old trying to draw inside the lines with crayon.
 
Next you will notice that I've taped off the upper hull at the gunports which is typically painted in some matte white version. I chose to paint over the white and redo this. When using a brush on a taped off area on a wooden ship, I did not like the bleed-over even though my model paint tape is very good. so, to correct this, I decided to tape off each individual gunport and instead of brushing it on, I will airbrush it on because airbrushing from a distance can be controlled and likely retain a much better rectangular shape without the bleeding. Also, it's applied in layers that dry faster. Brushes on the other hand put the paints on in globs and easily causes the bleed over. Using a polyurethane after sanding is hit and miss and I did not see a major difference. It's supposed to help make the paint go on easier when applying it to the surface, but I see that as more of a preference. I do want to make at least the outside of the hull look more professional that a toddler going to town in a coloring book. I know purists might argue using hand printing versus airbrushing. If it is a good solution to a problem, then that's what I will do. This is probably the only area of the ship that I'll airbrush and no other spot.
 
Finally. I had no warning that as you get close to finishing planking the deck, it gets friggin tough because there's little space to work in and you're tapering the wood strip to fit in there like a glove. It's enough that the top center of each bulkhead on the ship is slightly higher than the rest of the bulkheads, so adding shims to different parts of the bulkheads so the planks stay as leveled horizontally as possible. I did find out that the three type of CA glue do different things. I bought a set that had thin, medium, end thick. The medium was by far my favorite and the thick although I glued my digits several times because I never learn the first time. The one that kick me right in the bum was the thin on. I had no idea that when it saif thin, they meant watery, and it dries super-fast. So fast indeed that I accidentally glued all of my fingers from my left hand all at once instantly because I accidentally tips over the bottle. I had my hand soaking in acetone for like 5 minutes before I could pry them off of each other. But I also learned it can be your friend. When you need to glue a tight spot, of several planks together when you need to join them together, one drop would get absorbed into the wood quickly and spreads easily as well. If you do it too long, it will spread to the other planks or whatever wood nearby and like...welds them together. Alright, once I get the deck stained then I'll send more pictures, and then it's rivet time on the inside of the waterway. I don't know how many rivets are required, but I did buy 1,000 of them because there are also rivets on the hull as well. So, this will take a while and feel like an endless funeral. I didn't realize the practicum has the rivet piece in there considering having read several the narrative from several builds debating, "To rivet or not to rivet...that is the question." I'm choosing to do it because it really does look good and great for covering up flaws and mistakes.
 
Going into prepping the deck to give it that nice, weathered look, I had to improvise a bit with the recommended paints for the deck offered in the practicum. Unfortunately, some of the paints do not exist anymore and cross-over lists may not be available for all model paint manufacturers. Floquil paint looks like they are no longer in the model paint business, so finding roofers brown and grimy black to mix, it could be a challenge even though their names make it sound easier says than done. I decided as a substitute to use Flat Earth from Vallejo and Grimy Black, or at least that's what the bottle said. Either way, I think it worked. The instruction was to mix equal parts of both paints and apply them like a stain, brush on and wipe off immediately. The first set of pictures is the first wave where you do the first brush and wipe, followed by scraping everything off with a blade because depending on how you sanded with deck, if it was not with the grain, you may see several scratched areas that are not consistent throughout the entire deck. Once everything is scraped, then it is recommended to sand it again and then reapply the to the deck and then do another coat but using only the grimy black to give that weathered look.20250608_205856[1].jpg20250608_205911[1].jpg20250609_040331[1].jpg20250609_040342[1].jpg
 
The practicum recommended not to paint the bulwarks until after the deck was stained. I chose to paint it green anyway. I'm waiting for the rivets to arrive, so I have to paint everything to green anyway, but I'll likely tape off the deck, so I keep it nice and clean. I was pleasantly surprised that this this worked better than I expected. If anything throws me off is the fact that in the practicum, the picture of the completed deck is perfectly uniform and even. Although, it looks amazing, I don't feel it represented a true worn and weathered deck. A deck that is uniform and perfect means you're probably on a new ship, lol. For the first time, I feel like I have the upper hand on this because my deck might look a little ugly, but when you think of a deck that is weathered with traffic moving out and about, I think my deck represents this facet much better...and this is my opinion only because this is my first wooden ship model, so I cannot compete with anyone who has one or completed under their belt, but I'm always looking for advice and improvements.
20250609_043004[1].jpg20250609_043009[1].jpg20250609_043024[1].jpg
 
Although the hatch coamings will go one later, I decided to stain those and varnish them. Many photos show the wood color on the lighter side and varnished. I decided to go a little darker into the Oak realm and then varnish them. If the deck was going to be this dark, then I felt going light was too light, but getting it to a slightly dark brown hue would be a more compatible match...yes, my opinion too, lol. I'll likely add the picture when I send my next update, or between updates because I have lots of rivets to make friendship bracelets out of. I know rivets are not a requirement, but I like the challenge and frankly, each picture I've seen from modelers that have done this, really makes the ship somewhat stand apart in detail, even though in real life, you wouldn't see this detail because of distance and scale, unless you have a bionic eyem whihc woiuld be cool, but this is it for now.
 
Being a pretty green ship modeler myself, I’m showing a lot of temerity taking issue with the practicum as regards the deck. The Constitution, being a Navy ship, would have had her decks holystoned every morning while in active* commission. There would have been little or no weathering visible. Even laid up in ordinary, the decks would take on a silvery grey color from exposure to sun and rain.

With that said, I often make decisions on my builds that deviate from historical accuracy for the sake of what I will call visual interest or aesthetic appeal. If you achieved the look you were after, that’s the main thing.

*I say ‘active’ here because the Constitution remains in commission, but has not been subject to routine holystoning for quite some time. I suspect the decks get a thorough sanding when she’s overhauled, but I'm not sure what regular treatment she gets from her small crew.
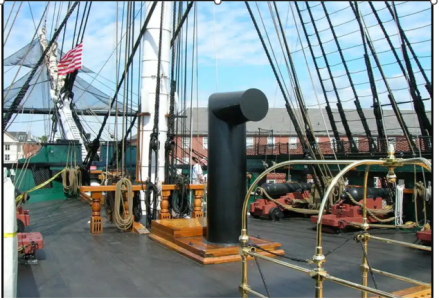
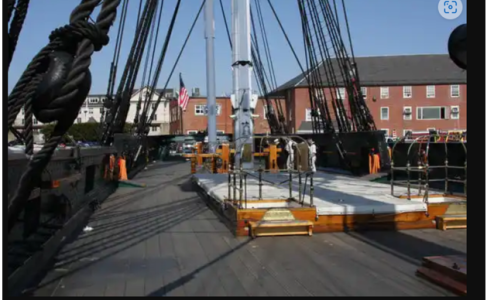
I totally agree with you as the deck is maintained today by the Navy. This model is based on the Navy plans of 1927, nearly 100 years ago, so the deck was likely not as uniform as it is today. Now in 1797 when the ship was commissioned that would have been an entirely different looking deck as well as a ships' company most likely wasn't as disciplined as today with a work hard, play hard attitude.The Navy did a great job on other ships over the years when teakwood was common on the main deck and even the bridge. So, would the deck look different treating the mixed paint as a stain as instructed in the practicum versus just using a stain straight up? If I had to do it again without brushing and wiping paint across the deck, I would have either used a stain across the deck evenly, or the mixed paint thinned out and laying it down without wiping it off. I also noticed that the wood straps in the kit are also inconsistent, plus I had to get more wood after running out. The new wood was excellent and had that wood been laid across the entire deck, then that is the only way to achieve that perfect and even look that's pictured in the practicum. If I was a seasoned wooden ship modeler, I probably would have picked up on this sooner, although I was at a crossroads whether to follow or deviate what the deck looked like either 100 years ago, or a ship 230 years old.
 
Hello rturcic72,

most of the decks of the ships around this century were Heller. Whether the USS Constitution was like that, I may doubt.
But it's your model that you're building and you decide how you want to build it. What I have learned is that staining is more difficult than with normal paint and you very quickly slip into a color that no longer looks nice. You should work carefully here.
Best regards

Günther Ship-1

Again, I followed what was recommended in the practicum, however; I've seen several variations over the years. I've seen the earthy brown and grimy black version that I used to a more grayish look to it in some versions caused by weathering, to a very dark deck or subdued deck color when I went aboard a few years ago. You are right about the paint. I think that is the key reason the practicum had us mix the roofers brown with the grimy black, but wiping it off like a stain was a first for me because I've only done that with a stain. I was thinking of sanding it down a little and adding more of a gray wash to it like some of the pictures I attached. At the end of the day, which color really represents the deck color today, I couldn't say or 230 years ago.
1749560902221.png
1749560923869.png
1749560947596.png
1749560967267.png

1749560987367.png
 
Hey, rturic,
Okay, I understand. I'm curious to see what happens next.

Cheers
Günther Ship-1
I could do a couple things....1. I could sand it down to lighten it up and then apply a possible gray wash to offset it, 2. I can keep as is and put the rivets in the inner bulkheads and tape it off and paint to green and see how it contrasts with the deck, 3. I could paint it without treating it like a stain and skip the wiping, or 4. sand it down so I can get it as light as possible without going through the deck, lol...and apply a gray weathered stain possibly with a mahogany mixed stain...Looks like I'll have to experiment, especially with the last one on a separate piece of wood I have.
 
If I may give you some advice,
you have to decide whether you want to build it as it is currently on display, or whether you really want to build it for yourself.
But then you should also think that it's the most beautiful thing you've ever built and that's how it should look.

My personal approach would be to definitely sand down the deck to make it look clean. Then you have a new base and can decide whether to go lighter or darker and, above all, whether you want a nice, clean finish.....

Cheers
Günther Ship-1
 
Back
Top