Nothing speedy about taking three weeks to double plank a hull? More confirmation that you and I are on wildly different skill levels! Yours is an amazing build!Pete! Thank you! That 4 cents is wealth IMHO!
As to the speed - I went through a period where I just worked on the hull and didn't post. Hull planking is not the most interesting subject. I know I just offended someoneApologies, shipmates!
The first planking began on June 14 and was completed June 22. I finished the second planking on July 4. So, nothing speedy about it. When I started to post about the hull the work was already done.
Blessings.
Chuck
-

Win a Free Custom Engraved Brass Coin!!!
As a way to introduce our brass coins to the community, we will raffle off a free coin during the month of August. Follow link ABOVE for instructions for entering.
-

PRE-ORDER SHIPS IN SCALE TODAY!
The beloved Ships in Scale Magazine is back and charting a new course for 2026!
Discover new skills, new techniques, and new inspirations in every issue.
NOTE THAT OUR FIRST ISSUE WILL BE JAN/FEB 2026
You are using an out of date browser. It may not display this or other websites correctly.
You should upgrade or use an alternative browser.
You should upgrade or use an alternative browser.
L'Orenoque Mamoli 1:100 scale
- Thread starter The Gavel
- Start date
- Watchers 27
-
- Tags
- l'orenoque mamoli
- Joined
- Mar 11, 2024
- Messages
- 162
- Points
- 113

the cutty sark was definitely fitted with both freeing ports and scuppers on her plans (1869) allthough in perhaps less quantity.Scuppers: There are many reasons why she would have had scuppers. A big one is what Naval Architect’s call the Free Surface Effect. Water is heavy (seawater, 64 lbs/cubic foot). If you multiply even a small depth of water by the deck area this adds up to a lot of weight. This deck load is dynamic. As the ship rolls, the water moves from side to side. This will negatively affect her transverse stability.
Although water would drain through gunports, this would still leave a significant amount of water trapped on the deck beneath the gun port sill. Scuppers would have been provided to drain this water.
Roger
- Joined
- Mar 11, 2024
- Messages
- 162
- Points
- 113

Well, that's one way of doing it ! Why am i so surprised ? Anyway, all of what you say afterwards makes sense. If you look at the picture of the pitching deck of the Darien you can see that the wheelhouses are well inside of the bulwarks line, looks like they even had space for stables alongside ! As for the Meteor / Sphinx the reason for the odd hull structure becomes apparent as the support is inbuilt. It's almost as if the paddlewheels are inboard.Martin! It took a bit longer than I intended to respond to your question about the wheel house construction in this kit. In this pic you'll see that the instructions have you glue the inboard side of the wheel house directly to the side of the ship. There is no instruction about the supports, only a plan view of a series of braces running from the bottom of the sponson deck to the hull (red arrows). If one built the kit as instructed

there would be four of these braces aft of the paddle wheel and four forward of the paddle wheel. Of course. the kit plans are nonsense. Moreover, it has the builder adding the delicate paddle wheels after the wheel houses are aboard. UTTER NONSENSE!!!
View attachment 531226
In all of the images of these ships, the wheel house was not just slapped on the side of the ship. It is more likely that the wheel house structure rode on the bulwark and extended some distance out onto the deck. In fact, in the pictures you shared of the models of Sphinx, given what appear to be well researched models built to represent the real ship, one sees that the paddle wheel house did ride the bulwark extending onto the deck far enough to make room for a structure on deck that followed the contours of the paddle wheel house.
As you know, none of the actual plans for these ships show how the designers intended to support the weight of the wheel house outboard. The model of Meteor, however, does show that the wheel house on that ship had iron braces to help support the weight.
View attachment 531232
My plan is to build the structure in parts off of the ship. Since this is how the real ship was built, I'll do my best to replicate the plans for the bateaux tambours.
I see at least 4 major parts: 1 - Yellow arrows - the external wheel house sponson deck; 2 - Red arrows - the lower section of the external wheel house; 3 - Blue arrows - the bateaux tambours; and 4 - the inboard structure. I'll probably limit the number of braces - we'll see On the display side of the ship, I may even try to show the boat being readied for lowering - see upper right of the plan below.
View attachment 531255
I'm fairly confident about the construction of the wheel houses - except for the boats themselves. Again, we'll see.
Blessings.
Chuck
Thanks for taking the time to reply,Chuck, I have to think a lot in advance with the L'Aigle as it is a scratchbuild , so it is interesting to see how others have done the job. In her case the inner walls are aligned with/ part of the bulwarks,and there are no exterior supports shown on the plans, although i have one contemporary illustration that does show them. I am sure that the bridge acts as a cross brace in strengthening the whole structure.
Anyway i will have to decide some stuff as i build , but i am pretty certain i will be building and installing the wheels before finishing the wheelhouses !
Planking on the stem....now that's a first to my knowledge!
- Joined
- May 25, 2020
- Messages
- 1,147
- Points
- 443

That's very kind of you to say! I don't know about the skill level part, I'm still in the stone age for tools and my tolerance of slight gaps in the planking probably makes some of our shipmates shake their heads in disgust and disappointment.Nothing speedy about taking three weeks to double plank a hull? More confirmation that you and I are on wildly different skill levels! Yours is an amazing build!

I'm glad you are enjoying my build! Hopefully, today I will have some more progress to share.
Blessings. Peace. Gratitude.
Chuck
- Joined
- May 25, 2020
- Messages
- 1,147
- Points
- 443

Martin! That's an interesting thought about the bridge! Since the bridge on these ships, based on the Darien illustration for example, crossed the whole deck without any support in the middle, it makes sense that the bridge may have functioned as part of the support system for the paddlewheel houses. Given the liberties I am taking with my build, I was thinking to design some sort of structural bracing to indicate the structural relationship between the bridge and the paddlewheel houses. As they say, "We'll see . . ."Well, that's one way of doing it ! Why am i so surprised ? Anyway, all of what you say afterwards makes sense. If you look at the picture of the pitching deck of the Darien you can see that the wheelhouses are well inside of the bulwarks line, looks like they even had space for stables alongside ! As for the Meteor / Sphinx the reason for the odd hull structure becomes apparent as the support is inbuilt. It's almost as if the paddlewheels are inboard.
Thanks for taking the time to reply,Chuck, I have to think a lot in advance with the L'Aigle as it is a scratchbuild , so it is interesting to see how others have done the job. In her case the inner walls are aligned with/ part of the bulwarks,and there are no exterior supports shown on the plans, although i have one contemporary illustration that does show them. I am sure that the bridge acts as a cross brace in strengthening the whole structure.
Anyway i will have to decide some stuff as i build , but i am pretty certain i will be building and installing the wheels before finishing the wheelhouses !
Blessings.
Chuck
- Joined
- May 25, 2020
- Messages
- 1,147
- Points
- 443

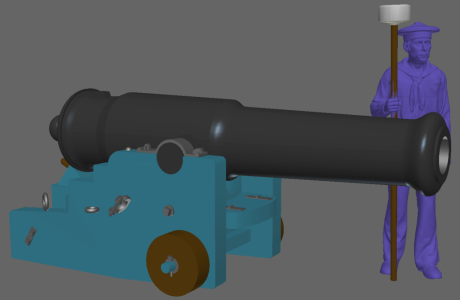
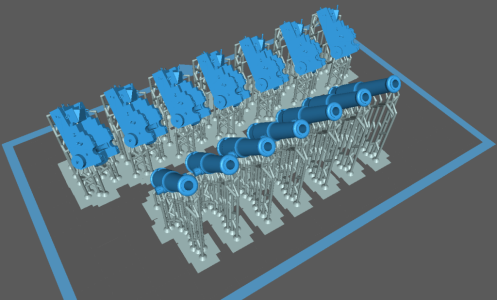
JERRY! That's wonderful news! I don't know how I didn't see this yesterday. I have retroactively crossed my fingers, toes and eyes.le canon est complet!
Seven tubes and carriages were scaled to 1:100, sliced, and are on the printer - fingers are crossed!
View attachment 531514 View attachment 531513

THANK YOU!!!
Blessings.
Chuck
- Joined
- May 25, 2020
- Messages
- 1,147
- Points
- 443

Brad! Right!?! It makes no sense with this kit - like a lot of thingsPlanking on the stem....now that's a first to my knowledge!
 ! The version of the model presented on the box shows a fully painted hull. The instrucitons talk about painting the hull. So, what's the point of the additional planking on the stem? Maybe, the designers figured that the builder can cover any errors where the hull planking meets the stem? And, since the stem gets planked so does the keel and the rudder. So the model winds up with a disproportionally thick stem, keel and rudder! Love it!


Blessings.
Chuck
- Joined
- May 25, 2020
- Messages
- 1,147
- Points
- 443

What ho, shipmates!
First - thank you for looking in, contributing, educating and sending emojis of approbation!
So, having decided to go with natural wood for the bulwarks inboard, I needed to finish the front of the poop deck and plank the poop deck so that I can get to the waterways. Here are a few shots of recent work.
My slightly oversized office on deck at dawn. Before I finished the from of the poop deck I decided that I needed to sand the deck thoroughly so that the lowest facing planks sat flush (or as close as possible ). I wound up sanding the whole ship down to 400 grit.
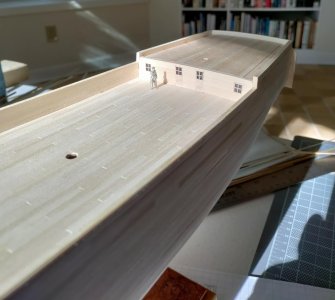
Overview of the poop deck planking - nice that you can see how bad several of the joints are. A confession - I have two major character flaws (yes only two major ones ) impatience and bad at math. Really just impatient so everything that takes too much effort is compromised further by my impatience. Since the forward end of the poop deck is 1 1/16" wider than the aft, I had a choice to make - either go with same width planks and have the sharp pointed ends aft, or taper them aft so that there was an even distribution and no sharp ends. I chose the latter. Reduce them by how much? My math told me that I needed 32 strakes at 1/8" forward. So, I reduced aft about, seriously, about 1mm or so, and began planking.
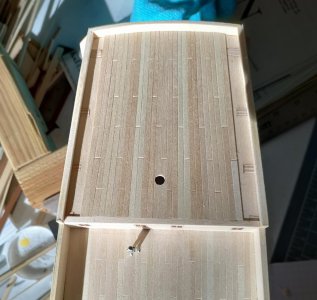
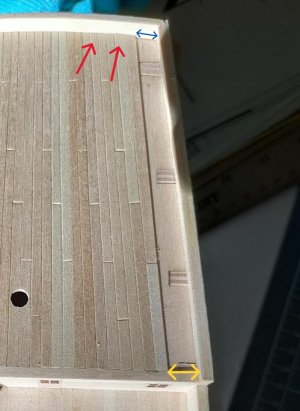
Here you can see that the aft ends aren't quite uniform, but then I got impatient. It looked like I could stop reducing the aft ends and use full width (red arrow second from left). WRONG

 The remaining width aft is still much smaller than the remaining width forward. We'll see how I manage to "fix" this. Unlike some of you, I'm not going to tear out those full with planks!!! And as I wrote that, I thought: When I get home this afternoon, I'll tear out the full width planks!
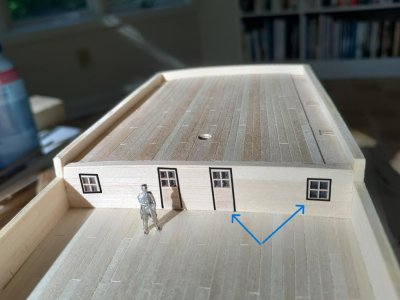
The doors and windows came with the kit - "hundreds" of them for the hotel that the kit designer would have one build from forward aft. So, with "wood" as the primary color inboard, based on the models of other French ships from this era, the other color inboard is black. I plan to frame the windows and doors in black using thin strips of black artists paper that I find give me the right color with no risk to the wood and the right thickness to indicate depth. I used the line drawing function in the computer to outline. It will look much better when the wood is tung oiled and that lovely honey color replaces the reflective white of the untreated wood. I can hardly wait!!!! But I will - after fixing and finishing the poop deck planking, installing the waterways and scuppers, then the tung oil, then the window and door trim.
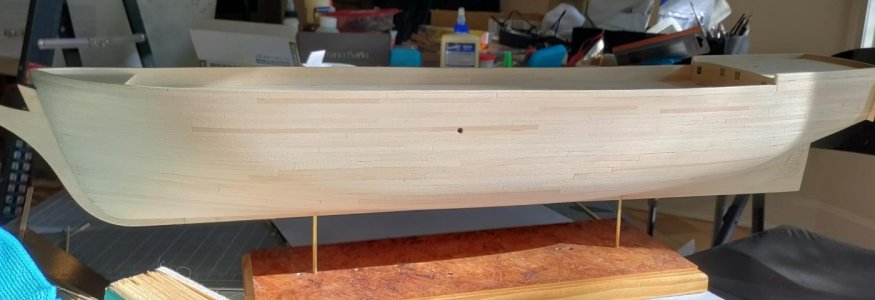
Finally, a shot of her money-maker sanded to 400 grit.
Blessings. Peace. Gratitude.
Chuck
First - thank you for looking in, contributing, educating and sending emojis of approbation!
So, having decided to go with natural wood for the bulwarks inboard, I needed to finish the front of the poop deck and plank the poop deck so that I can get to the waterways. Here are a few shots of recent work.
My slightly oversized office on deck at dawn. Before I finished the from of the poop deck I decided that I needed to sand the deck thoroughly so that the lowest facing planks sat flush (or as close as possible

Overview of the poop deck planking - nice that you can see how bad several of the joints are. A confession - I have two major character flaws (yes only two major ones
 ) impatience and bad at math. Really just impatient so everything that takes too much effort is compromised further by my impatience. Since the forward end of the poop deck is 1 1/16" wider than the aft, I had a choice to make - either go with same width planks and have the sharp pointed ends aft, or taper them aft so that there was an even distribution and no sharp ends. I chose the latter. Reduce them by how much? My math told me that I needed 32 strakes at 1/8" forward. So, I reduced aft about, seriously, about 1mm or so, and began planking.
Here you can see that the aft ends aren't quite uniform, but then I got impatient. It looked like I could stop reducing the aft ends and use full width (red arrow second from left). WRONG

The doors and windows came with the kit - "hundreds" of them for the hotel that the kit designer would have one build from forward aft. So, with "wood" as the primary color inboard, based on the models of other French ships from this era, the other color inboard is black. I plan to frame the windows and doors in black using thin strips of black artists paper that I find give me the right color with no risk to the wood and the right thickness to indicate depth. I used the line drawing function in the computer to outline. It will look much better when the wood is tung oiled and that lovely honey color replaces the reflective white of the untreated wood. I can hardly wait!!!! But I will - after fixing and finishing the poop deck planking, installing the waterways and scuppers, then the tung oil, then the window and door trim.

Finally, a shot of her money-maker sanded to 400 grit.

Blessings. Peace. Gratitude.
Chuck
Absolutely beautiful work, Chuck!
- Joined
- May 25, 2020
- Messages
- 1,147
- Points
- 443

- Joined
- Jun 17, 2021
- Messages
- 3,202
- Points
- 588

I agree with Paul.Thank you, Paul!
Blessings.
Love the (Olive Ash Burl?) base!
That is beautiful !!!! Bravo Chuck !
Although you are ‘bad at math’ you made a nice 4-steps pattern on the planking connections, Chuck.What ho, shipmates!
First - thank you for looking in, contributing, educating and sending emojis of approbation!
So, having decided to go with natural wood for the bulwarks inboard, I needed to finish the front of the poop deck and plank the poop deck so that I can get to the waterways. Here are a few shots of recent work.
My slightly oversized office on deck at dawn. Before I finished the from of the poop deck I decided that I needed to sand the deck thoroughly so that the lowest facing planks sat flush (or as close as possible). I wound up sanding the whole ship down to 400 grit.
View attachment 531841
Overview of the poop deck planking - nice that you can see how bad several of the joints are. A confession - I have two major character flaws (yes only two major ones) impatience and bad at math. Really just impatient so everything that takes too much effort is compromised further by my impatience. Since the forward end of the poop deck is 1 1/16" wider than the aft, I had a choice to make - either go with same width planks and have the sharp pointed ends aft, or taper them aft so that there was an even distribution and no sharp ends. I chose the latter. Reduce them by how much? My math told me that I needed 32 strakes at 1/8" forward. So, I reduced aft about, seriously, about 1mm or so, and began planking.
View attachment 531842
Here you can see that the aft ends aren't quite uniform, but then I got impatient. It looked like I could stop reducing the aft ends and use full width (red arrow second from left). WRONGThe remaining width aft is still much smaller than the remaining width forward. We'll see how I manage to "fix" this. Unlike some of you, I'm not going to tear out those full with planks!!! And as I wrote that, I thought: When I get home this afternoon, I'll tear out the full width planks!
View attachment 531843
The doors and windows came with the kit - "hundreds" of them for the hotel that the kit designer would have one build from forward aft. So, with "wood" as the primary color inboard, based on the models of other French ships from this era, the other color inboard is black. I plan to frame the windows and doors in black using thin strips of black artists paper that I find give me the right color with no risk to the wood and the right thickness to indicate depth. I used the line drawing function in the computer to outline. It will look much better when the wood is tung oiled and that lovely honey color replaces the reflective white of the untreated wood. I can hardly wait!!!! But I will - after fixing and finishing the poop deck planking, installing the waterways and scuppers, then the tung oil, then the window and door trim.
View attachment 531845
Finally, a shot of her money-maker sanded to 400 grit.
View attachment 531844
Blessings. Peace. Gratitude.
Chuck
And the hull planking looks very nice.
Regards, Peter
Last edited:
Hi Chuck,
Super clean work! Beautiful.
Bill
Super clean work! Beautiful.
Bill
- Joined
- Mar 11, 2024
- Messages
- 162
- Points
- 113

Eh beh , nickel mon pote !

Chuck, the attention to detail, sanding, repairing the bulwarks and planking on the poop deck look awesome! Very nice! Magic Mike
Good morning Chuck. I concur with my fellows- wonderful modelling. Cheers Grant
- Joined
- May 25, 2020
- Messages
- 1,147
- Points
- 443

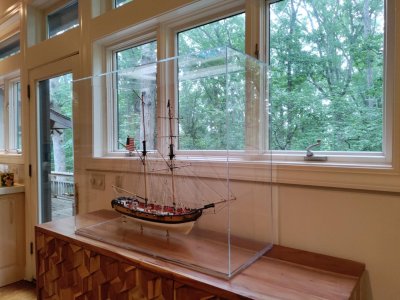
Pete! Thank you! You know, that's the second time you've admired my building boardI agree with Paul.
Love the (Olive Ash Burl?) base!
 I made it as a display board for my Constucto USS Enterprise. Then I discovered that dust, dog hair, dander were accumulating on the unprotected model and decided to put all of my models "under glass" as soon as they were finished. It took me two hours to try to clean up Enterprise and even then she was never the same as she was when I finished. When I finish L'Orenoque I'm going to send the board to you! BTW, I don't know the species of wood - I just like the burl.
Blessings.
Chuck
