• LUCZORAMA SHIPWRECK SCAVENGER HUNT GIVEAWAY. 4 Weeks of Fun • 1 Legendary Prize ((OcCre’s Fram Ship)) • Global Crew Welcome!
    **VIEW THREAD HERE**

Syren (1803) US Brig - 1/64 - Model Shipways - by Cpl Smith

Joined
Dec 3, 2022
Messages
1,463
Points
443

Introduction

IMG_0007.jpeg

Good day to you all!

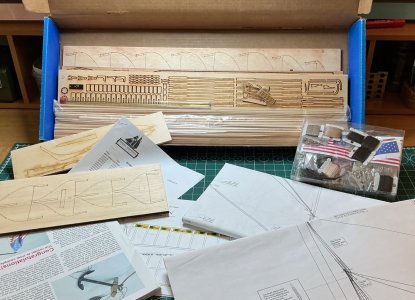
Today I broke the seals on this box of delights. It’s been in a cupboard for a couple of years but recently was moved onto a vacant bookshelf, just to fill the space left by a cull of my library (40% dumped. Yay!).

Of course, once it was in plain sight, it began to whisper, “Build me. Build Me. You know you want to. Go on, commit yourself to a relationship with a three dimensional jigsaw puzzle, macrame set and historical obsession all in one. Disturb your nights with the solving of a billion problems. And then abandon me when you are done. I know you, you cruel and ruthless man.”

“No! No! I can’t face the heartbreaks. I haven’t the time. I can’t afford it.”

But it was hopeless. Resistance proved fertile and here I am again, entering the lists for another battle of man vs model.
IMG_0008.jpeg

Estimated build time = 10 to 14 months (plus time outs for my periodic depressions)

Build style = Classic clean build, aiming at a museum style finish. Historical accuracy is somewhat important to me, though subordinate to considerations of cost, beauty, and practicality. I don’t intend to use aftermarket add-ons but I’ll scratch build improvements where I can.

My main aim is to refine the skills that I developed on the Vanguard Alert (1777) which I now consider to be a seven out of ten construction. I’ll be very pleased if I can get to a nine with Syren. To achieve this I accept the need for a lot of do-overing. I’m not short of wood, it’s determination that might be in short supply from time to time.

A secondary (but only just) aim is to write an entertaining and honest log. If you want to join in you are very welcome. That’s the whole point of the forum, innit? A kind word will help me through the dark times (planking, rat lines and that drafted longboat!) and if you take the trouble to write words to me, I promise that I’ll write a reply.

I ask only that you give me only honest praise. Please don’t tell me that my work is awesome unless you genuinely feel ‘reverential respect mixed with fear or wonder’ - over-praising will tend to make me complacent and lead to a lowering of standards. Constructive criticism is also welcome and all suggestions for improvement will be considered, though I might not agree or be able to implement them.

~~~~~~~~~~

Stage one is to read through the instruction manual several times. I had a look at the first few pages last night and I’m fairly impressed. The photos are less useful to me than the drawings and American grammar conventions render some of the text a bit cryptic but it’s head and shoulders above the manual for Alert and I managed to build that one. Close study of The Book will take me quite some time but that’s OK, a third big aim of this build is to develop my patience.

See you ASAP, Smithy.

 
Last edited:
Ahh, a rather erudite and compelling introduction. I've taken the bait...

You sir, are just the man I need.

I salute the King of the Do-overoveroveruntilit’sperfect and invite you to raise a discrete eyebrow in my direction whenever I get my “good enough for government work” head on.

You aren’t just the man I need, you’re the man I wannabe.
 
The Manual - First Impressions

Overnight I’ve read, studied, emended and (possibly) understood the first three chapters of the manual. There’s a lot of it and the construction method is quite different to my previous models. This generated a deal of panic and a strong desire to go out and buy myself a bigger hammer! However, I soon calmed down and realised that my usual three pounder ball-pein will be adequate. I’ll simply have to swing it a little harder and maybe take a run-up for the more challenging ‘adjustments’.

IMG_0012.jpeg

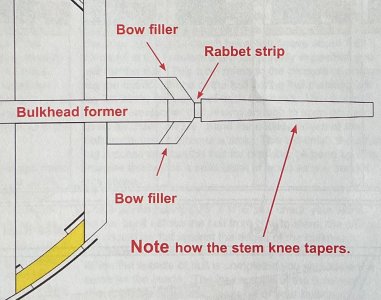
The proposed method of ‘building’ the rabbet onto the edge of the bulkhead former (the spine of the model, hereinafter called the BF), rather than cutting it into the side of the piece strikes me as very clever and likely to produce a neater rabbet than I’ve yet managed. Hurrah! [NB. I always put my captions below my photos, where they are supposed to be.]

I want the model to be mounted on the traditional brass pedestals so I mustn’t forget to cut slots for the threaded rods and install the captive nuts at this stage. I’ve also been tipped off that cutting slots and building housings for the two masts will save some unnecessary anguish way on down the line. There won’t be a lot left of that BF by the time I start building onto it properly.

IMG_0010.jpeg

I’m accustomed to plywood underdecks on which to lay the deck planks. Syren requires me to plank across the tops of the bulkheads with voids underneath much of the deck. I’m scared of heights and afraid I’ll fall into the voids with my partly unsupported planking and build a deck which simulates the long swells of the ocean rollers. I’ve achieved this interesting but hideous effect while hull planking too and it seems to me that if I extend the filler blocks outward and downwards, completely filling the hull, I’ll make the planking easier on deck and hull, assist me in the fairing, and perhaps even eliminate the need for two layers of planks on the hull. This requires some thought so I’ll be using that big hammer to beat some sense into myself in days to come.

IMG_0011.jpeg

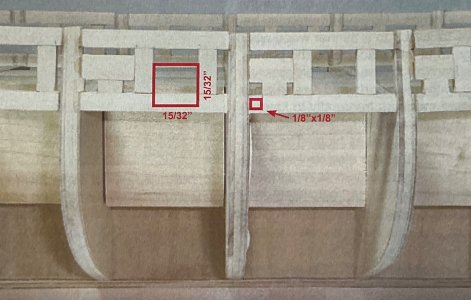
The other feature which is new to me is this Idea of framing the gun and sweep ports with huge lumps of timber and building the bulwarks in the manner of the real thing. Formerly I’ve been required to build solid bulwarks and then cut holes in them, tidying up the edges with a thin sill. The Syren way looks like one of those places on old maps marked “Here be Dragons!” It’s going to be the first place in the build where I start using up my timber two or three times faster than anyone else in a series of do-overs for each piece needed. Measure-twice-cut-once-offer-up-throw-away-start-again-again.

And all in fractions? Oh my dear America, when will you embrace that lovely lady Miss Millie Pede? I wonder if working with fractions is the reason why those red dimension lines are all displaced by 4mm? ;)

I trust that I won’t have to build sills later on and, to be fair, they were almost as fiddly as this method.

I haven’t examined my wood yet but the framing instructions specify basswood. That’s a little soft in my opinion for precision carpentry so I’ll probably substitute something a bit harder from my spares box.

Generally, if a mere corporal may speak Generally, I’m pleased with what I’ve discovered so far. New methods, new skills to learn but nothing that I can’t manage by the third or fourth attempt. :)
 
Last edited:
And all in fractions?
We are still using Imperial but it does save time for models of English ships as all the contermpary English dimensions for scantlings and drawing legends are in feet and inches, at least through about 1965. :) Even so I wish we had gone metric as well back then, or even sooner.

One example are the sweep ports dimensions. They were typically 10" up and down by 12" fore and aft on English ships (5/32" X 3/16"~ 4mmX4,76mm) at 1:64

I will be curious to see how you find this kit compares to your Vanguard kit.

Allan
 
I’m curious how many years this Model Expo kit has been on your shelf. I’ve found recently that they’ve taken some short cuts over the last 20 years that have seriously detracted from the quality of their kits. I’m looking forward to seeing how you overcome those challenges, as I think I will face the same with my current build. After you, if you please, Sir…
 
While you may change your avatar and even your user name, you just cannot disguise your eloquent writing style. Welcome back Smithy. I'll tag along for the ride, if you don't mind, that is.
 
I wish we had gone metric as well back then, or even sooner.

I learned rods, poles, perches, chains, furlongs as a kid. Looking back, it was so difficult yet I still recall that there are 108 lbs in a cwt. Even the abbreviations made little sense. I like the metric system even if it is French, but I still drink pints of beer even when filled from 440ml tins and I calculate my car’s mileage in miles per litre.
One example are the sweep ports dimensions. They were typically 10" up and down by 12" fore and aft on English ships (5/32" X 3/16"~ 4mmX4,76mm) at 1:64

That’s five sevenths by six sevenths of a Macedonian Cubit or in 1:64 scale 4,000,000 x 4,760,000 beard/seconds. True dat!

I will be curious to see how you find this kit compares to your Vanguard kit.

I bet the instructions and design will be better and the materials worse.
 
I’m curious how many years this Model Expo kit has been on your shelf. I’ve found recently that they’ve taken some short cuts over the last 20 years that have seriously detracted from the quality of their kits. I’m looking forward to seeing how you overcome those challenges, as I think I will face the same with my current build. After you, if you please, Sir…

The box carries a ‘copyright 2010’ date. I bought it second hand three years ago, probably. I had another model from Model Shipways/Expo which I binned due to the awful cheap basswood but in this case i’ll be able to replace most of that.
 
While you may change your avatar and even your user name, you just cannot disguise your eloquent writing style. Welcome back Smithy. I'll tag along for the ride, if you don't mind, that is.

I’m a changeable sort of fellow. I contain multitudes, sadly all at war with one another.
 
The Manual - First Impressions

Overnight I’ve read, studied, emended and (possibly) understood the first three chapters of the manual. There’s a lot of it and the construction method is quite different to my previous models. This generated a deal of panic and a strong desire to go out and buy myself a bigger hammer! However, I soon calmed down and realised that my usual three pounder ball-pein will be adequate. I’ll simply have to swing it a little harder and maybe take a run-up for the more challenging ‘adjustments’.

View attachment 537668

The proposed method of ‘building’ the rabbet onto the edge of the bulkhead former (the spine of the model, hereinafter called the BF), rather than cutting it into the side of the piece strikes me as very clever and likely to produce a neater rabbet than I’ve yet managed. Hurrah! [NB. I always put my captions below my photos, where they are supposed to be.]

I want the model to be mounted on the traditional brass pedestals so I mustn’t forget to cut slots for the threaded rods and install the captive nuts at this stage. I’ve also been tipped off that cutting slots and building housings for the two masts will save some unnecessary anguish way on down the line. There won’t be a lot left of that BF by the time I start building onto it properly.

View attachment 537670

I’m accustomed to plywood underdecks on which to lay the deck planks. Syren requires me to plank across the tops of the bulkheads with voids underneath much of the deck. I’m scared of heights and afraid I’ll fall into the voids with my partly unsupported planking and build a deck which simulates the long swells of the ocean rollers. I’ve achieved this interesting but hideous effect while hull planking too and it seems to me that if I extend the filler blocks outward and downwards, completely filling the hull, I’ll make the planking easier on deck and hull, assist me in the fairing, and perhaps even eliminate the need for two layers of planks on the hull. This requires some thought so I’ll be using that big hammer to beat some sense into myself in days to come.

View attachment 537669

The other feature which is new to me is this Idea of framing the gun and sweep ports with huge lumps of timber and building the bulwarks in the manner of the real thing. Formerly I’ve been required to build solid bulwarks and then cut holes in them, tidying up the edges with a thin sill. The Syren way looks like one of those places on old maps marked “Here be Dragons!” It’s going to be the first place in the build where I start using up my timber two or three times faster than anyone else in a series of do-overs for each piece needed. Measure-twice-cut-once-offer-up-throw-away-start-again-again.

And all in fractions? Oh my dear America, when will you embrace that lovely lady Miss Millie Pede? I wonder if working with fractions is the reason why those red dimension lines are all displaced by 4mm? ;)

I trust that I won’t have to build sills later on and, to be fair, they were almost as fiddly as this method.

I haven’t examined my wood yet but the framing instructions specify basswood. That’s a little soft in my opinion for precision carpentry so I’ll probably substitute something a bit harder from my spares box.

Generally, if a mere corporal may speak Generally, I’m pleased with what I’ve discovered so far. New methods, new skills to learn but nothing that I can’t manage by the third or fourth attempt. :)
Good afternoon Smithy. I’m with Russ, welcome back. I’m on board with this Syren build- enjoy. Cheers Grant
 
Ha! I thought so! Well spotted, Russ!

So good to have you back, Smithy!

I did sign the first post ‘Smithy’. :)

The years I spent as a cpl in the RAF, a single near-alcoholic with few responsibilities and many friends and spondulicks, was the best time of my life. I wanted to commemorate that. ROTF
 
Are you familiar with The History of Mr Polly by HG Wells by any chance, Russ?

I am not, however, looking over Wiki's cliff notes, it looks like a great read. I do like Wells' writings.

It would seem that Mr. Polly enjoyed coining phrases with multisyllabic words of which he didn't quite grasp the actual meaning - kind of like me? ROTF
 
kind of like me? ROTF

Us, Russ, us. The History is in one hand as I thumb my phone with t’other. A great book which I have read many times, perhaps once a decade since adolescence.

IMG_2446.jpeg

Before even the turning of the genesisttical page of this ‘ere log we find ourselves embarked upon our customarious disvergent menanderings. A worthy start o’man, a worthy start.
 
Back
Top