• Win a Free Custom Engraved Brass Coin!!!
    As a way to introduce our brass coins to the community, we will raffle off a free coin during the month of August. Follow link ABOVE for instructions for entering.

Corsair H.M.S. Enterprize Build Log

hat you're asking about are bumpers, or, in other words, fenders
Thanks Iutar. As it was in inboard profile drawing, it never dawned on me that it could be something on the outside of the hull. What you describe makes total sense. I wonder if the kit shows and explains these. It is obvious from the few inboard profile kit drawings that have been posted, this is not supposed to be a fighting ship, but rather a prisoner/holding hulk. I highly doubt that is what most people were expecting when they bought the kit.
Allan
 
Last edited:
but rather a prisoner/holding hulk
Dear Allan! According to Rif Winfield, "British Warships in the Age of Sail, 1714 to 1792," the ship served as a floating barracks for involuntary (compulsory, not voluntary) recruits.

In 1791, the converted ship was docked near the Tower of London. It served as a quarantine facility for new arrivals. From here, people were distributed among other ships.
 
According to Rif Winfield, "British Warships in the Age of Sail, 1714 to 1792," the ship served as a floating barracks for involuntary (compulsory, not voluntary) recruits.
That is correct. The drawings also show the two configurations, one set as a fighting ship, one set as a holding/prison ship. I say prison rather than barracks as the men being held captive there waiting for assignment to fighting ships probably did not want to be there. Kidnapped by the press gangs, then held prisoner, then hard work on a warship.
 
I say prison
That's right. People tried to escape. In "The Dispatches and Letters of Vice-Admiral Lord Viscount Nelson: With Notes by Sir Nicholas Harris, Nicolas G.C.M.G., Henry Colburn, London, 1845, Vol. VI," Nelson is quoted as saying that 42,000 deserters escaped in the ten years from 1793.
Officially, it was still a barracks, but in reality the ship was a prison. The drawing of the converted ship clearly shows that almost all the gun ports are sealed. This is typical for a prison. On floating barracks, all the gun ports were usually left open, with window frames inserted. But not on our ship.
 
Allan, hello! What you're asking about are bumpers, or, in other words, fenders. These reinforced fenders were installed on all ships and vessels intended for port service. Ports are crowded, and ships often collide. Often such ships are placed close to each other, and in high waves in bad weather they hit each other hard.
View attachment 548807
View attachment 548808 View attachment 548809 View attachment 548810 View attachment 548811 View attachment 548812 View attachment 548813
View attachment 548814 View attachment 548815
Thank you very much for providing this information. I've learned something today ! :)
 
One last planking update before I go back to lower decks.
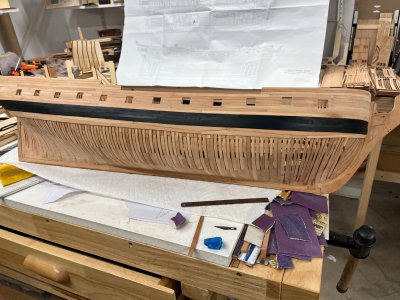
First coat on the wales. Starting to actually look like a ship.

Tim

View attachment 550059
You made a lot of progress, Jeff. Nice work.
………. Auch …… I see it’s not yours. :confused:
A bit confusing to post like this in someone else's log.
Regards, Peter
 
One last planking update before I go back to lower decks.
First coat on the wales. Starting to actually look like a ship.

Tim

View attachment 550059
Good morning Tim. This is so good. I wish you would do a log just so we can see how you do your work. Looking at your hull planking I see you have correctly used the Top and Butt planking pattern. I was wondering how you cut the planks into this pattern so accurately ? I have tried a few attempts and failed miserably Kudos on the notched planking by some of your gunports as well- its not often we see this. You are owning this Enterprise. Cheers Grant
 
Good morning Tim. This is so good. I wish you would do a log just so we can see how you do your work. Looking at your hull planking I see you have correctly used the Top and Butt planking pattern. I was wondering how you cut the planks into this pattern so accurately ? I have tried a few attempts and failed miserably Kudos on the notched planking by some of your gunports as well- its not often we see this. You are owning this Enterprise. Cheers Grant
Grant,
Thanks for the kind words but too far along to start, too lazy to take all those pics.
First off, realize this planks come pre cut, BUT, and it's a big but I had to custom fab a couple for the Wales and many of them, particularly toward the bow and stern had to be altered, mostly be planing angles. Here I use a small violin plane that is razor sharp and set to shave little curls of wood about 1/2 as thick as a sheet of paper......one of my most useful tools.
If you are custom fabbing all, IMHO, since they are all very close as to angles, you make one solid "prototype" master then trace everything from that. biggest variance is that final planks running to stern are longer but same angles as others.
That said, here is where gap filling CA and long brass bar clamps come into their own. When planks are fit, especially ones that need to be heat bent [I use a heat gun over a form with a moistened plank] once they are clamped through the frames, there are usually less than ideal gaps. One of the beauties of the medium CA it allows working time. Once clamped the brass adjustable bar clamps go from frame tops, plank bottoms to close up gaps.
Works great but sometimes small gaps remain and the CA with fast sanding to fill gapyields zero gap, ultimately using a very sharp, very light touch with a #11 blade to yield a small parting line.
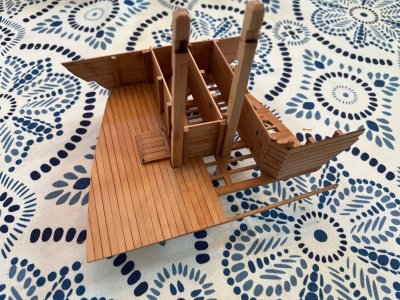
Personally I have never realized a suitable result using Titebond on planking. Also use CA on all lower structures. Here is my almost finished forward platform, once It's lightly sanded and finish applied the result seems appealing to my eye.
Hope this helps.

Tim

IMG_0777.jpeg
 
Last edited:
Grant,
Thanks for the kind words but too far along to start, too lazy to take all those pics.
First off, realize this planks come pre cut, BUT, and it's a big but I had to custom fab a couple for the Wales and many of them, particularly toward the bow and stern had to be altered, mostly be planing angles. Here I use a small violin plane that is razor sharp and set to shave little curls of wood about 1/2 as thick as a sheet of paper......one of my most useful tools.
If you are custom fabbing all, IMHO, since they are all very close as to angles, you make one solid "prototype" master then trace everything from that. biggest variance is that final planks running to stern are longer but same angles as others.
That said, here is where gap filling CA and long brass bar clamps come into their own. When planks are fit, especially ones that need to be heat bent [I use a heat gun over a form with a moistened plank] once they are clamped through the frames, there are usually less than ideal gaps. One of the beauties of the medium CA it allows working time. Once clamped the brass adjustable bar clamps go from frame tops, plank bottoms to close up gaps.
Works great but sometimes small gaps remain and the CA with fast sanding to fill gapyields zero gap, ultimately using a very sharp, very light touch with a #11 blade to yield a small parting line.
Personally I have never realized a suitable result using Titebond on planking. Also use CA on all lower structures. Here is my almost finished forward platform, once It's lightly sanded and finish applied the result seems appealing to my eye.
Hope this helps.

Tim

View attachment 550631
Good morning Tim. Thank you for the advice. WOW that is such a cool kit to have the planking precut. Definitely the best Enterprise kit out there. I love your work, so clean and precise. Cheers Grant
 
Good morning Tim. Thank you for the advice. WOW that is such a cool kit to have the planking precut. Definitely the best Enterprise kit out there. I love your work, so clean and precise. Cheers Grant
Thanks.
About as close to a full scratch as you're likely to get unless you love to glue plans to stock and scroll saw everything out.

Tim
 
Grant,
Thanks for the kind words but too far along to start, too lazy to take all those pics.
First off, realize this planks come pre cut, BUT, and it's a big but I had to custom fab a couple for the Wales and many of them, particularly toward the bow and stern had to be altered, mostly be planing angles. Here I use a small violin plane that is razor sharp and set to shave little curls of wood about 1/2 as thick as a sheet of paper......one of my most useful tools.
If you are custom fabbing all, IMHO, since they are all very close as to angles, you make one solid "prototype" master then trace everything from that. biggest variance is that final planks running to stern are longer but same angles as others.
That said, here is where gap filling CA and long brass bar clamps come into their own. When planks are fit, especially ones that need to be heat bent [I use a heat gun over a form with a moistened plank] once they are clamped through the frames, there are usually less than ideal gaps. One of the beauties of the medium CA it allows working time. Once clamped the brass adjustable bar clamps go from frame tops, plank bottoms to close up gaps.
Works great but sometimes small gaps remain and the CA with fast sanding to fill gapyields zero gap, ultimately using a very sharp, very light touch with a #11 blade to yield a small parting line.
Personally I have never realized a suitable result using Titebond on planking. Also use CA on all lower structures. Here is my almost finished forward platform, once It's lightly sanded and finish applied the result seems appealing to my eye.
Hope this helps.

Tim

View attachment 550631
This is REALLY intersting
I am oing the Inner Planking and finding the Titebond very unsuitable
Will tray THe other side with CA
Ive used CA on every other model but it appears some of you guys think its a no no!

Tim are you not marking Treenails on your deck
Mine is below with Planks Goggled
Will trim as i fit to Ship

I have always drilled and pinned (1mm stuff rounded) my planks
See My San Felipe Best planking i ever did
Not sure this is practical - looking at marking with tiny Marker pen On the beams


IMG_20251019_112929[1].jpg
 

Attachments

  • IMG_20251019_122139[1].jpg
    IMG_20251019_122139[1].jpg
    111.9 KB · Views: 4
Last edited:
Thanks.
About as close to a full scratch as you're likely to get unless you love to glue plans to stock and scroll saw everything out.

Tim
These kits from China are A Giant Leap for Modelship building
Until you see the quality of wood (Pear) and detail of cutting Its like a new Century
The new Surprise from AL Still has the very clever but impossible DEcks where they are precut but you can "see The Joints" and they spoilt the model
Much better to plank it yourself and then it can be "Joggled" and Treenailed as you want
Victory Models is also working on an HMS Suprise. I think I would wait for that one before I spent for the AL kit. :)
 
Victory Models is also working on an HMS Suprise. I think I would wait for that one before I spent for the AL kit. :)
Its not Victory Models but yes should be available early new year
Its Chris's design and will be amazing
I wil never even consider another AL kit
Superb design but the wood is so thick an d those deck joints
 
Well, I want to say "Thank You !" to all the members of the forums. I am really having a tough time getting the cant frames installed. However everyone with their beautiful builds has kept me motivated to get it done. I've managed to figure out what I need to do going forward with these and I've not got X1 through X3 of the bow cant frames installed. :) Thank you all again ! :)

I'm also trying to sand the inside of the hull frames, but my method was VERY slow going. So, I've ordered a new sander which should be here around Thursday and hopefully that will get it done in a reasonable amount of time.
 
Back
Top