
• SUBSCRIBE TO SHIPS IN SCALE TODAY!

    The beloved Ships in Scale Magazine is back and charting a new course for 2026!
    Discover new skills, new techniques, and new inspirations in every issue.

    NOTE THAT OUR NEXT ISSUE WILL BE July/August 2026
  • Win a Free Custom Engraved Brass Coin!!!
    As a way to introduce our brass coins to the community, we will raffle off a free coin during the month of August. Follow link ABOVE for instructions for entering.

His Majesty's Ship Fowey (44) 1744 by AllanKP69

They can be printed on regular paper then glued to the wood but once the paper is wet with glue I find it is hard to work with. The label paper does not stretch or twist like paper with glue in my experience.

I overcame the rag-like properties of timber patterns on printer paper by using the top-of -the -line 96% white paper and giving it a heavy coat of brushing lacquer. I attach the patterns using Best Test rubber cement. Use a smooth but liberal coat on the timber stock and on the pattern back. Let it dry. Then join the two. The grab is instant so there is no fine adjustment.
When the patterns have done their job an old used Gem blade starts the separation. Most of the time the whole pattern peals right off. Th Gem blade gets under any stubborn shards. My thumb removes the rubber cement from the wood.

One 4oz applicator bottle - a quart to refill it - a quart of n-heptane to keep the cement at brushing consistency - cheap bulb pipettes to add the solvent.

The lacquer - The solvent is fierce. I use it in open air. I tape down all four edges of my patterns sheet with old fashioned crepe paper masking tape to a sheet of contractors demo model floor protection brown paper cut from a roll. Dry lacquer under the paper is a bear to defeat. NO aerosole lacquer EVER. My lungs are not evolved to deal with a coating of nitrocellulose. It is better not to turn materials that are not otherwise volatile into something that is. The solvent is bad enough - a particle mask will not filter an organic solvent - only activated charcoal or an independent air supply will. But open air and a breeze works and the solvents are heavier than air. A 50 cent 3" brush is good enough to apply the lacquer.
High Gloss - the stuff with added dirt does not hurt and if I have to use it - do not stir it. A gallon used to be twice the cost of two quarts, but gallons are now difficult to find and the price - well inflation has really affected it. One heavy coat is enough. More is not better. More makes the surface grabby.

I do not have the reference, and it is not Goodwin, but I remember that the max depth of the timber chock (butt chock) was 50% of the molded dimension where its at.
 
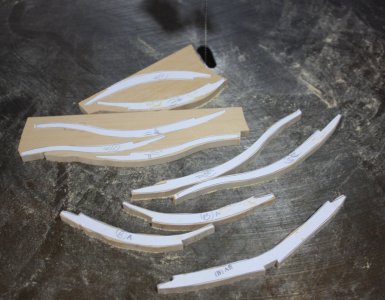
Frames. I am waiting on final decision on the framing dispostion as the team is traveling. In the mean time I can start making the frames. The frame drawings are printed onto label paper. Next step will be to cut each floor and futtock then peel the backing and stick the part onto the pre-thicknessed boards. The floors and first futtocks are the same thickness, 12.5", the second and 3rd futtocks are 11.75" and the top timbers/upper most futtocks are 11" broad. They can be printed on regular paper then glued to the wood but once the paper is wet with glue I find it is hard to work with. The label paper does not stretch or twist like paper with glue in my experience.

Two frame drawing examples before each piece is cut and attached to the wood. The first is from the drawing board. The second is another frame printed on the label paper
View attachment 617474View attachment 617475
Starting with the frame is a interesting and labor intensive part of the build, Allan. Will follow it with great interest. Till now it’s looking very promising.
Regards, Peter
 
the max depth of the timber chock (butt chock) was 50% of the molded dimension where its at
Good point, thanks Dean. I just looked in Goodwin's book The Construction and Fitting of the English Man of War. He describes the timber chock or anchor piece for ships from 1710 to 1750 but I cannot find any information on the sizing in the book. A conundrum as there are about 10 drawings of the chocks in TFFM Volume I and none of them are 1/2 of the molded dimension, but rather, about 2/3 or more. Without confirmation based on contemporary sources I am not sure if 1/2 or 2/3 is correct. The problem gets big when making the frames fore and aft as the chocks need to be cut at the same angle as the bevel of the frame. None of them will be seen from the side once the frames are raised but I would love to find contemporary information on these. I do not have Ollivier's book but if anyone out there has it and it gives this information PLEASE let me know. I checked the scantlings in the Establishments, The Shipbuilder's Repository and David Steel's The Elements and Practice of Naval Architecture and found nothing so far regarding the chocks.

Regarding, glue on drawings is there is an advantage to using contact cement and solvent and bulbs and bottles and does it do a better job? If it does it would definitely be worth a try. Right now I print, cut and peel.

Thanks again Dean

Allan
 
Without confirmation based on contemporary sources I am not sure if 1/2 or 2/3 is correct.
From the practical - it does not matter. The frame chocks will be almost impossible to see anyway.
They only matter on a section model. - You should also consider doing one for the midship in addition.
I do not even consider them for my style. It is the fore quarter and aft quarter where the bevel is significant that cause me to consider them not worth the trouble. In your place, I would consider splitting the difference and do 0.6.

In your place, I would stick with POF, but where the framing is behind planking, I would choose practical over authentic.
No filling frames, combine them into a bend. Or a solid wall and full frames all the way. On a model there is no needed to worry about loss to bevel. Plotting cants and going that complex geometry when it is hidden?
I checked to see if my prejudice against cant frames was shared and found many if not most of the 1670's Navy Board stylized frame masterpieces were full frame up to the hawse. And I believe full frames up to the transoms.


Regarding, glue on drawings is there is an advantage to using contact cement and solvent and bulbs and bottles and does it do a better job? If it does it would definitely be worth a try. Right now I print, cut and peel.
I use rubber cement - the wrinkle-free - paper stuff.
I much prefer Best Test to Elmer's - quality matters here. An even coat, but a thick one too.

It is new to me that DAP contact cement is also a rubber cement, but it is a totally different formulation. That stuff just does not want to go away. It is lousy after 20 years or so for house or furniture construction which is what it is for. It is totally contraindicated for any use on a model. I have up to now used it to bond paper backed and now cloth backed sanding media to the Maple platen on my Larson model thickness sander. No organic solvent that I have tried will totally remove it without a ton of work, but I have never tried n-heptane - so I have some hope there.

I am looking at your pix of your patterns and I am having the thought that by not dissembling the patterns into individual timbers and doing close packing before printing you will use a lost of Avery material that ain't cheap.
I cycle R G B instead of black to idiot proof things -me being the one making idiot mistakes unless I plan against it.
 
In your place, I would stick with POF, but where the framing is behind planking, I would choose practical over authentic.
We are on the same page in a lot of things. That is exactly what will be done. Every third frame, where t will be planked over. This leave less than 3/4 inch assunder so plenty of surface area to glue the planking without worrying about flat sections like the kits that have too few bulkheads.

I checked to see if my prejudice against cant frames was shared and found many if not most of the 1670's Navy Board stylized frame masterpieces were full frame up to the hawse.
The actual ships had all square frames until about 1710 if I remember correctly and that is my plan for now. It made drawing up the frames using the body plan station lines much easier.

you will use a lost of Avery material that ain't cheap.
I stopped using Avery years ago. There are equally good label papers for half the price.

What is RGB. Really Good Build??? :)
 
What is RGB.
Painter19 defaults to the triangle - circle and three slides for color selection.
I am all about quick and dirty so sliding the top one all the way is 255 000 000 = Red
middle G green - bottom B blue
If each face is a different color and cycling thru three I know Red is always deadflat face when R G
Green always when G B and Blue when B R.
More efficient would be Magenta - Cyan - Yellow but this way any one color uses all three nozzles
My Ecotank gets cranky if it sits idle for longer than a week.

I am guessing deadflat so far? I am waiting to see how you do the bevel when both faces' shape is different and how you align the partners in a bend.

Your cut faces are a lot smoother than mine, so I am betting scroll saw?
I use a Taiwanese 9" bench bandsaw with 3-4 TPI - cuts as fast as I care to push thru 0.25" stock.
Castelo is dense.

The actual ships had all square frames until about 1710 if I remember correctly
Well that explains it, and here I have been thinking that they avoided cants because they were too much work to justify the difference in look.
 
I am guessing deadflat so far?
The only frames that will be exposed will be the dead flat frames so the chocks are not an issue. For the rest they will be planked over so I may just go with scarphs. The moulded dimensions of the floors and futtocks will be over sized as needed to account for the angle that will be sanded as needed going aft and forward.
I am betting scroll saw?
You are right, I use a scroll saw. I had a band saw that rarely saw the light of day so I got rid of it years ago. I know there are uses but with a full size table saw, planer and a Byrnes thickness sander I have not missed it to make slats of wood.

Allan
 
Back
Top