• Ships of Scale has incorportated an extra level of security when you log In. Please follow on-screen prompts to acknowledge that you are not a robot via a "Check Box" or a "Pictorial Check Box Puzzle". This is needed due to higher level of AI Activity Security.
  • SUBSCRIBE TO SHIPS IN SCALE TODAY!

    The beloved Ships in Scale Magazine is back and charting a new course for 2026!
    Discover new skills, new techniques, and new inspirations in every issue.

    NOTE THAT OUR NEXT ISSUE WILL BE July/August 2026
  • Win a Free Custom Engraved Brass Coin!!!
    As a way to introduce our brass coins to the community, we will raffle off a free coin during the month of August. Follow link ABOVE for instructions for entering.

USS Constitution by BlueJacket 1:96

Phase I complete! I've made up all the needed hooks for the gun tackle to be used. Once I got in a rhythm, I could do get one done in less than a minute. The problem for me is my thumb. There is a tiny joint at the base of your thumb called the CMC. The cartilage in mine is all but gone, so after handling cutters and plyers for about 15 minutes and I'm in agony. So, take a break, drink a beer and come back later to do another 15 or so.
Here's what they look like
20260716_100817.jpg 20260716_175356.jpg

These are still about 1 mm longer than they should be, but I used #22 hooks and any smaller would be near impossible. It's hard to believe there are 100 of these little hooks in that tray. Now to move on and strop 100 tiny little blocks.
 
By the way, Thanks for looking in Pete. Not sure if there was a question or comment intended, but there was no text in your reply.
 
...so after handling cutters and plyers for about 15 minutes and I'm in agony. So, take a break, drink a beer and come back later to do another 15 or so...
...hard to believe there are 100 of these little hooks in that tray.
These hooks look really sharp (no pun intended!), Frank! Nice job!

Was trying to do the math on how many beers it took you to finish all 100, but I had to stop for my own beverage break and lost count! ROTF Looking forward to seeing how these look when the carriages are fully rigged! Thumbsup
 
So, phase two complete. I've managed to get all the double blocks stropped with hooks. I first tied a piece of rope (2-3") to the hook - decided not to seize these as it adds a bit of length to something that is already a little over sized. Then, glued to hook to the block and wrapped the rope around, tieing it of at the bottom. A little dab of CA kept everything in place. After all the pieces had been stropped, I gave them all a hair cut.
20260721_092415.jpg 20260721_095007.jpg

48 down, 48 to go
 
Well, moving right along, slowly but surely. I got all 48 sets of tackle rigged up and ready to go. A tedious job to say the least. These 3D printed blocks are 2mm in length and the holes are .01. I drilled these out using a #79 drill bit (.014') to make reaving them a little easier. I also stiffened the end of the rope with UV resin.

20260726_151409.jpg 20260726_151535.jpg

Now it's time to move on to the guns themselves. Before I do that, I need to go ahead and get the spar deck permanently glued down. However, recent posts by Jon (@JSGerson ) regarding all the eyebolts in the deck have made me think I might want to get all these in place while the deck is "off ship".

Stay tuned
 
...have made me think I might want to get all these in place while the deck is "off ship".

Stay tuned
Yes, that has been my plan, as well, for whenever I get to that point. For both the gun deck and the spar deck guns. I recall someone making a single gun mockup with all the rigging points so that each of the guns and tackle would be consistent and be much easier to prepare... then move to the actual ship. We'll see if that plan comes thru.
 
By the way, Thanks for looking in Pete. Not sure if there was a question or comment intended, but there was no text in your reply.
My bad,

I was saying what fantastic work you are doing and thanks for the tips. I have a 1/96 Revell kit USS Constitution (old version) that I am building my skills up to tackle that project.
 
Hi Pete
Thanks for dropping back by and thanks for the compliments. As for your skills, I've been watching your Titanic build and I would say your skills are just fine. Very impressive in fact. I loved your idea for backlighting an image of the restaurant, and you obviously have no problem working at a small scale. The benches are amazing. Can't wait to see what you do with your Connie
 
Hello All,
Another victim here of the MSW disaster. Two and a half years into my build and sadly, I did not keep a personal copy of my log. So, instead of trying to re-do the entire thing from the beginning, I am going to start up my log from where I am. As it stands, I am just getting started on the spar deck. Here are a few photos of the ship currently
View attachment 596698 View attachment 596699


View attachment 596705

View attachment 596704 I hope to do them justice soon.


Nice job so far! I have the same kit in my stash, as well as several other MSW and Blue Jacket kits.
Hello All,
Another victim here of the MSW disaster. Two and a half years into my build and sadly, I did not keep a personal copy of my log. So, instead of trying to re-do the entire thing from the beginning, I am going to start up my log from where I am. As it stands, I am just getting started on the spar deck. Here are a few photos of the ship currently
View attachment 596698 View attachment 596699


View attachment 596705

View attachment 596704
I'm confused. Is this thread about the Blue Jacket kit or about the Model Shipways kit? The represent the ship at different times in her career and are of differing methods of modeling. Thank you for any clarification!
 
Hi Bill, the kit is have is the BlueJacket kit. MSW refers to ModelShip World, which is another forum that experienced a serious crash earlier this year. All data on that site was lost
 
Hi Bill, the kit is have is the BlueJacket kit. MSW refers to ModelShip World, which is another forum that experienced a serious crash earlier this year. All data on that site was lost
Thank you for clarifying! I was aware of MSW's crash, but many refer to Model Shipways as MSW. Hence, my confusion. They also produce a kit of the Constitution, but that kit is how she appears today. The Bluejacket kit depicts her as she appeared in 1812.

Bill
 
Yes Bill, you are absolutely correct, the kit is supposed to be as she was in 1812, which is how I wanted to build her. I must say that it is a decision that comes with alot headache. The truth is, the ship actually changed a good bit during that year, so when you consider 1812, you must also consider when in 1812. My intent was to get as close as I could to what she looked like in the battle with Guerriere. The kit falls short in several areas, the one that has given me the most trouble is the fact that the instructions are very vague. Case in point, the location and purpose of the various eyebolts required on the spar deck. I have been somewhat paralyzed for the last week or so trying to decide how to proceed. I want to get these little details installed on the deck before I actually glue it down. I love the details given by Eriksen and trust his plans more than anything, but his information is based on how she was in 1815, so that is an issue. I finally realized that much of what I was fretting over were belaying points for the sail rigging and I do not intend on attaching sails, so even if a few things are missing, I won't need them. As for the deck eyebolts, I'll follow Eriksen and if there are extras, oh well.

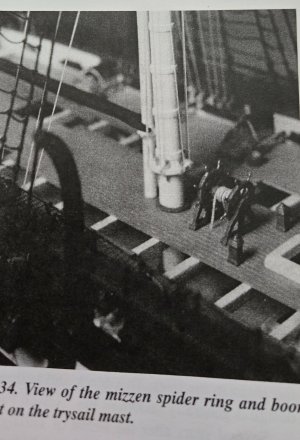
So I got started putting in eyebolts around the masts. I first glued down the mast boots so I wouldn't accidentally put an eyebolt too close. I've decided to use eyebolts that are slightly larger than the ones used for the gun tackle. I used #16 hooks instead of #22. When I got to the Mizzen mast I ran into a problem. How exactly is the Trysail mast stepped on the spar deck?
The BJ instructions simply states: "step the trysail mast to the spar deck with its upper end in a socket on the mizzen cap".
The instructions provide the following photo of Arnot's model
20260802_151054.jpg
You can see the small boot around the mizzen mast, but the trysail mast just appears to be resting directly on the spar deck. If you look very closely, you can see that the mizzen mast extends down into the gun deck, but the trysail does not. I have to think it must have been secured somehow. So my question for all of you out there is how should I handle this? Should I drill a hole for the trysail mast to rest in, or build some kind of boot for it. I've seen other models that have a square piece that seems to secure this mast?
As always, thanks for your help

 
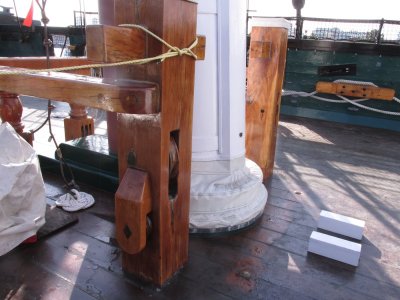
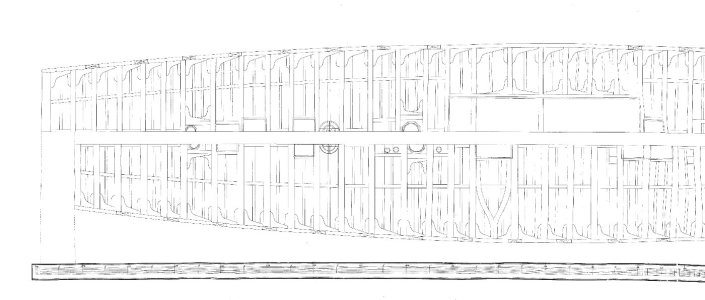
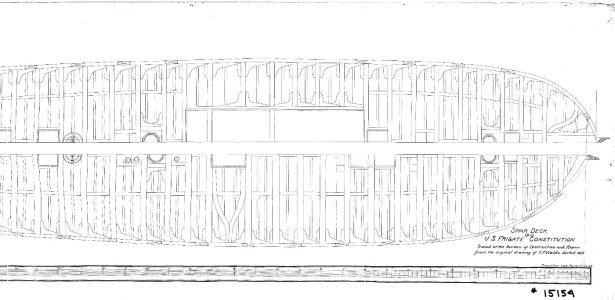
Peter, I checked my US Navy plans for the trysail mast and found as far back as 1819 and 1849, the arrangement plans show the mizzen mast passing through the spar deck but not it appears, the trysail. The square piece you see on other models is at least provided by the MS kit to reflect at least today's configuration. I can't say anything about other kit manufacturers.

Jon
Mizzen Mast 05.JPG

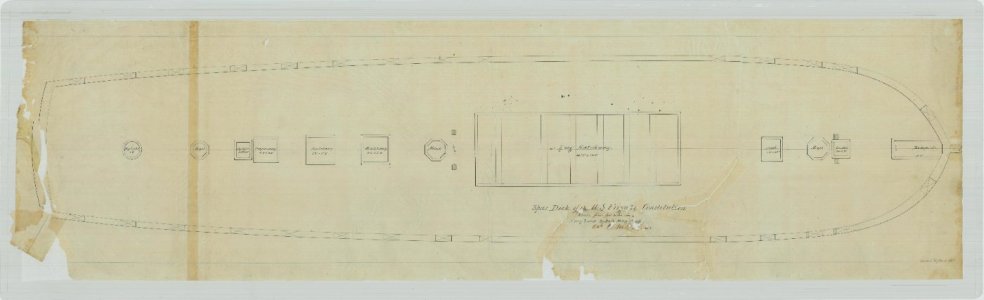
15154001_1 - Spar Deck.jpg

15154001_2 - Spar Deck.jpg

Spar Deck - RG19_ALPHA_Constitution_1797_08.jpg
 
Jon, that is an interesting photo. I presume the trysail mast would be stepped into those two little blocks, but what holds it in place?
 
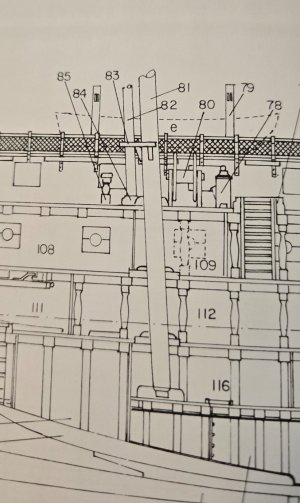
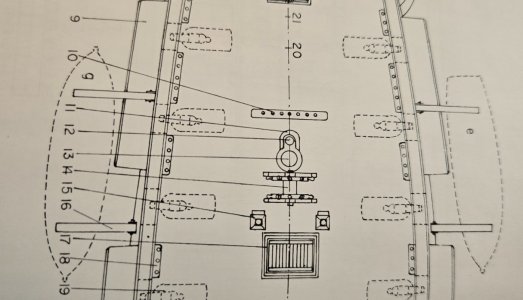
To add to the confusion, I checked AOTS and found this
20260802_171028.jpg 20260802_171046.jpg

On the left, #84 is listed as the "spanker mast step" (not trysail) and the same for #11 on the right. Clearly this mast does not pass through the spar deck, but it should obviously have some sort of step to hold it in place. Although most of what I have seen shows this as being square, Marquardt shows it as being curved?

Guess I'll just flip a coin
 
Yes Bill, you are absolutely correct, the kit is supposed to be as she was in 1812, which is how I wanted to build her. I must say that it is a decision that comes with alot headache. The truth is, the ship actually changed a good bit during that year, so when you consider 1812, you must also consider when in 1812. My intent was to get as close as I could to what she looked like in the battle with Guerriere. The kit falls short in several areas, the one that has given me the most trouble is the fact that the instructions are very vague. Case in point, the location and purpose of the various eyebolts required on the spar deck. I have been somewhat paralyzed for the last week or so trying to decide how to proceed. I want to get these little details installed on the deck before I actually glue it down. I love the details given by Eriksen and trust his plans more than anything, but his information is based on how she was in 1815, so that is an issue. I finally realized that much of what I was fretting over were belaying points for the sail rigging and I do not intend on attaching sails, so even if a few things are missing, I won't need them. As for the deck eyebolts, I'll follow Eriksen and if there are extras, oh well.

So I got started putting in eyebolts around the masts. I first glued down the mast boots so I wouldn't accidentally put an eyebolt too close. I've decided to use eyebolts that are slightly larger than the ones used for the gun tackle. I used #16 hooks instead of #22. When I got to the Mizzen mast I ran into a problem. How exactly is the Trysail mast stepped on the spar deck?
The BJ instructions simply states: "step the trysail mast to the spar deck with its upper end in a socket on the mizzen cap".
The instructions provide the following photo of Arnot's model
View attachment 623682
You can see the small boot around the mizzen mast, but the trysail mast just appears to be resting directly on the spar deck. If you look very closely, you can see that the mizzen mast extends down into the gun deck, but the trysail does not. I have to think it must have been secured somehow. So my question for all of you out there is how should I handle this? Should I drill a hole for the trysail mast to rest in, or build some kind of boot for it. I've seen other models that have a square piece that seems to secure this mast?
As always, thanks for your help

That is true of all ships. Ships undergo frequent modifications, so if you are trying to be accurate, you must go so far as to identify not only the year but the actual deployment date.

Concerning the plans, give Nic a call at Bluejacket. He is most helpful and can help with virtually any problem with any of their models. For example, I bought a Bluejacket model of Flying Cloud earlier this year. The kit is incomplete, especially missing its fittings set. Although that model has not been produced since the 1990s, he was able to replace the set. I had also found a much older Bluejacket kit off of Ebay, Hudson's Half Moon. He was able to send replacement plans and give detailed advice on the kit. Bluejacket is a real pleasure with which to do business! Nic is a large part of that.

You can also contact the USS Constitution museum in Boston should you like detail information. They provided instrumental assistance when Bluejacket was designing the kit and making the corrections to the 1812 period.

I hope that this information helps!
 
wow. i am just seeing this build for the first time. Must have been fun working with a solid hull. I tried one once and it takes a lot of skill to get the right dimensions. Yours is looking great. At the time that I bought my kit, I didn't know there was another manufacturer that offered a better kit.
 
Last edited:
Hi Mark,
Thanks for looking in. This kit was a gift from some very thoughtful, but very unknowing work colleagues. They had no idea how difficult this model is to build, especially considering I have never built a wooden ship. I decided to jump in even though everything I read said I was crazy. Couldn't have done it without forums like this and folks like yourself sharing their builds. I have to say, if I were to choose myself, I would not go with a solid hull. It has it's own set of challenges, especially in the beginning, trying to shape the hull. I think I spent about 5 months sanding, shaping, checking, sanding, shaping, etc. I haven't posted much in a while, but doesn't mean I haven't been busy. I should have an update in the next day or so.

Keep up the good work on yours
 
Back
Top