• Ships of Scale has incorportated an extra level of security when you log In. Please follow on-screen prompts to acknowledge that you are not a robot via a "Check Box" or a "Pictorial Check Box Puzzle". This is needed due to higher level of AI Activity Security.
  • SUBSCRIBE TO SHIPS IN SCALE TODAY!

    The beloved Ships in Scale Magazine is back and charting a new course for 2026!
    Discover new skills, new techniques, and new inspirations in every issue.

    NOTE THAT OUR NEXT ISSUE WILL BE July/August 2026
  • Win a Free Custom Engraved Brass Coin!!!
    As a way to introduce our brass coins to the community, we will raffle off a free coin during the month of August. Follow link ABOVE for instructions for entering.

Syren 1803 1:64 Model Shipways

Beakheads really are quite fiddly work, aren’t they.

Hi Vic, yes they sure are. I found out the hard way after so many repeat attempts. Initially the manual says to place each of the head timbers, in two parts, between the upper and middle rails but to secure them in such a way they look like one piece of wood. That baffled me (and still does) but I tried many times and after weeks of on again off again I just couldn’t get something that looked suitable. I then went with three pear timbers each side but each in one piece. Then trying to line up the top rail with the sheer while getting the iron stanchions the correct length was also fiddly. No less fiddly are all the little frustrating angles.

All in all you used a good descriptor Vic - fiddly! Thanks for your post.
 
Good morning Roger. Ahh, it is so cool to see some work done on your Syren. I am always in admiration of crisp, neat outcomes and your beakhead work is no different. Always a challenge these beakheads- kudos. Cheers Grant
 
Good morning Roger. Ahh, it is so cool to see some work done on your Syren. I am always in admiration of crisp, neat outcomes and your beakhead work is no different. Always a challenge these beakheads- kudos. Cheers Grant

And a good morning to you too. Thanks for your post and comments, always well appreciated.

Yes, progress has been slow with longish intermittent periods where I had to keep from the bench. However, as I mentioned earlier any progress is progress in this hobby. Unless of course I inadvertently ding a completed piece, look at a Grant redo and then wonder if I can remember how I made it In the first place ROTF.

Have a great week.
 
Last edited:
For’d stuff cont/.

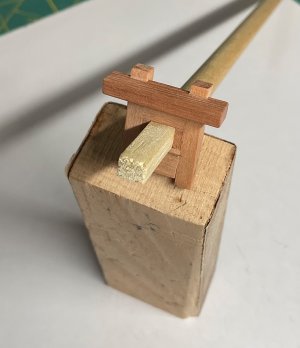
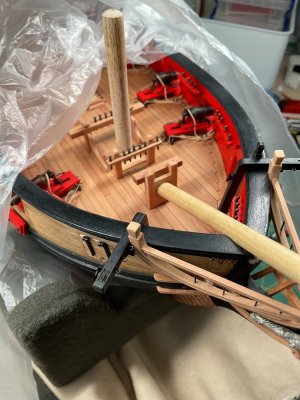
Work continues for’d with the construction of the bowsprit bitts from pear and starting the bowsprit itself. Early days though because right now the bowsprit is just a chunk of ugly 1/4” dowel.

I found this a small challenging part of the build ensuring the mortise of the bitts matched the tenon of the bowsprit but at an angle. I started off fitting the tenon to the mortise in a straight line. Then cut the necessary angles on the packing pieces of the bitts. Once they fit together I cut lots of small slivers off both parts to get the correct angle so the dowel lays properly on the cap rail, while maintaining the necessary angular fit into the mortise of the bitts. I think that makes sense but summary of this part? - it was a pain :(.

Unfinished of course and that knobby tenon will be suitably cleaned up and cropped but a couple of photos anyway. Thanks for following along you are all well appreciated.

IMG_6507.jpeg

IMG_6510.jpeg
 
For’d stuff cont/.

Work continues for’d with the construction of the bowsprit bitts from pear and starting the bowsprit itself. Early days though because right now the bowsprit is just a chunk of ugly 1/4” dowel.

I found this a small challenging part of the build ensuring the mortise of the bitts matched the tenon of the bowsprit but at an angle. I started off fitting the tenon to the mortise in a straight line. Then cut the necessary angles on the packing pieces of the bitts. Once they fit together I cut lots of small slivers off both parts to get the correct angle so the dowel lays properly on the cap rail, while maintaining the necessary angular fit into the mortise of the bitts. I think that makes sense but summary of this part? - it was a pain :(.

Unfinished of course and that knobby tenon will be suitably cleaned up and cropped but a couple of photos anyway. Thanks for following along you are all well appreciated.

View attachment 629838

View attachment 629839
A nice result, Roger. Taking all those angles into consideration.
Regards, Peter
 
Always a joy to see your clean, precise work, Roger!
Thank you Paul. Not only are you an extremely gifted modeller but you are also a very supportive member of this forum to the benefit of a great many of us.

A nice result, Roger. Taking all those angles into consideration.
Regards, Peter

Hi Peter, it took a while with some frustrating moments. Thanks.

Roger that... ;)

Thanks Jim. Now all I can hear in my head is VHF responses from years ago “Roger, Roger” ROTF.
 
Good morning Roger. It’s been a while. I really enjoy your updates, such good woodwork. Cheers Grant

Hi Grant, thanks, small updates that are keeping me accountable to myself. However, a redo or hopefully just an adjustment to that first length of the bowsprit is looming. I think I hacked off too much by way of the cap rail notch area (blame the chippy ;)). I was trying to get the angle of the bowsprit a little more correct. The fit looks crappy now so I might increase the diameter of a new piece of suitable dowel to fit better. I buried myself in Lee’s book to see how much leeway I have for a realistic bowsprit diameter to main mast.
To be continued /.
 
Fine job on the cannon / carriages and deck details. I am working on being that good with those things also.

Hello Charles, thanks for dropping by and for your nice post. Lots of small parts to the Syren which I found a little daunting when I started. However, slow and steady, discarding pieces as I went and of course redo’s has become my friend.
 
Hi Grant, thanks, small updates that are keeping me accountable to myself. However, a redo or hopefully just an adjustment to that first length of the bowsprit is looming. I think I hacked off too much by way of the cap rail notch area (blame the chippy ;)). I was trying to get the angle of the bowsprit a little more correct. The fit looks crappy now so I might increase the diameter of a new piece of suitable dowel to fit better. I buried myself in Lee’s book to see how much leeway I have for a realistic bowsprit diameter to main mast.
To be continued /.
Eish Roger, However I quite like redo,s.........:cool:
 
Back
Top