• Ships of Scale has incorportated an extra level of security when you log In. Please follow on-screen prompts to acknowledge that you are not a robot via a "Check Box" or a "Pictorial Check Box Puzzle". This is needed due to higher level of AI Activity Security.
  • SUBSCRIBE TO SHIPS IN SCALE TODAY!

    The beloved Ships in Scale Magazine is back and charting a new course for 2026!
    Discover new skills, new techniques, and new inspirations in every issue.

    NOTE THAT OUR NEXT ISSUE WILL BE July/August 2026
  • Win a Free Custom Engraved Brass Coin!!!
    As a way to introduce our brass coins to the community, we will raffle off a free coin during the month of August. Follow link ABOVE for instructions for entering.

Rat lines first time

Hallo Jiopio,

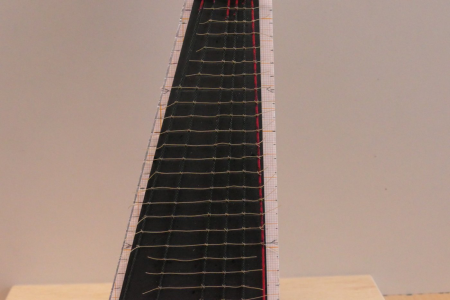
If you want the ratlines to appear at the correct scale on your model, there's only one way to do it: make them as thin as possible. In the photo at the start of this report, you can see that the ratlines are far too thick. I completely agree with the answer AndyA gave right after your post.

On my own Victory I first did a few tests with making the ratlines. See my build report for this: https://shipsofscale.com/sosforums/threads/hms-victory-of-caldercraft-by-wil.16072/page-8 There you can see how I approached it and how you can get a nice, even spacing.

I make my own rope from single-strand polyester thread. This base material is very thin. The ratlines are made of 3x1 thread, about 0.1 mm thick. I'd advise against cotton sewing thread, it has too many little fibers, which will later attract a lot of dust. Polyester, on the other hand, is smooth and stays looking nice. I glue the knots with a tiny bit of superglue, which doesn't show.
P1034395.JPG
 
Hallo Jiopio,

If you want the ratlines to appear at the correct scale on your model, there's only one way to do it: make them as thin as possible....

The ratlines are made of 3x1 thread, about 0.1 mm thick.
I agree that we need to keep ratlines quite thin, but 0.1mm is a bit too thin, I think. For your model (I think it's 1/76 scale), that works out to 7.6mm in full size, or 0.3" in diameter. (Hard to tell in the photo above, as I just about can't see the ratlines.) I believe most ratlines were closer to 1/2" diameter size, so you could increase the size a bit. However, the smaller size will certainly reduce the size of the knots.

(After writing this I checked out your link above)

From your linked article this photo shows them better, with the black background:
1788716625824.png
But right below this photo, you mention "Since the ratlines are only 0.2 mm thick, they are barely visible like this."

Again, IMHO, the 0.2mm you used here is a better compromise, working out to 15.2mm or 0.6mm in full size. And they do look great.

Great job and tutorial on ratlines on this link, BTW! Very well detailed and helpful.
 
RE Top Down
If I apply ratlines top down then the loop of thread hangs out of the way and voids disturbing the previous ratline. The passes of the needle between and around the shrouds can be made where the shrouds a widely spaced then drawn upwards; this reduces the likelihood of catching two shrouds at once.
Expanding on my use of spacer clips described above I often use the following sequence.
position clip A
Tie a ratline below it
add clip B below and push the ratline up against the bottom of clip A to straighten and protect it.
Tie a ratline below clip B
push up with clip C
Squeeze clip B and carefully draw out clip A
Continue.
As an aside: a cow hitch on the end shrouds will leave the end of the ratline cord pointing inwards rather than outwards though it is a bit of a faff.
I think I really like this procedure using clips, but it's a bit hard for me to visualize. Do you have photos to go with it, like in a previous build?
 
After the strakes have been laid, this detail must be addressed before the ratlines are installed.
Construction and placement: It consists of a shaped block of hardwood (often elm or ash) featuring a longitudinal groove. Attachment: It is securely lashed to a shroud (a piece of standing rigging) using a rope binding known as a lashing. Function: It acts as a movable cleat. It allows a line—such as a halyard or a sheet—to be quickly made fast (secured) directly to the shroud, without needing to run the line all the way to the cleats on deck.
 
I think I really like this procedure using clips, but it's a bit hard for me to visualize. Do you have photos to go with it, like in a previous build?
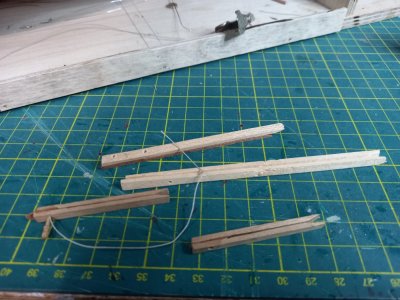
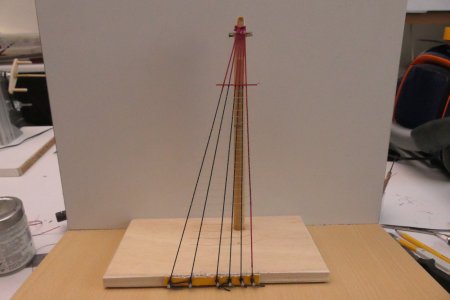
This from an earlier build: Rigging the topmast on the bench. It only uses two clips but I have refined the process a bit now and use more. The clips are easy to make and be of various length or widths. The key bit is the bit of thin planking (a tad thinner than the shroud cord) to separate the two sides.
Hope this clarifies,
topmast shrouds.jpg spacers.jpg
 
Last edited:
After the strakes have been laid, this detail must be addressed before the ratlines are installed.
Construction and placement: It consists of a shaped block of hardwood (often elm or ash) featuring a longitudinal groove. Attachment: It is securely lashed to a shroud (a piece of standing rigging) using a rope binding known as a lashing. Function: It acts as a movable cleat. It allows a line—such as a halyard or a sheet—to be quickly made fast (secured) directly to the shroud, without needing to run the line all the way to the cleats on deck.
Sorry, the translation is completely wrong. Frank
 
Hallo Jiopio,

If you want the ratlines to appear at the correct scale on your model, there's only one way to do it: make them as thin as possible. In the photo at the start of this report, you can see that the ratlines are far too thick. I completely agree with the answer AndyA gave right after your post.

On my own Victory I first did a few tests with making the ratlines. See my build report for this: https://shipsofscale.com/sosforums/threads/hms-victory-of-caldercraft-by-wil.16072/page-8 There you can see how I approached it and how you can get a nice, even spacing.

I make my own rope from single-strand polyester thread. This base material is very thin. The ratlines are made of 3x1 thread, about 0.1 mm thick. I'd advise against cotton sewing thread, it has too many little fibers, which will later attract a lot of dust. Polyester, on the other hand, is smooth and stays looking nice. I glue the knots with a tiny bit of superglue, which doesn't show.


View attachment 632563
Those ratlines look absolutely fantastic.
 
Hey all.
Ship: Harvey
Scale: 1:96
Ive been researching about my ratlines and stays as i work on them for the first time. I decided to go with the clove hitch method and really learned the benefit of the beeswax here. But as you can see im getting some variance in my knots and width which i assume will come in practice. The instructions for the harvey im using show using the rigging tool and just gluing them across and my question for that would be, is that more preferable for smaller scales and the clove hicht for larger scales?
Curious yalls opinion. Thanks!

View attachment 631410
I hope would be useful the see my method...

View attachment Legatura griselle.mp4
 
I suggest that folks try using thinned shellac (Zinsser's clear Bullseye shellac straight from the can, 3 pound cut) for sealing knots, forming coils, and shaping catenaries in rigging line. It dries very quickly and stiffens as it dries, so that the line can be shaped and will stay in that shape when the shellac finally dries. The shellac is applied with a paintbrush. Just a touch will immediately be wicked into the thread and will dry leaving no visible indication of its presence. (Repeated applications will build up, however.) Shellac is also an excellent all-purpose sealer for wood which will not raise the grain on bare wood like water-based coatings do. It is compatible with all most all other coatings applied on top of it. When applied to softwoods such as basswood, shellac will harden the fibers of the surface into which it soaks, permitting fine sanding to yield a perfectly smooth surface without "fuzz."

Shellac is inexpensive and has excellent archival qualities. Its solvent is plain alcohol, and dried shellac is easily re-liquified and can be soaked up with a bit of paper towel, if need be. Importantly, shellac is reversible, which is an important consideration when doing archival-quality work which at some point in the future will have to be reversed for repairs and maintenance of the model. Unlike more permanent adhesive materials, shellac permits undoing sealed knots when doing rigging work where the need to correct mistakes is to be expected, especially in complex models. (When I do rigging, I often leave an extra end length of thread "flying" until the job is done and only then cut them off to length. This method leaves a suitable length of thread available to dilute a dried shellac-set knot and re-tie it if a mistake is made, or the rigging tension needs adjusting as I go along.)

Brushes clean easily in alcohol. If shellac thickens in the can due to alcohol evaporation, the desired consistency is easily restored by adding a bit more alcohol. I prefer using canned prepared shellac such as Bullseye, a common brand in the U.S. because mixing dry shellac flakes myself is a bit of a bother. Some report that mixed shellac has a rather short shelf life. I haven't found this to be the case (for years in my experience) when the premixed canned shellac is stored in a tightly sealed can. Shellac comes in a range of colors from "orange" to dark brown, as well as "clear" or "bleached," (sometimes called "white shellac.") For modelling purposes, I always use "clear." Thinned shellac applied to a porous surface will soak into the material and dry invisibly. Additional coats will build one upon the other and yield a glossy finish.

By allowing the alcohol solvent to evaporate until the mixture is suitably thickened, thickened shellac is also a good archival adhesive for fastening parts together. Here again, shellac's reversibility is a great advantage over relatively permanent alternatives such as PVA and CA adhesives. While others' mileage may vary, for a variety of reasons I would not advise using diluted PVA on model rigging, nor CA on anything on a model except in some sort of "last resort."

In the spirit of full disclosure, I should mention that the general consensus of professional fine arts conservators and restorationists, natural hide and fish glues are also highly regarded for their reversibility, although somewhat nasty to work with as they generally require heating in a special "pot," and tend to have offensive aromas. The pros currently consider the relatively new adhesive material known as "Paraloid B-72" to be the gold standard for archival adhesives. This material is a thermoplastic acrylic resin which is sold in solid small pellet form and is diluted in acetone and some other "hot" solvents, mixing and behaving much as does shellac. It's major advantage over shellac is that it remains slightly flexible when its solvent evaporates, unlike shellac, which dries hard. Paraloid B-72's slight flexibility provides greater strength in shear than does the rigid shellac. (See: https://en.wikipedia.org/wiki/Paraloid_B-72)
 
Apparently several, from the tar used in their waterproof clothes, to the tar they used on their hair

I do not believe tar was ever used to waterproofing clothing or fabric. Waterproof clothing was (and is still in some instances) developed over time, beginning with adding fish oil to tightly woven cotton sail cloth and, eventually, to impregnating the tightly woven cotton with wax. Tar never entered into it. (See: https://en.wikipedia.org/wiki/Waxed_cotton)
 
I suggest that folks try using thinned shellac (Zinsser's clear Bullseye shellac straight from the can, 3 pound cut) for sealing knots, forming coils, and shaping catenaries in rigging line. It dries very quickly and stiffens as it dries, so that the line can be shaped and will stay in that shape when the shellac finally dries. The shellac is applied with a paintbrush. Just a touch will immediately be wicked into the thread and will dry leaving no visible indication of its presence. (Repeated applications will build up, however.) Shellac is also an excellent all-purpose sealer for wood which will not raise the grain on bare wood like water-based coatings do. It is compatible with all most all other coatings applied on top of it. When applied to softwoods such as basswood, shellac will harden the fibers of the surface into which it soaks, permitting fine sanding to yield a perfectly smooth surface without "fuzz."
Interestingly, I just purchased Zinsser Bullseye shellac for my next project. I intend to mix it 4:1 (Alcohol to shellac) for early coats and to help strengthen very fragile parts before sanding/shaping. Not sure what final coat I'll be using, probably wipe-on poly. I'll have to try it on ropes as you suggest. Lots of good information, Popeye!
 
I do not believe tar was ever used to waterproofing clothing or fabric. Waterproof clothing was (and is still in some instances) developed over time, beginning with adding fish oil to tightly woven cotton sail cloth and, eventually, to impregnating the tightly woven cotton with wax. Tar never entered into it. (See: https://en.wikipedia.org/wiki/Waxed_cotton)
I'm finding information both for and against the history of tar usage in clothing. Just now I found one that said use of tar in clothing was a myth, and this one indicating that it was in fact used that way: A History of the Maritime use of Tar. Maybe it just wasn't common use?
 
On a trip to the UK years ago I bought a Barbour Jacket. The olive drab colored one with the corduary collar. It is oiled to make it waterproof. Barbour advertises that it can be returned periodically to be re-oiled.

Maybe the same as sailors’ oilskins?

Roger
 
I seem to remember that the running rigging line was cotton but have been unable to find any current reference that this was ever the case. AI claims that cotton fibers were too weak for this service. So what is the correct line to be used for rigging a model yacht of the era prior to widespread use of synthetic materials?

Judging from the old pre-Dacron era line and sail bolt ropes I encountered working at the yacht brokerage in the early seventies, I'd say, on the West Coast, at least, most all of the old natural fiber yacht cordage was untarred hemp which would start out fairly white and end up looking medium gray. You could tell the hemp rope because it had a wonderfully soft "hand." They weren't making it anymore back then, but I believe hemp cordage is available again now, although I don't know if it's being made in sizes suitable for yacht rigging. If I were trying to replicate the appearance of scale hemp running rigging, I'd use a light cream color or an "off white" (ecru) color for a "new" appearance and a light gray for a "used" appearance.

Funny you should ask department: Last Saturday, I reconnoitered the new Hobby Lobby store that just opened in town here. I always have an eye open for useful sources of modeling materials. Hobby Lobby is a chain of humongous fabric, art supplies, and "crafting" stores that are about the size of a football field. (This one took over the space of a big K-Mart that closed down.) The place is 99% junk, but they do have a huge selection, so there were a few things that might be useful for modeling, if you take the time to look for them. I discovered, to my surprise, that they carry a line of three strand right hand tightly laid hemp cord in sizes which looked to be suitable for scale rigging use. The stuff comes in about a half dozen sizes from perhaps 3/16" down to 1/32" diameter. It's sold in their fabric department in the ribbon section and is packaged like ribbon on 4" disk spools. It's a uniform light tan color. It's probably too big for anything below 1/4" scale (save anchor cables) but it looked like pretty decent stuff if you had a need for it. I forget how much is on a spool or what the price was, but given the prices in the store, it would have been very inexpensive compared to what the aftermarket rigging line outfits sell online.
 
from my experiance on a schooner, the lines were probably oiled in manufacture but certainly not tared.

Don't take my word for it. :rolleyes:

"The use of tarred rigging is now of less interest to seafaring man than formerly because of the rapid and extensive development of steam power. However, tarred rigging is used today on craft of various types to such an extent that the production of tarred goods is an important branch of the cordage industry. The tar best suited for cordage comes from various members of the pine tree family and is obtained by the distillation process, either by using the old kiln or by modern retorts. It is conceded that the kiln-made article is superior for tarred rigging and therefore it is used principally in making first-quality tarred rope. The tar, as it comes from the kiln, is poured into barrels which are shipped to the cordage works. The way this tar is handled and how it is made to penetrate and adhere to the yarn, as is done by the Plymouth Cordage Company, North Plymouth, Mass., may be described as follows:

"The tar is heated to 200 degrees or more in tanks from which the liquid feeds into long copper-lined troughs, where the tarring takes place. Through these "coppers," so called, run steam pipes to further regulate the temperature. Excessive heating would cause the loss of the tar's good qualities, and to prevent this the supply in the "coppers" must be freshened frequently. As the yarns, heavily saturated with tar, come from the "copper" they are compressed between two rollers, adjusted to leave in the yarn as much or as little tar as needed for the particular goods being made and to turn back the surplus. The pull which carries the yarn through the tar and between the rollers comes from two large drums, around which the yarns travel preparatory to reeling on to the friction-driven receiving bobbins. Goods of nine-thread size and under are usually tarred in the completed rope form, but the process is essentially the same as with the yarns. The rich golden-brown color of the tarred goods—an outward sign of right materials and methods—has become recognized as the Plymouth mark of the weather-resisting qualities contained in the goods."
[4]


Oiling of Running Rigging on Sailing Ships​

Historically, running rigging was not typically oiled in the same way as standing rigging. Standing rigging — the fixed lines and wires that support the mast and spars — was often tarred or coated with oil to protect it from saltwater, UV damage, and rot Everything Explained TodayEverything Explained Today. This gave it a darker, heavier appearance compared to running rigging.

Running rigging, by contrast, was made from flexible ropes (often hemp, manila, or sisal) that needed to move freely through blocks and pulleys. Oiling or tar was generally avoided because it could make the rope stiff, reduce its flexibility, and increase friction, which would hinder sail handling Everything Explained TodayEverything Explained Today. The goal was to keep the running rigging supple and easy to move, so it was left in a lighter, untarred state.

That said, some running rigging could be treated with oils or greases for specific purposes:

  • Lubrication of blocks and pulleys — the hardware itself might be oiled to reduce friction, but the rope was not.
  • Temporary protection — in very salty or wet conditions, a light coating might be applied to prevent chafing, but this was not standard practice.
  • Specialty ropes — certain synthetic or coated ropes (like some manila or sisal types) were naturally more weather-resistant, reducing the need for extra treatment grokipedia.comgrokipedia.com

 
I'm finding information both for and against the history of tar usage in clothing. Just now I found one that said use of tar in clothing was a myth, and this one indicating that it was in fact used that way: A History of the Maritime use of Tar. Maybe it just wasn't common use?

The internet isn't particularly discriminating when it comes to accuracy, particularly historical accuracy. A "deeper dive" is usually required, and it takes some critical analysis of the source of the information before swallowing it hook, line, and sinker. For example, the cited "A History of the Maritime use of Tar" contains this gem explaining why sailors were called "tars," among others:

"Firstly, the crew who did the dirty work was often up to their elbows in black pitch, tarring seams, standing lines, etc. They would dump raw salt water on the decks, get on their hands and knees, and rub the deck with a heavy stone that stripped the wood of any slippery dirt. The surface was then flooded with water again and mopped up. The deck would dry to an almost oaky-white color and be coated with the pine tar solution mentioned above, to seal the deck fibers and keep it slip-free."

That was enough for me to just ignore the entire thing as far a reliable historical accuracy goes. I believe the weight of authoritative historical information indicates that the early waterproof "oilskins" were made of tightly woven cotton impregnated with linseed oil and later with wax (bees' wax or "parafin" in American English.)
 
the object of the hobby is please yourself to the best of your ability, not please an audiance. do your best and try to improve. over the years skills improve, and so will the quality of your work, as you noticed by experimenting with these rat lines. polish the diamond a little at a time.

because you chose to take a shortcut or omit something, doesnt mean you don't care, its a limitation. its true most people looking at models have no idea what they are looking at. a frigate, bark, clipper, schooner, yawl yacht... its just a ship. no one will notice you didnt use clove hitches, or omitted bunts n leeches. they will be more amazed you were even able to tie anything that small. no one will know you didnt use hearts or rosewood blocks to proper scale or have ropes left or right twist or eye bolts that would be for giants in reality... thats your secret... its also not a reason to buy a souvenir and call it a day. its YOUR hobby.

the model is a representation of what you can do and that is what people notice first. more important is your feeling of satisfaction when its done and how youll make it better next time. do your best, improve as you learn. whats next?

its a hobby. enjoy the fruits of your labor.
This is kind of my feeling lol. Ive lesrned a lot in this thread about the differing ways people do these and i agree the scale for this is likely not the ebst for actually tiing any knots. But im also using this cheap ship to just try different things and learn a bit more about the process so its probably gonna be a mess anyways xD it is definitely a lot of fun though even if its not "accurate"
 
Back
Top