• Ships of Scale has incorportated an extra level of security when you log In. Please follow on-screen prompts to acknowledge that you are not a robot via a "Check Box" or a "Pictorial Check Box Puzzle". This is needed due to higher level of AI Activity Security.
  • SUBSCRIBE TO SHIPS IN SCALE TODAY!

    The beloved Ships in Scale Magazine is back and charting a new course for 2026!
    Discover new skills, new techniques, and new inspirations in every issue.

    NOTE THAT OUR NEXT ISSUE WILL BE July/August 2026
  • Win a Free Custom Engraved Brass Coin!!!
    As a way to introduce our brass coins to the community, we will raffle off a free coin during the month of August. Follow link ABOVE for instructions for entering.

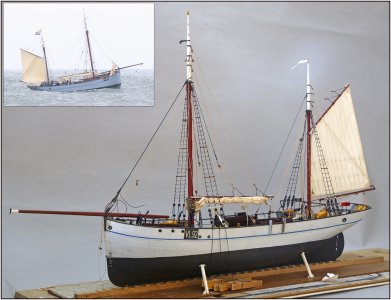
BALDER, Vlaardingen Herring Lugger from 1912, scratch build scale 1:50 Plate-On-Frame

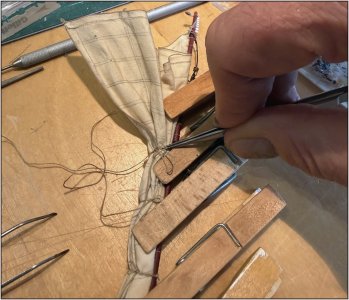
To furl the sail against the gaff, I used the same method as I did for my Bluenose:
1219 Main sail.jpg
I secured six cloth pins to the work surface using double-sided tape. I clamped the gaff into the V-shaped openings and then proceeded to stow the sail in folds. I used loose ties at intervals to secure the sail, starting from the claw, using the same easily released knots we use on the 1:1.

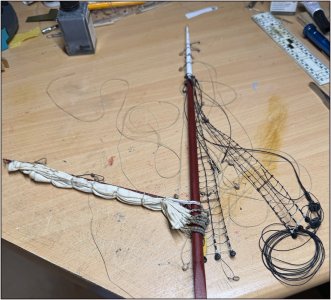
I removed the sail from the temporary mast and mounted it onto the actual mast:
1220 Main sail.jpg
I reeved the throat and peak halyards first.

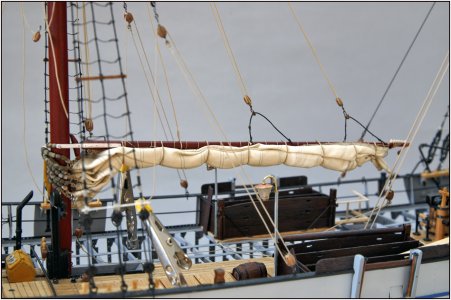
This gave me the opportunity to position the gaff with the sail furled like this:
1221 Main sail.jpg
This is the configuration used when approaching a harbor, for instance.
Please overlook the lines that are still hanging loose or aren't quite in place yet.

I was also able to test whether the rack cleat effectively caught the parrel lines:
1222 Main sail.jpg
They are caught neatly.

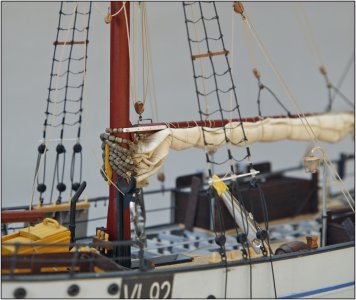
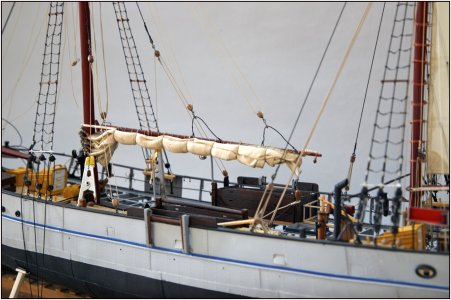
A few more photos of the furled sail:
1223 Main sail.jpg
At this 1:50 scale, I feel that using Navarre fabric allows for a sail to be furled neatly. Extra details such as securing the bolt rope with thread or stitching the individual sail panels wouldn't really be visible in this position at a normal viewing distance anyway.
The advice from Ab Hoving @Ab Hoving works perfectly.
1224 Main sail.jpg
The blocks at the corners of the sail will be addressed later, once I have everything positioned and secured correctly.
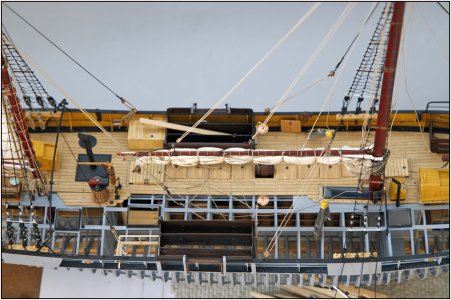
1225 Main sail.jpg
Seen from above, the furled sail also looks great.

Now I'm starting to have second thoughts about whether I should lower the mast .....:rolleyes:
Since everything is functional, I can always decide later .....:)
Regards, Peter
 
I'm just amazed at the level of detail you achieve Peter. Stunning!
I'm absolutely agree with with the compliments that our friend Daniel wrote—well done.
Wow! Soo nice :-)
Modeling perfection, Peter! Way to go!
You clearly have a talent for furling sails. Next time you're in the neightborhood, I've got a little job for you. :cool:
Wow, your detailing is nothing less than amazing. Stunning work.
Thanks you very very much for this compliments and very very nice words, Daniel, Shota, Dirk, Paul, Stephan and Herman. And all the other with the ‘likes’ or just a view. It’s very motivating to keep me sharp and keep on working on the model.
Regards, Peter
 
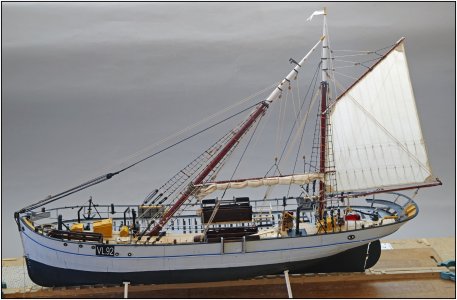
Using the forestay, I lowered the main mast:
1226 Fishing.jpg
As I did so, I gradually raised the gaff and maneuvered it into the desired position using the peak halyard and throat halyard. Then, I tensioned the shrouds and secured all the lines to their attachment points. Nothing is permanently fixed yet, as the jib and jib boom still need to be installed. I will show the relevant lines individually:

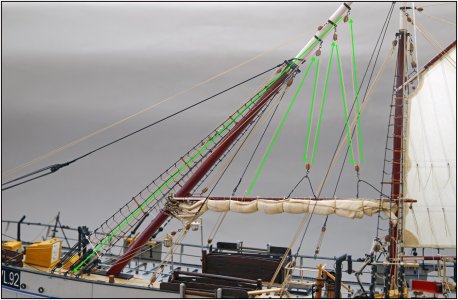
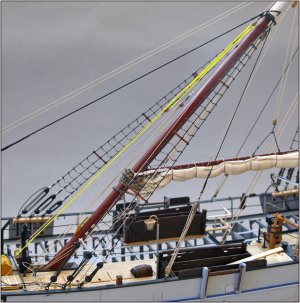
The Peak Halyard:
1227 Piekenval.jpg
Just like on the mizzen, the standing end is secured at a point approximately one-third of the way along the gaff from the mast. It is then reeved through three 5 mm single-sheave hook blocks on the mast and two on the gaff. From the top block, the hauling part currently runs to the port pin rail. However, it still needs to be secured to the wooden cleat with a sheave, which is mounted on the port bulwark between the pin rail and the shrouds. On the full-scale vessel, this is not done.

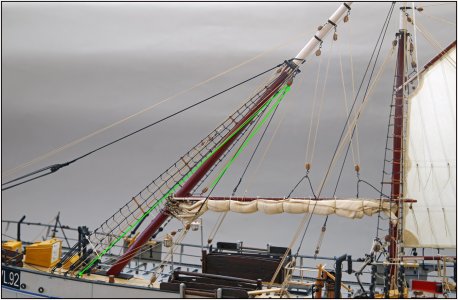
The Throat Halyard:
1228 Klauwval.jpg
This is a 4-part tackle, featuring a 7 mm beveled fiddle block with a hook and becket at the top (on the aft side of the mast hounds and a 5 mm hook block at the bottom, hooked onto the bracket on the gaff. The final pass through the upper block runs from starboard to port and is secured to the port pin rail. On the full-scale vessel, it is secured on the starboard side, but that causes problems when I separate the two halves of the model. So, in this instance, the AL-FI instructions were the deciding factor.

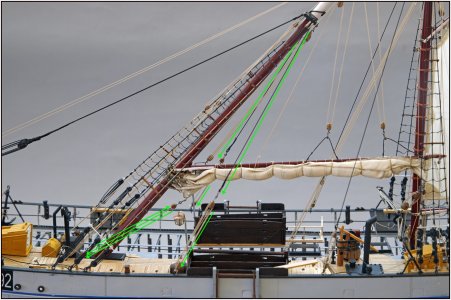
The Tack:
1229 Hals.jpg

The tack is also a 4-part tackle, consisting of two 3.5 mm double-sheave blocks. The upper block is attached to the tack of the mainsail using sister hooks. The lower hook-block is attached to an eye located diagonally behind the mast. On the full-scale vessel, this is on the starboard side, but due to the split mast 'kossing', that is not possible on my 1:50 model. So, AL-FI said .....;)

The Backstays:
This photo also shows both backstays, the rearmost of the four shroud lines. An eye is spliced into the line well above the deck, holding a four-part tackle with 5 mm double-sheave blocks, fitted with sister hooks. The lower block is attached to an eye on the bulwark and is secured independently.

The Sheet:
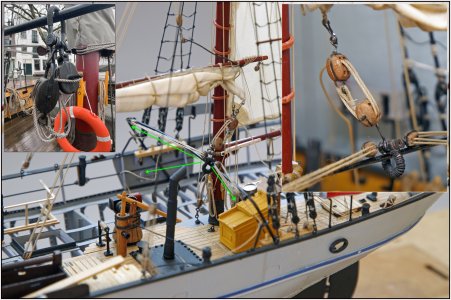
1230 Schoot.jpg
Here, too, a four-part tackle is used, featuring 5.5 mm double blocks. A block with sister hooks is hooked onto the clew of the mainsail. The other block is attached via an eye to a large harp shackle. This shackle can slide back and forth along the horse bar, depending on which side of the ship the sail is set.
2 four-part tackles using 3.5 mm blocks are attached to either side of the shackle. These allow the sheet to be secured at either end of the horse.
Another detail regarding the shackle: the bow is fully served (wrapped) so that it can slide along the horse without significant resistance.
Inset (top left): When the 1:1 Balder is being prepared for winter, the block with the sister hooks is detached from the mainsail and hooked onto the shackle.

The Outer Jib Halyard:
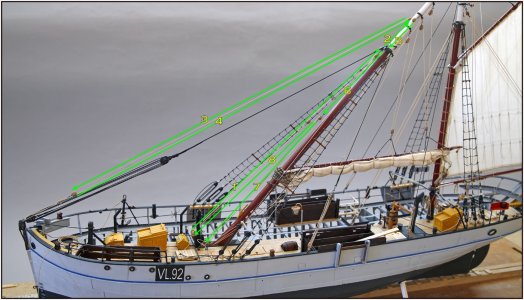
1231 Kluiverval.jpg
I have temporarily secured the outer jib halyard with a piece of line. When the outer jib is not set, the lower block on the 1:1 is secured by hooking it to the traveler, which slides along the jib boom. I still need to fabricate this part. One hauling part is secured to the starboard pin on the pin rail in front of the mast tube/'kossing'.
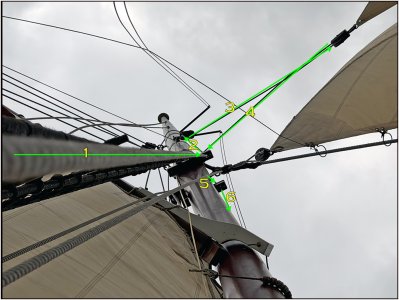
It passes first through a hole at the front of the starboard trestletree (1) and then to the 4 mm single-sheave hook block on the starboard side of the second mast band (2).
Next, it runs forward to the 4 mm single-sheave lower block (3) and then back up to the hook block on the port side (4).
Passing through the hole in the port trestletree (5), this end is finished with an eye splice (6). Attached to this via sister hooks is a tackle system using 3.5 mm double-sheave blocks (7). Its running end is belayed to the port pin in front of the mast tube/'kossing' (8).
Shown here as it appears on the full-scale vessel:
1232 Kluiverval.jpg

The Jib Halyard:
1233 Fokkeval.jpg
This, too, has been temporarily secured with a short length of line.
The upper block of the jib halyard is located between the two trestletrees at the front of the mast. It consists of two 4 mm single-sheave blocks. The running end is belayed to the middle pin in front of the mast case.

I plan to attend to a few small details over the coming days, ensuring I have a decent model to display at the International Exhibition in Hamburg in early October.
Regards, Peter
 
Last edited:
I plan to attend to a few small details over the coming days, ensuring I have a decent model to display at the International Exhibition in Hamburg in early October.

It's fine to read that you're also in Hamburg at IMM exhibition. These are really great new. Then we can meet there. I will be really happy to see your model and the progress again.
 
It's fine to read that you're also in Hamburg at IMM exhibition. These are really great new. Then we can meet there. I will be really happy to see your model and the progress again.
Indeed, Christian, it’s great to meet you and a lot of other SoS-members in Hamburg. To see each other in real life gives a better impression of our models.
Regards, Peter
 
Back
Top