• Ships of Scale has incorportated an extra level of security when you log In. Please follow on-screen prompts to acknowledge that you are not a robot via a "Check Box" or a "Pictorial Check Box Puzzle". This is needed due to higher level of AI Activity Security.
  • SUBSCRIBE TO SHIPS IN SCALE TODAY!

    The beloved Ships in Scale Magazine is back and charting a new course for 2026!
    Discover new skills, new techniques, and new inspirations in every issue.

    NOTE THAT OUR NEXT ISSUE WILL BE July/August 2026
  • Win a Free Custom Engraved Brass Coin!!!
    As a way to introduce our brass coins to the community, we will raffle off a free coin during the month of August. Follow link ABOVE for instructions for entering.

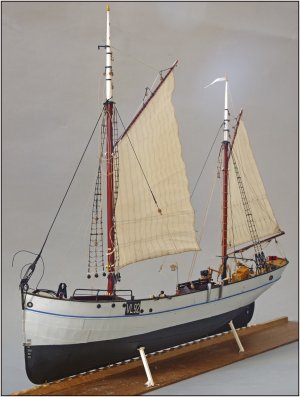
BALDER, Vlaardingen Herring Lugger from 1912, scratch build scale 1:50 Plate-On-Frame

Trying out a new method:
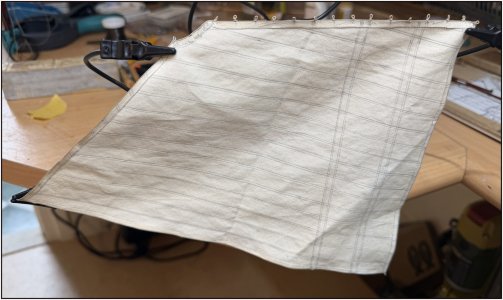
Marked out the size of the mainsail and cut it from the pre-colored piece of Navarra fabric:
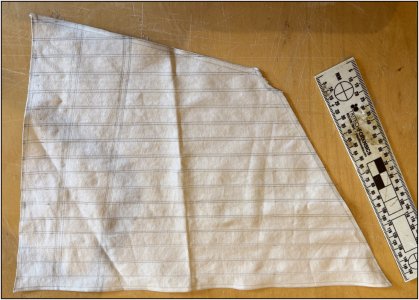
1205 Mainsail.jpg
Marked the sail panels and reef bands, including the double stitching lines. Glued the folded hems using diluted Lineco PVA.

For the mizzen sail, I had laid the fabric on a mirror and glued the luff made of 0.45 mm thread directly against it. That was quite a messy process, even though the mirror was easy to clean.
I had a "third hand" tool available. First, I formed the top loop in the thread and glued it to the peak of the sail using undiluted Lineco.
Once dry, I could stretch the long side of the sail between two clamps:
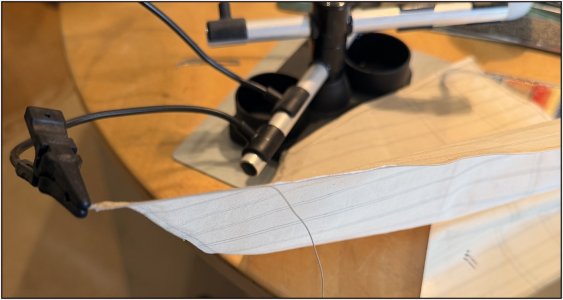
1206 Mainsail.jpg
Applied some glue to the sail's edge and the thread, then used my fingers to guide the line along the edge until the thread adhered.
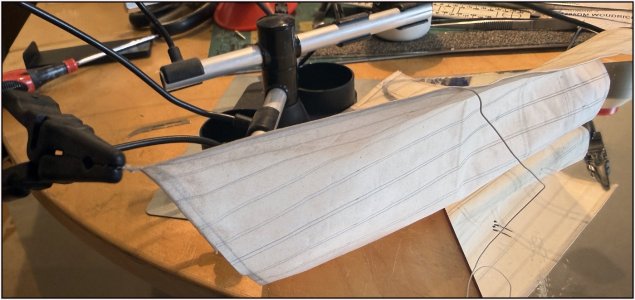
1207 Mainsail.jpg
The key is not to try doing sections that are too large at once.

Creating the eyelets on the mizzen sail, such as those for the reef lines, was a real hassle. There had to be a better way .....
Upon reaching the first reef band, I waited for the glue to dry. At the desired spot, I slightly untwisted the thread so I could insert my smallest sail needle under one of the strands:
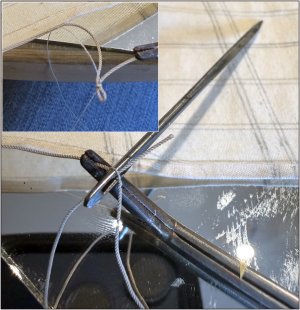
1208 Mainsail.jpg
Pulled the needle through to the eye. This allowed me to pass the end of the thread underneath the strand. I pulled the thread through further to achieve the desired eyelet size and secured it with some Serafil (see insert).
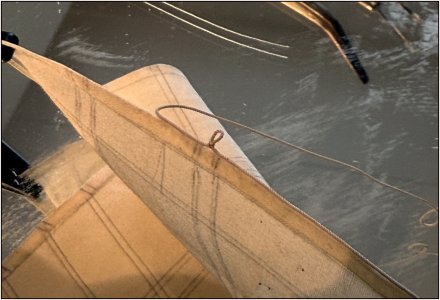
1209 Mainsail.jpg
Glued the thread to the sail for a short distance, resulting in a neat eyelet in the exact right spot. The new method is working well. I can now finish the mainsail all the way around. I do still need to wait and see if the hems remain flexible enough to stow the sail neatly later on.
Regards, Peter
 
Hi Dom. The sticks I used are 2 mm in diameter. If you put the stick at the edges of the 3-claw the wood has a good support and will not slice.
Here I first made a center point with a needle and as an example drilled a 1 mm hole.
View attachment 635253
For sure 1,2 or a bit more is possible.
View attachment 635254
After drilling pull the stick a bit outside together with the drill and you can cut off the ring. I cut the beads off using a file to round off the edges. You can also cut the ring off with the tip of a scalpel blade for cleaner, sharper edges.
Regards, Peter
Thanks Peter,

I will give it a try and see how successful I am ( I expect a lot will end up in the bin). Fortunately I only need 30x2mm ones and there are some smaller fairleads that only run one rope, so they may be easier to make (I think I only need 12x of those).

Regards

Dom
 
No, no subscription to the magazine.
Regards, Peter
Me too, they send me only the magazines with my contribution in it.
Here is the way how too in the log of the PW:
But I like your idea in the lathe, I think to combine it with mine would be a better way to get the hole right.
 
Me too, they send me only the magazines with my contribution in it.
Here is the way how too in the log of the PW:
But I like your idea in the lathe, I think to combine it with mine would be a better way to get the hole right.
Thanks, Stephan. Now I know your post again. I made a centre hole in the middle of the stick and the drill find that centre.
Regards, Peter
 
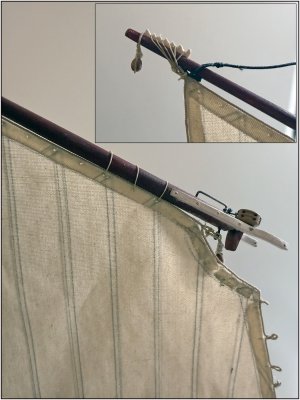
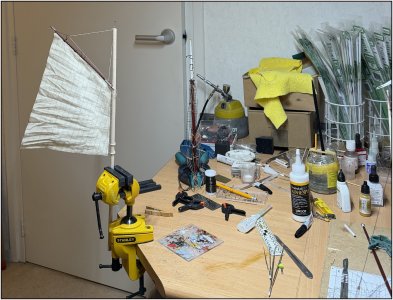
After a few hours of stitching, threading, knotting, and so on, I had finished the luff all around:
1210 Mainsail.jpg
I really like making the loops using the sail needle. The 14 loops are neatly positioned at 1 cm intervals along the 15 cm front luff. A parrel line with beads will be attached for every pair of loops.

Unfortunately, you’ll have to make do with photos taken at the workbench; hauling everything over to the studio setup every time would be quite an undertaking.

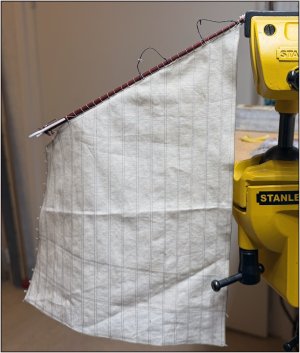
The next step was attaching the sail to the gaff.
1211 Mainsail.jpg
First, I tied the throat line to the eye beneath the claw. Then, I attached the peak to the gaff end using a crow's foot.
Next, I began 'marling' the sail to the spar.
1212 Mainsail.jpg
That was finished after about an hour.

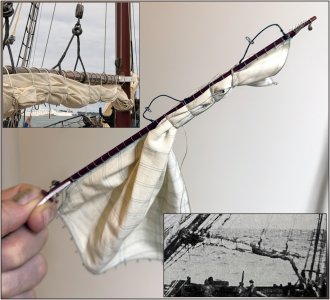
And then came the 'moment of truth': could I furl the entire sail realistically? At its greatest height and width, the sail measures 26 x 18.5 cm:
1213 Mainsail.jpg
I secured a part of the sail with a few marl-stitches. On the 1:1 Balder, we would use loose ties for this.

After this successful test, I’m now going to mount the gaff against a temporary mast to attach the parrel lines.
Regards, (a very happy) Peter (for this moment):)
 
Last edited:
The master of tiny details at it again..........Good morning Peter. I don't know why, but the 2 logs I refer to the most, Yours and Pauls (@dockattner ) keep dropping from my favourites ?? I think there is a conspiracy here.... ROTF . Cheers Grant
Yes Grant. The digital world is full of surprises. Perhaps one of the mutinous AI-agents has infiltrated the SoS.;)
But fortunately, you still know how to find my log.
Regards, Peter
 
Hi Peter,
Had some serious catching up to do on your blog, stunning work again. Enjoyed the pictures of the real life Balder under sail very much. Must have been a fantastic immersive experience sailing on your own model.
Hi Maarten. Thanks for catching up and the compliments. The sailing with the 1:1 came on the right moment because of my work on the rigging on my 1:50. And because I had worked out the layout of all the lines and blocks based on the original specifications, most of the handling while sailing felt completely intuitive. It was fascinating to see my model truly come to life.
Hopefully I can install the lowered main mast with the furled main sail before we drive to de exhibition in Hamburg.
Regards, Peter
 
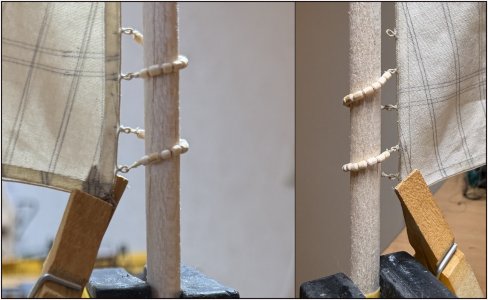
I set up a temporary rig to assemble the parrel lines, as doing so directly on the model would be impossible:
1214 Beads.jpg
'Organized chaos' is back in the picture. Every few days I tidy up my workspace, and step by step it becomes... :rolleyes:;)

After assembling two of them:
1215 Beads.jpg
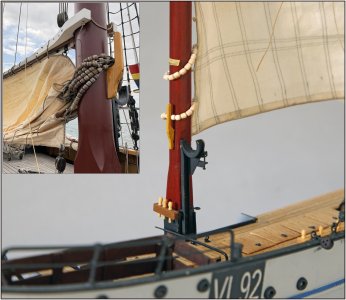
I wanted to test whether they would actually fit over the square base of the mast and the parrel cleat:
1216 Beads.jpg
And fortunately, theory and practice align: it works. Perhaps I will give the beads a light color.
The inset shows the function of the large cleat: gathering all the parrel lines.

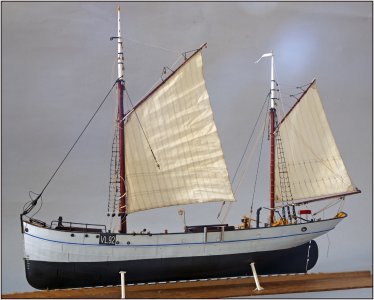
And since the mast with the mainsail set is already on the model, I took the opportunity to snap two photos. After all, this is the only time the model appears with two full sails:
1217 Main sail.jpg
1218 Main sail.jpg
Only the postweide half-model. Setting the starboard side also along would have been a big struggle with all those loose hanging lines.
Regards, Peter
 
Last edited:
Very nicely scaled and crafted beads, Peter.
Remarkable work Peter and thanks for showing us your sail making techniques. Your furling looks very realistic.
Everything with these sails is turning our wonderful!

I agree with your idea of giving the beads a little stain to achieve a slightly darker color.

Thanks for such detailed descriptions of how you achieved this result and also the superb photos!!
Thanks for the compliments, Paul, Roger and Brad. And good to know that you appreciate showing the steps.
Regards, Peter
 
Back
Top