
-

SUBSCRIBE TO SHIPS IN SCALE TODAY!
The beloved Ships in Scale Magazine is back and charting a new course for 2026!
Discover new skills, new techniques, and new inspirations in every issue.
NOTE THAT OUR NEXT ISSUE WILL BE July/August 2026 -

Win a Free Custom Engraved Brass Coin!!!
As a way to introduce our brass coins to the community, we will raffle off a free coin during the month of August. Follow link ABOVE for instructions for entering.


You are using an out of date browser. It may not display this or other websites correctly.
You should upgrade or use an alternative browser.
You should upgrade or use an alternative browser.



I had to read a lot about the build of the paddlewheel boxes and they came out very nice, Tom. Wish you a quick recovery and to see you soon again on your yard.
Regards, Peter
Regards, Peter


The Harriet Lane can wait. Take care of yourself! I know you will do well.
Rob
Rob


Post 44 - Hit the Decks, Part III
My appendix is out, without complications. Thanks to everyone for your concern! My surgeon said I couldn't drive, sign legal documents or do any online shopping(?) for 24 hours, but she didn't say I couldn't model, so back to the deck. I finished planking the deck this morning, a total of about 230 planks. I sanded it with 180, 220 and then 400 grit sand paper, followed by a scrape with a fresh razor blade, as per Toni Levine.
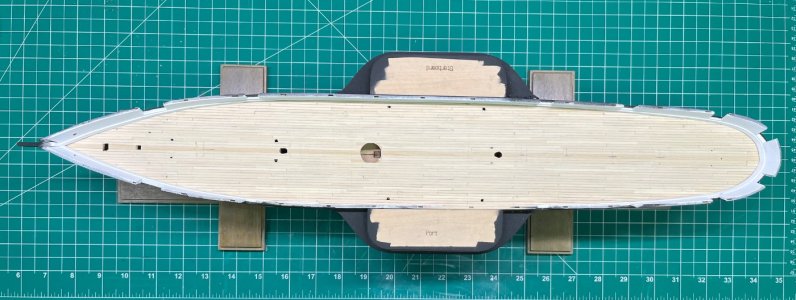
I'm fairly proud of myself for tackling this. I think it will make a big improvement in how the model looks, and was far easier than I thought it would be. I am glad I used the wider planks, and not the true to scale 1/16" planks. I didn't draw the planking layout on the deck, which was maybe a mistake, as it was a challenge to keep track of the butt shifts, although I don't think I made any mistakes.
I've been experimenting with finishes, but haven't found one I'm satisfied with - a project for tomorrow. I'm open to suggestions. Now for some Tylenol and medicinal bourbon
My appendix is out, without complications. Thanks to everyone for your concern! My surgeon said I couldn't drive, sign legal documents or do any online shopping(?) for 24 hours, but she didn't say I couldn't model, so back to the deck. I finished planking the deck this morning, a total of about 230 planks. I sanded it with 180, 220 and then 400 grit sand paper, followed by a scrape with a fresh razor blade, as per Toni Levine.
I'm fairly proud of myself for tackling this. I think it will make a big improvement in how the model looks, and was far easier than I thought it would be. I am glad I used the wider planks, and not the true to scale 1/16" planks. I didn't draw the planking layout on the deck, which was maybe a mistake, as it was a challenge to keep track of the butt shifts, although I don't think I made any mistakes.
I've been experimenting with finishes, but haven't found one I'm satisfied with - a project for tomorrow. I'm open to suggestions. Now for some Tylenol and medicinal bourbon
Last edited:
Glad to see you are doing well. The advancements in medicine are amazing and under appreciated. As for the decking, I used 2 coats of Minwax Colonial Maple stain on the deck of my Bluenose followed by a coating of oil based polyurethane. I really like the color.
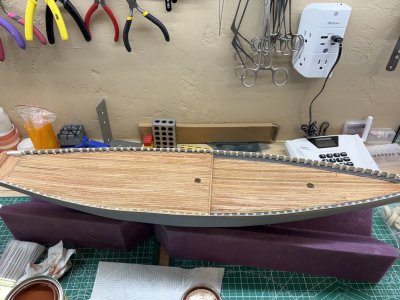
Enjoy the bourbon!
Rob
Enjoy the bourbon!
Rob
I'm a little concerned about the basswood staining unevenly, so I'm thinking about a paint wash ala Tom Lauria. Did you use a wood conditioner?
I did not use a sanding sealer if that's what you are asking (sanding sealer is basically shellac). From my understanding, if you use some kind of sealer first the stain will not penetrate the wood. As you can see from the photo, the wood did stain unevenly. I think this enhances the realistic look of the wood. I am not familiar with a paint wash. Use some test strips to see what kind of effect you get with either method.I'm a little concerned about the basswood staining unevenly, so I'm thinking about a paint wash ala Tom Lauria. Did you use a wood conditioner?
Here is a close up.
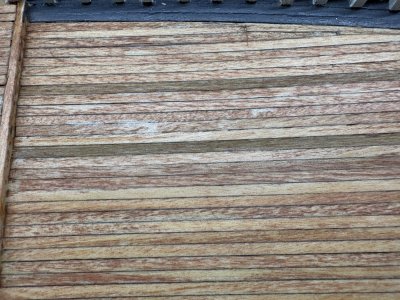
Rob
A paint wash is a very dilute (1:5 - 1:10) acrylic paint:water mix that you brush on and then immediately wipe off. It is supposed to give more consistent color than stain on soft woods like basswood, which it does, in my limited experience. Here is a link to Tom Lauria's YouTube video of the technique:
Tom Lauria Paint Wash Tutorial
Tom Lauria Paint Wash Tutorial
Post 44 - Hit the Decks, Part IV
After doing some more test swatches of colors for the deck I decided on a 5:1 mixture of water and Deco Arts 'Fawn' craft paint, followed by Minwax WOP. After masking the inner bulwarks I brushed it on, and then immediately wiped it with a piece of paper towel. Here you can see the difference between treated and untreated:
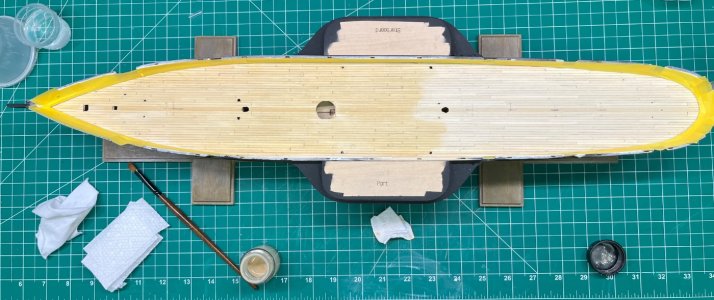
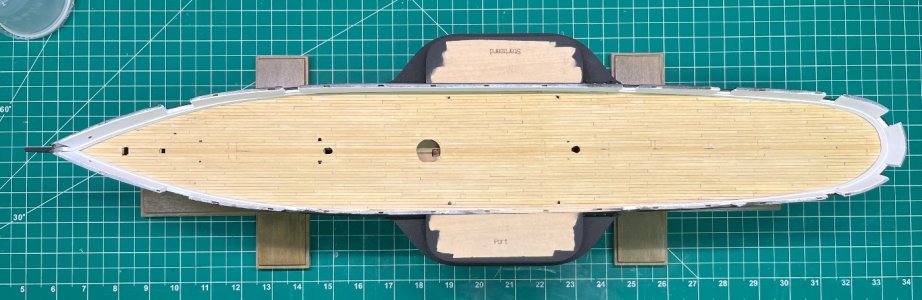
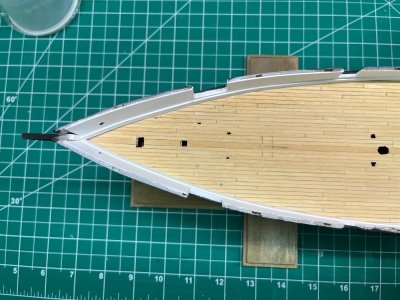
When it was dry I buffed it with a clean piece of paper towel. Here's the completed deck with a coat of WOP, after that had dried.
This is a technique I learned from a Tom Lauria YouTube video.
My goal was to get the look of a new pine deck, before it has weathered. I think I succeeded - at least I'm happy with it! The contrast in color of the king plank was a bonus I didn't count on. I know these planks were often a different wood than the rest of the deck. I bought all the wood strips from Northeastern Scale Lumber Co., so I guess it was just the luck of the draw. Finishing the deck feels like another major accomplishment, and I now have the confidence to do this on other models.
Next, on to the fiddly bits of making the deck furniture and fittings - but first I have to revive my brass blackening skills for the eyebolts on the stem.
After doing some more test swatches of colors for the deck I decided on a 5:1 mixture of water and Deco Arts 'Fawn' craft paint, followed by Minwax WOP. After masking the inner bulwarks I brushed it on, and then immediately wiped it with a piece of paper towel. Here you can see the difference between treated and untreated:
When it was dry I buffed it with a clean piece of paper towel. Here's the completed deck with a coat of WOP, after that had dried.
This is a technique I learned from a Tom Lauria YouTube video.
My goal was to get the look of a new pine deck, before it has weathered. I think I succeeded - at least I'm happy with it! The contrast in color of the king plank was a bonus I didn't count on. I know these planks were often a different wood than the rest of the deck. I bought all the wood strips from Northeastern Scale Lumber Co., so I guess it was just the luck of the draw. Finishing the deck feels like another major accomplishment, and I now have the confidence to do this on other models.
Next, on to the fiddly bits of making the deck furniture and fittings - but first I have to revive my brass blackening skills for the eyebolts on the stem.
Last edited:
Tom,Post 44 - Hit the Decks, Part IV
After doing some more test swatches of colors for the deck I decided on a 5:1 mixture of water and Deco Arts 'Fawn' craft paint, followed by Minwax WOP. After masking the inner bulwarks I brushed it on, and then immediately wiped it with a piece of paper towel. Here you can see the difference between treated and untreated:
View attachment 645689
When it was dry I buffed it with a clean piece of paper towel. Here's the completed deck with a coat of WOP, after that had dried.
View attachment 645688
View attachment 645687
This is a technique I learned from a Tom Lauria YouTube video.
My goal was to get the look of a new pine deck, before it has weathered. I think I succeeded - at least I'm happy with it! The contrast in color of the king plank was a bonus I didn't count on. I know these planks were often a different wood than the rest of the deck. I bought all the wood strips from Northeastern Scale Lumber Co., so I guess it was just the luck of the draw. Finishing the deck feels like another major accomplishment, and I now have the confidence to do this on other models.
Next, on to the fiddly bits of making the deck furniture and fittings - but first I have to revive my brass blackening skills for the eyebolts on the stem.
Thanks for the link. I think your deck wash looks great.
Rob
Post 45 - "Minor Details"
The instructions have you add the figurehead and some eyebolts to the stem before mounting the model on the stand. I had misread the instructions:
"Dry-fit the dowels home in the model, then glue the dowels and model into the baseboard. Check and adjust so that the model is vertical when seen end-on."
and had already glued the model to the dowels. No big deal. I blackened the eyebolts with Jax Pewter Black diluted 10:1 with water, after soaking them in vinegar for two hours followed by a Dawn dish-wash soap rinse. It took about 10 minutes to blacken them, after which I dunked them in a bicarb-water rinse to neutralize the reaction. I tried this method (which was suggested by Google AI) because my blackening efforts on prior models didn't work too well - the black kept flaking off. This seemed to do the trick.
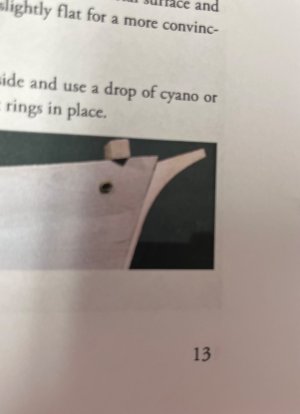
I primed the figure head after cleaning off the flash with my mini polishing rotory tool. I used Deco Arts '24K Gold' for the paint. The instructions show a different stem than the one included in the kit:
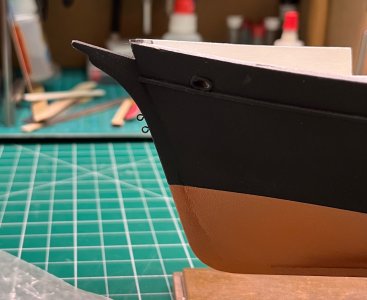
For good or ill, I made the assumption that the figurehead fits in the notch. A test fit bowsprit sat properly, at least. Here is the result:
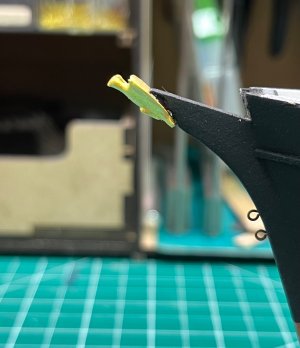
I used 5 minute epoxy to attach it.
I then cleaned up the inner hawse pieces. Also had my next Model Shipways-itis attack: the pieces are far too short:
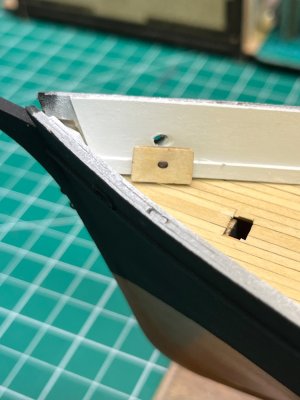
This is partly due to my raising the bulwarks to fit the guns, but even without that, the hawse holes would need to be in the spriketting for these pieces to work. I think a fix will be easy, but will sleep on it first.
The instructions have you add the figurehead and some eyebolts to the stem before mounting the model on the stand. I had misread the instructions:
"Dry-fit the dowels home in the model, then glue the dowels and model into the baseboard. Check and adjust so that the model is vertical when seen end-on."
and had already glued the model to the dowels. No big deal. I blackened the eyebolts with Jax Pewter Black diluted 10:1 with water, after soaking them in vinegar for two hours followed by a Dawn dish-wash soap rinse. It took about 10 minutes to blacken them, after which I dunked them in a bicarb-water rinse to neutralize the reaction. I tried this method (which was suggested by Google AI) because my blackening efforts on prior models didn't work too well - the black kept flaking off. This seemed to do the trick.
I primed the figure head after cleaning off the flash with my mini polishing rotory tool. I used Deco Arts '24K Gold' for the paint. The instructions show a different stem than the one included in the kit:
For good or ill, I made the assumption that the figurehead fits in the notch. A test fit bowsprit sat properly, at least. Here is the result:
I used 5 minute epoxy to attach it.
I then cleaned up the inner hawse pieces. Also had my next Model Shipways-itis attack: the pieces are far too short:
This is partly due to my raising the bulwarks to fit the guns, but even without that, the hawse holes would need to be in the spriketting for these pieces to work. I think a fix will be easy, but will sleep on it first.

- Joined
- May 3, 2026
- Messages
- 210
- Points
- 78

...the hawse holes would need to be in the spriketting for these pieces to work. I think a fix will be easy, but will sleep on it first.
You should thing about a run of the chain that makes sense physically..
The advantage is that it gives a much more consistent color than does stain on soft wood like basswood. The down side is that you have to do a lot of testing with different paints and dilutions to find a combination you're happy with.Tom,
Thanks for the link. I think your deck wash looks great.
Rob
It is always an exciting moment when you start treating the deck. The result after your brushing, wiping and buffing looks very nice, Tom. A nice color with subtle accents of the seams.Post 44 - Hit the Decks, Part IV
After doing some more test swatches of colors for the deck I decided on a 5:1 mixture of water and Deco Arts 'Fawn' craft paint, followed by Minwax WOP. After masking the inner bulwarks I brushed it on, and then immediately wiped it with a piece of paper towel. Here you can see the difference between treated and untreated:
View attachment 645689
When it was dry I buffed it with a clean piece of paper towel. Here's the completed deck with a coat of WOP, after that had dried.
View attachment 645688
View attachment 645687
This is a technique I learned from a Tom Lauria YouTube video.
My goal was to get the look of a new pine deck, before it has weathered. I think I succeeded - at least I'm happy with it! The contrast in color of the king plank was a bonus I didn't count on. I know these planks were often a different wood than the rest of the deck. I bought all the wood strips from Northeastern Scale Lumber Co., so I guess it was just the luck of the draw. Finishing the deck feels like another major accomplishment, and I now have the confidence to do this on other models.
Next, on to the fiddly bits of making the deck furniture and fittings - but first I have to revive my brass blackening skills for the eyebolts on the stem.
Regards, Peter

but she didn't say I couldn't model, so back to the deck.
Now for some Tylenol and medicinal bourbon
 . I glad to hear the op went well.
Good afternoon Tom. You are totally owning this build. Man your paddle wheels came out exceptionally well. I’m with Peter re your deck - kudos. Cheers Grant
Do you mean all the deck fittings? I've never built those kind of structures before, so it has me a little worried.I m continuing to watch with interest, You are coming to the difficult bits (not that it has been a clear run to date) & I will watch with interest how you do it (them)
Post 46 - Bow Bits
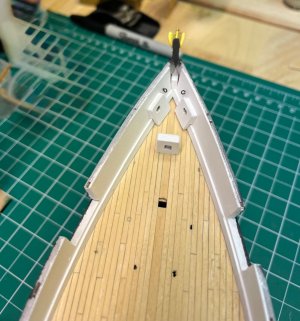
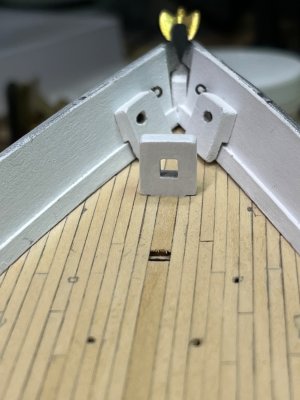
Ultimately, I decided to use the outer pieces of the inner howse holes as the inner pieces. I had to trim a little off the bottom to get the holes to line up. I made new outer pieces from excess on the wooden sheet that held the original pieces. The inner howse holes are going to be higher than they should be, but the other options - raising the deck or drilling lower howse holes through the hull were non-starters for me. Before I installed them, I added the 2 eyebolts at the bow for the forestays, thinking the clear space would make it easier. I marked my drill bit so I wouldn't drill through the bulwarks
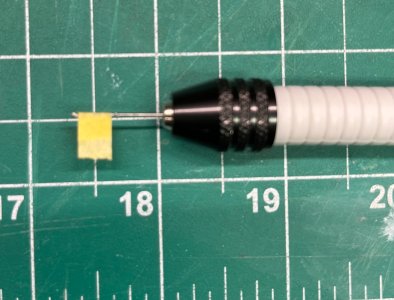
and estimated their location, based on the pictures in the manual. Once in place, I glued in the painted inner howse holes and bowsprit step.
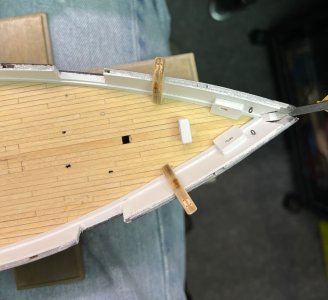
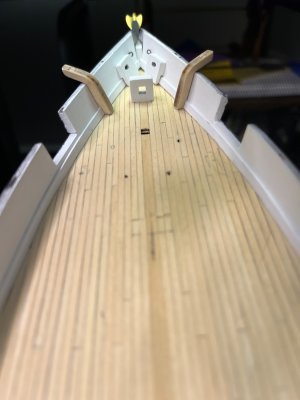
The catheads at first seemed daunting, but I remembered I had a drill press with a compound table (which I had installed, but never used). I again estimated where the holes should be from the pictures. I spaced the two ends of each "sheave" 2.5mm apart, and located them 2.5 mm from the end of the cathead and 1mm from each side. I first used a piece of scrap strip to test the setup. I used a machinist square to get the angle on the actual cathead right:
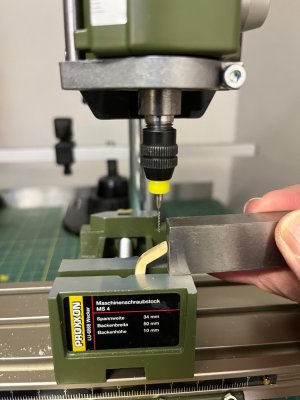
After another quick prayer to St. Rosalie (she never lets you down!) I drilled the first hole, turned the appropriate knobs on the compound table the appropriate times, and drilled the rest. Amazing what the right tools let you do. I had cleaned up 3 catheads, thinking I would need a test run, but the test one was good enough I only needed two. Here is one after I adde the groove to mimic the sheave
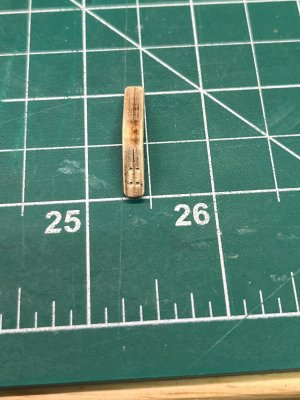
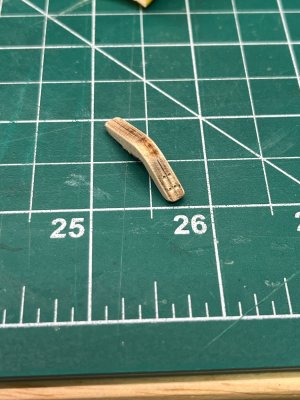
I couldn't resist a photo op of the test fitting
And here are the two of them primed
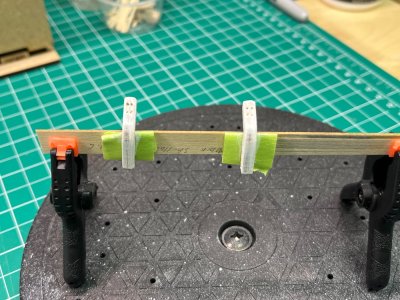
I may have to deepen the grooves, but I feel like I have successfully overcome the first of the fussy bits that lie ahead of me. I also learned a lot today - like how to use a compound table. Next daunting fussy bit is fabricating the windlass.
Ultimately, I decided to use the outer pieces of the inner howse holes as the inner pieces. I had to trim a little off the bottom to get the holes to line up. I made new outer pieces from excess on the wooden sheet that held the original pieces. The inner howse holes are going to be higher than they should be, but the other options - raising the deck or drilling lower howse holes through the hull were non-starters for me. Before I installed them, I added the 2 eyebolts at the bow for the forestays, thinking the clear space would make it easier. I marked my drill bit so I wouldn't drill through the bulwarks
and estimated their location, based on the pictures in the manual. Once in place, I glued in the painted inner howse holes and bowsprit step.
The catheads at first seemed daunting, but I remembered I had a drill press with a compound table (which I had installed, but never used). I again estimated where the holes should be from the pictures. I spaced the two ends of each "sheave" 2.5mm apart, and located them 2.5 mm from the end of the cathead and 1mm from each side. I first used a piece of scrap strip to test the setup. I used a machinist square to get the angle on the actual cathead right:
After another quick prayer to St. Rosalie (she never lets you down!) I drilled the first hole, turned the appropriate knobs on the compound table the appropriate times, and drilled the rest. Amazing what the right tools let you do. I had cleaned up 3 catheads, thinking I would need a test run, but the test one was good enough I only needed two. Here is one after I adde the groove to mimic the sheave
I couldn't resist a photo op of the test fitting
And here are the two of them primed
I may have to deepen the grooves, but I feel like I have successfully overcome the first of the fussy bits that lie ahead of me. I also learned a lot today - like how to use a compound table. Next daunting fussy bit is fabricating the windlass.
Post 47 - Windlass
After I painted the catheads I deepened the groove for the 'sheave' and darkened it with a pencil. I used 5-miute epoxy to attach them
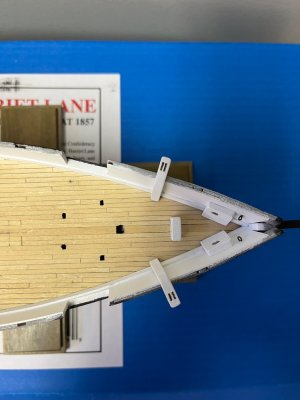
The remainder of my modeling time over the past two days was spent on the windlass. I decided to add the rocker mechanism. Building something like this from scratch was an entirely new experience. First up was making sure the Samson post and Carrick bitts fit in the openings in the deck. My Samson post hole is misaligned with the frame, so I narrowed the tab to allow it to fit. It appeared far to tall, and in fact was taller than the scale doors on the pilot house. I used the picture in the instructions to get some relative measurements, and cut it down from 7/8" to 9/16" which looked right. I mitered the top and inserted the pointy end of a brad in it to guide the rocker mechanism.
I tried blackening the windlass itself after I cleaned off the flash, but it got very blotchy, so I painted it with Deco Arts 'Flat Iron." Next I put those four pieces in place
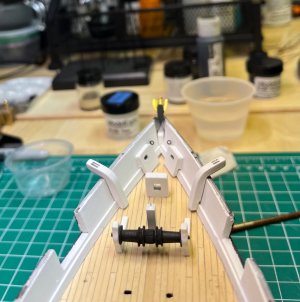
I had measured the distance between the two geared collars on the windlass that interact with the rocker mechanism (purchase rims), and cut a piece of wood strip slightly longer. I gave it a scoop on the top ends, as per the illustration in the instructions, using a round file. I used 26g copper wire for the purchase rods, and some seed beads I had bought as parrels for my Lobster Smack to mimic the joints
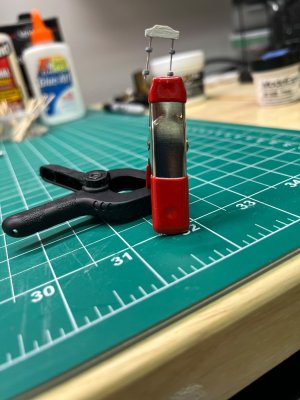
I primed and painted that black. I then got a little bolder, and added brass brad heads in the center to mimic the pivot point, squares of card stock to mimic the flanges in the instruction's illustration, and more seed beads to mimic the insertion points for the handles
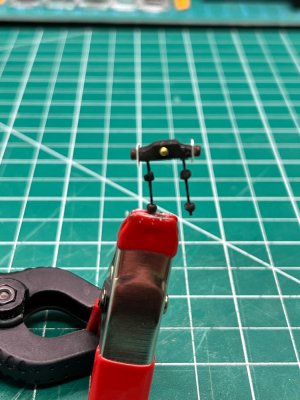
I used superglue to attach everything. After I installed that, I made the brake pawl. I glued two 1/8" x 1/32" strips together, and shaped them into a wedge with a sanding stick
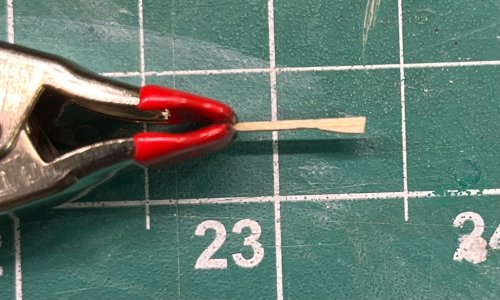
Painted it black and trimmed the excess, and superglued it to the Samson post. The final result:
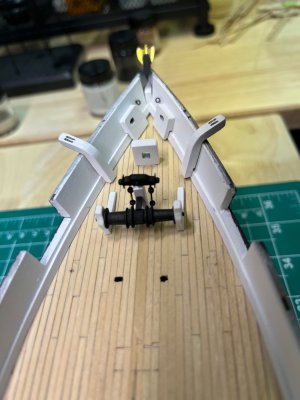
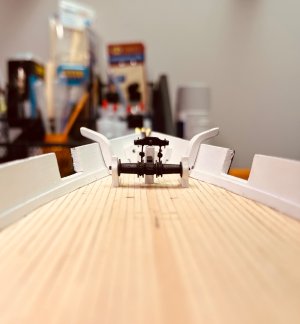
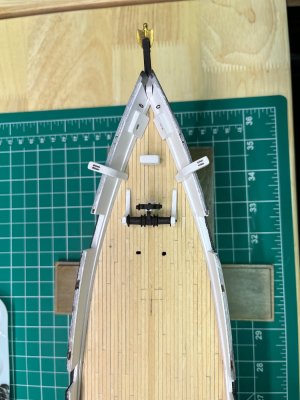
The illustration in the instructions for comparison:
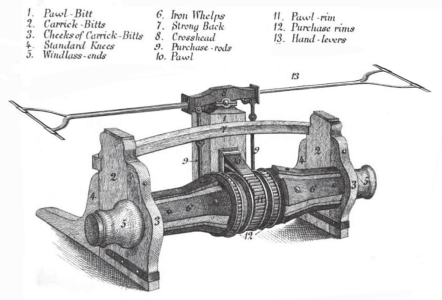
I know the purchase rods should have pawls on the ends to connect to the windlass, but I couldn't find a good picture of how that worked online, so I left them off. Overall, I'm happy with my first real attempt at almost-scratch building something.
After I painted the catheads I deepened the groove for the 'sheave' and darkened it with a pencil. I used 5-miute epoxy to attach them
The remainder of my modeling time over the past two days was spent on the windlass. I decided to add the rocker mechanism. Building something like this from scratch was an entirely new experience. First up was making sure the Samson post and Carrick bitts fit in the openings in the deck. My Samson post hole is misaligned with the frame, so I narrowed the tab to allow it to fit. It appeared far to tall, and in fact was taller than the scale doors on the pilot house. I used the picture in the instructions to get some relative measurements, and cut it down from 7/8" to 9/16" which looked right. I mitered the top and inserted the pointy end of a brad in it to guide the rocker mechanism.
I tried blackening the windlass itself after I cleaned off the flash, but it got very blotchy, so I painted it with Deco Arts 'Flat Iron." Next I put those four pieces in place
I had measured the distance between the two geared collars on the windlass that interact with the rocker mechanism (purchase rims), and cut a piece of wood strip slightly longer. I gave it a scoop on the top ends, as per the illustration in the instructions, using a round file. I used 26g copper wire for the purchase rods, and some seed beads I had bought as parrels for my Lobster Smack to mimic the joints
I primed and painted that black. I then got a little bolder, and added brass brad heads in the center to mimic the pivot point, squares of card stock to mimic the flanges in the instruction's illustration, and more seed beads to mimic the insertion points for the handles
I used superglue to attach everything. After I installed that, I made the brake pawl. I glued two 1/8" x 1/32" strips together, and shaped them into a wedge with a sanding stick
Painted it black and trimmed the excess, and superglued it to the Samson post. The final result:
The illustration in the instructions for comparison:
I know the purchase rods should have pawls on the ends to connect to the windlass, but I couldn't find a good picture of how that worked online, so I left them off. Overall, I'm happy with my first real attempt at almost-scratch building something.
Nothing is more satisfying than 'scratch building'. And the windlass with its rocker arms is a truly fine result. Hats off to you!Post 47 - Windlass
After I painted the catheads I deepened the groove for the 'sheave' and darkened it with a pencil. I used 5-miute epoxy to attach them
View attachment 647193
The remainder of my modeling time over the past two days was spent on the windlass. I decided to add the rocker mechanism. Building something like this from scratch was an entirely new experience. First up was making sure the Samson post and Carrick bitts fit in the openings in the deck. My Samson post hole is misaligned with the frame, so I narrowed the tab to allow it to fit. It appeared far to tall, and in fact was taller than the scale doors on the pilot house. I used the picture in the instructions to get some relative measurements, and cut it down from 7/8" to 9/16" which looked right. I mitered the top and inserted the pointy end of a brad in it to guide the rocker mechanism.
I tried blackening the windlass itself after I cleaned off the flash, but it got very blotchy, so I painted it with Deco Arts 'Flat Iron." Next I put those four pieces in place
View attachment 647191
I had measured the distance between the two geared collars on the windlass that interact with the rocker mechanism (purchase rims), and cut a piece of wood strip slightly longer. I gave it a scoop on the top ends, as per the illustration in the instructions, using a round file. I used 26g copper wire for the purchase rods, and some seed beads I had bought as parrels for my Lobster Smack to mimic the joints
View attachment 647200
I primed and painted that black. I then got a little bolder, and added brass brad heads in the center to mimic the pivot point, squares of card stock to mimic the flanges in the instruction's illustration, and more seed beads to mimic the insertion points for the handles
View attachment 647195
I used superglue to attach everything. After I installed that, I made the brake pawl. I glued two 1/8" x 1/32" strips together, and shaped them into a wedge with a sanding stick
View attachment 647190
Painted it black and trimmed the excess, and superglued it to the Samson post. The final result:
View attachment 647189
View attachment 647197
View attachment 647196
The illustration in the instructions for comparison:
View attachment 647202
I know the purchase rods should have pawls on the ends to connect to the windlass, but I couldn't find a good picture of how that worked online, so I left them off. Overall, I'm happy with my first real attempt at almost-scratch building something.
Regards, Peter