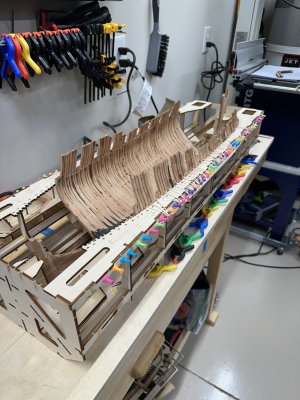
All of the flat frames are glued in to the keel now !
Here is a picture for @dockattner (and others too )
)
Now on to building the cant frames !

Here is a picture for @dockattner (and others too
 )
)Now on to building the cant frames !

 |
As a way to introduce our brass coins to the community, we will raffle off a free coin during the month of August. Follow link ABOVE for instructions for entering. |
 |
 )
)

I don’t know Corsair… Are you sure this isn’t AI generated? Your shop is way to organized and clean… Even the clamps are in organized rows.All of the flat frames are glued in to the keel now !
Here is a picture for @dockattner (and others too)
Now on to building the cant frames !
View attachment 542747
They are just clipped onto a bar that is part of a mount to hang stuff.I don’t know Corsair… Are you sure this isn’t AI generated? Your shop is way to organized and clean… Even the clamps are in organized rows.
A little off track, but I THINK it was Longridge that described laying out the shop floor with black and white checker pattern tiles. Makes it easy to find parts, both light and dark ones. Plus, it looks like the captain's ward roomOh, some of us talked about this in the past. My shop is one bay of my garage and for the shop, I put down an epoxy finish with no speckle which makes it really easy to sweep and also to see dropped parts. The drawback is if it gets wet, it is VERY slippery !
That’s looking very nice, Jeff. A big step, a lot of practice for the next parts.All of the flat frames are glued in to the keel now !
Here is a picture for @dockattner (and others too)
Now on to building the cant frames !
View attachment 542747
Thank you.That’s looking very nice, Jeff. A big step, a lot of practice for the next parts.
Regards, Peter
Lovely progress Jeff.All of the flat frames are glued in to the keel now !
Here is a picture for @dockattner (and others too)
Now on to building the cant frames !
View attachment 542747
Thanks Grant.Lovely progress Jeff.
Well, if she says that, why not do it. The epoxy makes a HUGE difference with clean up.Hey Jeff,
That looks really excellent. Just great. Your garage is great. If my wife saw it now, she would immediately say: "See, others do that too... ..." Why don't you?
Best regards
Günther
Thanks Daniel !Your clean neat work area makes for clean crisp joinery.
Good morning Jeff. Ahh those cant frames. Did the kit give you the angles to cut/sand where they attach to the keel. This can be tricky.....so all looks perfect. Enjoy. Cheers GrantI just finished gluing up the forward cant frames !
Next will be to trim off the excess from the frame chocks and then fitting them onto the keel in the building jig !
View attachment 543824

Beautiful !!!Thought I might circle back of this for two principle reasons.
First, as a follow on from post 325, here is finish I outlined, on the well. Not as dark as photo implies and it will lighten when completely dry but, all in all, I like it.
Lastly, another cautionary note. IMHO, do not rely on drawings/sheets for any vertical structures....well, partitions, etc, they're not super accurate and you need to take measurements, make templates, make adjustments, especially where pieces locate on beams......slows everything down, but moving along.
Everything still dry fit only until all individual pieces assembled and I can lay down finish to everything under platforms.
Starting to look like an actual ship.
Tim
View attachment 544402
Thanks for the heads up Tim, I appreciate it ! Your build looks great ! Keep it up !Jeff, all,
A bit of a cautionary note.
Needed a bit of a break from the platform details and because I was apprehensive, I decided to fit a few corses of planking at and below the gun ports.
In my particular case while the first course locates off the ports, mine were close but less than ideal so I implemented a bit of a work around.
While I understand the primary planks ( course #3) set up everything that follows including the sweep of planks, truth be told they would be in 1/48 about 75’-80’ long which really was not possible, plus, giving them very modest adjustment required me to rip a few new ones including some of the short ones, angled on the ends which were too short to reach port sides as supplied.
FWIW most extras were ripped from the parts sheets left after everything removed to maintain similar wood..
A bit perplexing since my ports all faithfully followed proper spacing while enclosed in the jig but given the scope of this kit and all fairly complex alignment requirements it was not a complete surprise and not particularly tough to execute a workable around.
Sorry for being wordy and jumping on your build Jeff, but hopefully some may find it helpful.
Finally, the planks lay down nicely with required heat bending at the bow and, again, I left the char on which looks pretty good and used medium CA.
I also put a small bevel on about 1/2 the edge which allows tight fitment.
Tim
