Thats very sage advice Grant. I am leaning in the direction of leaving the cross beams where they are supposed to be then make adjustments to accommodate the mast. I am even considering moving the mast step which would solve everything except that the step is in the correct location now according to plans.Good morning Daniel. I've said it before I'm sure these kit manufactures deliberately add some Gremlins in just to challenge us...... That being said this looks like a really cool kit to build and we all know what a beautiful ship the Le Requin is. I would have a look and see if there are any bits, pumps etc which do go down at this beam. If not and you are going to plank the entire deck then I would cut/sand/drill the beam a little to accommodate the mast. I would not move the beam as this could change the curvature of the deck and the length of the carlings etc ?. Just my 2 Cents. Cheers Grant
-

Win a Free Custom Engraved Brass Coin!!!
As a way to introduce our brass coins to the community, we will raffle off a free coin during the month of August. Follow link ABOVE for instructions for entering.
You are using an out of date browser. It may not display this or other websites correctly.
You should upgrade or use an alternative browser.
You should upgrade or use an alternative browser.
Just to be clear - I wasn't suggesting that the single offending beam be moved - I was wondering if the whole thing (the whole deck) was in the right place...
Well, the misalignment I am experiencing is enough to make one wonder if the deck is in the wrong place. I believe I have set off a negative tone by pointing out my challenges, struggles and mistakes. For this I apologize, the purpose for this build log is to showcase what I believe is going to be a representation of a ship that has strikingly beautiful lines. I am getting close to the planking stage which for me is exciting. The visual treats this ship has to offer are amazing. Large 2" canons and side carvings that are a work of CNC art. The expectations of a beautiful pearwood hull and decking with accent wood running the length of the ship not to mention those beautiful lateen sails, keeps me motivated and moving toward the finish line. I hope all of you following this build enjoy the ride as well. More progress pictures coming in the near future.Just to be clear - I wasn't suggesting that the single offending beam be moved - I was wondering if the whole thing (the whole deck) was in the right place...
Thank you all for keeping an interest.
No worries, Daniel. Besides, I wasn't blaming the kit - I was blaming youWell, the misalignment I am experiencing is enough to make one wonder if the deck is in the wrong place. I believe I have set off a negative tone by pointing out my challenges, struggles and mistakes. For this I apologize, the purpose for this build log is to showcase what I believe is going to be a representation of a ship that has strikingly beautiful lines. I am getting close to the planking stage which for me is exciting. The visual treats this ship has to offer are amazing. Large 2" canons and side carvings that are a work of CNC art. The expectations of a beautiful pearwood hull and decking with accent wood running the length of the ship not to mention those beautiful lateen sails, keeps me motivated and moving toward the finish line. I hope all of you following this build enjoy the ride as well. More progress pictures coming in the near future.
Thank you all for keeping an interest.


 .
.In truth I was only trying to be helpful. I'll go back to staring at the drawings of my SP now
I could tell,I was blaming you

.

Thank you, you helped me shut down my complaint department.In truth I was only trying to be helpful.


- Joined
- Sep 3, 2021
- Messages
- 5,065
- Points
- 738

Triggered by your response, I visited the suppliers' webpage; I wanted to see for myself why this model has this magnetic powers over you. I must admit, she does have beautiful lines and a very attractive sail arrangement. Also, all the added wood carvings adds to the overall appeal.The purpose for this build log is to showcase what I believe is going to be a representation of a ship that has strikingly beautiful lines. I am getting close to the planking stage which for me is exciting. The visual treats this ship has to offer are amazing. Large 2" canons and side carvings that are a work of CNC art. The expectations of a beautiful pearwood hull and decking with accent wood running the length of the ship not to mention those beautiful lateen sails, keeps me motivated and moving toward the finish line.
As far as misalignments go; my advice, for what it's worth, correct them while you can, for they will come back to hurt you, badly.
Finally, I think the end result will be exactly what you envision, if I extrapolate on what you've shown before.
PS Any ideas yet for the helideck?
So far, I have not read anything concerning the utility of that large open grated deck area. There is a grated hatch over the rudder area I assume is for access to the rudder for possible repair or replacement. Other than that lawn chairs and umbrellas?PS Any ideas yet for the helideck?
- Joined
- Jan 25, 2023
- Messages
- 444
- Points
- 278

Afternoon Daniel. I finally got the kit and can compare the drawings to your pictures and this is my take. Keep in mind I'm an armchair expert, take it with a big grain of salt.
I've compared the kit drawings to the Boudriot drawings and they both agree the center of the mast step appears centered front to back over the floor (center section) of frame 42.
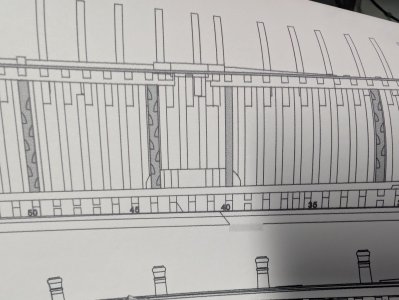
As near as I can see from this picture, you have it centered over the gap between 42 and 43. It might just be perspective.
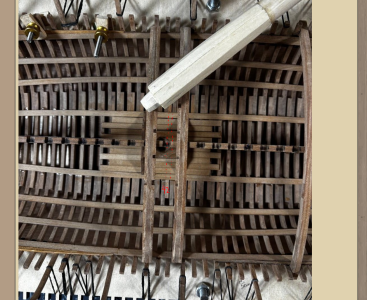
That's what it looks like to me from the perspective of this picture, I could easily be wrong, so feel free to ignore if you don't agree.
I've compared the kit drawings to the Boudriot drawings and they both agree the center of the mast step appears centered front to back over the floor (center section) of frame 42.

As near as I can see from this picture, you have it centered over the gap between 42 and 43. It might just be perspective.

That's what it looks like to me from the perspective of this picture, I could easily be wrong, so feel free to ignore if you don't agree.
I think I finally see Rob, your 4 in frame 42 is over what I believe is called a futtock or main tall rib and the 2 in 42 is over the floor rib. One is offset by about the amount I am off. The only caveat I faced was on the jig where rib 42 is called to be on the taller futtock. The other situation called for a vertical post up against the mast step, see yellow post. The post location is dictated by the notch in the keelson. I believe you have solved my mystery, thank you!
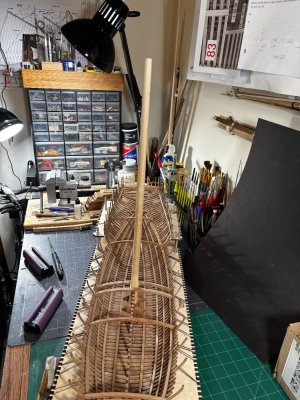
I spent quite a bit of time today setting and dry fitting the main mast. The deck beams are in their plan location, with a little fenagling I have found a home for the main mast check it out.
The yellow post and mast step butted up next to each other first.
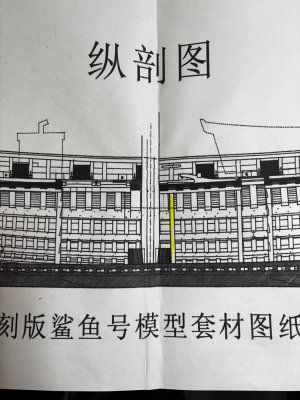
My final solution dry fitted only.
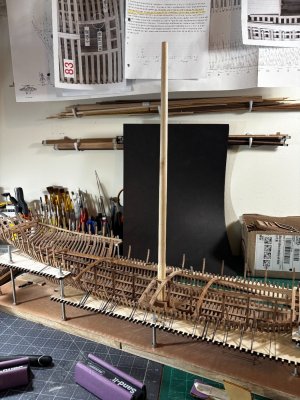
Now on to more adventures in modeling.
Again, does anyone know what's up with having to post then go back and rotate these pictures?
I spent quite a bit of time today setting and dry fitting the main mast. The deck beams are in their plan location, with a little fenagling I have found a home for the main mast check it out.
The yellow post and mast step butted up next to each other first.

My final solution dry fitted only.


Now on to more adventures in modeling.
Again, does anyone know what's up with having to post then go back and rotate these pictures?
Glad you got the mast location resolved.I think I finally see Rob, your 4 in frame 42 is over what I believe is called a futtock or main tall rib and the 2 in 42 is over the floor rib. One is offset by about the amount I am off. The only caveat I faced was on the jig where rib 42 is called to be on the taller futtock. The other situation called for a vertical post up against the mast step, see yellow post. The post location is dictated by the notch in the keelson. I believe you have solved my mystery, thank you!
I spent quite a bit of time today setting and dry fitting the main mast. The deck beams are in their plan location, with a little fenagling I have found a home for the main mast check it out.
The yellow post and mast step butted up next to each other first.
View attachment 547312
My final solution dry fitted only.
View attachment 547313View attachment 547314
Now on to more adventures in modeling.
Again, does anyone know what's up with having to post then go back and rotate these pictures?
I’m looking forward to seeing the deck installation after you finish with the beams.
I have no idea why all the pictures need to be rotated, seems this issue started not long ago and has been a constant issue for everyone posting.
The Helideck is a Grant patentTriggered by your response, I visited the suppliers' webpage; I wanted to see for myself why this model has this magnetic powers over you. I must admit, she does have beautiful lines and a very attractive sail arrangement. Also, all the added wood carvings adds to the overall appeal.
As far as misalignments go; my advice, for what it's worth, correct them while you can, for they will come back to hurt you, badly.
Finally, I think the end result will be exactly what you envision, if I extrapolate on what you've shown before.
PS Any ideas yet for the helideck?

A beauty Daniel.I think I finally see Rob, your 4 in frame 42 is over what I believe is called a futtock or main tall rib and the 2 in 42 is over the floor rib. One is offset by about the amount I am off. The only caveat I faced was on the jig where rib 42 is called to be on the taller futtock. The other situation called for a vertical post up against the mast step, see yellow post. The post location is dictated by the notch in the keelson. I believe you have solved my mystery, thank you!
I spent quite a bit of time today setting and dry fitting the main mast. The deck beams are in their plan location, with a little fenagling I have found a home for the main mast check it out.
The yellow post and mast step butted up next to each other first.
View attachment 547312
My final solution dry fitted only.
View attachment 547313View attachment 547314
Now on to more adventures in modeling.
Again, does anyone know what's up with having to post then go back and rotate these pictures?
Rob, based on your helpful observations, I recommend you lay the keel (along with the stern post), keelson, one or two of the columns at the step location, and the longitudinal backbone that supports all the transverse deck beams out on your flat plan and profile sheet. If everything lines up, I will say your good to go. On my ship the mast step being smack up against that support column AND the notches above for the deck beams were automatically tied into the wrong position. The way I see it now the only other fix early on would have been to trim the forward end of the mast step 3 or 4 mm then glue it down up against the vertical column.then glue it down to th Oops, I failed to mention I got the Shicheng version of the kit, so there might be some subtle differences. Looks like to got it resolved either way, the results look awesome.
When do you think you might start a log for your Le Requin?
Last edited:
Thank you Günther.Ahoy Daniel,
that looks simply stunning! Great job so far!!! I'm a fan of your kit.
No helicopters allowed on my ships aft deck; the rotor blades would shred all my mizzen sheets and sail!The Helideck is a Grant patent


- Joined
- Sep 3, 2021
- Messages
- 5,065
- Points
- 738

Man up, Dan, it's just a minor design issue requiring some proper attention. I'm sure you can come up with something other than "no helicopters allowed on my ship".No helicopters allowed on my ships aft deck; the rotor blades would shred all my mizzen sheets and sail!


- Joined
- Sep 3, 2021
- Messages
- 5,065
- Points
- 738

The issue being?The Helideck is a Grant patent
- Joined
- Jan 25, 2023
- Messages
- 444
- Points
- 278

I'll definitely come back to this post and research heavily before I glue the step down. I want to finish the longboat I have started before I start Requin, or else I'll never finish it, I'll find some new rabbit to chase out of it's hole.Rob, based on your helpful observations, I recommend you lay the keel (along with the stern post), keelson, one or two of the columns at the step location, and the longitudinal backbone that supports all the transverse deck beams out on your flat plan and profile sheet. If everything lines up, I will say your good to go. On my ship the mast step being smack up against that support column AND the notches above for the deck beams were automatically tied into the wrong position. The way I see it now the only other fix early on would have been to trim the forward end of the mast step 3 or 4 mm then glue it down up against the vertical column.
When do you think you might start a log for your Le Requin?


