1/48 scale Launch, plank on frame, by neptune

Joined
May 25, 2017
Messages
3,188
Points
688

Location
Australia.
A1.jpg
I bought two of these small boats awhile ago, this one is a 30 foot
launch at 1/48 scale and the other is a 1/48 scale cutter, these are the
sellers photo's of the finished boat and the instruction sheets, Cost of
the boats was approx AUD 34 including post for each one,

B1.jpg


1.jpg


2.jpg
 
Last edited:
3.jpg
This is the base of the building jig, you pop out the two side pieces and glue them to the base, see next pic,

4.jpg
The two sides glued in place,

5.jpg
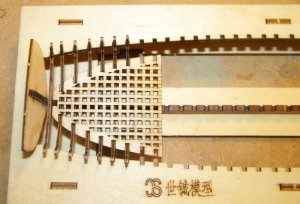
This is the top of the jig,

6.jpg
The top glued in place, also shows the keel lying through teh middle just to see what it fits like,

7.jpg
Next up i went to get the frames, and that is when I noticed that they had given me two sets of the same frames,
so I have had to send them a request to send me another set of frames so i can continue,

8.jpg
This shows the three parts that make up the stem stern and keel, note the two tabs on the bottom of the keel locate into two holes in the jog base,


To be continued,
 
Last edited:
Good, that you started the building log of these small beauties......so I know how to do it, when I have to make mine for the La Salamandre.
I will follow with big interest (and hope, that the spares are delivered asap....)
 
Good, that you started the building log of these small beauties......so I know how to do it, when I have to make mine for the La Salamandre.
I will follow with big interest (and hope, that the spares are delivered asap....)

G'day Uwe
If you follow John in his build, you can't go wrong. John has a vast knowledge in this hobby and he is always there to pass on his experiences.
This I'm sure you would already know.
Happymodeling to all
Greg
 
10.jpg
I decided to build the launch as far as I can, then I will have to wait for the other frames, good news is that the seller on ebay has said he will send the missing frames, this pic shows the stem and stern posts on both the Launch and the cutter after gluing, I like to put a bit of paper over both sides of the joins when I use PVA glue as this helps keep them together,

11.jpg
The assemblies after removing the paper,

12.jpg
close up of one of the stern posts with my finger to show how small these parts are,

13.jpg
The keel section for the launch sitting in the jig,

14.jpg
This part goes on either side of the stem,

15.jpg
Glued in place, with the other part waiting to be glued,
 
16.jpg
Transom attached

17.jpg
keel with transom attached in the jig

18.jpg
The first seven aft frames in place, every thing is cut so clean and precisely, the parts just drop into place,

19.jpg
another view,

20.jpg
and looking down on top of the frames,


22.jpg
view along the jig, the grating is just sitting there and is not yet glued,

23.jpg
This just shows how evry thing goes together, this now is as far as i can go with the launch untill I receive the missing frames,
 

Attachments

  • 21.jpg
    21.jpg
    104 KB · Views: 6
9.jpg
The jig for the cutter

24.jpg
Stern post stem and keel assembly in the jig

25.jpg
approx half of the frames in place,

26.jpg
view along the bottom of the jig,

27.jpg
all the frames in place except for the forward cant frames,

28.jpg
another view

29.jpg
The transom, gratings and stern assembly in place,
 
37.jpg
One side of the floor boards fitted, they are just glued onto the ribs below,

38.jpg
All the floorboards now fitted and you can see one half of the capping rail waiting to be attached,

39.jpg
Both sides of the capping rails attached and I have put some paper weights on top while they are drying,

40.jpg
Two views of the capping rails,

41.jpg
 
45.jpg
The seats now fitted, I still have the cant frames to fit at the bow,

46.jpg
they do not provide one in the kit, but I fitted a support beam under the five main seats for surport,

47.jpg
and then I fitted the forward cant frames,

48.jpg
another view,

49.jpg
These little suckers go on the inside edge of the stem, they are for the planks to land on at the bow,

50.jpg
very fine and tiny, next job will be the planking, fingers crossed,
 
Looking good so far..... now with planking the really challenge will start
But I think with this well developed kit there will be no unsolvable problems to be expected
 
51.jpg
So now its on with the planking, this is the first plank,

52.jpg
Two planks attached,


53.jpg
another view,

54.jpg
Three planks,

55.jpg
and now four, they are going on ok, but do take a little bit of manipulating, to get them right,

56.jpg
another view and thats it for tonight, I will let every thing set and settle over night,
 
Back
Top