I cannot imagine what was said about you, but it sounds awful. Was this before or after the NRG took over the forums? I had a run in with one moderator about 15 years ago.
-

Win a Free Custom Engraved Brass Coin!!!
As a way to introduce our brass coins to the community, we will raffle off a free coin during the month of August. Follow link ABOVE for instructions for entering.
-

PRE-ORDER SHIPS IN SCALE TODAY!
The beloved Ships in Scale Magazine is back and charting a new course for 2026!
Discover new skills, new techniques, and new inspirations in every issue.
NOTE THAT OUR FIRST ISSUE WILL BE JAN/FEB 2026
You are using an out of date browser. It may not display this or other websites correctly.
You should upgrade or use an alternative browser.
You should upgrade or use an alternative browser.
900-ton wooden barque
- Thread starter shipbuilder
- Start date
- Watchers 19
- Joined
- Jun 30, 2012
- Messages
- 1,418
- Points
- 433

It was pretty bad, and did me a lot of harm - I was made aware of it by someone here. It was after NRG took over, at a time when a lot of folk were coming under fire from them.
Robert
Robert
That's a shame.It was pretty bad, and did me a lot of harm - I was made aware of it by someone here. It was after NRG took over, at a time when a lot of folk were coming under fire from them.
Robert
@shipbuilder, I have followed this thread with great interest and have purchased a few downloads from you. What I am also very interested in is your method of modelling or designing sea water. Are there any further explanations?
Many thanks
Bela
Many thanks
Bela
- Joined
- Jun 30, 2012
- Messages
- 1,418
- Points
- 433

- Joined
- Jun 30, 2012
- Messages
- 1,418
- Points
- 433

Here is an article my wife wrote:
MAKING & PAINTING SEAS
By
Christine Wilson
Christine Wilson
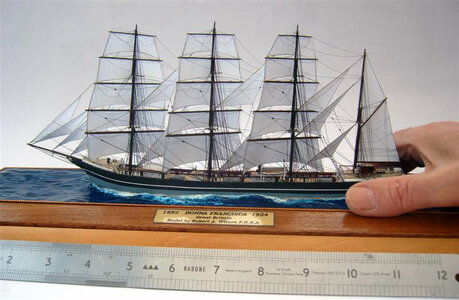
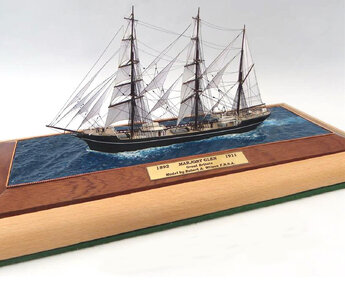
When I first began painting the seas for the waterline models, they were handed over to me complete with their wooden edging containing the plasticine sea and a hole cut out in the centre to take the ship. At this stage, the wooden edging had been smoothed and varnished. In order to keep it clean during the painting, it was necessary to mask it off with paper masking tape. Anyone who has used masking tape will probably have realised that paint has an annoying habit of getting under the edges, especially at the corners, no matter how hard the tape has been pressed down. As a result, I usually spent two hours painting the sea and then a further hour trying to remove the excess paint from the wood without marking it. This involved twisting the finest piece of cotton wool around the end of a cocktail stick and dipping it into white spirit, with a separate one for each paint mark to avoid transferring paint to the area just cleaned. A very laborious and frustrating task!
In more recent models, the process has been greatly simplified since Robert began making a removable sea tray that is a close fit inside the wooden edging. With this system, no masking is required, and the whole sea-painting process is speeded up considerably.
Although the sea is already formed when I get it, I check that it is dust free and spend a few minutes with the sea-roller tool making a few adjustments or improvements as I see fit. Once all the lumps and irregularities are sorted out, the plasticine is primed using a matt grey aerosol priming paint such as is used in car body work repairs.
For the main sea colour I like to use Humbrol gloss enamel paint. Generally a dark hue of blue or green is favoured although I rarely use them singly. Usually two colours are used, one painted on immediately after the other and for interesting effects I sometimes blend in small amounts of metallic blues and greens. Whilst still wet, I add the bow wave, wash and wake using white enamel gloss.
Because the main colour is still wet, the white will run into it and after a while will shrink creating a streaky “foamy” sort of appearance. Because of this shrinkage I apply quite a lot of white at this beginning stage. When this is semi dry, more white can be added according to the desired “sea state”. When the whole thing is more or less completely dry I lightly stipple white paint on with a small bristle brush (held upright) to simulate spray.
The sea should enhance the model and not compete with it and therefore I have found it best to avoid bright shades of blue or green that tend to make the scene look garish. As most of the models have black or other dark hulls a fairly colourful sea is still required. Grey always seems appropriate when a “rough” sea is called for but this would look very depressing against anything other than a brightly coloured ship.
After the sea has dried thoroughly, the removable tray containing it may be glued inside the wooden edged base and a tightly twisted length of 24swg wire glued around the junction between sea and edging. This makes for a very neat finish to the sea.
Once the model has been completed and fitted into the sea, the final touches may be added. This consists of pushing the plasticine as close to the hull as possible. This still leaves a dry looking junction that needs to be dealt with. I use a thick, clear liquid acrylic to fill the gap. Whilst it is still liquid, it is of a cloudy appearance, but it dries clear. It may also be mixed with acrylic paint, as the wake of water alongside the hull is usually white rather than clear. The use of acrylic makes for a very effective “wet” looking junction between hull and water.
After a few days, a further inspection of the sea may reveal some small area which needs touching up or improving in some small way.
- Joined
- Jun 30, 2012
- Messages
- 1,418
- Points
- 433

Welcome back, Bob, and wishing you to feel better.
- Joined
- Jun 30, 2012
- Messages
- 1,418
- Points
- 433

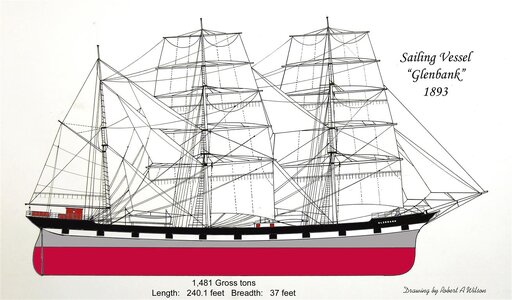
Thanks JIm. The glue alergy prevents me from building any more, and the main problem is fatigue, but if I don't expend much energy, I generally feel OK, and no pain. Consequently, I have moved over to technical drawing with pen and ink. Here is my latest effort. Barque Glenbank - a highly unpopular class of sailing ship, but I do like these big steel square-riggers -Welcome back, Bob, and wishing you to feel better.
- Joined
- Jun 30, 2012
- Messages
- 1,418
- Points
- 433

Thank you very much for the explanation.
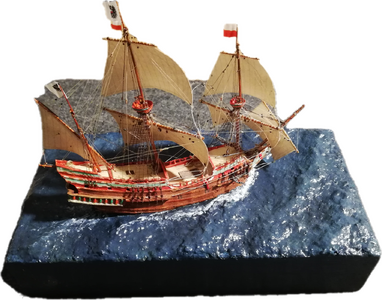
The attached example is mine. However, I am not very happy with the result and am looking for better options
.scale 1:250View attachment 459816
- Joined
- Jun 30, 2012
- Messages
- 1,418
- Points
- 433

The sea looks OK to me, it looks like it is made with polystyrene foam, a method that I used latterly -
- Joined
- Jun 29, 2024
- Messages
- 1,496
- Points
- 393

Bob,
As a new member of SOS, also a refugee from MSW after a recent run in with the powers that be, I was completely unaware of your work.
To sum it up, it is wonderful! You beautifully capture the essence of these late Nineteenth Century sailing vessels. And, your steamship models are great too. Your work is also a refreshing change from the Nelson Era “Wooden Walls” models. If you had any to sell and if there was a way to overcome the overseas shipping problems, I would love to have one in my collection. I can’t imagine why anyone, “expert” or otherwise could find anything to criticize about your work.
Roger
PS: I too like these great steel sailing vessels that attempted to compete with steamships during the late Nineteenth and early Twelfth Centuries. They were the ultimate powerful wind machines of their day.
Last edited:
- Joined
- Jun 30, 2012
- Messages
- 1,418
- Points
- 433

Thank you. An extreme character assassination (and mostly made up) from MSW some time ago, almost destroyed my business, and I began to run things down after that, and do not build models any more. That is not because of MSW, but more because I developed an allergy to glue fumes, and also had a fair amount of eye surgery. These days, I am specialising in plan drawing (Merchant ships only). Very few ship modellers are interested in merchant ships, but I can store the plans easily as they take up very little space, and in many ways, I am pleased to be free of the worries of building model ships to sell. I am now 80 years old.Bob,
As a new member of SOS, also a refugee from MSW after a recent run in with the powers that be, I was completely unaware of your work.
To sum it up, it is wonderful! You beautifully capture the essence of these late Nineteenth Century sailing vessels. And, your steamship models are great too. Your work is also a refreshing change from the Nelson Era “Wooden Walls” models. If you had any to sell and if there was a way to overcome the overseas shipping problems, I would love to have one in my collection. I can’t imagine why anyone, “expert” or otherwise could find anything to criticize about your work.
Roger
PS: I too like these great steel sailing vessels that attempted to compete with steamships during the late Nineteenth and early Twelfth Centuries. They were the ultimate powerful wind machines of their day.
