Tightly served. What size is the block? RichIt's only my first try using this little tool.
View attachment 224929
But it's worked a lot better than most of my previous efforts
Jan
-

Win a Free Custom Engraved Brass Coin!!!
As a way to introduce our brass coins to the community, we will raffle off a free coin during the month of August. Follow link ABOVE for instructions for entering.
-

PRE-ORDER SHIPS IN SCALE TODAY!
The beloved Ships in Scale Magazine is back and charting a new course for 2026!
Discover new skills, new techniques, and new inspirations in every issue.
NOTE THAT OUR FIRST ISSUE WILL BE JAN/FEB 2026
You are using an out of date browser. It may not display this or other websites correctly.
You should upgrade or use an alternative browser.
You should upgrade or use an alternative browser.
Hi Rich,
The block is 9mm. I‘ve not tried any smaller ones but with enough practice I’d expect the same result. I used a light color thread for the serving to get a good look at the result.
Jan
The block is 9mm. I‘ve not tried any smaller ones but with enough practice I’d expect the same result. I used a light color thread for the serving to get a good look at the result.
Jan
I am down in the 2.4 to 5 mm sizes which are likely to small but let me know how something down around 5 works for you. Thanks. RichHi Rich,
The block is 9mm. I‘ve not tried any smaller ones but with enough practice I’d expect the same result. I used a light color thread for the serving to get a good look at the result.
Jan
OK, I can do that. I've got some 4 and 5mm blocks that I need to redo.I am down in the 2.4 to 5 mm sizes which are likely to small but let me know how something down around 5 works for you. Thanks. Rich
Jan
Hi. Allow me some notes.
No matter the size, it depends on the way you proceed with a seizing,
As I wrote because of the slide ability of the seizing knot, you can preform the loop in whish you'll place a block.
Look at the sketch.

I wrote also that I don't know whether the tool itself can help with the seizings in our hobby. And that because maybe (?) it's made
to work with thicker fishing lines and those lines, as nylon material, have different behavior as you make loops with it.
Generally the smaller the loops, the better to keep stable a preformed seizing knot.
Thx
No matter the size, it depends on the way you proceed with a seizing,
As I wrote because of the slide ability of the seizing knot, you can preform the loop in whish you'll place a block.
Look at the sketch.

I wrote also that I don't know whether the tool itself can help with the seizings in our hobby. And that because maybe (?) it's made
to work with thicker fishing lines and those lines, as nylon material, have different behavior as you make loops with it.
Generally the smaller the loops, the better to keep stable a preformed seizing knot.
Thx
@PT-2,
Had a little time this morning so I tried a 4mm and 5mm block using the same routine I used for the bigger block.
I used slightly oversized thread so I could see what I was working with. The block thread is 1.0mm and the serving thread is 0.5mm on the 5mm block. for the 4mm block I used 1.0mm again but the serving is 0.25mm.
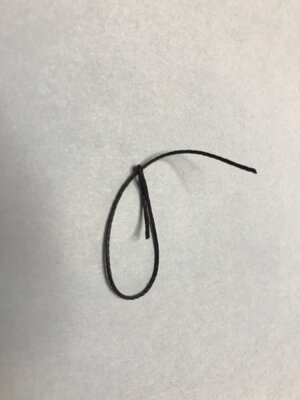
The first step was to create a small loop in the block thread with a drop of CA. The long end of of the thread was then run through the small loop forming a large loop.
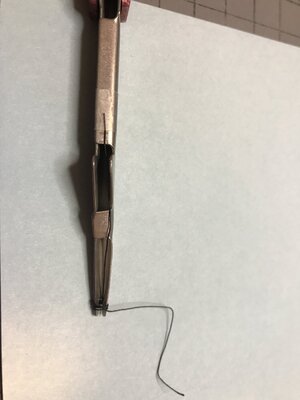
The next step was to wrap the serving around the tool. One end of the serving thread was taped to the tools finger rest.
The block thread was then passed into the "valley" of the tie fast tool small loop first. The serving was moved over the small loop and a block placed in the larger loop.
The serving ends were slowly pulled apart. Enough slack was left in the serving to be able to pull the large loop tight around the block.
The final step was to tighten the serving and add a small dab of CA to hold the knots.

A drop of CA to create a loop or eye, and the thread run through to create a bigger loop.

The serving wrapped on the tool, note the tape to hold the upper end of the serving on the tool.

The block tread placed in tool with small loop/eye first

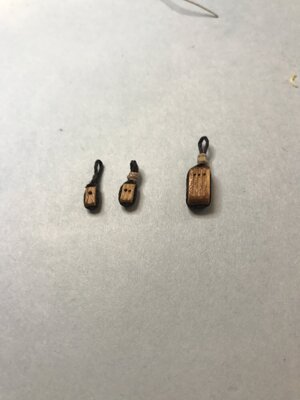
The 4mm, 5mm and 9mm blocks completed.
I think with some practice and a bit of patience a good product can be accomplished.
Jan
Had a little time this morning so I tried a 4mm and 5mm block using the same routine I used for the bigger block.
I used slightly oversized thread so I could see what I was working with. The block thread is 1.0mm and the serving thread is 0.5mm on the 5mm block. for the 4mm block I used 1.0mm again but the serving is 0.25mm.
The first step was to create a small loop in the block thread with a drop of CA. The long end of of the thread was then run through the small loop forming a large loop.
The next step was to wrap the serving around the tool. One end of the serving thread was taped to the tools finger rest.
The block thread was then passed into the "valley" of the tie fast tool small loop first. The serving was moved over the small loop and a block placed in the larger loop.
The serving ends were slowly pulled apart. Enough slack was left in the serving to be able to pull the large loop tight around the block.
The final step was to tighten the serving and add a small dab of CA to hold the knots.

A drop of CA to create a loop or eye, and the thread run through to create a bigger loop.

The serving wrapped on the tool, note the tape to hold the upper end of the serving on the tool.

The block tread placed in tool with small loop/eye first

The 4mm, 5mm and 9mm blocks completed.
I think with some practice and a bit of patience a good product can be accomplished.
Jan
Last edited:
Thanks for the presentation of excellent information. I will surely be putting it to use.
Happy Modelling
Steven
Happy Modelling
Steven
Recently took delivery of a couple of these tools.
I noticed your post #26 where you resorted to trapping your thread with tape.
A small tip:- the folded flat in front of your tape is an inbuilt feature to do just that.
Last edited:
Hallo @ThanasisHi all.
As a long time ship modeler and member in quite forums, I keep seeing that the issue of an easy way of seizing, is most wanted.
It was also for me but after many experiments, I ended up to the below method.
See what I mean.
As many of you, I also like fishing, so I came across the tool which allows you to tie fishing hooks easy, the "Tie-fast knot tyer". Then, I got the idea of a "Tie-fast seizing tyer".
I don’t know whether the fishing tool itself, can be used for seizing but I made my own tools…
So depending on the thickness of the threads I use, I modified three useless head paint brushes by trimming them down and creating a channel. See photo.
View attachment 219075
Every time I need to seize something, I choose the proper modified paintbrush's head and by following the sketches for the use of the "knot tyer" (modified as well), I make loops around the edge of it.
Then, I insert the loop (or single thread) that I want to be seized in the formed channel and carefully remove all the threads (loops and thread to be seized) from the paintbrush's head. See the sketches and the photos of the process.
View attachment 219076
View attachment 219077
Finally, I gently pull the two edges of the loops' thread and I have my seizing knot formed.
View attachment 219078
The seizing knot is slid able, so I move it to its final place, I cut the edges and secure with a drop of glue.
View attachment 219079
I hope you find my method easier than others.
Thanks
we wish you all the BEST and a HAPPY BIRTHDAY

Many thanks for your wishes Uwe.
I also wish you happy and creative new year.
Take care
I also wish you happy and creative new year.
Take care
This indeed looks like a great and easy tool
Let me order one
Let me order one
Canadian Tire (Canada) have it. But I have concern about the size of the tool. May be your trick for miniature is better with paint brush mods.
I am curious about someone input using the original one.
I am curious about someone input using the original one.
Hallo @ThanasisHi all.
As a long time ship modeler and member in quite forums, I keep seeing that the issue of an easy way of seizing, is most wanted.
It was also for me but after many experiments, I ended up to the below method.
See what I mean.
As many of you, I also like fishing, so I came across the tool which allows you to tie fishing hooks easy, the "Tie-fast knot tyer". Then, I got the idea of a "Tie-fast seizing tyer".
I don’t know whether the fishing tool itself, can be used for seizing but I made my own tools…
So depending on the thickness of the threads I use, I modified three useless head paint brushes by trimming them down and creating a channel. See photo.
View attachment 219075
Every time I need to seize something, I choose the proper modified paintbrush's head and by following the sketches for the use of the "knot tyer" (modified as well), I make loops around the edge of it.
Then, I insert the loop (or single thread) that I want to be seized in the formed channel and carefully remove all the threads (loops and thread to be seized) from the paintbrush's head. See the sketches and the photos of the process.
View attachment 219076
View attachment 219077
Finally, I gently pull the two edges of the loops' thread and I have my seizing knot formed.
View attachment 219078
The seizing knot is slid able, so I move it to its final place, I cut the edges and secure with a drop of glue.
View attachment 219079
I hope you find my method easier than others.
Thanks
we wish you all the BEST and a HAPPY BIRTHDAY

Many thanks for your wishes Uwe.
I wish all the best for you and the members of the forum.
Thanasis
I wish all the best for you and the members of the forum.
Thanasis
I have always -when building -used a big needle -both for sizing and splicing. As I normally toke three years pr. model, I have never gotten into sophisticated tools. Anyhow I find your method rather goodHi all.
As a long time ship modeler and member in quite forums, I keep seeing that the issue of an easy way of seizing, is most wanted.
It was also for me but after many experiments, I ended up to the below method.
See what I mean.
As many of you, I also like fishing, so I came across the tool which allows you to tie fishing hooks easy, the "Tie-fast knot tyer". Then, I got the idea of a "Tie-fast seizing tyer".
I don’t know whether the fishing tool itself, can be used for seizing but I made my own tools…
So depending on the thickness of the threads I use, I modified three useless head paint brushes by trimming them down and creating a channel. See photo.
View attachment 219075
Every time I need to seize something, I choose the proper modified paintbrush's head and by following the sketches for the use of the "knot tyer" (modified as well), I make loops around the edge of it.
Then, I insert the loop (or single thread) that I want to be seized in the formed channel and carefully remove all the threads (loops and thread to be seized) from the paintbrush's head. See the sketches and the photos of the process.
View attachment 219076
View attachment 219077
Finally, I gently pull the two edges of the loops' thread and I have my seizing knot formed.
View attachment 219078
The seizing knot is slid able, so I move it to its final place, I cut the edges and secure with a drop of glue.
View attachment 219079
I hope you find my method easier than others.
Thanks


