Albatros by Occre - First build

Joined
May 7, 2025
Messages
11
Points
8

Hi, fellas. Thanks for having me. I’ve always wanted to build wood 18th century war ships. I just retired so now I have the time to invest in a hobby. For my first ship I chose OcCre’s Albatros. I chose this model as it seemed like a good kit to learn the skills I’m going to need. My goal is to eventually build a museum quality ship of the line. We’ll have to see how steep the learning curve is before I can build something as complicated as that.

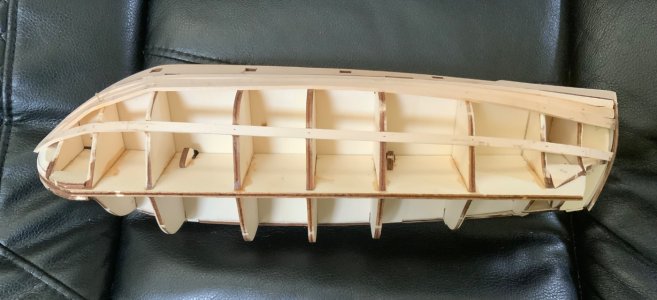
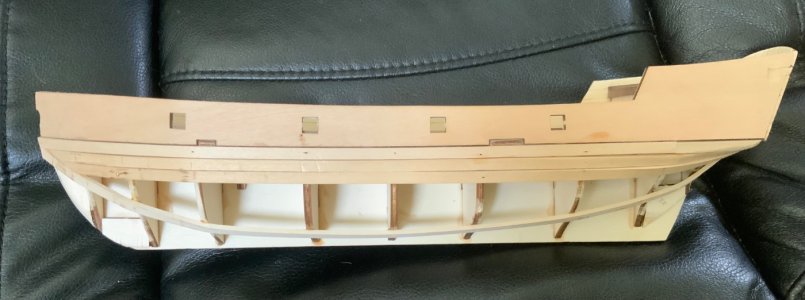
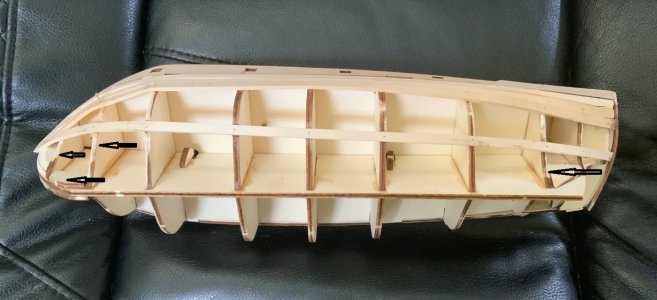
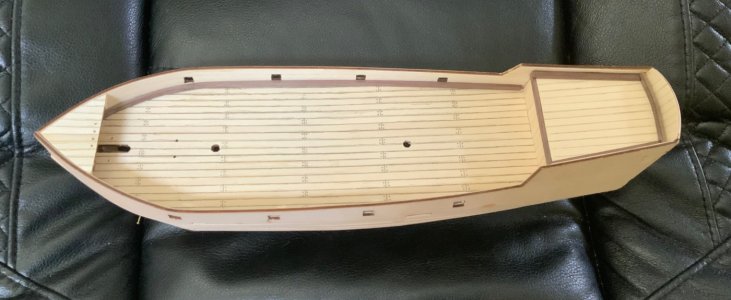
I’ve just started the planking. The first plank was inadvertently placed too low. When I plank the starboard side I’ll make a better effort to place the first plank in the middle. The instructions showed planking from the middle up, but I was concerned about the top planks being at an angle, so after that first plank was placed I started planking from the top down. On the second planking I’ll place a plank on the port side then one at the same location of the starboard side. I wanted to plank the port side first then the starboard side on the first planking to use it as a learning tool. As you can see the planks look a little ‘wavy’ toward the bow (prow?). On my next model I’ll pay more attention to the bulkheads.

Any advice or criticism is welcome.
IMG_1737.jpeg

IMG_1738.jpeg

IMG_1736.jpeg
 
Welcome, LT. Most folks typically start planking from the sheer line (deck) down or from the keel up. Some alternate top and bottom until they meet in the middle. Starting from the middle is not something I’ve seen before, but I am also on the low end of the learning curve.

I think the consensus among experienced builders is to also alternate port and starboard one strake at a time. This helps ensure even planking on each side and minimizes the risk of forcing the hull out of alignment.

As Kaya already mentioned, the bulkheads could use some more fairing to help ensure your planks follow a smooth curve. Adding some balsa filler blocks between the bulkheads and filing those down to the shape of the hull will help support your planks so they don’t kink going over the bulkheads. Lots of build logs on this site and tons of video tutorials on the internet worth checking out before starting each phase of your build. And keep asking questions. Lots of helpful folks in the forum happy to share their knowledge and experience. I’ve learned tons from them.

Keep calm and build on.
 
I use an electric plank bender. I soak the strip for 10 minutes and then bend it over the plank bender (which I have attached to the workbench). Then it will be quite easy to get an even bending of the strip.
I also usually fill in with balsa where the hull has quite strong bends. On your boat I had filled in between 2-3 frames in the fore and aft.

I watched some of Occre's videos and you should plank one more time. Then you can safely putty and grind to the right shape. It is important that you get a decent hull after sanding the first planking. It is not possible to correct that much with the second planking.
 
Last edited:

Lieutenant Super warm welcome to SoS

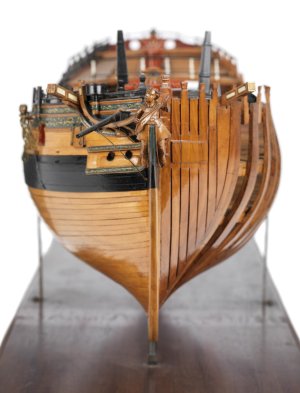
Planking has a huge learning curve, especially regarding edge bending, that is, bending across the breadth of the plank. There are a number of posts here at SoS on how planking was done on a ship that you might find interesting and useful, if not on this model, maybe down the road. When and if you ever want to get into this kind of thing the planks all have to be pre-shaped so that they end in the rabbet as in the model in the photo below. There are written and You Tube tutorials that are a big help.
Four part video on planking. Part one -->
1746713144747.jpeg
 
Thanks for the replies. I spent some time today sanding the bulkheads on the starboard side. After starting the port side planking I had a better idea of how much needed to be sanded. I’ll definitely pay more attention to this in the future. When I do the second planking I’ll alternate port and starboard. I’m doing one side, then the other, on the first planking as I wanted to use it as a lesson and correct any mistakes when I do the second side. Those lessons should help when I’m doing the second planking. What are you guys using to glue the second planking?
 
Regarding glue it seems there is no one answer for everyone. Some prefer CA, others PVA, and there is a place for epoxy as well. For gluing wood, PVA carpenter's glue is a great choice, but it may be best to try a few different glues on scrap assemblies to see which one you prefer regarding ease of use, odor, time to cure, etc.

Allan
 
Allan, does CA make it difficult to stain/paint/varnish? When I was doing the deck I found there was a little bleed over when I used contact cement that was very difficult to remove.
 
Almost any glue is going to cause problems with staining if you get it on the surface being stained. Could also show up with clear varnish and might impact adhesion of paint. As Allen said, it's best to make a test piece with the glue and finish you intend to use to see how they interact before you use them on the real thing.

Personally, I don't like CA for wood-to-wood applications. I actually use plain old Elmer's white glue (PVA) on my models, but wood glue works also. Wood glue dries much harder than standard PVA so that could cause challenges when finish-sanding a second planking layer if you got much squeeze out (less is more when applying glue. Some sources recommend contact cement for second planking, but I would not suggest it for someone still learning the art of planking. Contact cement is very unforgiving and does not allow for adjusting placement.
 
Allan, does CA make it difficult to stain/paint/varnish?
I have no idea as I only use PVA carpenter's glue and white PVA at times for wood. The CA fumes are not kind to me so I do not use it except for quick repairs around the house. With PVA any excess glue that squeezes out when assembling two pieces of wood can be wiped clean with a wet paper towel. Even if a little remains it is usually not a problem to scrape or sand any minor residue once it dries.
Allan
 
Last edited:
UBJS, thanks for posting the video.

Until now the only thing I recall studying from a Batchvarov was Kroum's masters degree thesis on ship framing. Sadly I had never seen his wife's planking video until now. It is really well done. There are a number of very useful things to take in from her video. Anyone building a model with two planking layers would benefit from watching this video. Heck, some of the ship model makers would be well served to include this video in the kit:)
Allan
Everything Olha does is first class. All of her videos—and they are legion—are worth the time spent.
 
Welcome to the forum and your first build.

One suggestion, use the search tool and input ship name, to see what others have posted about this ship kit.

It may be helpful to know about possible problem issues and errors others have made, so you don't have to learn them yourself.
 
Welcome, LT. Most folks typically start planking from the sheer line (deck) down or from the keel up. Some alternate top and bottom until they meet in the middle. Starting from the middle is not something I’ve seen before, but I am also on the low end of the learning curve.

I think the consensus among experienced builders is to also alternate port and starboard one strake at a time. This helps ensure even planking on each side and minimizes the risk of forcing the hull out of alignment.

As Kaya already mentioned, the bulkheads could use some more fairing to help ensure your planks follow a smooth curve. Adding some balsa filler blocks between the bulkheads and filing those down to the shape of the hull will help support your planks so they don’t kink going over the bulkheads. Lots of build logs on this site and tons of video tutorials on the internet worth checking out before starting each phase of your build. And keep asking questions. Lots of helpful folks in the forum happy to share their knowledge and experience. I’ve learned tons from them.

Keep calm and build on.

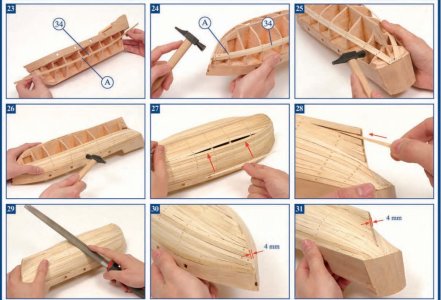
Here are the kit instructions that showed to begin planking at the water line, which is what I did. Actually, I laid the first plank lower than the instructions by mistake. I’ve finished the first planking on the port side, which admittedly didn’t go as well as I planned, but I learned a couple of things. When I begin planking the starboard side I’ll probably alternate top and bottom, meeting in the middle and see how that goes. When I do the second planking I’ll alternate sides like is supposed to be done.

IMG_1745.jpeg
 
When I begin planking the starboard side I’ll probably alternate top and bottom, meeting in the middle and see how that goes.
This may not be the best idea if you want planking like on a ship. On a ship all the strakes of planking land at the rabbet at the stem and at the sternpost (except if there is a drop strake or stealer. :)) If you leave an opening in the middle you will likely wind up with planking like in the instructions above, with pointy ends for some as can be seen in photo 30 and 31. By the same token if you don't mind the look shown in the instructions go for it. As this is your first ship, it would be good practice to follow Olha's video for planking as she addresses lining off and tapering of each strake. Do the instructions show the same method for the second layer?
Allan
 
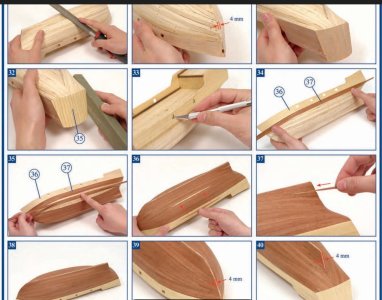
Here are the instructions for the second planking. As this is my first one I’m fumbling around trying to figure out where to start the planking.

IMG_1750.jpeg
 
The simplified method shown in the instructions will produce a fine-looking result if you are not striving for strict accuracy, which in my world is perfectly acceptable especially for new builders. However, after checking out some planking tutorials, you might use this as a chance to practice techniques that more closely approximate the look of accurate planking.

Of course, you’ll want to go completely over your first planking layer to ensure you have eliminated all unevenness. Some filler if needed to build up low spots and sanding to take care of high spots. Better to do that now since the second planking layer will be too thin to take much sanding.
 
Back
Top