Alex R H.M.S. Enterprize Build Log

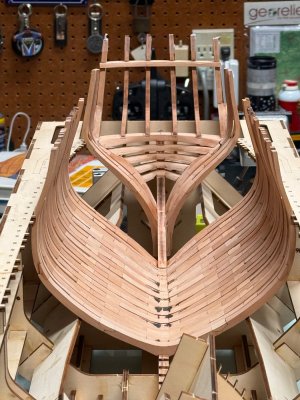
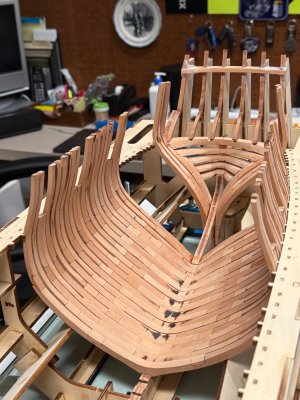
Well, spent two solid days on transoms, sternpost, Y8’s, there are a lot of angles, bevels to get everything matched up and aligned. For no particular reason I was not especially happy with the layered transoms so I scratch built my own…came out OK. Glued them up and did final sanding in situ to try and get angles without gaps on the short Y8, after that’s glued. Will tackle the filler pieces.
Fairly pleased given how many pieces I ended up building.
Will try for a couple pics, nxt day or so.
Tim
 
Ok, the frame half of #3 is fixed, I've trial fit the frame halves of 3, 4 and 5 into the keel and I have trimmed down the chocks on 3 and 4. Maybe rather than completing the construction of all the frame halves and then gluing them. I'll start gluing the frame halves together as I progress. :) That will give me a little variety. Going to bed now. :)
 
Ok, the frame half of #3 is fixed, I've trial fit the frame halves of 3, 4 and 5 into the keel and I have trimmed down the chocks on 3 and 4. Maybe rather than completing the construction of all the frame halves and then gluing them. I'll start gluing the frame halves together as I progress. :) That will give me a little variety. Going to bed now. :)
Hi Corsair, I'm asking: if you have just the project ho do you have any books to help you with the construction?Frank
 
Hi Corsair, I'm asking: if you have just the project ho do you have any books to help you with the construction?Frank
If you are referring to a reference book, no I do not have a book specifically on the Enterprise. I would like to find one. I do have some general books but they are not much help at this stage. I do have the instructions that came with the kit. You can download those from the Dry-Dock Models and Parts website.
 
As

2 1/4” or so, Stewmac.com, was actually just looking at it, ultra thin pull saw.
Wish I had sheets for those parts, had to use holes left from OEM parts as templates and trim accordingly. Almost finished .
You talk about “ downhill” one of my good ski buddies about a year ago was going downhill very fast on his big money carbon bike…….front forks failed, shattered his collar bone.
Sorry for the thread drift….night all.
Tim
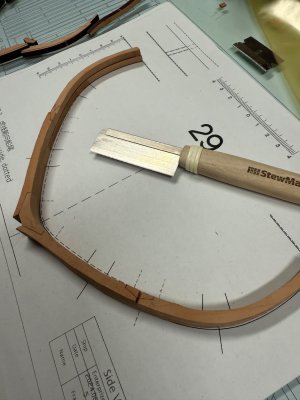
I love my small 2 3/4" Dozuki saw from StewMac. It is super sharp, and easily cuts very thin (0.3mm) lines. I wish I had had this tool years ago ! Once I cross-cut the chock, I can also saw it lengthwise and do the whole operation with the saw. It is so smooth you don't even need to sand the cut.
IMG_1615.jpeg
Here is frame 29 and the StewMac Dozuki saw. I used only the Dozuki to do all the trimming of the chocks, no chisel, no sanding afterwards. Fast and accurate

Alex R
 
I love my small 2 3/4" Dozuki saw from StewMac. It is super sharp, and easily cuts very thin (0.3mm) lines. I wish I had had this tool years ago ! Once I cross-cut the chock, I can also saw it lengthwise and do the whole operation with the saw. It is so smooth you don't even need to sand the cut.
View attachment 516197
Here is frame 29 and the StewMac Dozuki saw. I used only the Dozuki to do all the trimming of the chocks, no chisel, no sanding afterwards. Fast and accurate

Alex R
I love the pictures with a Japanese saw in use ….. thanks for sharing, Alex. And yes, there saw cuts are razor sharp.
Regards, Peter
 
Friends,
Finished most of the transom just now. Still to install upper timbers of fashion piece and glue in the transom wing.
Not perfect, but not bad....Will need some final shaping, filling and sanding, but that will be after the ship comes out of the building jig.
IMG_1620.jpegIMG_1619.jpeg
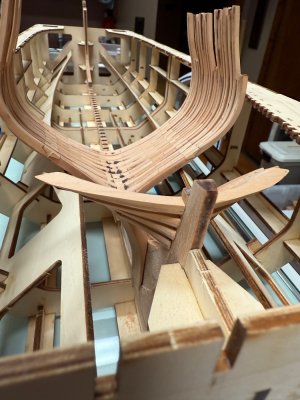
Stern timbers glued into stern post and lower part of fashion pieces; wing transom notched and dry-fitted. 2nd picture shows transom from rear; rising timber of larboard fashion piece can be seen- installed.

Did I say, I hate transoms !

The hardest part was installing the fashion pieces with the ship in the build jig. I needed to grow some long fingers !
Looking back, I should have taken out the frames (they are all dry-fitted ), removed the keel from the build jig, and installed the stern and fashion pieces outside the building jig. Too late now, it's done, yet I'm pretty happy with it.
Time to catch some ZZZ's

Cheers

Alex R
 
Last edited:
Friends,
Finished most of the transom just now. Still to install upper timbers of fashion piece and glue in the transom wing.
Not perfect, but not bad....Will need some final shaping, filling and sanding, but that will be after the ship comes out of the building jig.
View attachment 516654View attachment 516656
Stern timbers glued into stern post and lower part of fashion pieces; wing transom notched and dry-fitted. 2nd picture shows transom from rear; rising timber of larboard fashion piece can be seen- installed.

Did I say, I hate transoms !

The hardest part was installing the fashion pieces with the ship in the build jig. I needed to grow some long fingers !
Looking back, I should have taken out the frames (they are all dry-fitted ), removed the keel from the build jig, and installed the stern and fashion pieces outside the building jig. Too late now, it's done, yet I'm pretty happy with it.
Time to catch some ZZZ's

Cheers

Alex R
You can't tell you hate transoms from this build. :) You did a wonderful job ! I hope mine turns out as well ! I'm still plodding along with the frames.
 
Friends,
Finished most of the transom just now. Still to install upper timbers of fashion piece and glue in the transom wing.
Not perfect, but not bad....Will need some final shaping, filling and sanding, but that will be after the ship comes out of the building jig.
View attachment 516654View attachment 516656
Stern timbers glued into stern post and lower part of fashion pieces; wing transom notched and dry-fitted. 2nd picture shows transom from rear; rising timber of larboard fashion piece can be seen- installed.

Did I say, I hate transoms !

The hardest part was installing the fashion pieces with the ship in the build jig. I needed to grow some long fingers !
Looking back, I should have taken out the frames (they are all dry-fitted ), removed the keel from the build jig, and installed the stern and fashion pieces outside the building jig. Too late now, it's done, yet I'm pretty happy with it.
Time to catch some ZZZ's

Cheers

Alex R
A beautiful result of that transom, Alex. Nice flowing parts.
Regards, Peter
 
Does anyone (Allan ?) know how the transom and wing frames were secured to the sternpost ? I was planning on inserting a metal (copper ?) nail at the center of each stern frame (kinda like the floor timbers were secured to the keel.)...
Thasnks

Alex R
 
Hello Alex,
I'll stick with your kit. It looks great and I'm curious about your next steps.

Best regards
Günter Ship-1
 
Hi guys,
The transom is mostly finished. Only need to install the top timbers for the quarter galleries, and the filling frames below the stern. I'll probably install filling transoms after the ship is out of the build jig., and the friable top-timbers after Installing interior bands and clamps.
Overall, the stern timbers are installed where they are supposed to be, symmetrical, and true to plan. There are details and joinery that are not perfect, but were fixed with filing, and filling.

When I finish a section, I always think of mistakes made, and what should I have done differently.

My main mistake was to initially install Y-8 without its top-timber, and without Y-7 adjacent to keep perspective and flow. This made it very hard to get the correct orientation and angle of the Y-8 top timber, and to fix it correctly in place.
A second mistake was to trim the wing transom's bevels too tightly, and to cut the grooves for the curved stern pieces before the sternpost was attached. I had to re-cut the top and then repair the top of the wing transom. The later part off the wing transom was too thin, and I had to add pieces of wood to make the joint between the fashion piece and Y-8 top timber- probably the most complex and multi-faceted joint in the ship.
I'm sure that you guys already know this stuff, but I'm just letting everybody know FYI.

If I had to do it over again, I would do the following:

1) Make Y-7 and Y-8 fully and install Y-7 first, followed by Y-8. reinforce the last joint on Y-8 and top timber, (pinned). It is a very fragile part. I would NOT bevel the top timber at this point, but wait until all the stern pieces are installed.
2) Study and figure out how these stern pieces come together and relate to each other. INMO, The "anatomy" in this area is the most complicated in the ship, and the building process and illustrations are not very helpful.
The bottom (half-frame B) of Y-8 fits under stern frame # 4-Stern frames # 1,2, and 3 attach to the side of half frame A.
3) The wing transom should not be completely beveled, but finished later. Install the wing transom after both sides of Y-8 are attached to the stern frames.
Do not cut the notches on the the top-side until the exact location of the stern top-timbers on the transom has been marked with pencil. I taped the top timbers with adhesive tape to the build-jig's parts B17, A, B and C to establish and fix their location and how they land on the transom; and hatre-cut grooves, and later fill in.
Anyway, the stern is structurally correct and according to plan, but has some work-arounds in the joinery.
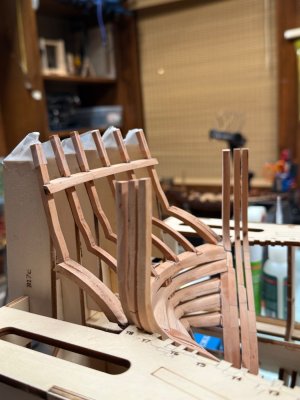
IMG_1630.jpegIMG_1629.jpegIMG_1626.jpeg
Thanks

Alex R
 
Freunde,
Heute beginne ich mit dem Bau.
Ich hatte schon länger überlegt, dass ein Bautisch mit T-Nuten für dieses große Projekt sehr hilfreich wäre.
Ich habe bei Rockler ein vorgefertigtes Melamin-T-Schienenbrett (2,5 cm x 101,6 cm x 66 cm) mit einigen Klemmen und Zubehörteilen zur Befestigung an den Schienen gekauft. Rockler bietet mehrere Klemmen und Vorrichtungen zum Gleiten auf den Schienen an.
Als Erstes musste ich das T-Schienenbrett mit doppelseitigem Schaumstoffklebeband auf meinem Bautisch befestigen und die Werkstatt für den Neubau vorbereiten.
Anschließend lege ich den Kielplan zwischen Glasscheiben, um ihn zu glätten. Anschließend wird die Kielstruktur zusammengebaut und anschließend die Baulehre eingesetzt.
Die Bleche mit den Teilen der Kielstruktur und die Teile selbst sind sehr deutlich gekennzeichnet. Das Holz ist von höchster Qualität, und die Laserschnitte sind perfekt und durchdringen das Blech vollständig. Die Pläne sind sehr gut, die Teilenummern sind deutlich gekennzeichnet; ich habe die Bedienungsanleitung auf meinem iPad direkt vor mir.
Als nächstes werde ich den Kiel und die Schürzenteile von den Blechen entfernen und die Laserverkohlung beseitigen.
Nach der Detaillierung und Trockenmontage werden die Kielteile mit einem Klebestift auf den Plan geklebt und mit Holzleim zusammengebaut.
Die Kielstruktur wird dann zwischen zwei Glasscheiben eingefasst, während die Bauvorrichtung zusammengebaut wird
View attachment 511137
Hier ist mein neuer Bautisch mit T-Schienen!

Alex R
Hallo Alex,
Wow, was für eine Werkstatt! Ich wünschte, ich hätte so viel Platz und könnte mir so tolles Equipment kaufen wie du. Der Tisch ist sensationell. Ich freue mich schon auf deinen Baubericht.

Beste grüße
Günther
Friends,
Today I start the build.
I had been thinking for a while that a building table with T-tracks would be very helpful for this big project.
I bought a pre-made Melamine T-track board 1" x 40" x 26" from Rockler with a few clamps and accessories to fit on the rails. Rockler has a multiple clamps and devices that slide on the rails.
First order of business was to secure the T-track board on my building table with double stick foam tape and organize the shop for the new build.
Next, I put the keel plan between glass panes to smooth it out. The keel structure will then be assembled followed by the building jig.
The sheets containing the parts forming the keel structure and the parts themselves are very clearly marked. The wood is top quality, and the laser cuts are perfect, cutting completely through the sheet. The plans are very good, with parts' numbers clearly marked; I have the instruction manual on my I-pad right in front of me.
Next I will remove the keel and apron parts from the sheets, and clean up the laser char.
Once detailed and dry-fitted, the keel parts will be glued with a glue stick to the plan and assembled using wood glue.
The keel structure will then be sandwiched between two glass panes. while the building jig is assembled
View attachment 511137
Here is my new building table with T tracks !

Alex R
Hello Alex,
wow, what a workshop. I wish I had that much space and could buy the kind of great equipment you have. The table is sensational. I'm already looking forward to your build report.

Best regards
Günther
 
Alex
Nice job with a tough task. Agree with you, this was a real bear to finish up.....glad it's done.
Pretty much same approach although I have not installed top timbers......afraid to have them up there while doing finish sanding when fully framed, etc. I did mill out the locating slots on the wing after gluing up.
About the only thing I did different, about 1/2 of the beveling as I found frames fit the jig better and to insure that, rather than the rubber band deal I use spreader bars which I build using threaded rod with a nut that slides into brass tubing, both with wooden plugs on the end. You adjust length by simply adjusting the nut and press the frames tight to the jig.
Now , to change up, finishing up the "X's", soon to glue Hawse pieces after final sanding. Another tricky part seems to be getting those positioned to locate on frame in proper jig position....well see.
One final tip, guys. Be aware, especially on the X's.....you not only have to get a good lateral angle to fit the keel, usually 7-10 deg, but also vertical angle requires taper for tight fit.
I went too far on a couple and had to glue small pieces to frame bottoms to start again., although easy fix and virtually invisible when fastened, but easier not to screw up in the first place.;)

Tim
 
Back
Top