• Win a Free Custom Engraved Brass Coin!!!
    As a way to introduce our brass coins to the community, we will raffle off a free coin during the month of August. Follow link ABOVE for instructions for entering.

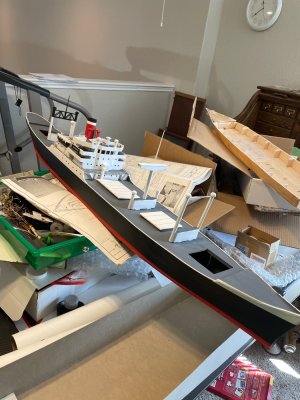
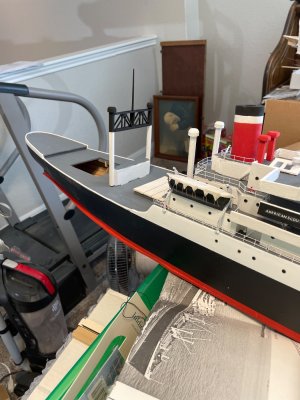
American Scout C-2 Cargo Ship by Sterling Models

Master model maker Eric Ronnberg built a pair of steam trawler models 25-30 years ago. Construction was detailed in a multipart NRJ article. Although the actual trawlers were built from steel he used wood entirely.

Before painting he treated all wood surfaces with artist’s gesso, a brush on filler used to treat canvas before painting. I have seen the models now at Mystic Seaport. They look like they were built from steel.

Trying to make balsa look like steel is doing things the hard way. Since this model is model railroad scenery, I would buy some styrene plastic for the doors. They can be glued to the balsa with either Duco Cement or CA glue.

Roger
 
Balsa is like a sponge. Basswood is a close second. It’s not the paint, it’s the wood.
Actually that stuff worked great on unsealed plywood for me the week before. It was probably the epoxy coating. I'm my case it was another plastic : 3D printed PLA. It was still not cured 2 weeks later. I sanded most of that off and used their 2-in-1 Filler primer and that cured just fine and made a nice hard coating.
 
Soon I'll be starting a similar project for my HO layout.

OnWorkbench.jpg

I'm not trying to convert the model into a Liberty Ship - I'll be modeling a C2 converted to military use, so I'll be following the kit plans fairly closely and adding armaments and other modifications the Navy might have made. A number of C2's were converted this way during WWII: https://en.wikipedia.org/wiki/USS_Polaris_(AF-11):

USS_Polaris_%28AF-11%29_off_Korea_in_1953.jpg


I've got the armaments on hand - a half dozen 20mm guns, a 3" gun for the bow and a 5" gun for the stern. I got these in HO scale so if I want to man them with HO figures they'll be correctly scaled for the figures. Also got some Navy life rafts. The armaments are from https://distefano3dprint.com/.

Armaments.jpg

I'm going to upgrade some of the more crude details of the model; railings from https://seaportmodelworks.com/; stairs from https://www.tichytraingroup.com/, etc.

Details.jpg

I plan to build it as a waterline model but rather than building it per instructions and cutting it at the waterline, I'm going to cut the bulkheads at the water line and assemble it from the beginning as a waterline model.

I'm not quite ready to start construction yet but I'll start a thread on it when I begin.

Still looking for a source for Navy number decals in 1:96 or close scale, if anyone has any sources I'd appreciate a link.
 
In another thread, Davidp established that the Sterling kit is undersized and actually 1/110 scale. It's going to be small on your layout and those HO figures will tower over the doors, etc. PM me if you are interested in collaborating on a 3D printed 1:87 hull.
 
Last edited:
In another thread, Davidp established that the Sterling kit is undersized and actually 1/110 scale. It's going to be small on your layout and those HO figures will tower over the doors, etc. PM me if you are interested in collaborating on a 3D printed 1:87 hull.
Thanks for the info.

Model railroading is all about "selective compression" - a Google search on that term defines as "the process of selectively reducing the size or complexity of something to fit a smaller space while retaining its key identifying features." While we can reproduce individual items like locomotives to exact scale, there's no way in an reasonable space to reproduce the terrain a train might travel through or even create a scale model of a very large bridge for example. In the case of this ship, selective compression for me means that a ship that's a bit under scale will still be large enough to give the right impression. And yes, scale people will tower over the doors in this kit. There are several options to deal with that, one of which I'll decide on during construction of the ship:

1. Modify the deckhouse to have proper height proportions for HO scale so the doors and people scale the same.
2. Only put scale people in places where they won't be near doors, such as on the fantail manning the 5" gun.
3. Don't put any scale people on the ship and leave the doors as-is.

Right now I think options 1 or 3 will turn out to be the right one, but once I get far enough into the construction of the ship, one of those options will become the clear choice for completing the model and in any case the ship will still be large enough to dwarf a typical HO locomotive or freight car and will give the right overall impression.

BTW I have many years of experience making molds for fiberglass components (custom automotive components for example) so if I wanted to create a true scale C2 or Liberty Ship hull I would make a mold and do a hull in fiberglass, but for my model railroad purposes, selective compression will work out just fine.

Thank you.
 
jscherb, you are welcome.
i would do #3 as #1 will cause other scale issues with rest of the ship.
 
Thanks for the info.

Model railroading is all about "selective compression" - a Google search on that term defines as "the process of selectively reducing the size or complexity of something to fit a smaller space while retaining its key identifying features." While we can reproduce individual items like locomotives to exact scale, there's no way in an reasonable space to reproduce the terrain a train might travel through or even create a scale model of a very large bridge for example. In the case of this ship, selective compression for me means that a ship that's a bit under scale will still be large enough to give the right impression. And yes, scale people will tower over the doors in this kit. There are several options to deal with that, one of which I'll decide on during construction of the ship:

1. Modify the deckhouse to have proper height proportions for HO scale so the doors and people scale the same.
2. Only put scale people in places where they won't be near doors, such as on the fantail manning the 5" gun.
3. Don't put any scale people on the ship and leave the doors as-is.

Right now I think options 1 or 3 will turn out to be the right one, but once I get far enough into the construction of the ship, one of those options will become the clear choice for completing the model and in any case the ship will still be large enough to dwarf a typical HO locomotive or freight car and will give the right overall impression.

BTW I have many years of experience making molds for fiberglass components (custom automotive components for example) so if I wanted to create a true scale C2 or Liberty Ship hull I would make a mold and do a hull in fiberglass, but for my model railroad purposes, selective compression will work out just fine.

Thank you.
Very interesting. I’m still amazed at the attention this sort of model has received.
 
Why? We used to sail these vessels. There should be those interested in them.
I'm not complaining--just amazed.
Soon I'll be starting a similar project for my HO layout.

View attachment 551674

I'm not trying to convert the model into a Liberty Ship - I'll be modeling a C2 converted to military use, so I'll be following the kit plans fairly closely and adding armaments and other modifications the Navy might have made. A number of C2's were converted this way during WWII: https://en.wikipedia.org/wiki/USS_Polaris_(AF-11):

USS_Polaris_%28AF-11%29_off_Korea_in_1953.jpg


I've got the armaments on hand - a half dozen 20mm guns, a 3" gun for the bow and a 5" gun for the stern. I got these in HO scale so if I want to man them with HO figures they'll be correctly scaled for the figures. Also got some Navy life rafts. The armaments are from https://distefano3dprint.com/.

View attachment 551672

I'm going to upgrade some of the more crude details of the model; railings from https://seaportmodelworks.com/; stairs from https://www.tichytraingroup.com/, etc.

View attachment 551673

I plan to build it as a waterline model but rather than building it per instructions and cutting it at the waterline, I'm going to cut the bulkheads at the water line and assemble it from the beginning as a waterline model.

I'm not quite ready to start construction yet but I'll start a thread on it when I begin.

Still looking for a source for Navy number decals in 1:96 or close scale, if anyone has any sources I'd appreciate a link.
Can you find any numbers stamped on your balsa pieces? Mine were obliterated over time. And I did not put on the bottom pieces of large balsa below the waterline, but I still had to cut off a couple of inches off the bottom to reach the waterline.
 
I'm not complaining--just amazed.

Can you find any numbers stamped on your balsa pieces? Mine were obliterated over time. And I did not put on the bottom pieces of large balsa below the waterline, but I still had to cut off a couple of inches off the bottom to reach the waterline.
The numbers on the pieces in my kit look like they're as legible as the day they were made. It's hard enough to find the pieces among the many pieces in the box with legible markings, it must be very frustrating to try to find pieces without markings.

The ribs/bulkheads extend about 1 3/8" below the waterline and then as you know get glued to the base pieces of balsa. My plan is to cut the bottom 1 3/8 off the ribs before gluing them in place which will result in a waterline hull without having to cut it after assembly. Then I'll add a piece of 1/4" plywood to the bottom to stiffen the hull.
The bulkheads won’t fit the balsa base. Many of them curve inward. If you cut them off before they reach the bottom, they will be wider than the base and the pegs going into the slots on the base won’t be there to fit into the base. That’s why I opted to build to the false deck/base and then cut off the bottom. Also, I used 1/8“ hardboard for a new base and I left about 1/4“ more of hull. That gave enough space for the „water.“
 
The bulkheads won’t fit the balsa base. Many of them curve inward. If you cut them off before they reach the bottom, they will be wider than the base and the pegs going into the slots on the base won’t be there to fit into the base. That’s why I opted to build to the false deck/base and then cut off the bottom. Also, I used 1/8“ hardboard for a new base and I left about 1/4“ more of hull. That gave enough space for the „water.“
Thanks, I know the bulkheads will be wider and will need modification to fit into the slots, I've already planned for that. When I cut them shorter at the bottom I'll cut them to shape to create new "pegs" to go into the slots. And when I add the plywood base I'll make the plywood the correct shape where the bulkheads are wider. When being the build I will start a thread on it and I will post photos of the process of lowering the bulkheads.
 
Thanks, I know the bulkheads will be wider and will need modification to fit into the slots, I've already planned for that. When I cut them shorter at the bottom I'll cut them to shape to create new "pegs" to go into the slots. And when I add the plywood base I'll make the plywood the correct shape where the bulkheads are wider. When being the build I will start a thread on it and I will post photos of the process of lowering the bulkheads.
Very cool. Can’t wait to see it.
 
Back
Top