Tutorial An easy introduction to making wood ornaments by Stephan Kertész (Steef66)

Alright, folks, I've made some progress on my carving journey and wanted to share where I’m at. I’d genuinely appreciate your thoughts and guidance, especially if you can spot areas where I’ve gone off course (unless, of course, the whole thing is one glorious mistake!).
Constructive feedback is most welcome, I'm here to learn and improve.

View attachment 516810

View attachment 516811
View attachment 516812
View attachment 516813
This is great JImsky! If I could make a few suggestions...
1746058725281.png
Yellow highlight - don't pass over or through branches, instead stop before the intersection and come back with a rifler file and create a sharp corner. Then you can round that area with a file or the edge of an xacto knife by scraping. I like using an xacto knife to round edges on inside corners because it has a fine sharp tip and I can access the inside of a corner. Hope that helps. Don't limit yourself to one tool. I use all kinds of dremel bits, files, and an xacto knife on each piece I work on. I throw everything but the kitchen sink at it...ROTF
 
How big is that branch? If it is so "big" as I made it. Keep away other tools then the rotary. It will break. Mine was around 1,5 mm or smaller on these spots.
The flame burs like in post #51 or this one
20250501_082422.jpg
are perfect to create these sharp edges without the use of other tools that use 'force' to scrape the wood of. The use of the small rotary drill make it possible to gently take little parts of wood without bending the wood on very small parts.
Sometime a X-acto works faster, I use it to make a little scratch in the wood. That gives the bur a direction to go and not wandering around. But when the part have a diameter of 2 or less mm. You have to be careful not to break the wood.
 
How big is that branch? If it is so "big" as I made it. Keep away other tools then the rotary. It will break. Mine was around 1,5 mm or smaller on these spots.
The flame burs like in post #51 or this one
View attachment 516897
are perfect to create these sharp edges without the use of other tools that use 'force' to scrape the wood of. The use of the small rotary drill make it possible to gently take little parts of wood without bending the wood on very small parts.
Sometime a X-acto works faster, I use it to make a little scratch in the wood. That gives the bur a direction to go and not wandering around. But when the part have a diameter of 2 or less mm. You have to be careful not to break the wood.
I personally prefer an xacto to lightly scrape and shape edges as the wood removal is slow and controlled. With power tools you can remove too much with one slip. I try to do as much as I can with knifes and files. But everyone has their preference and comfort level. ;)
 
I personally prefer an xacto to lightly scrape and shape edges as the wood removal is slow and controlled. With power tools you can remove too much with one slip. I try to do as much as I can with knifes and files. But everyone has their preference and comfort level. ;)

At the bottom of the second post of this topic I asked this:

And quietly I hope that the modellers who are also good at it, will share their experiences in it. What should you pay attention to? What materials and tools do you use? How do you guys do it? I am curious because I see this forum as a learning place for everyone where everyone shares their way.

So your experience is very welcome, and maybe you can tell and show us more how you do it, this will make this topic more valuable for future carvers. If you use a chisel, X-aco knife, needle files, rotary tool with burs or whatever.
 
The method I have shown above. To list again:
First transfer the drawing to a suitable size wood (keep in mind the grain direction, in this case along the length of the branch).
Then saw out or cut away the outer lines.
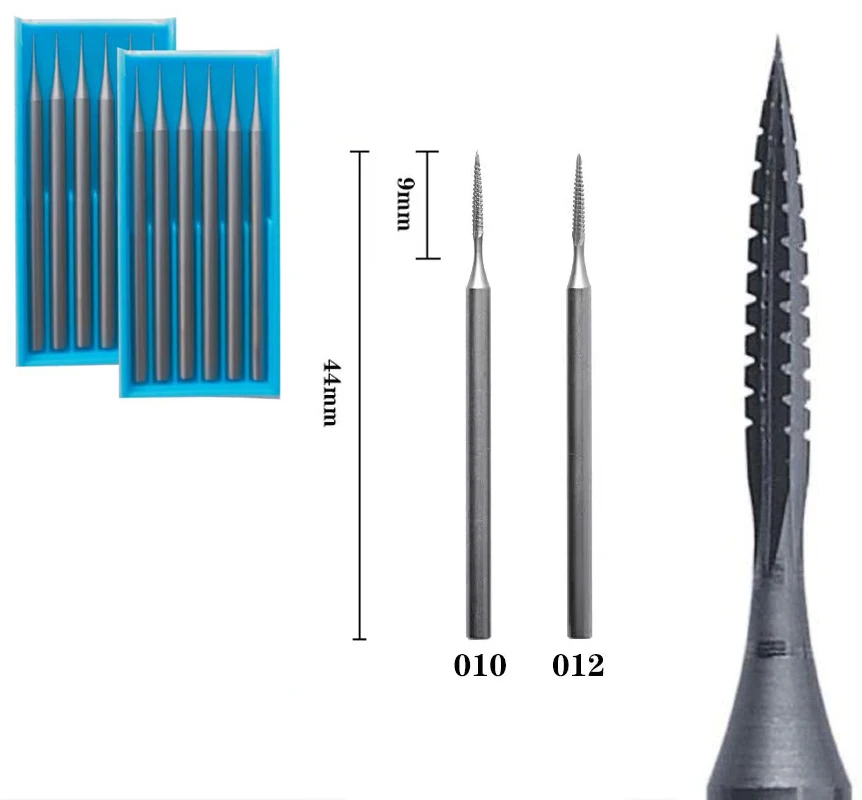
Then with an ornament like this, work from 1 side to the other. Don't do too many steps at once. Leaf by leaf to avoid breaking the piece.
First remove coarse material with a sharp cutter, beware of catching the cutter in wood.
Then you polish it with a cheap diamond cutter or a blunt end mill. In any case, something that takes away virtually no material. You can also use very fine sanding cloth or rotary sanding pads.

LINK

Then finish with an oil or paint.

The same applies to the face of the Viking. Proceed step by step.

View attachment 493714
View attachment 493715

And I realize that making a face is quite difficult. You will have to take into account the contours of the side and front. The nose and chin sticking out, the deeper lying eyes. Making a head takes a lot of practice. I also hear from fellow builders who do this work that this is one of the hardest things you can do. My first face I made was also completely out of context. Nose was out of proportion to the rest.

What has helped me a lot to delve a bit more into the proportions of a head are Loomis' drawing methods. If you Googled “Loomis method” you will come across many of his books (which are free to download). This method uses circles and proportions to create a face. With this in mind, I even manage to make a head without an example. Just transfer what was in my mind to wood.

I do not claim that wood cutting or milling is easy to do, but you can teach yourself. It takes time but from the other side it is fun to do. For these two examples I cited, I also made a bookmark with a head of a figure from the Dzhengis Khan era on the end.

View attachment 493716

With that, I want to round off. I hope I have been able to encourage you to give it a try as well. As I mentioned, you can start with a small starting capital of around 30 Euro. A milling machine and 2 sets of cutters. A piece of wood will do the rest. Start as I indicated simple, best straightforward. With a cross on a shield, a small curling element. When that gets your feel for your possibilities you can start looking at other things. Don't be scared and I hope to admire your work in the future someday as well. For myself, I want to gain more experience and learn even more. Maybe I will share more new experiences with you in this topic. And quietly I hope that the modellers who are also good at it, will share their experiences in it. What should you pay attention to? What materials and tools do you use? How do you guys do it? I am curious because I see this forum as a learning place for everyone where everyone shares their way.

Thanks for your visit.
totally beyond my skill level, but I may try it nonetheless.
 
At the bottom of the second post of this topic I asked this:


So your experience is very welcome, and maybe you can tell and show us more how you do it, this will make this topic more valuable for future carvers. If you use a chisel, X-aco knife, needle files, rotary tool with burs or whatever.
Thank you, I don’t have the experience or expertise you do, but I started out with just an xacto as a carving knife and micro files.
I think it’s important to develop good hand skills prior to jumping into rotary carving. I do both now. I still find rotary carving can mess up a piece very fast…lol. So more hand control and tool experience is needed. And of course carving runs the risk of cutting yourself, so I always make cuts going away from my fingers if possible.
Here is something I am working on now…
IMG_8026.jpeg
It’s in the crude initial carving phase. Thus far I have used nothing but an xacto and files. This enables me to get sharp edges of if I chose. Sometimes rotary carving leaves you with everything rounded off, which is normally not what you want. So I use it sparingly.
My tools…
IMG_8028.jpegThese are my standard go to tools.
And rotary tools…

IMG_8029.jpeg
These are just a few I have, but the ones I use most. I have 100s of dental burrs, as a friend of mine owns a dental lab. ;)
A few examples of my work on my current build…

IMG_8030.jpegIMG_8031.jpegIMG_8032.jpegIMG_8033.jpegIMG_8037.jpegIMG_8038.jpegIMG_8040.jpeg
The figure head was purchased from CAF and highly modified. I it was a good foundation to start with … I cut the crown off and added fangs and teeth, more detail in the hair, eyes, etc. and carved a new crown. I used an xacto and files on the crown.
How it came…
IMG_8041.jpeg
No disrespect to CAF, but I didn’t like that it looked like it had a smile, no teeth, blank eyes, and the crown was wrong for my ship.
To make the cornea of the eyes, I made a custom gouge out of a piece of tubing with the correct id, then pressed it into the middle of the eye. Then I came back with an xacto and removed a little material all around the diameter I had just cut. So sometimes I am creative and make a tool I need.
IMG_8042.jpeg
As you can see I changed the nose to be more like a Lion imo. ;)
The scrolls and coat of arms and the galley carvings employ both rotary and knife and file work. I try to use whatever works best for the situation.
Anyway, I am no expert…just good enough to be dangerous. ROTF
 
Last edited:
I try to use whatever works best for the situation.
Anyway, I am no expert…just good enough to be dangerous. ROTF
Thanks for sharing, you did a good job. And yes your hand control is needed, you have to learn that by practise. Even the tools you use need practise, what is possible and what not. I combine tools too, my chisels and knives are nearby. Sometimes you just need them, but the longer I practised the more I just use the rotary. Maybe because the rotary is more kind to my hands. The chisel or knife sometimes hurt my hands after use. Artritis is a bitch.
 
Thanks for sharing, you did a good job. And yes your hand control is needed, you have to learn that by practise. Even the tools you use need practise, what is possible and what not. I combine tools too, my chisels and knives are nearby. Sometimes you just need them, but the longer I practised the more I just use the rotary. Maybe because the rotary is more kind to my hands. The chisel or knife sometimes hurt my hands after use. Artritis is a bitch.
Thank you. And I fully understand, also material removal is quicker with rotary! I am 63 now, and I am hoping my eyesight and hands hang in there for many years to come...ROTF. I use magnifying glasses when carving tiny stuff. My current ship is 1:75 scale...so everything is tiny...sigh!
 
Also, I wanted to say thanks for starting this thread. I use a lot of boxwood and Pearwood for carving. You didn’t mention Pearwood, unless I missed that. You have any thoughts on using it? I like it because it is fine grained and carves very well in my experience.
Also when I started the build of the Norske Love, I referenced the scratch build by Karl..
1746116725573.png
This was the sister ship to the Norske Love and it is very similar. His sharp detail on the carvings is top notch! I reached out to Karl, and he was nice enough to give me some tips to get started carving.
On my ship I am going with a paint scheme of black and gold, so all my carvings are painted and much smaller in scale. I think the paint is actually to my advantage at this point because I can use dry brushing to help bring out detail. ;)
On this coat of arms carving, I used pearwood. To get the sharp edges on the F5 text, I first cut around the edges with an xacto knife and then used the rotary to get the depth around it, and when getting to the edges i kept the burr at an angle to get to the vertical cut and the edges stay sharp that way. At least that's how I did it. Not saying you have to, but it helped me.
1746117280484.png
 
Alright, folks, I've made some progress on my carving journey and wanted to share where I’m at. I’d genuinely appreciate your thoughts and guidance, especially if you can spot areas where I’ve gone off course (unless, of course, the whole thing is one glorious mistake!).
Constructive feedback is most welcome, I'm here to learn and improve.

View attachment 516810

View attachment 516811
View attachment 516812
View attachment 516813
Is there a jimmyangelo in you? Very fine work.
 
Also, I wanted to say thanks for starting this thread. I use a lot of boxwood and Pearwood for carving. You didn’t mention Pearwood, unless I missed that. You have any thoughts on using it? I like it because it is fine grained and carves very well in my experience.
Also when I started the build of the Norske Love, I referenced the scratch build by Karl..
View attachment 517034
This was the sister ship to the Norske Love and it is very similar. His sharp detail on the carvings is top notch! I reached out to Karl, and he was nice enough to give me some tips to get started carving.
On my ship I am going with a paint scheme of black and gold, so all my carvings are painted and much smaller in scale. I think the paint is actually to my advantage at this point because I can use dry brushing to help bring out detail. ;)
On this coat of arms carving, I used pearwood. To get the sharp edges on the F5 text, I first cut around the edges with an xacto knife and then used the rotary to get the depth around it, and when getting to the edges i kept the burr at an angle to get to the vertical cut and the edges stay sharp that way. At least that's how I did it. Not saying you have to, but it helped me.
View attachment 517035
I didn't try pear till now, but I mentioned it in the first posts. I try cherry and apple. Also great woods to use.
 
@Jimsky I searched a few others who sell them. Maybe they deliver to the states.


Many thanks, I have those burs, I bought them way before increasing tariffs
 
Back
Top