Artesania Latina ME BF 109G

Hmmmmmm. And now the Me109. I do not like the canopy profile or fit to the rear deck. Obvious error because everyone's eyes are initially drawn to where "the man" sits. Until fixed, I shan't be interested.
 
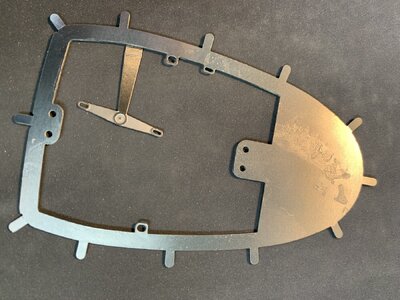
Thank you all for the advice! I have to check it all out! But until then, I learned that using CA (thin) on these SS etched parts (that take SOOOOO long to smoooth off the runners) will also run across the surface:

IMG_0452.jpeg
 
Gonna clean it up with acetone I guess (from what I've read). Is that the best or are there other recommendations?
 
NO. Continental is a German brand, as is Metzler. I have Conti MC6s on my little Tiburon and they hang in there like tigers. I bought a BMW 3.0S in Malaysia around 50 years ago shod with Metzler Monzas. They chopped out in around 20,000 kilometers, not driven hard but with European cold temperature soft compound could not stand the heat of the tropics. Limped into Singapore from Johore Bahru going 'whump; whump; whump................ with a right rear bulging . Definitely under stress!! Made it, and shod the 3 litre with Bridgestones, and never looked back. Nice car, nice tyres.
My first Chrysler came on Continentals. Chrysler actually issued a "recall" and offered to pay for anyone who had already replaced them. And since I used to put in a LOT of miles (or klicks) on that machine at the time, I was outside the payment settlement window. But the Goodyears I switched to got me to over 300k.

Goodyear was the first company to produce the new size for my 300C. Now everyone does. Bridgestone's would be definitely on the table for the next re-shoe option!
 
I am also building this kit and the engineering in it is amazing.
I am using the " thick " viscosity CA glue from Hobby Lobby with great success. Highly recommended.
I am using Crescent brand electronic side cutting pliers and they minimize the "nubs " that need to be filed away.
Am very familiar with epoxies , and although they would work in this application, not recommended.
For paint , I am using the Tamiya Surface spray primer on the die cast pats and enamel paints. Using both airbrush and hand brush.
The sheet metal material is all 0.012" stainless steel. The die cast parts are a zinc/aluminum alloy. Some I will polish and clear coat.
Still have a long way to go , but I really enjoy this kit. Dave
I've never used thick CA. My background is with balsa plane models where thin CA just wicks into the pores and creates the joint. I guess I will have to test out the thicker formulas. But, heck, we are working on a $600 kit!!!! So "experimenting" makes me nervous.

Thanks for all the info!!! Please continue to advise me if you think of anything that can help with this project!

M.
 
I am also currently building this model. My impressions: customer support is excellent (quick response, excellent assistance), manual is fantastic with detail I have never seen before, parts are well made with very little touch up required on cast parts. Going to try the electric side cutting pliers to improve the filing of nubs on the steel parts. Many finger punctures. My biggest problem was with parts with tabs that need to be bent on many parts. They are delicate and more than 2 bends and they break off. I had a lot of work around securing parts with broken tabs. To the company’s credit, they quickly replaced parts with multiple broken tabs for the three layer bulkhead. I just couldn’t keep going back to them for subsequent broken parts. I used primer and model paint on the cast parts but found that it rubbed off if I handled the part to any extent. I also used Super Glue to bond parts and had good success unless I put too much pressure on the parts. All in all I am extremely satisfied with this model and will happily go back for additional models in the future.
 
what kind of primer do you use, recommend: from aircans or airbrushes, what brand?
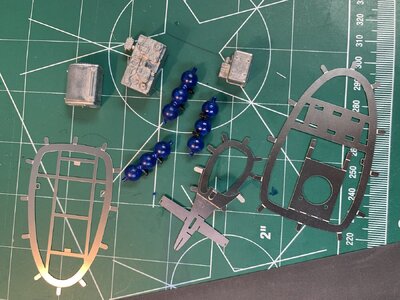
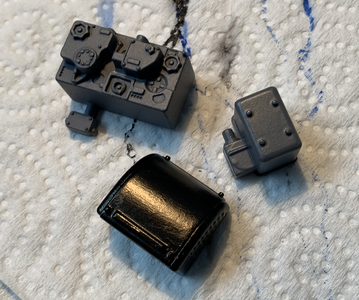
No recommendations (yet)! Since this is the first model I've done with diecast parts I am just trying stuff out. Rust-Oleum spraycan white primer covered nicely. But the blue acrylic used in the tanks above did not cover that well at all. In the pic that is three coats (brushed) and then a clear matte acrylic spraycan coating and they are still a bit marbled with light areas. Not sure if that is because of the primer or the acrylic though. Obviously not the fault of the person in charge of the painting! I'll be trying Rust-Oleum spraycan gray primer today on the three nude diecast parts next. They then get a base of satin black before some dark grey, siler, and white details. Hopefully the black covers in one coat.

Side note: Clean diecast will thin superglue to another in an instant. No chance to adjust positioning of the parts at all. Total surprise to me.
 
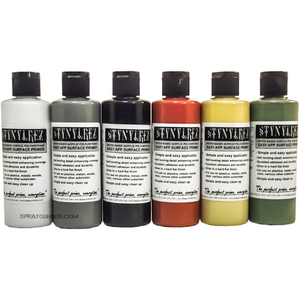
I read multiple articles about Vallejo primers. Many scale modelers recommend it alone with STYNYLREZ made by Badger. The latest comes in many different colors and can be sprayed without dilution.

1723383376960.png
 
If you wish to glue thin pieces with springback (bent or curved brass) or cast pieces, you will need to roughen the mating surfaces first. CA is fine on photo etched parts because they are generally very small, don’t get touched once in place, and the CA can go right to the edges of the part you are gluing. You will need to roughen the mating surfaces first, so there is “tooth” for the glue to grab onto, otherwise the part may pop off. CA needs to sink into the surface, hence roughing the mating parts. I use a medium CA almost exclusively, with no problems or later issues. I did have problems with parts popping out of place before I learned to roughen the mating surfaces.
 
If you wish to glue thin pieces with springback (bent or curved brass) or cast pieces, you will need to roughen the mating surfaces first. CA is fine on photo etched parts because they are generally very small, don’t get touched once in place, and the CA can go right to the edges of the part you are gluing. You will need to roughen the mating surfaces first, so there is “tooth” for the glue to grab onto, otherwise the part may pop off. CA needs to sink into the surface, hence roughing the mating parts. I use a medium CA almost exclusively, with no problems or later issues. I did have problems with parts popping out of place before I learned to roughen the mating surfaces.
I roughed the mating parts with some 1000 grit before then clamping them all together. I then tried to edge them with thin CA with the idea that capillary action would draw it in. And I think it did, but I also over dripped some areas (faster than I could wipe since I was not prepared for that). A second time working on another side of the same three laminates it went better. Until I noticed a gap in their fit-up. And when I moved a clamp to close that gap it squeezed out some CA and I was back to emergency wiping mode!
 
I read multiple articles about Vallejo primers. Many scale modelers recommend it alone with STYNYLREZ made by Badger. The latest comes in many different colors and can be sprayed without dilution.

View attachment 464208
Thanks. I ordered an airbrush earlier today. Not sure how good it will be but I had not yet heard of ones with an attached rechargeable compressor before. So I thought I'd give it a try.

 
There are always more than one way to successfully accomplish a task.
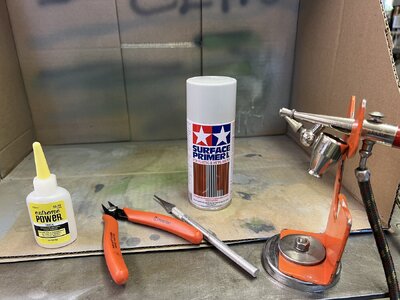
The picture attached shows some of the things that are working for me on the ME109 kit.
An old Pasche air brush hooked to an air compressor at 20 psi. The Tamiya spray surface primer. ( expensive but high quality ) .
I am using enamel paints.
The Crescent , electronic wire , flush cutting pliers ( a must or something similar ), The thick CA glue ( Hobby Lobby ). This does allow some repositioning before setting. A tool made from an Exacto holder and a piece of ruler ground to shape to use as a glue applicator. My cardboard box spray booth !
Another tip in filing off the nubs left from the cutting : If you file from the back side of the part , the location of the "nub " is more obvious.
Another thing I have learned on bending tabs is they must be supported underneath with a piece of metal, etc. in order to obtain a sharp bend.
Hope this helps . Dave

IMG_3176.jpeg
 
There are always more than one way to successfully accomplish a task.
The picture attached shows some of the things that are working for me on the ME109 kit.
An old Pasche air brush hooked to an air compressor at 20 psi. The Tamiya spray surface primer. ( expensive but high quality ) .
I am using enamel paints.
The Crescent , electronic wire , flush cutting pliers ( a must or something similar ), The thick CA glue ( Hobby Lobby ). This does allow some repositioning before setting. A tool made from an Exacto holder and a piece of ruler ground to shape to use as a glue applicator. My cardboard box spray booth !
Another tip in filing off the nubs left from the cutting : If you file from the back side of the part , the location of the "nub " is more obvious.
Another thing I have learned on bending tabs is they must be supported underneath with a piece of metal, etc. in order to obtain a sharp bend.
Hope this helps . Dave

View attachment 464245
I'm definitely going to look into better side cutters. The Micro Mark ones I have been using on this so far are great! But they do not cut as flush as I would like. Not sure anything will but dressing each metal etched part with diamond files for a half hour or so is sooooo slowing progress.

Meanwhile, the Rust-Oleum spraycan gray primer worked a charm and the satin black acrylic took to it fine.

gray.png
 
Thanks. I ordered an airbrush earlier today. Not sure how good it will be but I had not yet heard of ones with an attached rechargeable compressor before. So I thought I'd give it a try.

Yeah, it is a double-action airbrush, unfortunately, you may experience some difficulties spraying primers with a 0.3mm needle. You will have to dilute it before spaying.
 
Just a quick note to Artesina (who I assume is reading us). BF190 and of course, any Spitfire!!! PLEASE!!!
 
Yeah, it is a double-action airbrush, unfortunately, you may experience some difficulties spraying primers with a 0.3mm needle. You will have to dilute it before spaying.
K. I've never become proficient with an airbrush since the last time I had the equipment to try it was probably 30 years ago or though. I'm not sure what a "double-action" airbrush means! Please give advice as much as you have time for!

M.
 
K. I've never become proficient with an airbrush since the last time I had the equipment to try it was probably 30 years ago or though. I'm not sure what a "double-action" airbrush means! Please give advice as much as you have time for!

M.
I am also a learner, and I carefully give advice when it comes to painting.

Single-action airbrush is one where the trigger only operates one action - the air. When you press the trigger on a single action airbrush, the airflow is turned on and a pre-set amount of fluid will be sprayed. The amount of fluid is controlled by turning either a fluid tip or cone on external mix airbrushes, or a preset knob or preset ring on the handle of internal mix airbrushes. This can be turned with your other hand during spraying, or you may pause work to adjust the preset and then continue spraying when you have re-set it. Either of these methods of using the single-action preset is much more awkward than the instant control of a dual-action airbrush. However, single-action is good for applications where you want long runs at a steady preset spray pattern and the preset prevents you from overshooting. The preset on a single-action works differently than the preset handle that may come with or may be optionally added to a dual-action airbrush. On a single-action airbrush, the preset knob pulls the needle in or out of the nozzle to vary the paint, whereas on a dual-action airbrush, the trigger controls the needle, and a preset handle acts to limit the range.

A dual-action airbrush is one where one trigger controls two actions - the air and the fluid. The trigger is first pressed down for air and then pulled back for fluid. This is typically controlled with the forefinger. The downward movement opens the air valve and the backward movement pulls the needle back from the nozzle to allow fluid through. It is important to always press down for air first (and actually widely considered best practice to keep pressed down for air between a series of strokes too), so that the fluid is then always introduced to an existing airflow and atomized immediately. If you pull back for paint at the same time as pushing down for air, or before, then there is an opportunity for an amount of fluid to build up at the tip before being atomized and then this is projected out as an initial splatter as the air begins to flow. The ability to introduce the paint more gradually to avoid initial splatter is one of the advantages of a dual-action over a single-action airbrush.

The main advantage of dual-action is the instant control you have over the amount of paint and therefore the spray pattern, allowing you to go from a wide spray down to a fine line in one stroke (a 'dagger stroke') or vice versa, or even just switch quickly between fine lines or wide coverage on subsequent strokes without having to pause to change a preset like you would on a single-action airbrush. The further you pull back on the trigger the more fluid is introduced. For fine lines or wide spray, the same applies to the volume of paint and distance from the surface as for a single-action airbrush above, but a dual-action airbrush allows you to control both air and fluid actions with one continuous finger movement of one hand. Therefore dual-action airbrushes are favored greatly by any artistic applications that require more control and variance in spray pattern, such as art, crafts, model painting, cosmetics, etc. This is why almost all Iwata airbrushes are dual-action and only a few are single-action. Click here to view all of our dual-action airbrushes.

Here is a good article to start airbrushing

 
Back
Top