
-

SUBSCRIBE TO SHIPS IN SCALE TODAY!
The beloved Ships in Scale Magazine is back and charting a new course for 2026!
Discover new skills, new techniques, and new inspirations in every issue.
NOTE THAT OUR NEXT ISSUE WILL BE MARCH/APRIL 2026 -

Win a Free Custom Engraved Brass Coin!!!
As a way to introduce our brass coins to the community, we will raffle off a free coin during the month of August. Follow link ABOVE for instructions for entering.
You are using an out of date browser. It may not display this or other websites correctly.
You should upgrade or use an alternative browser.
You should upgrade or use an alternative browser.
Artesania Latina 'Sultan'. Arab dhow
- Thread starter Dudley
- Start date
- Watchers 6
-
- Tags
- artesania latina sultan


I started this vessel on 23rd December 2020. My first ever wooden boat but not my first kit; I've made military and railway models for many years. I'm taking my time and thinking each stage through. Yesterday I watched a couple of short You Tube tutorials from Artesania Latina on plank bending which was very helpful.
Dudley
Dudley
I used an old thermos flask with boiling water to softer/bend the first few planks, last night I revived a (photograhic) dry mounting iron which I used in conjunction with a small model paint brush wetting the plank in local areas. I also used superglue to tack rather than the pva white glue which I'd used before.
Dudley
Dudley
I was wondering how to sum up my idle thoughts about this kit during construction and concluded with 'painful'. For me it's very slow but every day that I stick a new plank is yet more experience. I WILL finish the model and it will be unique to me; the most important thing is forward progress no matter how small.
Dudley
Dudley

Time and patience is what is needed. You are doing fine so far


Looking good - keep on the good work
Today 15th January I'm just gluing the final sliver into the first finished side of the false hull. The pencil marks on this little piece enable me to always fit it the same way round, a good tip when cutting and sanding components to fit into a specific area on the model.
Dudley

Dudley
Last edited by a moderator:

Dudley,
You're still a long ways from this point but there are some eyelets you need to add in the deck and in the awning support columns - there are also some cleats that you add under the awning and to the columns. You really don't find out about them until you do the rigging and they are much easier to add before you put the awning structure on. Read ahead and do them when you build the awning. It's a pain in the you know what later on.
Also, the instructions and pictures aren't very clear as to how to attach the awning posts - look ahead and you can judge where they go by the height they should be above the deck. If you add the middle and rear posts and beams first, you can put a ruler across them bow to stern to get the correct height for the forward supports. I had to pull mine off and adjust it twice.
Dominick
After a little break I have returned to the ship building. I'm very happy with the initial hull cladding and the UHU Hart is sticking the (secondary) decorative veneer extremely well, however I could use some guidance please. You can see from my latest photo that I have four basswood veneers and one sapele; they follow the line of the false hull planking but when I try to stick another sapele below this the lower edge of the sapele buckles due to the double curvature.
Because the veneer skin is what will be seen I don't want the same planking pattern as the false hull (because I don't think that the upward sweep of the lower planks to the bow is how a ship is built, but I may be wrong here?)
I have to say that the AL instructions are very vague despite their good efforts at providing lots of photographs throughout but what is required at this point is a line drawing showing the planks.
Help! Dudley
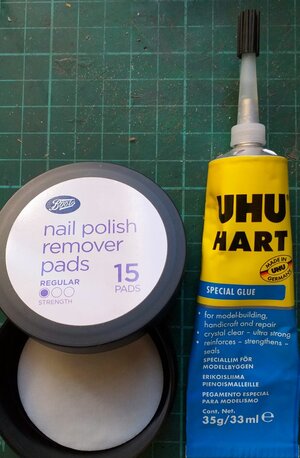
Yesterday I finished the secondary sapele veneer clad of the dhow. Despite getting stuck at the outset I quickly found it to be a very therapeutic process. I can recommend the UHU Hart 100% for speed and ease of use; I used just short of one 33ml tube. To clean away excess dry glue I used lint free acetone nail varnish removal pads which far exceeded my expectations and I recommend 100%.
Dudley


Dudley
Attachments

The photo shows an Occre sanding block which I have modified to stop the wedge or the folded sandpaper from popping out, rather annoying!
Two pieces of 6mm ply and two card spacers (from food packaging.) The ply measures 28mm x 88mm and 28mm x 75mm. The top of the wedge was sanded to reduce the height and the card packing sits between the ply and the block. The components of my modification are all stuck together with PVA wood glue.
Happy modelling,
Dudley
Attachments

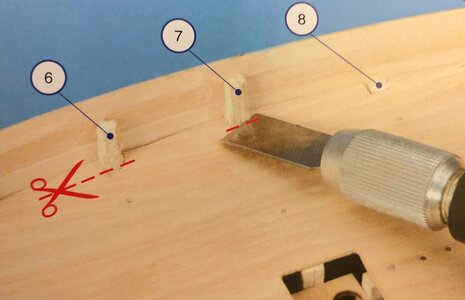
Progressing on and the instructions show the use of a craft chisel to remove the uprights inside the bulwarks, see first photo.
This didn't seem like a good idea to me; too much pressure and a slip means damaging the bulwark.
I made a different tool to do this job in a more controlled manner. A brand new junior hacksaw blade and a wooden clothes peg. Remove the small pin from the front of the saw with a pair of fine nose pliers (saw teeth point forward for correct orientation.) Use the peg as a handle to your new saw. Grip the pin at the back of the blade in between the peg halves and if necessary close the peg together in a bench vice, forcing the wee pin into the sides of the peg. Run some masking tape around the handle.
See how I quickly removed three uprights. 2nd photo.
Just watch out that the back of the saw near the handle isn't cutting into your model as you concentrate on the front end!
Dudley
Attachments


Hi there from sunny South Africa .
I've just opened my "Sultan " box this very day and am keen to get going .
I look forward to be following in your slipstream.
I was wondering ...?....after doing a bit of forward reading in the book ......on 2 things ..
1-----------In one of the last models I built ....the Marie Jeanne........I planked the deck prior to mounting it ....seemed to be easier than planking it 'in situ'once the deck has been mounted.
The instructions do say to plank the deck once it's mounted........
2-----------again I plan to cut the deck planks into shorter lengths and to mark the deck planking on its 4 edges with a felt tip pen ....to simulate caulking ....and then to place the shorter planks in a realistic staggered pattern
With the last model I did this to ,I didn't do the 'simulated 'nails ....I'm going to maybe do them with this one .
You just have to be carefull of the graphite from the pencil nails messing up the deck during any sanding ....so ...it may be better to do the nails once all deck fine sanding is over.
What do you think .?
Here's a shot of the deck planking I did on the Marie Jeanne
You can see I cut the planking into shorter lengths and staggered them after marking the edges to simulate caulking
I plan to do this on the Sultan I started this morning .
What you think ?

You can see I cut the planking into shorter lengths and staggered them after marking the edges to simulate caulking
I plan to do this on the Sultan I started this morning .
What you think ?
Last edited by a moderator:
Hey, Kenny @Kennyb We would love to see more photos of your model of Marie Jeanne. Is it possible? We have a dedicated section for completed models
Submit Images of Completed Models Here
This forum is for those that would like to upload their completed ships for the Showcase.
shipsofscale.com
HiHey, Kenny @Kennyb We would love to see more photos of your model of Marie Jeanne. Is it possible? We have a dedicated section for completed models
Submit Images of Completed Models Here
This forum is for those that would like to upload their completed ships for the Showcase.shipsofscale.com
I will do so ...just need to get some better photos .
Soon....I hope !