
Your off to a good start. Look forward to seeing your progress.Captain's Log ~~~ March 27, 2021
Construction start for the Black Pearl (All-Scenario version)
Outlining the Black Pearl Steps 1 through 26 in Pole #1 plan book
Remove parts 1 & 2 (5mm) —Keel
Remove parts 3-16 (6mm) —Bulkheads
NOTE: Parts 3 (combo of parts K5 & J21), 15, & 16 will not be set into the keel at this time. Place them aside from the other bulkheads.
Remove parts 17, 18, & 19 (2 each) (5mm)—Keel reinforcers.
Remove part 21 (lower deck) and set it off to the side.
Remove parts A1-A7 (6mm)—Starboard Bulkhead halves on the walnut board.
Remove parts 6D-12D (2 each) off the (3mm) board.
The above parts (excluding parts 3, 15, & 16) are the only parts used for Steps 1-26.
WARNING: Follow the plans with an open mind and try to familiarize yourself with the parts. Study the pictures and be prepared to improvise! Chinese to English translation and build transition in the kit plans can leave a lot more questions than answers.
This is me when I don’t follow my own advice.
View attachment 223714
Steps & Notes for construction on this phase:
1. Observe the fairing lines on any of the bulkheads and do some of the rough sanding prior to gluing the ribs to the keel. NOTE: Keep the groove on all the right side bulkheads. Do not sand flush!
2. If you are installing LED lights, now is a good time to drill holes in the bulkheads for any bus lines or wires, before gluing them to the keel.
View attachment 223715
3. Dry fit the bulkheads and get comfortable with their relationship to each other. Firm fit but not too tight to the keel. Don’t rush to pick up the glue.
4. Dry fit the lower deck and note it’s relationship to the bulkheads and keel. Make pencil marks to note the relation of the deck to the
bulkheads.
View attachment 223717
View attachment 223718
View attachment 223733
View attachment 223734
At this stage, I once again removed the bulkheads and was overthinking a bit. I used my micrometer to mark center point to center point in millimeters from bulkhead center to center. (just approximations, for what use I don't know but it seemed to be useful at the moment) I forgot to take a picture of the lower deck dry fit.
NOTE: Mixing some 502 CA adhesive to a good wood glue like Titebond Ultimate will enhance the bonding performance. A strongly bonded ship skeleton will endure the rigors of planking and future sanding and it seems like a good idea.
View attachment 223743
5. READY FOR GLUE. Place down some parchment or wax paper to cover
the work area for gluing the keel. Square up the keel and glue it together.
(Parts 1 & 2) Allow glue to thoroughly dry.
View attachment 223752
Following the charts of those who proceeded me, I grabbed anything that would add some weight to the keel to keep it flat so it would not buckle to the drying glue. Waited almost 24 hours before moving on.
NOTE: It is very important to square all parts when gluing the bulkheads to the keel. It may be best to work from the middle of the hull outward, leveling, squaring, and gluing each bulkhead one at a time. Right angle brackets, a small level, various clips and vises can be your best friend. Make sure to keep the right side bulkheads level and in alignment with each other. Let the glue thoroughly dry before proceeding!
View attachment 223792
View attachment 223795
I only glued the first three bulkheads today (#9, #10, & #11) starting from the center and working stern to bow. From all that I have read, it seems that you can't underestimate the importance of keeping everything squared and level. The plan instructions emphasize the importance to make sure that the right side (starboard) bulkheads are level to each other. I used the green level above to show me that reality and I used the yellow level to check each bulkhead.
NOTE: I chose to dry fit parts 17, 18 & 19 to help determine the correct positions of the bulkheads. I was careful to not be sloppy with the glue so they should be able to come back out as I proceed the the next grouping and then I will re-insert them to help once again with the alignment
6. After all bulkheads are in place, proceed with fitting and gluing parts 17, 18, & 19 (2 each) to the keel. With proper alignment this step will add integrity and strength to the keel. Again, keep things square then glue and clamp as needed.
7. Once the glue dries take the lower deck and carefully dry fit it into place. Be careful to not force anything. Make any pencil marks as needed then remove the deck. NOTE: Use a razor knife to deepen the laser lines of the deck, making the boards more vivid after finishing. Lightly sand and apply your finish to the lower deck and set it aside to dry. Once satisfied, glue the lower deck into position and adding some weight to the deck is a good way to make sure it is contacting all surfaces while the glue is drying.
At this point, 10% of Pole #1 will be complete.
- Staining all the bulkheads is not necessary but you may want to finish the visible walnut bulkheads (A1-A7) on the exposed starboard side to match your chosen finish for the interior cells, posts, and beams of the lower deck.
- The next step after all the glue is dry is to finish, fit and glue parts A1-A7. These are the walnut bulkheads and they must be installed asymmetrical to the opposite side. At this point, it seems this task would be much easier if you dry fit the main deck to these bulkheads before gluing them into place. An ounce of prevention here, will save a pound of cure later if things are not square and the main deck won’ fit in.
- Finally, follow the plans for placement of parts 6D-12D (2 each).
Mates, I will work through the above steps and report back once I finish up with further comments and pictures.
Be well and ahoy all.

-

SUBSCRIBE TO SHIPS IN SCALE TODAY!
The beloved Ships in Scale Magazine is back and charting a new course for 2026!
Discover new skills, new techniques, and new inspirations in every issue.
NOTE THAT OUR NEXT ISSUE WILL BE MARCH/APRIL 2026 -

Win a Free Custom Engraved Brass Coin!!!
As a way to introduce our brass coins to the community, we will raffle off a free coin during the month of August. Follow link ABOVE for instructions for entering.
You are using an out of date browser. It may not display this or other websites correctly.
You should upgrade or use an alternative browser.
You should upgrade or use an alternative browser.
Black Pearl 1:50 ZHL All-Scenario version
- Thread starter Ahoy All
- Start date
- Watchers 25
-
- Tags
- black pearl zhl
- Joined
- Mar 1, 2021
- Messages
- 315
- Points
- 168

Thanks Tony. I'm tempted to run out to the workbench and start fiddling....but I'm going to let the glue dry overnight and I'll see how things look before I place another 3 or 4 bulkheads....probably best to take it slow through this first stage of the build.Your off to a good start. Look forward to seeing your progress.
HI Tony,
Wish I would have read this a week earlier.
I was trying to figure out when to drill the holes for the wires after I attached the frames .
.
Now I have to figure out how to drill those holes while not breaking anything.
My other concern is how will you connect the led wires to any extension wire?
Originally I was going to solder the wires (ordered the Evans Design Nano Leds) but the wire is to small.
Then I thought I would crimp them together but again the wire is tiny, don't think I have crimps that small.
The book says try glue, I guess that would work.
How are you planning on doing this?
Wish I would have read this a week earlier.
I was trying to figure out when to drill the holes for the wires after I attached the frames
.Now I have to figure out how to drill those holes while not breaking anything.
My other concern is how will you connect the led wires to any extension wire?
Originally I was going to solder the wires (ordered the Evans Design Nano Leds) but the wire is to small.
Then I thought I would crimp them together but again the wire is tiny, don't think I have crimps that small.
The book says try glue, I guess that would work.
How are you planning on doing this?
- Joined
- Mar 1, 2021
- Messages
- 315
- Points
- 168
Hi Rowboat. You have me confused with Tony. I'm Rick and I have just started my build. One thing I have already discovered. No matter how much you pre-plan you will make mistakes along the way. Now, I know why some refer to these kits as puzzles...no one puts a zig saw puzzle together without realizing they have a wrong piece in the wrong place.HI Tony,
Wish I would have read this a week earlier.
I was trying to figure out when to drill the holes for the wires after I attached the frames
Now I have to figure out how to drill those holes while not breaking anything.
My other concern is how will you connect the led wires to any extension wire?
Originally I was going to solder the wires (ordered the Evans Design Nano Leds) but the wire is to small.
Then I thought I would crimp them together but again the wire is tiny, don't think I have crimps that small.
The book says try glue, I guess that would work.
How are you planning on doing this?
I thought I learned from the mates before me to take their advice and pre-drill the holes before installing the bulkheads. So, I did and I thought great job. Until I realized after gluing in the first three bulkheads that I drilled the holes too close toward the keel slot....so when parts #17-19 are inserted, it covers my wire holes. STUPID, STUPID me. Well, I will have to carefully re-drill those three bulkheads now installed. I caught my mistake soon enough to alter the remaining bulkhead hole locations.
I ordered thirty nano's from Evan Designs and I plan to run one bus, both positive and negative through the keel and to three separate switches to the lower, main and Captain's quarters and stern lamps. It's a bit of over kill but I wanted to fool around with some different effects for display. I will solder additional wire to the LED's before they hit the bus and solder to the bus. Evans says that you should be able to safely power 30 LED's in parallel with the 3v AC supply I purchased.
In the meantime, I still decided to take Jodie's work into consideration and may try to solder the LED's that came with our kit. I received three strings of (11) for a total of 33 LED's....I successfully managed to make 7 of the first 11 work. (only 1 of the next 4) I soon realized I was working with too heavy of a solder and not a fine enough tip so I ordered .6mm solder and needle tips....I plan on seeing if I can also add the coffin 12v system to the ship and may figure out a way to light up the masts for more visual effects. That's a long way off for me. The pic below is three of the LED's from the kit that I soldered and used liquid tape to finish with.
I actually ordered 25 warm white LED's from Amazon for $9, so I have plenty of lights to fool with.

Last edited:
- Joined
- Mar 1, 2021
- Messages
- 315
- Points
- 168
Pirate Lore, Myths and Legends #1

I thought it would be a good idea to break up the monotony of my build and add another segment, Pirate Lore, Myths, & Legends will compliment my Captain's Log, which deals with my construction of the Black Pearl. Looking back over the years there were many great movies that dealt with special effects that brought us many super-natural characters. Ray Harryhausen was an original master creator of special effects. In the movie Clash of the Titans (1981), he brings us face-to-face with the Kraken of ancient Greece. So, for those of us who enjoyed the Pirates of the Caribbean series, we know that the Kraken, is part of its history too. Different variations over the years but just as scary nonetheless, as the pics below show: THE KRAKEN


Despite the lack of detail about his appearance, the Kraken’s size was enough to secure him a place in Nordic legend. Over time, his appearance was fleshed out, giving people a complete image of this monstrous being.
He has a flat body, which tends to emerge from the water in humps like small islands, and dozens of long, flexible arms (sometimes called horns), which he can lift out of the water to the height of a ship’s mast. Giant circular waves and swarms of frightened fish usually appear in front of him. Today, he is generally imagined as a giant octopus, a giant crab, or some combination of the two.
In fact, the Kraken is a rather lazy creature. It spends most of its time sleeping on the ocean floor. Even when it rises from the ocean floor to hunt, its strategies are passive.
Of course, there are a few stories of the Kraken attacking ships, usually because it was disturbed by their passage. In these cases, the Kraken can be ferocious and merciless, tearing the ship to splinters without any regard for human life.
Perhaps the most interesting thing about this beast is his unique hunting strategy. The Kraken feeds on fish—thousands and thousands of fish—but rather than swimming around the ocean, snapping up fish one by one, he has devised a way to make dinner come to him.
After the Kraken digests a round of fish—which can take up to three months—he recycles the waste, spewing out so much vomit or excrement that the water around him is “muddied and turbid.” It may sound disgusting, but,
The Kraken has other skills too, although none of them are quite as practical as his hunting strategy. When he moves, he can create whirlpools that suck ships to a watery grave. He can also make vocal calls that cause underwater earthquakes.
By the mid-thirteenth century, naturalists had begun looking into the legend. The Konungs Skuggsja elaborated on its appearance and feeding habits. Even into the eighteenth century, prominent scientists like Carl Linnaeus included the Kraken in their classification of sea creatures.
Today, it remains one of fictions most popular sea monsters, appearing in movies like Pirates of the Caribbean, Clash of the Titans, and Game of Thrones.
The giant squid, which does live in the waters off the coast of Norway, might have been encountered by early sailors. Giant squids can grow up to forty-two feet, the length of seven or eight men. Like the Kraken, they are bottom-dwellers who feed mostly on fish—although sperm whales often bare scars from their toothy tentacles. They are also capable of spewing dark ink, similar to the “muddy” substance that the Kraken was said to use to attract fish.
(Source: Mythology.net)

The Pirates of the Caribbean Kraken history:
Few had seen the Kraken and lived to tell the tale. The word "Kraken" was first heard in seagoing lore and mythology, referring to a creature whose many arms or tentacles could reach to the top of a ship's mainmast and could without any great effort capsize a fully-rigged vessel. The huge suckers on the Kraken's tentacles were strong enough to pull the flesh clean away from a sailor's face. Under Davy Jones' command, the Kraken brought Jones ever more souls to join his crewaboard the Flying Dutchman, dying sailors forever impressed into servitude on his cursed ship.
After becoming a marked man with the Black Spot, ensuring that the Kraken would come, Captain Jack Sparrow attempted to find the Dead Man's Chest, which contained the heart of Davy Jones. Jack planned to use the heart to make Jones call off the Kraken. However, Jack's plan ultimately failed as he ended up facing the merciless Kraken as it dragged both Jack and the Black Pearl to the depths of the ocean. Afterwards, to the dismay of Davy Jones, who then served under the East India Trading Company, the Kraken would face death as Lord Cutler Beckett's forces was bearing down on the seas.
Legends of the Kraken go back many years of seagoing mythology. The word "Kraken" was first heard in 12th-century Norwegian legends, referring to a creature the size of an island, and usually depicted as a giant squid. In these legends, the Kraken normally lived at great depths, but have been sighted at the surface and have reportedly attacked ships. The Kraken's many tentacles could reach to the top of a ship's mainmast and could without any great effort capsize a fully-rigged vessel.
In Norse mythology, the Kraken was a creature from the sea so large that on the surface it was mistaken for a chain of islands. Seamen were often lost when they camped on what they thought was an island, only to be drowned when the creature swam back to the bottom of the sea. It had large tentacles and suckers with which it could seize large ships and drag them down. The Norse believed the Kraken would rise to the surface at the end of the world.
Most stories told during the Age of Piracy say that the Kraken was Davy Jones' obedient leviathan, sent to do his bidding and prey on unwary ships and mariners. The Kraken was commanded to prey upon ships, which ultimately condemned many souls aboard Jones' cursed vessel, the Flying Dutchman, dead sailors forever impressed into servitude. The terrible beast could be summoned from aboard the Flying Dutchman, with the use of a giant capstan hammer that sent a shock wave through the ocean that served as a call to the creature. Jones would at times recite a chant while his crew summoned the beast.
The Kraken was unleashed upon those who had been marked with a Black Spot, and could only be called off if the mark were removed, which only Jones himself could do. A person given the Black Spot would be ruthlessly tracked down by the Kraken, and even items of clothing or personal belongings left by the target would attract the creature on its hunt. Davy Jones was further able to order the Kraken to attack specific ships he wanted attacked. If one possessed the heart of Davy Jones, that person could control not only Jones himself, but the Kraken as well, which in effect gave the person control of the oceans.
(Source: Pirates.fandom.com)

I thought it would be a good idea to break up the monotony of my build and add another segment, Pirate Lore, Myths, & Legends will compliment my Captain's Log, which deals with my construction of the Black Pearl. Looking back over the years there were many great movies that dealt with special effects that brought us many super-natural characters. Ray Harryhausen was an original master creator of special effects. In the movie Clash of the Titans (1981), he brings us face-to-face with the Kraken of ancient Greece. So, for those of us who enjoyed the Pirates of the Caribbean series, we know that the Kraken, is part of its history too. Different variations over the years but just as scary nonetheless, as the pics below show: THE KRAKEN
What is the Kraken?
Off the coast of Norway, at the bottom of the ocean, the giant Kraken slumbers. When he wakes to an empty stomach, he heads up towards the ocean’s surface, bringing mighty ripples with him. Any ship who spots these ripples must flee or face destruction.Characteristics
Physical Description
The earliest descriptions of the Kraken don’t give away too much information. They dwell on the creature’s size, claiming that he is “the hugest monster in the sea.” He is so large that he can swallow ships and whales. So large that his body can be mistaken for land, his mouth for a sound, and his teeth for boulders. So large that his movement can create whirlpools.Despite the lack of detail about his appearance, the Kraken’s size was enough to secure him a place in Nordic legend. Over time, his appearance was fleshed out, giving people a complete image of this monstrous being.
He has a flat body, which tends to emerge from the water in humps like small islands, and dozens of long, flexible arms (sometimes called horns), which he can lift out of the water to the height of a ship’s mast. Giant circular waves and swarms of frightened fish usually appear in front of him. Today, he is generally imagined as a giant octopus, a giant crab, or some combination of the two.
Personality
With his whirlpool-making and ship-swallowing abilities, the Kraken is certainly a dangerous beast—but, unlike other sea monsters, he isn’t particularly interested in hunting humans. Most of the sailors who have gone down in the Kraken’s belly simply didn’t get out of the way fast enough.In fact, the Kraken is a rather lazy creature. It spends most of its time sleeping on the ocean floor. Even when it rises from the ocean floor to hunt, its strategies are passive.
Of course, there are a few stories of the Kraken attacking ships, usually because it was disturbed by their passage. In these cases, the Kraken can be ferocious and merciless, tearing the ship to splinters without any regard for human life.
Special Abilities
The Kraken may be lazy, but with his size, he couldn’t fail to be powerful.Perhaps the most interesting thing about this beast is his unique hunting strategy. The Kraken feeds on fish—thousands and thousands of fish—but rather than swimming around the ocean, snapping up fish one by one, he has devised a way to make dinner come to him.
After the Kraken digests a round of fish—which can take up to three months—he recycles the waste, spewing out so much vomit or excrement that the water around him is “muddied and turbid.” It may sound disgusting, but,
This hunting method is so effective that ancient Nordic fisherman sought out the Kraken, braving his wrath to get in on the bounty of fish who swarmed above him.“THIS MUDDINESS IS SAID TO BE VERY AGREEABLE TO THE SMELL OR TASTE OF OTHER FISHES, [AND] THEY GATHER TOGETHER FROM ALL PARTS TO IT, AND KEEP […] DIRECTLY OVER THE KRAKEN: HE THEN OPENS HIS ARMS […] SEIZES AND SWALLOWS HIS WELCOME GUESTS, AND CONVERTS THEM, […] BY DIGESTION, INTO A BAIT FOR OTHER FISH OF THE SAME KIND.”
The Kraken has other skills too, although none of them are quite as practical as his hunting strategy. When he moves, he can create whirlpools that suck ships to a watery grave. He can also make vocal calls that cause underwater earthquakes.
Cultural Representation
Origin
The Kraken was first described in 1180 by no less than the king of Norway. As decades passed, the beast’s legend grew larger and larger, with heroes in some of Norway’s first epic tales, like the Orvar-Oddr, having close encounters with the monster.By the mid-thirteenth century, naturalists had begun looking into the legend. The Konungs Skuggsja elaborated on its appearance and feeding habits. Even into the eighteenth century, prominent scientists like Carl Linnaeus included the Kraken in their classification of sea creatures.
Modern Appearances
At the turn of the eighteenth century, the Kraken began to be relegated to works of fiction. It found a place in poems by Alfred Tennyson and in Herman Melville’s Moby Dick, Jules Vernes’ Twenty Thousand Leagues Under the Sea, and HP Lovecraft’s Call of Cthulu.Today, it remains one of fictions most popular sea monsters, appearing in movies like Pirates of the Caribbean, Clash of the Titans, and Game of Thrones.
Explanation
While science has discarded the idea of a mile-long monster lurking at the bottom of the ocean, it has discovered a sensational, Kraken-like creature: the giant squid.The giant squid, which does live in the waters off the coast of Norway, might have been encountered by early sailors. Giant squids can grow up to forty-two feet, the length of seven or eight men. Like the Kraken, they are bottom-dwellers who feed mostly on fish—although sperm whales often bare scars from their toothy tentacles. They are also capable of spewing dark ink, similar to the “muddy” substance that the Kraken was said to use to attract fish.
(Source: Mythology.net)
The Pirates of the Caribbean Kraken history:
Few had seen the Kraken and lived to tell the tale. The word "Kraken" was first heard in seagoing lore and mythology, referring to a creature whose many arms or tentacles could reach to the top of a ship's mainmast and could without any great effort capsize a fully-rigged vessel. The huge suckers on the Kraken's tentacles were strong enough to pull the flesh clean away from a sailor's face. Under Davy Jones' command, the Kraken brought Jones ever more souls to join his crewaboard the Flying Dutchman, dying sailors forever impressed into servitude on his cursed ship.
After becoming a marked man with the Black Spot, ensuring that the Kraken would come, Captain Jack Sparrow attempted to find the Dead Man's Chest, which contained the heart of Davy Jones. Jack planned to use the heart to make Jones call off the Kraken. However, Jack's plan ultimately failed as he ended up facing the merciless Kraken as it dragged both Jack and the Black Pearl to the depths of the ocean. Afterwards, to the dismay of Davy Jones, who then served under the East India Trading Company, the Kraken would face death as Lord Cutler Beckett's forces was bearing down on the seas.
Legends of the Kraken go back many years of seagoing mythology. The word "Kraken" was first heard in 12th-century Norwegian legends, referring to a creature the size of an island, and usually depicted as a giant squid. In these legends, the Kraken normally lived at great depths, but have been sighted at the surface and have reportedly attacked ships. The Kraken's many tentacles could reach to the top of a ship's mainmast and could without any great effort capsize a fully-rigged vessel.
In Norse mythology, the Kraken was a creature from the sea so large that on the surface it was mistaken for a chain of islands. Seamen were often lost when they camped on what they thought was an island, only to be drowned when the creature swam back to the bottom of the sea. It had large tentacles and suckers with which it could seize large ships and drag them down. The Norse believed the Kraken would rise to the surface at the end of the world.
Most stories told during the Age of Piracy say that the Kraken was Davy Jones' obedient leviathan, sent to do his bidding and prey on unwary ships and mariners. The Kraken was commanded to prey upon ships, which ultimately condemned many souls aboard Jones' cursed vessel, the Flying Dutchman, dead sailors forever impressed into servitude. The terrible beast could be summoned from aboard the Flying Dutchman, with the use of a giant capstan hammer that sent a shock wave through the ocean that served as a call to the creature. Jones would at times recite a chant while his crew summoned the beast.
The Kraken was unleashed upon those who had been marked with a Black Spot, and could only be called off if the mark were removed, which only Jones himself could do. A person given the Black Spot would be ruthlessly tracked down by the Kraken, and even items of clothing or personal belongings left by the target would attract the creature on its hunt. Davy Jones was further able to order the Kraken to attack specific ships he wanted attacked. If one possessed the heart of Davy Jones, that person could control not only Jones himself, but the Kraken as well, which in effect gave the person control of the oceans.
(Source: Pirates.fandom.com)
Last edited:


Please keep it up! It is very interesting to read...Thanks Jimsky...truthfully too much time on my hands now retired. LOL! I'll see how long I can keep it up.
- Joined
- Mar 19, 2021
- Messages
- 98
- Points
- 113

LarryFollowing with great interest as I have the smaller version coming from ZHL.
- Joined
- Mar 1, 2021
- Messages
- 315
- Points
- 168
Hi Larry, I welcome your follow and when you start your build I'd like to follow you too! If you want to see great work and craftsmanship you should look up Tony H's build of the same version of the Black Pearl as yours. He has left me with a lot of great info...also guys like Vfordyce and MystRacing are doing great write-ups on the same version I'm building...very good input and advice from those guys.Larry
Last edited:
- Joined
- Mar 19, 2021
- Messages
- 98
- Points
- 113
I am already following them. So much to learn but I will take it one step at a time.Hi Larry, I welcome your follow and when you start your build I'd like to follow you too! If you want to see great work and craftsmanship you should look up Tony H's build of the same version of the Black Pearl as yours. He has left me with a lot of great info...also guys like Vfordyce and MystRacing are doing great write-ups on the same version I'm building...very good input and advice from those guys.
Larry
Oops, sorry about the name confusion Rick.Hi Rowboat. You have me confused with Tony. I'm Rick and I have just started my build. One thing I have already discovered. No matter how much you pre-plan you will make mistakes along the way. Now, I know why some refer to these kits as puzzles...no one puts a zig saw puzzle together without realizing they have a wrong piece in the wrong place.
I thought I learned from the mates before me to take their advice and pre-drill the holes before installing the bulkheads. So, I did and I thought great job. Until I realized after gluing in the first three bulkheads that I drilled the holes too close toward the keel slot....so when parts #17-19 are inserted, it covers my wire holes. STUPID, STUPID me. Well, I will have to carefully re-drill those three bulkheads now installed. I caught my mistake soon enough to alter the remaining bulkhead hole locations.
I ordered thirty nano's from Evan Designs and I plan to run one bus, both positive and negative through the keel and to three separate switches to the lower, main and Captain's quarters and stern lamps. It's a bit of over kill but I wanted to fool around with some different effects for display. I will solder additional wire to the LED's before they hit the bus and solder to the bus. Evans says that you should be able to safely power 30 LED's in parallel with the 3v AC supply I purchased.
In the meantime, I still decided to take Jodie's work into consideration and may try to solder the LED's that came with our kit. I received three strings of (11) for a total of 33 LED's....I successfully managed to make 7 of the first 11 work. (only 1 of the next 4) I soon realized I was working with too heavy of a solder and not a fine enough tip so I ordered .6mm solder and needle tips....I plan on seeing if I can also add the coffin 12v system to the ship and may figure out a way to light up the masts for more visual effects. That's a long way off for me. The pic below is three of the LED's from the kit that I soldered and used liquid tape to finish with.
I actually ordered 25 warm white LED's from Amazon for $9, so I have plenty of lights to fool with.
View attachment 224011
Thanks for the follow up info. Got a laugh out of your "STUPID, STUPID me"
 .
.- Joined
- Mar 1, 2021
- Messages
- 315
- Points
- 168
Captain's Log ~~~ March 29, 2021
Build time today: 2 hours
Total build time: 5.5 hours
Good day my fellow sea dogs! I want to introduce you to my alter-ego who will accompany us on this build. His name is Ricky F. Up and he will appear throughout my build whenever I make mistakes. I figured it's a way to show anyone who is interested in my f-ups. When you see Ricky appear, you'll know that Davy Jones sent him to screw me up and that I'm backstroking my way to get things right.

Over the past two days, I spent 3 hours to set Bulkheads #8, #7, #12, and #13. Let them dry overnight.

Removed clamps and here they are set in place.

Before finishing up setting the remaining bulkheads, I had to go back and re-drill
my wire holes on the first three bulkheads I set....Luckily, all went well, nothing broke loose.
Here are bulkheads 4-14 set in place drying.

I can't say enough about keeping things square. I know I'm not completely perfect but
between vertical, horizontal and across the keel, I'm about as good as my skill and tools will allow me to be. I did dry fit the lower deck after my first seven bulkheads were in and it went in with no problems. At this point, I also glued in Parts #17- 19 (2 each).

Well mates, according to the plans we have reached Step #13 of the 1st Pole.

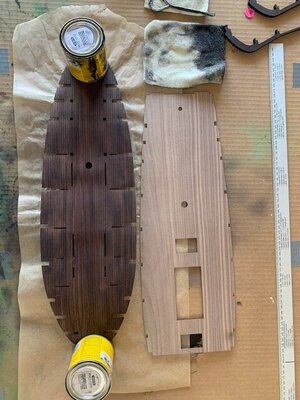
Since I'll likely be gluing down the lower deck next, I decided to play around with some stain...I'm not that fussy here and I just threw on some Minwax Weathered Oak and streaked it with Ebony....wiped it down with a clean rag and set it aside to dry. For reference, I placed the upper deck beside it, as it looked like this prior to the stain. I'm not likely to use tung oil or anything else....perhaps I may airbrush some satin floor wax to keep things from getting scuffed up...but that can come later if I want a different effect. I did score the deck lines as recommended and I couldn't believe how it really works. The deck looks a bit lighter than the pic shows here.

While I was staining, the deck I decided to get Parts A1-A7 ready and I stained them with the Ebony stain.

Finally, I did try my luck the other day soldering the 1.2mm LED's to the magnet wire furnished with the kit. I managed to get 8 out of 15...before realizing I needed to order some thinner solder and needle tips. I really don't need to utilize these lights since I have 55 LED's from Amazon and Evan Designs in various types. Flickering Orange, warm white, yellow....I plan on a 3v power source with three switches to light the three decks to give different effects...may utilize the kits 12v setup too with a crazy idea to highlight the masts...who knows at this point. The liquid tape works great though and will be useful when I solder the LED's to the bus wires.

That's it for today mates. Shore duty is on call. Grass needs to be cut. Beautiful day in San Diego, CA.
Ahoy all.
Build time today: 2 hours
Total build time: 5.5 hours
Good day my fellow sea dogs! I want to introduce you to my alter-ego who will accompany us on this build. His name is Ricky F. Up and he will appear throughout my build whenever I make mistakes. I figured it's a way to show anyone who is interested in my f-ups. When you see Ricky appear, you'll know that Davy Jones sent him to screw me up and that I'm backstroking my way to get things right.
Over the past two days, I spent 3 hours to set Bulkheads #8, #7, #12, and #13. Let them dry overnight.
Removed clamps and here they are set in place.
Before finishing up setting the remaining bulkheads, I had to go back and re-drill
my wire holes on the first three bulkheads I set....Luckily, all went well, nothing broke loose.
Here are bulkheads 4-14 set in place drying.
I can't say enough about keeping things square. I know I'm not completely perfect but
between vertical, horizontal and across the keel, I'm about as good as my skill and tools will allow me to be. I did dry fit the lower deck after my first seven bulkheads were in and it went in with no problems. At this point, I also glued in Parts #17- 19 (2 each).
Well mates, according to the plans we have reached Step #13 of the 1st Pole.
Since I'll likely be gluing down the lower deck next, I decided to play around with some stain...I'm not that fussy here and I just threw on some Minwax Weathered Oak and streaked it with Ebony....wiped it down with a clean rag and set it aside to dry. For reference, I placed the upper deck beside it, as it looked like this prior to the stain. I'm not likely to use tung oil or anything else....perhaps I may airbrush some satin floor wax to keep things from getting scuffed up...but that can come later if I want a different effect. I did score the deck lines as recommended and I couldn't believe how it really works. The deck looks a bit lighter than the pic shows here.
While I was staining, the deck I decided to get Parts A1-A7 ready and I stained them with the Ebony stain.
Finally, I did try my luck the other day soldering the 1.2mm LED's to the magnet wire furnished with the kit. I managed to get 8 out of 15...before realizing I needed to order some thinner solder and needle tips. I really don't need to utilize these lights since I have 55 LED's from Amazon and Evan Designs in various types. Flickering Orange, warm white, yellow....I plan on a 3v power source with three switches to light the three decks to give different effects...may utilize the kits 12v setup too with a crazy idea to highlight the masts...who knows at this point. The liquid tape works great though and will be useful when I solder the LED's to the bus wires.
That's it for today mates. Shore duty is on call. Grass needs to be cut. Beautiful day in San Diego, CA.
Ahoy all.
Attachments
Last edited:
Hi Rick I liked the Kraken information. It looks like you're off to a flying start. My f-ups if fixable are learning experiences, if not it's builder's choice or that the way the pirates did it or an optical illusion due to camera angle and anything that looks really bad I have photo shop. I've learnt a lot since starting my BP.
Tony
Tony
- Joined
- Mar 1, 2021
- Messages
- 315
- Points
- 168
Love it Tony, right on. I have more than enough free time being retired, so this project for me is like a bucket list item. lol! Actually, in light of so much that I see wrong in today's World I find that this has really taken my mind off the evening news and all the bad stories in the headlines. I find this very rewarding and no matter the turnout, I find it therapeutic and relaxing.Hi Rick I liked the Kraken information. It looks like you're off to a flying start. My f-ups if fixable are learning experiences, if not it's builder's choice or that the way the pirates did it or an optical illusion due to camera angle and anything that looks really bad I have photo shop. I've learnt a lot since starting my BP.
Tony
I wanted to make my thread interesting for the reader so the Pirates Lore, Myths, and Legends in between the Captain's Logs, will hopefully add some interesting facts that will be educational and informative. I really enjoyed reading your thread early on. In addition to guys like Vic and Jodie, its probably the reason I laid out the bucks to try my hand at this. In any regard, I'll enjoy staying in touch with our builds and welcome the friendship.
I love your log! Same thing happened to me with the first two “poles.” I got the third pole afterwards, and it was definitely the right call for me. The only thing I ran short of was rigging line U4-6. You might check on either ordering more from ZHL or doing what others did by using line from a different source. Glad you started your log. I’m surprised I haven’t seen it yet since I’m following you.Captain's Log ~~~ March 10, 2021
I wanted to say a word about the process of order and delivery from ZHL My emails to ZHL were responded to by Max Zeng. Max seems to be a very customer centric type of guy, responding to each email promptly within 24 hours. I ordered my kit on 2/27 and it arrived at my front door in San Diego on March 8th. My kit is a Pole #1 & Pole #2 offering, which is a partial build. I read comments about the different versions of the BP and thought that new buyers would receive Poles 1-3 for a complete build. Apparently, my assumption is not the case as Max informed me that Pole #3 is an additional $75.00. So, if you guys have different input, the joke may be on me. You know what they say about the word assume. LOL!
View attachment 219610
Since I don't plan to start the Pearl right away, I was a bit concerned dealing with an offshore company and possibly finding out months later that parts were missing. Max assured me that they would make good for any missing parts up to six months. This concerned me some since I don't have any specific timeline to build the Pearl. While there are YouTube videos on what comes in the box, I laid out Pole 1 & 2 on my pool table separately. This shows the magnitude of the kit for your money.
View attachment 219616
Pole 1 parts with plans
View attachment 219617
Pole 2 parts with plans
Closeups reveal that I decided to take inventory vs, the parts list and label everything to give me a clear understanding of what is what. I can honestly say that all parts were included and there was a few more in many cases than the count. This took some time because some of the parts in the Pole 1 part list are in the Pole 2 box. Go figure. Finally, the doofus that I am realized that the little red star must have been an indication to look in the second box....of course nothing stated as much in the plans....more laughs. After hitting a good portion of rum, I started to become very familiar with all the pieces. So, when build time comes I'll know right where to look.
I would recommend keeping all the pieces together until you are ready to work on what is needed. Although everything is laser cut and very clean, small pieces could have a tendency to separate from the panels. So, its best to be extremely careful or you'll be looking for something so small that will end up in the most improbable place, frustrating the hell out of you. Overall, things looked pretty good and for my money's worth, at least everything is there and with that comes the peace of mind that parts are labeled and safely back in the box. For me, that’s a good start!
I'm planning on redoing my workbenches in the garage in order to keep the Admiral happy. I‘ll be getting some needed tools that will be a big help. I recently got a little bench top air brush/compressor setup and today a new soldering and hot air gun station arrived. Yeah I can see by the time this is done, it may be a bit crazy throwing a grand at something you never did before. However, this is a bucket list item for me and I’ll enjoy the challenge and diversion to add to my retirement. My brother said, "why in the hell didn't you start with a smaller kit?" I laughed. Told him I'm into the running rigging now on my plastic Revell 1:96 scale USS Constitution and the Admiral wants that completed before I start the Pearl.
Sailing off for now, but in the next week I hope to send a few pics of my setup and some of the tools I have so you mates can add any other thoughts. Just like in real estate they say location, location, location....I'm of the belief this endeavor for me is about preparation, preparation, preparation. I think I want to make the build process easier for novices to follow. So, I plan to make an outline and/or format that will show the steps in parallel with the plan booklets. (example: Steps 1-10) then follow that with construction steps and notes (example: 1-12), add some pics each time or perhaps a video that will highlight the Captain's Log thread.
Looking forward to the coming year mates! Should be a helluva sail.
Ahoy all!
- Joined
- Mar 1, 2021
- Messages
- 315
- Points
- 168
Pirate Lore, Myths, and Legends #2

Dance the Hempen Jig~~
To be hanged by the neck until dead. An old pirate term.
If those scalawags catch us, they'll make us dance the hempen jig!
Trials for piracy, were usually held in admiralty courts, tribunes, that had been founded in 1340’s in England, for trials concerning crimes committed beyond the high water mark. It was possible for a member of the pirate crew to turn King’s evidence and testify against his fellow pirates, for which a pardon was granted, but only after the others had been convicted. Once convicted, the pirate could be hanged any time ten days after the trial.
On the day of the hanging, the condemned pirates were led in a procession led by an officer carrying the Silver Oar, which symbolized the authority of the High Court of the Admiralty. The final destination was the gallows, which was usually positioned in a public place near the water, often at the low-tide mark. The entire event, like all hangings was a spectacle that drew large crowds.
Before the actual hanging, a chaplain usually gave a sermon, urging the convicted to profess their faith, and repent, before being hung. Often the sermon would also preach to the audience, using the pirates as prime examples of the degeneracy of a human soul After the sermon, the pirate was allowed to speak to the people before being swung off the cart beneath the gallows. In their last speech, before execution, some appeared to be repentant, some frightened, others surly, while there were those who told crude jokes to the crowds.
After the execution, the bodies of the less significant crew members, were buried face down, below the high water mark, or left hanging until three tides had passed over them. The bodies of the most notorious captains, were often embalmed in tar, encased in an iron framework or chains, and hung from a gibbet in a conspicuous place by the water edge, where they swayed in the wind, until nothing was left. This served as a frightening example to those leaning towards the tempting rewards of piracy.
The punishment for privateering was imprisonment, with the possibility of being released in a prisoner exchange. This however was not a favorable alternative to the noose since it often meant a prolonged death, in prison hulks, which were converted naval ships that were no longer seaworthy, or goals, which were usually damp and disease-ridden.
Dance the hempen jig
 A pirate euphemism for hanging, the usual manner in which pirates were executed. Between 1716 and 1726 over four hundred pirates were hanged. Prior to 1740, hangings used what was known as a short-drop, which meant pirates died by slow strangulation. Their hands were tied in front of them rather than behind, then the Lord High Executioner stood them on a ladder, stool or barrel, put a noose around their necks, then pulled the support out from under them. Tamara J. Eastman, in her article “Hanging Around in the 18th Century…,” described what happened next. “The victim would be unable to breathe, and their skin would begin to turn a ghoulish shade of bluish-purple…. Within minutes the tongue would protrude from the mouth, the eyes would bulge from the sockets...in many cases the prisoner lost complete control of their bladder and bowels….” (No Quarter Given, March 2000)
Source:
Pirates and Privateers

The History of Maritime Piracy
Cindy Vallar, Editor & Reviewer
P. O. Box 425, Keller, TX 76244-0425
Enjoy this tune:
Dance the Hempen Jig~~
To be hanged by the neck until dead. An old pirate term.
If those scalawags catch us, they'll make us dance the hempen jig!
Pirate Punishment
Author: Krzysztof Wilczynski
It would be an unfair statement to say that a lighthearted way of life in the 18th century was restricted to piracy. During this period, death was often sudden, in the midst of battle, by shipwreck, tavern brawls, disease, etc. But then, there was always death by ‘dancing the hempen jig’, a pirate’s term for a hanging, which awaited any pirate brought to trial, and sentenced.Trials for piracy, were usually held in admiralty courts, tribunes, that had been founded in 1340’s in England, for trials concerning crimes committed beyond the high water mark. It was possible for a member of the pirate crew to turn King’s evidence and testify against his fellow pirates, for which a pardon was granted, but only after the others had been convicted. Once convicted, the pirate could be hanged any time ten days after the trial.
On the day of the hanging, the condemned pirates were led in a procession led by an officer carrying the Silver Oar, which symbolized the authority of the High Court of the Admiralty. The final destination was the gallows, which was usually positioned in a public place near the water, often at the low-tide mark. The entire event, like all hangings was a spectacle that drew large crowds.
Before the actual hanging, a chaplain usually gave a sermon, urging the convicted to profess their faith, and repent, before being hung. Often the sermon would also preach to the audience, using the pirates as prime examples of the degeneracy of a human soul After the sermon, the pirate was allowed to speak to the people before being swung off the cart beneath the gallows. In their last speech, before execution, some appeared to be repentant, some frightened, others surly, while there were those who told crude jokes to the crowds.
After the execution, the bodies of the less significant crew members, were buried face down, below the high water mark, or left hanging until three tides had passed over them. The bodies of the most notorious captains, were often embalmed in tar, encased in an iron framework or chains, and hung from a gibbet in a conspicuous place by the water edge, where they swayed in the wind, until nothing was left. This served as a frightening example to those leaning towards the tempting rewards of piracy.
The punishment for privateering was imprisonment, with the possibility of being released in a prisoner exchange. This however was not a favorable alternative to the noose since it often meant a prolonged death, in prison hulks, which were converted naval ships that were no longer seaworthy, or goals, which were usually damp and disease-ridden.
Dance the hempen jig
Source:
Pirates and Privateers
The History of Maritime Piracy
Cindy Vallar, Editor & Reviewer
P. O. Box 425, Keller, TX 76244-0425
Enjoy this tune:
Last edited:
My fingers were dancing the hempen jig today trying to rig the sails and belay the lines. My eyes were bulging and my tongue was hanging out as I twisted and turned and gave spasmodic jerks as the muscles in my back seized up after the third time the line slipped from its moorings.Pirate Lore, Myths, and Legends #2
View attachment 224231
Dance the Hempen Jig~~
To be hanged by the neck until dead. An old pirate term.
If those scalawags catch us, they'll make us dance the hempen jig!
Pirate Punishment
Author: Krzysztof Wilczynski
It would be an unfair statement to say that a lighthearted way of life in the 18th century was restricted to piracy. During this period, death was often sudden, in the midst of battle, by shipwreck, tavern brawls, disease, etc. But then, there was always death by ‘dancing the hempen jig’, a pirate’s term for a hanging, which awaited any pirate brought to trial, and sentenced.
Trials for piracy, were usually held in admiralty courts, tribunes, that had been founded in 1340’s in England, for trials concerning crimes committed beyond the high water mark. It was possible for a member of the pirate crew to turn King’s evidence and testify against his fellow pirates, for which a pardon was granted, but only after the others had been convicted. Once convicted, the pirate could be hanged any time ten days after the trial.
On the day of the hanging, the condemned pirates were led in a procession led by an officer carrying the Silver Oar, which symbolized the authority of the High Court of the Admiralty. The final destination was the gallows, which was usually positioned in a public place near the water, often at the low-tide mark. The entire event, like all hangings was a spectacle that drew large crowds.
Before the actual hanging, a chaplain usually gave a sermon, urging the convicted to profess their faith, and repent, before being hung. Often the sermon would also preach to the audience, using the pirates as prime examples of the degeneracy of a human soul After the sermon, the pirate was allowed to speak to the people before being swung off the cart beneath the gallows. In their last speech, before execution, some appeared to be repentant, some frightened, others surly, while there were those who told crude jokes to the crowds.
After the execution, the bodies of the less significant crew members, were buried face down, below the high water mark, or left hanging until three tides had passed over them. The bodies of the most notorious captains, were often embalmed in tar, encased in an iron framework or chains, and hung from a gibbet in a conspicuous place by the water edge, where they swayed in the wind, until nothing was left. This served as a frightening example to those leaning towards the tempting rewards of piracy.
The punishment for privateering was imprisonment, with the possibility of being released in a prisoner exchange. This however was not a favorable alternative to the noose since it often meant a prolonged death, in prison hulks, which were converted naval ships that were no longer seaworthy, or goals, which were usually damp and disease-ridden.
Dance the hempen jig
A pirate euphemism for hanging, the usual manner in which pirates were executed. Between 1716 and 1726 over four hundred pirates were hanged. Prior to 1740, hangings used what was known as a short-drop, which meant pirates died by slow strangulation. Their hands were tied in front of them rather than behind, then the Lord High Executioner stood them on a ladder, stool or barrel, put a noose around their necks, then pulled the support out from under them. Tamara J. Eastman, in her article “Hanging Around in the 18th Century…,” described what happened next. “The victim would be unable to breathe, and their skin would begin to turn a ghoulish shade of bluish-purple…. Within minutes the tongue would protrude from the mouth, the eyes would bulge from the sockets...in many cases the prisoner lost complete control of their bladder and bowels….” (No Quarter Given, March 2000)
Source:
Pirates and Privateers
The History of Maritime Piracy
Cindy Vallar, Editor & Reviewer
P. O. Box 425, Keller, TX 76244-0425
Enjoy this tune:
- Joined
- Mar 1, 2021
- Messages
- 315
- Points
- 168
Captain's Log ~~~ April 1, 2021
Build time today: 1 hour
Total build time: 9.5 hours
Two pirates, one old captain and one young rookie, are sitting in a bar. The older pirate captain has a wooden leg, a hook for a hand, and an eyepatch on one eye. The younger pirate, impressed and more than a little bit scared, asks the old pirate captain how he got his accessories."Well, I was out at sea on a stormy day and I fell overboard. A shark came up and bit me leg clean off." says the old pirate captain.
"Wow," says the young pirate, "and how did you lose your hand?""I was fighting a Navy officer, and he lopped me hand off with his sword. Still lived to tell the tale, though," the old pirate captain says with a grin."Amazing. What about your eye?" the young pirate asks. The old pirate captain's face turns dark.“I was standing on the deck and a huge seagull did a poo right in me eye."
"But you don't go blind from a bit of bird poo!"
"True," says the old pirate captain, "But it was me first day with the hook.
-284858.png")
Stupid joke, now let's get on with it. Mates, it's time for the Captain to quit draining his dragon overboard so we can get the lower deck installed.

Lower deck glued in and everything within reach helping to weigh it down.

All level and smooth sailing under a gentle breeze.

Now, time for more fiddling. Made myself a support that could clamp to the keel and my vise, which allowed me to work under the deck while keeping the ship upright making it easier for me to place the (7) bulkheads and the braces underneath.

Have to refer back to the logs and see what Captain Jodie said about placing the rest of the Starboard Bulkheads....yep, found it. A real treasure map for a newbie Captain. Dry fit the upper deck into position and align the bulkheads A1-A7 to it, using rubber bands as a stabilizer after gluing in the braces at the same time, Parts 6D-12D (2 each). NOTE: The braces in the pic below are just sitting on the deck as placement reminders per bulkhead, their final and correct placement is below the deck butting up against each bulkhead and keel.

After this part of the build was finally set, I let the glue dry overnight. I put some added items on the deck while it was drying to make sure the deck was in contact with the braces on each side of the bulkheads. One word about the glue in this phase, Steps #1-26. Each time I used some glue, I put some of the Titebond Ultimate in a plastic cup and added a squirt or two of clear Gorilla for added strength. It sort of gets mentioned in Step 13 of the 1st Pole plan book, but I used this mix from Step 1. Seems that this will make it a bit more sturdy to handle all the flipping about as the build progresses.
At this point, we have completed the first 26 Steps of the 1st Pole plan. (accomplishing about 10% of the 1st Pole) I want to take a moment to toast all the mates here that have kept me focused on my 1st wooden model shipbuild. I have learned so much from you mates and for me to even get this far is a big callout to you. I feel its because of the knowledge each of you so graciously shared with this forum. CHEERS! Sorry for the cheap rum. Saving the good stuff for if/when we get through with the lighting.

Build time today: 1 hour
Total build time: 9.5 hours
Two pirates, one old captain and one young rookie, are sitting in a bar. The older pirate captain has a wooden leg, a hook for a hand, and an eyepatch on one eye. The younger pirate, impressed and more than a little bit scared, asks the old pirate captain how he got his accessories."Well, I was out at sea on a stormy day and I fell overboard. A shark came up and bit me leg clean off." says the old pirate captain.
"Wow," says the young pirate, "and how did you lose your hand?""I was fighting a Navy officer, and he lopped me hand off with his sword. Still lived to tell the tale, though," the old pirate captain says with a grin."Amazing. What about your eye?" the young pirate asks. The old pirate captain's face turns dark.“I was standing on the deck and a huge seagull did a poo right in me eye."
"But you don't go blind from a bit of bird poo!"
"True," says the old pirate captain, "But it was me first day with the hook.
Stupid joke, now let's get on with it. Mates, it's time for the Captain to quit draining his dragon overboard so we can get the lower deck installed.
Lower deck glued in and everything within reach helping to weigh it down.
All level and smooth sailing under a gentle breeze.
Now, time for more fiddling. Made myself a support that could clamp to the keel and my vise, which allowed me to work under the deck while keeping the ship upright making it easier for me to place the (7) bulkheads and the braces underneath.
Have to refer back to the logs and see what Captain Jodie said about placing the rest of the Starboard Bulkheads....yep, found it. A real treasure map for a newbie Captain. Dry fit the upper deck into position and align the bulkheads A1-A7 to it, using rubber bands as a stabilizer after gluing in the braces at the same time, Parts 6D-12D (2 each). NOTE: The braces in the pic below are just sitting on the deck as placement reminders per bulkhead, their final and correct placement is below the deck butting up against each bulkhead and keel.
After this part of the build was finally set, I let the glue dry overnight. I put some added items on the deck while it was drying to make sure the deck was in contact with the braces on each side of the bulkheads. One word about the glue in this phase, Steps #1-26. Each time I used some glue, I put some of the Titebond Ultimate in a plastic cup and added a squirt or two of clear Gorilla for added strength. It sort of gets mentioned in Step 13 of the 1st Pole plan book, but I used this mix from Step 1. Seems that this will make it a bit more sturdy to handle all the flipping about as the build progresses.
At this point, we have completed the first 26 Steps of the 1st Pole plan. (accomplishing about 10% of the 1st Pole) I want to take a moment to toast all the mates here that have kept me focused on my 1st wooden model shipbuild. I have learned so much from you mates and for me to even get this far is a big callout to you. I feel its because of the knowledge each of you so graciously shared with this forum. CHEERS! Sorry for the cheap rum. Saving the good stuff for if/when we get through with the lighting.
Attachments

Last edited:
Ahoy All,
The ship is coming along nicely.
I didn't dry fit the 2nd or 3rd level decks while installing the bottom deck.
With the abundant of build logs for the BP, I end up missing those little things. So much to read, I prefer looking at the pics") .
.
The ship is coming along nicely.
I didn't dry fit the 2nd or 3rd level decks while installing the bottom deck
.With the abundant of build logs for the BP, I end up missing those little things. So much to read, I prefer looking at the pics
.