Black Pearl 1:50 ZHL All-Scenario version

Ahoy All,

The ship is coming along nicely.

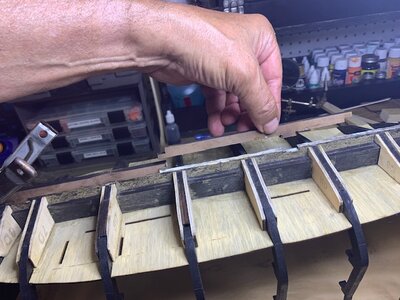
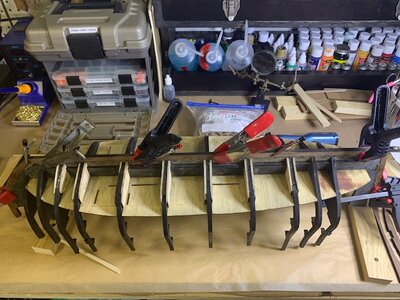
I didn't dry fit the 2nd or 3rd level decks while installing the bottom deck :rolleyes:.

With the abundant of build logs for the BP, I end up missing those little things. So much to read, I prefer looking at the pics;).
I understand mate. I decided to slow it down some. I did check my beams this morning prior to staining them and I didn't run into the problem that you did with Parts 8A....Jodie was spot on about dry fitting the main deck. My biggest gap was no more than a 1mm or so. Odds are 1000:1 to get it right without that neat little tip Jodie highlighted for newbies. However, many things in wood are forgiving so that's why you take a step back and rethink the next step forward.

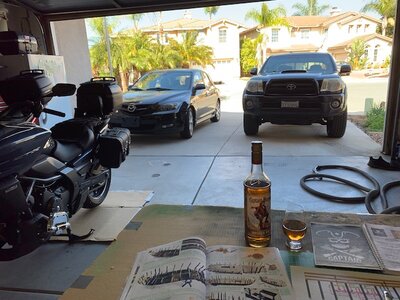
I'll be working on the jail cells and finishing them up in the next week....and then I'll take some time to enjoy painting all those little add-on deck charms....then the step that will throw me is the wiring, but I'm getting some better rum and I'll drink my way through it. Captain's privilege.
 
Pirate Lore, Myths and Legends #3

Edward Teach.jpg

10 Brutal Facts About Edward Teach (the Legendary Blackbeard the Pirate)


He Didn’t Actually Need The Money

He Fired Bags Of Glass, Nails, and Lead At Enemy Ships

He Got Drunk And Stole People’s Hats

He Burned Toxic Chemicals To See Who Could Tough It Out The Longest

He Shot His Crew Members To Remind Them He Was In Charge

He Shared His Wives With His Crew As A Gift

He Raided Ships In Search Of Syphilis Treatments

He Strangled The Women He Captured

He Got The British To Give Him A Full Royal Pardon Anyway

He Was Shot Five Times And Stabbed 20 Before He Died

Even after he got his pardon, Blackbeard still didn’t stop pirating. It didn’t take long before he got bored with leading a peaceful life and took to the seas once more, raiding slave ships and wreaking havoc along the coastlines.

Lieutenant Robert Maynard went after Blackbeard with two ships and 60 men. He would be the man who would finally kill Blackbeard, but it wouldn’t be easy.

Maynard made it look like his vessel was nearly deserted to lure Blackbeard into boarding his ship. Then, while the pirate’s guard was down, Maynard’s men swarmed out of the hatches. Blackbeard was furious, and he charged straight for Maynard—who immediately shot him in the chest.

That didn’t stop Blackbeard, though. He kept fighting and soon was clashing his sword against Maynard’s. Blackbeard thrust down so hard that he broke Maynard’s sword and likely would have killed him. But somebody stabbed Blackbeard in the neck from behind.

Even after that, Blackbeard kept fighting. By the end, he’d been shot five times and stabbed more than 20 before he died of blood loss. In his final moments, he was reloading his gun, determined to keep shooting no matter how many times they shot him.

Source: MARK OLIVER Listverse.com
 
Captain's Log ~~~April 6, 2021
Build time today: 1 hour
Total build time: 25 hours

Construction for the Black Pearl (All-Scenario version)​

Build guidelines:

Steps 27-41 & 48 & 49 (Phase 1)

Steps 42-71 excl. 48 & 49 (Phase 2)

Steps 72-77 (Phase 3)

Steps 27-41, 48 & 49​

Secure the following parts:

B1-B5, C1-C3, D1, D2, D3, D4, D5, D6, D7, 6A-14A, E1 & E2, Y1-Y5 (Doors & parts: E7, T4, W1 & W2)

Phase 1
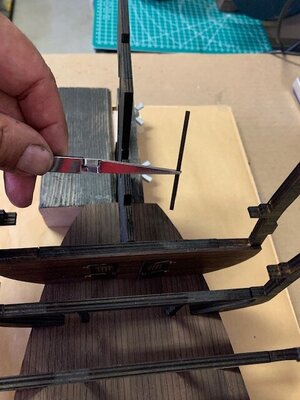
Parts B1-B5 are the 5 stem pieces that connect to the keel with tabs. Sand the tabs flush with the keel to finish.

pic1.JPG
pic2.JPG

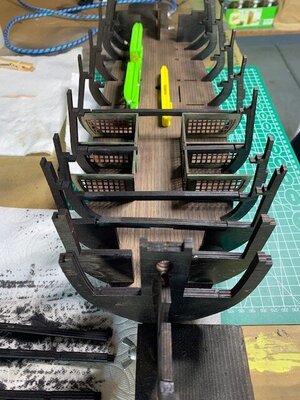
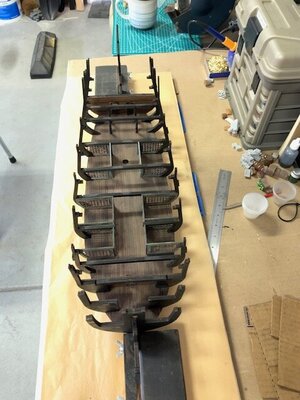
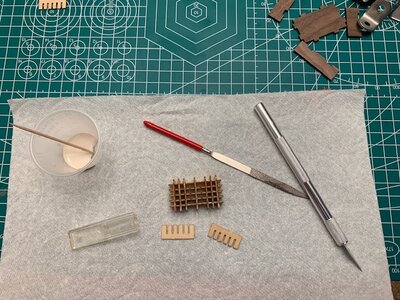
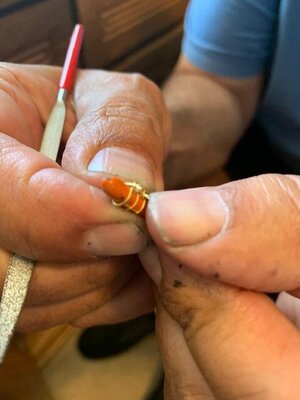
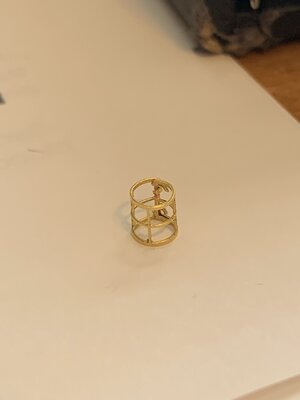
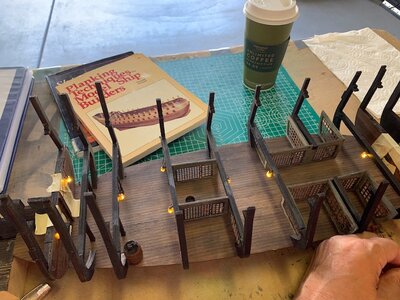
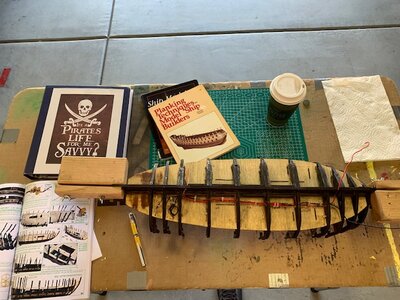
Steps 31-40 involves the construction of the jail cells. Here, you get to fit the jail bars to their wooden frames. In my case there was very little sanding. NOTE: @MystRacing pointed out that the brass bars of the cells do not properly fit the wooden frames. I found this to be true. It was a bit more work but I decided to grind down the metal to fit the wood frames and the bulkheads.The test ahead by dry fitting the jail cells and the beams would show if my bulkheads were set within a proper tolerance. Fortunately, the maximum gap was not much more than a single millimeter from bo to stern. (Again, shout out to Jodie@MystRacing who advised to dry fit the lower deck before setting the starboard bulkheads.)

My 1” belt sander for the wood and my bench grinder for the metal made fitting the pieces a snap.
1.jpg
2.jpg

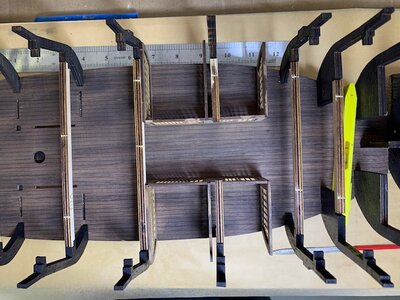
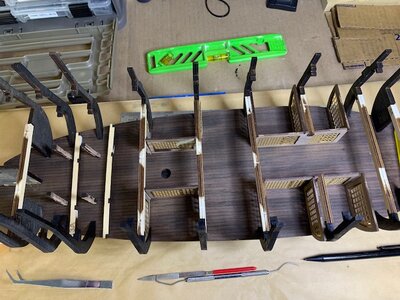
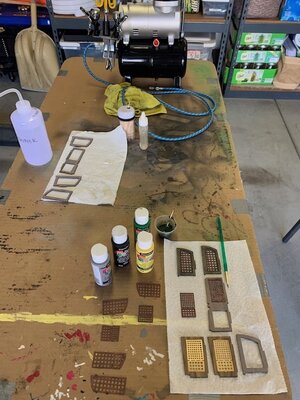
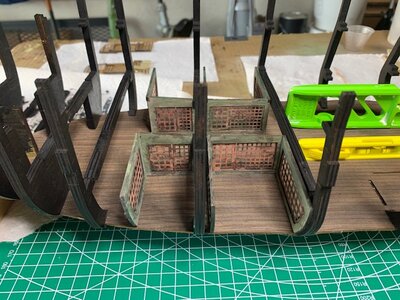
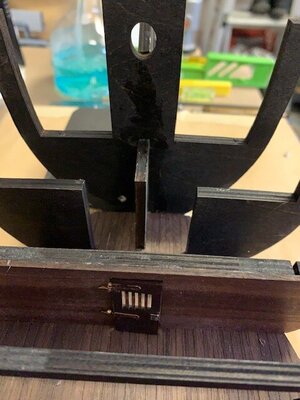
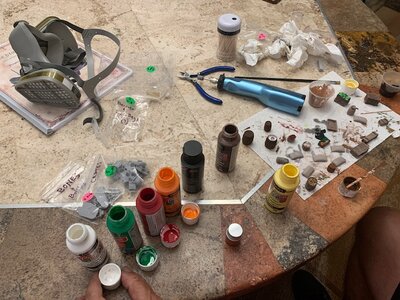
I wanted to offset the lumber in the cells against the beams. I imagine the jails were nasty, stenchy places to be holed up in, I airbrushed the frames a light gray then I brushed with a vomit green acrylic mix over the wood. For the metal, I acid washed the bars black and touched with rust color acrylic that I mixed up. I won't be making my Pearl the all-black version. I wanted to go for some contrast in the lower deck between the ebony of the bulkheads and beams by making the jail cell wood frames lighter!
3.JPG
4.JPG
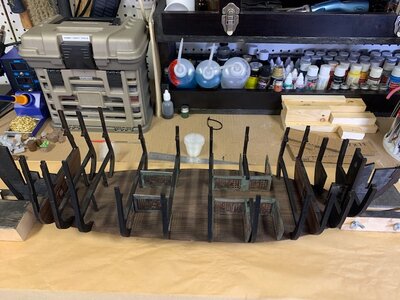
Methinks the beams and bulkheads in ebony stain will work for me. A peek at the first cell block, dry-fitted!
6B.JPG
I felt the cell frames above were a bit too green so I darkened them up some by wiping some black acrylic over them. The last pic in this log will show the finished look.
Well mates, now we just need to complete Step 48 & 49 and we will have completed the Phase #1 of this part of the build.

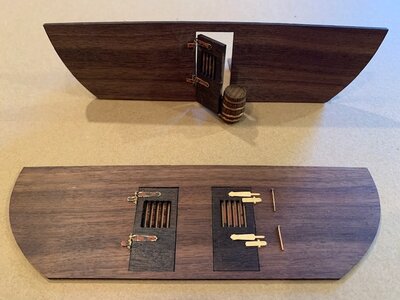
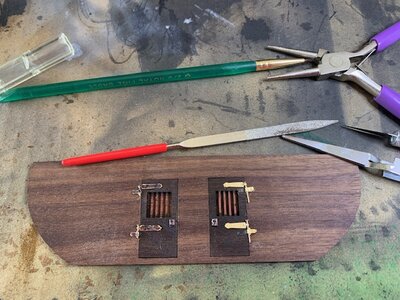
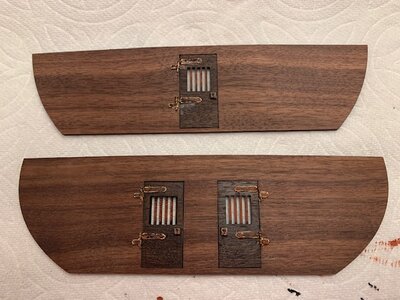
I used weathered oak stain to finish where the bow and stern prison doors were hinged to parts E1 & E2. For three doors that will barely be noticed at first I thought, just let the doors stay in the panels and glue the two parts in place to the bulkheads....but the Admiral put the kibosh on that when I asked her opinion of what would be best. Experience tells me that to approach the Admiral with a question so dumb, somehow always ends up more work for me. So I was ordered to make the doors work with hinges. I probably did too much star gazing in this menial task, but what the heck mates with a little rum, some oldies playing in the background, it was like walking down memory lane. Take a look.
5.JPG
Stained the doors ebony and played around with the hinges (Parts W1 & W2) by acid washing them with a tiny brush and hitting them with the same acrylic color I used for for the rust look on the jail cell bars.
6.jpg
I snipped the pins (Part T4) that are supposed to be used with the hinges.
7.jpg
I applied a second coat of Weathered Oak stain and made some keyholes by snipping three pieces from the 1mm wood board and gluing them to the doors and touching them up. The above pic is the finished look that I glued to the bulkheads and beams.

Well sea dogs, it's time for shore privileges. The next few days will be like R & R, handling the little things.
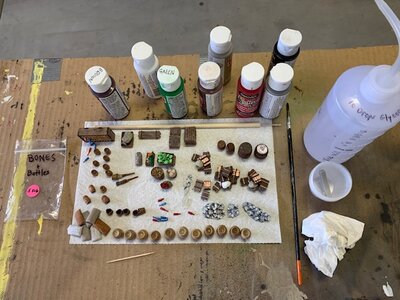
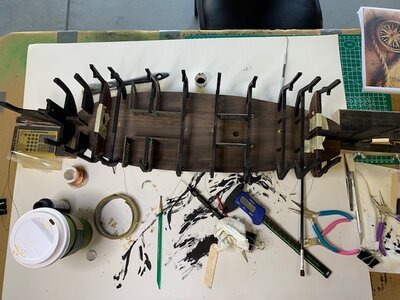
Steps 42-71 excl. 48 & 49 (Phase 2) Time to enjoy some rum and round up all those barrels, bones and baskets. It's party hardy time and paint away....here's a pic summing up where we stand to date.

8.JPG
9.JPG
10.JPG
Smooth sailin' mates. Until the next time. Ahoy all!

So, I'm sitting on the deck sipping some rum, taking pride in the task at hand. I decide to flip over to Jodie and Vic's build and spit out my rum when I noticed and figured out from their pics that I didn't attach Part E7.
So, I guess we have to say hello to Ricky F. Up.

Ricky F. Up.jpeg

WARNING: Part #E7 is not the doors, like I thought...the plans clearly say to attach E7 between both door frames. I'm thinking they are the doors. Luckily, this is an easy fix by just installing the part.
DON'T FORGET TO ATTACH #E7 BETWEEN THE STERN DOORS!


11.JPG
 
Last edited:
Captain's Log ~~~April 6, 2021
Build time today: 1 hour
Total build time: 25 hours

Construction for the Black Pearl (All-Scenario version)​

Build guidelines:

Steps 27-41 & 48 & 49 (Phase 1)

Steps 42-71 excl. 48 & 49 (Phase 2)

Steps 72-79 (Phase 3)

Steps 27-41, 48 & 49​

Secure the following parts:

B1-B5, C1-C3, D1, D2, D3, D4, D5, D6, D7, 6A-14A, E1 & E2, Y1-Y5 (Doors & parts: E7, T4, W1 & W2)

Phase 1
Parts B1-B5 are the 5 stem pieces that connect to the keel with tabs. Sand the tabs flush with the keel to finish.

View attachment 225691
View attachment 225693

Steps 31-40 involves the construction of the jail cells. Here, you get to fit the jail bars to their wooden frames. In my case there was very little sanding. The test ahead by dry fitting the jail cells and the beams would show if my bulkheads were set within a proper tolerance. Fortunately, the maximum gap was not much more than a single millimeter from bo to stern. (Again, shout out to Jodie@MystRacing who advised to dry fit the lower deck before setting the starboard bulkheads.)

My 1” belt sander for the wood and my bench grinder for the metal made fitting the pieces a snap.
View attachment 225694
View attachment 225695

I wanted to offset the lumber in the cells against the beams. I imagine the jails were nasty, stenchy places to be holed up in, I airbrushed the frames a light gray then I brushed with a vomit green acrylic mix over the wood. For the metal, I acid washed the bars black and touched with rust color acrylic that I mixed up. I won't be making my Pearl the all-black version. I wanted to go for some contrast in the lower deck between the ebony of the bulkheads and beams by making the jail cell wood frames lighter!
View attachment 225697
View attachment 225698
Methinks the beams and bulkheads in ebony stain will work for me. A peek at the first cell block, dry-fitted!
View attachment 225702
I felt the cell frames above were a bit too green so I darkened them up some by wiping some black acrylic over them. The last pic in this log will show the finished look.
Well mates, now we just need to complete Step 48 & 49 and we will have completed the Phase #1 of this part of the build.

I used weathered oak stain to finish where the bow and stern prison doors were hinged to parts E1 & E2. For three doors that will barely be noticed at first I thought, just let the doors stay in the panels and glue the two parts in place to the bulkheads....but the Admiral put the kibosh on that when I asked her opinion of what would be best. Experience tells me that to approach the Admiral with a question so dumb, somehow always ends up more work for me. So I was ordered to make the doors work with hinges. I probably did too much star gazing in this menial task, but what the heck mates with a little rum, some oldies playing in the background, it was like walking down memory lane. Take a look.
View attachment 225704
Stained the doors ebony and played around with the hinges (Parts W1 & W2) by acid washing them with a tiny brush and hitting them with the same acrylic color I used for for the rust look on the jail cell bars.
View attachment 225715
I snipped the pins (Part T4) that are supposed to be used with the hinges.
View attachment 225716
I applied a second coat of Weathered Oak stain and made some keyholes by snipping three pieces from the 1mm wood board and gluing them to the doors and touching them up. The above pic is the finished look that I glued to the bulkheads and beams.

Well sea dogs, it's time for shore privileges. The next few days will be like R & R, handling the little things.
Steps 42-71 excl. 48 & 49 (Phase 2) Time to enjoy some rum and round up all those barrels, bones and baskets. It's party hardy time and paint away....here's a pic summing up where we stand to date.

View attachment 225723
View attachment 225724
View attachment 225725
Smooth sailin' mates. Until the next time. Ahoy all!
Nice work I can see this is going to be another excellent BP build.
 
Nice work I can see this is going to be another excellent BP build.
Tony, the easy stuff is over. Now, as I move on things will get harder...lighting and planking....oh boy! Will definitely go slow through those phases.....
 
Captain's Log ~~~April 6, 2021
Build time today: 1 hour
Total build time: 25 hours

Construction for the Black Pearl (All-Scenario version)​

Build guidelines:

Steps 27-41 & 48 & 49 (Phase 1)

Steps 42-71 excl. 48 & 49 (Phase 2)

Steps 72-79 (Phase 3)

Steps 27-41, 48 & 49​

Secure the following parts:

B1-B5, C1-C3, D1, D2, D3, D4, D5, D6, D7, 6A-14A, E1 & E2, Y1-Y5 (Doors & parts: E7, T4, W1 & W2)

Phase 1
Parts B1-B5 are the 5 stem pieces that connect to the keel with tabs. Sand the tabs flush with the keel to finish.

View attachment 225691
View attachment 225693

Steps 31-40 involves the construction of the jail cells. Here, you get to fit the jail bars to their wooden frames. In my case there was very little sanding. The test ahead by dry fitting the jail cells and the beams would show if my bulkheads were set within a proper tolerance. Fortunately, the maximum gap was not much more than a single millimeter from bo to stern. (Again, shout out to Jodie@MystRacing who advised to dry fit the lower deck before setting the starboard bulkheads.)

My 1” belt sander for the wood and my bench grinder for the metal made fitting the pieces a snap.
View attachment 225694
View attachment 225695

I wanted to offset the lumber in the cells against the beams. I imagine the jails were nasty, stenchy places to be holed up in, I airbrushed the frames a light gray then I brushed with a vomit green acrylic mix over the wood. For the metal, I acid washed the bars black and touched with rust color acrylic that I mixed up. I won't be making my Pearl the all-black version. I wanted to go for some contrast in the lower deck between the ebony of the bulkheads and beams by making the jail cell wood frames lighter!
View attachment 225697
View attachment 225698
Methinks the beams and bulkheads in ebony stain will work for me. A peek at the first cell block, dry-fitted!
View attachment 225702
I felt the cell frames above were a bit too green so I darkened them up some by wiping some black acrylic over them. The last pic in this log will show the finished look.
Well mates, now we just need to complete Step 48 & 49 and we will have completed the Phase #1 of this part of the build.

I used weathered oak stain to finish where the bow and stern prison doors were hinged to parts E1 & E2. For three doors that will barely be noticed at first I thought, just let the doors stay in the panels and glue the two parts in place to the bulkheads....but the Admiral put the kibosh on that when I asked her opinion of what would be best. Experience tells me that to approach the Admiral with a question so dumb, somehow always ends up more work for me. So I was ordered to make the doors work with hinges. I probably did too much star gazing in this menial task, but what the heck mates with a little rum, some oldies playing in the background, it was like walking down memory lane. Take a look.
View attachment 225704
Stained the doors ebony and played around with the hinges (Parts W1 & W2) by acid washing them with a tiny brush and hitting them with the same acrylic color I used for for the rust look on the jail cell bars.
View attachment 225715
I snipped the pins (Part T4) that are supposed to be used with the hinges.
View attachment 225716
I applied a second coat of Weathered Oak stain and made some keyholes by snipping three pieces from the 1mm wood board and gluing them to the doors and touching them up. The above pic is the finished look that I glued to the bulkheads and beams.

Well sea dogs, it's time for shore privileges. The next few days will be like R & R, handling the little things.
Steps 42-71 excl. 48 & 49 (Phase 2) Time to enjoy some rum and round up all those barrels, bones and baskets. It's party hardy time and paint away....here's a pic summing up where we stand to date.

View attachment 225723
View attachment 225724
View attachment 225725
Smooth sailin' mates. Until the next time. Ahoy all!

So, I'm sitting on the deck sipping some rum, taking pride in the task at hand. I decide to flip over to Jodie and Vic's build and spit out my rum when I noticed and figured out from their pics that I didn't attach Part E7.
So, I guess we have to say hello to Ricky F. Up.

View attachment 225731

WARNING: Part #E7 is not the doors, like I thought...the plans clearly say to attach E7 between both door frames. I'm thinking they are the doors. Luckily, this is an easy fix by just installing the part.
DON'T FORGET TO ATTACH #E7 BETWEEN THE STERN DOORS!

View attachment 225732
Glad I was reading your blog today.

Looks like I forgot to install that same part, E7 :rolleyes:.

At least I caught it before the next deck goes in .
 
Glad I was reading your blog today.

Looks like I forgot to install that same part, E7 :rolleyes:.

At least I caught it before the next deck goes in .
Good for you Rowboat! I finished painting the little Knick knacks...I started the dreaded wiring today..took me all but three hours to do 5 lanterns!
 
Captain's Log ~~~April 8, 2021
Build time today: 6 hours
Total build time: 36 hours

Construction for the Black Pearl (All-Scenario version)​

Build guidelines:​

Steps 27-41 & 48 & 49 (Phase 1) Completed

Steps 42-71 excl. 48 & 49 (Phase 2) Completed

Steps 72-77 (Phase 3)

Steps 42-71, excl. 48 & 49 (Phase 2)​

Secure the following parts:
All the resin baskets, food stuffs, and crates. S1, S2, S3, S5, T2, T9, Z6. Z7, E1 (placed in Phase 1).

Phase 2
Most of the work in this phase is open to your own imagination as you paint all the items above as you like.
One item that requires assembly is the wine rack and that would be parts R6 (5), R7 (9), also S6 (12) wine bottles.

IMG_4671.jpg

The resin parts for paint and staining are Parts S1-S30.
IMG_2585.JPG

Whatever floats your boat mates!
04-08A.jpg

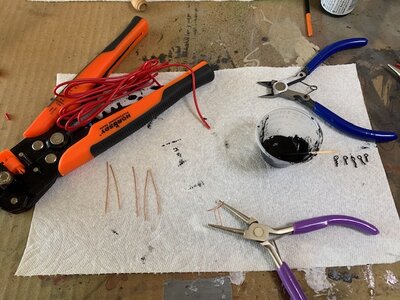
While I had the paints out, I remembered @MystRacing (Jodie) saying that once you reach the part you started to place the lanterns, the hooks that are supplied might be a bit too hokey with as many times as you would be flipping the ship up, down, over etc... so I followed his lead and made my own eye hooks to keep the wire in place.
04-08C.jpg
I stripped some wire that was laying around, twisted it around the pliers, dumped it into some black acrylic and let it dry...then I snipped them evenly to about a 1/16"....I'll use my hand drill and use a small bit to make enough of a hole to place these hooks...and secure with some CA glue.

While I did finish painting the resin parts, I did not glue any parts onto the lower deck at this point.

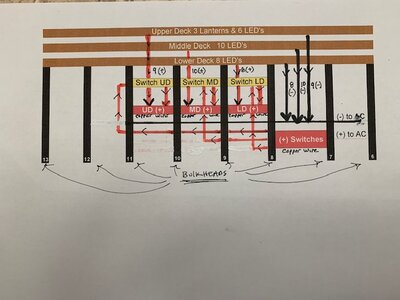
My greater concern was to dig into the wiring mates. The most I know about electricity is the old thought "think of current as the way water flows." Luckily, its not likely that using a 3v lithium CR 2025 battery as a power source that I can be too much of a danger to anyone. So, over a bit of rum and a little day dreaming, I plan to follow this diagram.
04-08D.jpg
It was a beautiful day today in San Diego, and the shipyard was open for 6 hours....since the following steps are part of my Phase 3, I will defer until the weekend to give you the next Captain's Log.

Be well mates!
Ahoy all!
 
Last edited:
Captain's Log ~~~April 8, 2021
Build time today: 6 hours
Total build time: 36 hours

Construction for the Black Pearl (All-Scenario version)​

Build guidelines:​

Steps 27-41 & 48 & 49 (Phase 1) Completed

Steps 42-71 excl. 48 & 49 (Phase 2)

Steps 72-79 (Phase 3)

Steps 42-71, excl. 48 & 49 (Phase 2)​

Secure the following parts:
All the resin baskets, food stuffs, and crates. S1, S2, S3, S5, T2, T9, Z6. Z7, E1 (placed in Phase 1).

Phase 2
Most of the work in this phase is open to your own imagination as you paint all the items above as you like.
One item that requires assembly is the wine rack and that would be parts R6 (5), R7 (9), also S6 (12) wine bottles.

View attachment 226075

The resin parts for paint and staining are Parts S1-S30.
View attachment 226076

Whatever floats your boat mates!
View attachment 226077

While I had the paints out, I remembered @MystRacing (Jodie) saying that once you reach the part you started to place the lanterns, the hooks that are supplied might be a bit too hokey with as many times as you would be flipping the ship up, down, over etc... so I followed his lead and made my own eye hooks to keep the wire in place.
View attachment 226078
I stripped some wire that was laying around, twisted it around the pliers, dumped it into some black acrylic and let it dry...then I snipped them evenly to about a 1/16"....I'll use my hand drill and use a small bit to make enough of a hole to place these hooks...and secure with some CA glue.

While I did finish painting the resin parts, I did not glue any parts onto the lower deck at this point.

My greater concern was to dig into the wiring mates. The most I know about electricity is the old thought "think of current as the way water flows." Luckily, its not likely that using a 3v lithium CR 2025 battery as a power source that I can be too much of a danger to anyone. So, over a bit of rum and a little day dreaming, I plan to follow this diagram.
View attachment 226079
It was a beautiful day today in San Diego, and the shipyard was open for 6 hours....since the following steps are part of my Phase 3, I will defer until the weekend to give you the next Captain's Log.

Be well mates!
Ahoy all!
Good steady progress, Rick.
 
Hi Vic. Nice to see that you arrived safe, and overall the BP held up well. Today is a solder day! Hopefully, tonight when the sun sets, my PEARL will have 8 lanterns working from a rum barrel switch! Jodie was so kind to mail me his unused lantern pieces so I’ll be able to add the full 13 lamps to the mid deck as the plan calls for.
 
Hi Vic. Nice to see that you arrived safe, and overall the BP held up well. Today is a solder day! Hopefully, tonight when the sun sets, my PEARL will have 8 lanterns working from a rum barrel switch! Jodie was so kind to mail me his unused lantern pieces so I’ll be able to add the full 13 lamps to the mid deck as the plan calls for.
If I remember correctly, the kit lights for the big lanterns were not entirely compatible with the arcana transformer or battery pack.
 
Captain's Log ~~~April 9, 2021
Build time today: 4.5 hours
Total build time: 40.5 hours

Construction for the Black Pearl (All-Scenario version)​

Build guidelines:

Steps 27-41 & 48 & 49 (Phase 1) Completed

Steps 42-71 excl. 48 & 49 (Phase 2) Completed

Steps 72-77 (Phase 3) Completed

Steps 72-77

Secure the following parts:
Part #V2 is enameled wire. If you are using pre-wired LED's things are a lot easier. If you jup ahead to Steps 121-126, there is a half-baked explanation showing how to make a wired LED with the kit parts. Good luck with that. I chose an easier path by spending an extra $100 bucks and ordered 30 pre-wired nano LED's from Evan Designs. I got 21 warm white for the decks, 6 yellow for the Captain's Quarters, and 3 Flickering Orange for the stern lamps. I also decided to run power with a 3v AC adapter and a remote control.

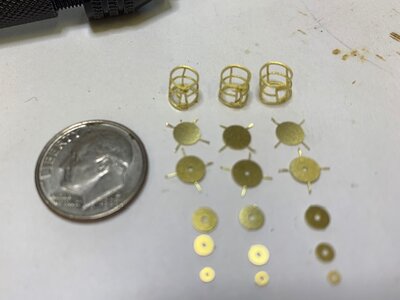
With the LED issue settled, you still have to make the lanterns. Each lantern requires 6 parts. #Z1, Z2. Z3, Z4, & Z5. 5 parts right, Chinese math. Z2 has two different parts...one solid for the lantern bottom, one with a hole for the LED wire to pass through the lantern top. This task is impossible unless you have the eyes of an Eagle. I used magnifying goggles to pass the test.
Think I'm exaggerating, take a look:

04-08C.jpg
04-08A.JPG
04-08B.jpg
After you complete this part of the water torture, you now can flip the ship upside down and lose the pins on your door hinges. Ha! HINT: If you designed your doors to open freely on the hinges, I would suggest putting some tape over the hinges. Before I put the middle deck in, I'll likely put some super glue on the pin head to keep it in place.

OK, all eight lanterns in place, hanging from the little eye hooks I made.

04-08E.jpg


04-08F.JPG
Nothing else to do for now other than drink some rum.

This morning is where all the fun starts. I refuse to take on stormy seas....yes, its solder time.
"What, me worry?"
MAD.JPG

4 1/2 hours later with only a surprising few number of goofs for me,we have lights.
IMG_4693.JPG

The belly of the beast:
IMG_4692.jpg

I have a brief video that I want to upload that shows the lights working with the on/off switch which I attached to the barrel.


Time to take a weekend away from this build as we now have completed through Step 77, which is 29% competition of the First Pole.

Ahoy all!
 
Last edited:
Captain's Log ~~~April 9, 2021
Build time today: 4.5 hours
Total build time: 40.5 hours

Construction for the Black Pearl (All-Scenario version)​

Build guidelines:

Steps 27-41 & 48 & 49 (Phase 1) Completed

Steps 42-71 excl. 48 & 49 (Phase 2) Completed

Steps 72-79 (Phase 3) Completed

Steps 72-79

Secure the following parts:
Part #V2 is enameled wire. If you are using pre-wired LED's things are a lot easier. If you jup ahead to Steps 121-126, there is a half-baked explanation showing how to make a wired LED with the kit parts. Good luck with that. I chose an easier path by spending an extra $100 bucks and ordered 30 pre-wired nano LED's from Evan Designs. I got 21 warm white for the decks, 6 yellow for the Captain's Quarters, and 3 Flickering Orange for the stern lamps. I also decided to run power with a 3v AC adapter and a remote control.

With the LED issue settled, you still have to make the lanterns. Each lantern requires 6 parts. #Z1, Z2. Z3, Z4, & Z5. 5 parts right, Chinese math. Z2 has two different parts...one solid for the lantern bottom, one with a hole for the LED wire to pass through the lantern top. This task is impossible unless you have the eyes of an Eagle. I used magnifying goggles to pass the test.
Think I'm exaggerating, take a look:

View attachment 226198
View attachment 226199
View attachment 226200
After you complete this part of the water torture, you now can flip the ship upside down and lose the pins on your door hinges. Ha! HINT: If you designed your doors to open freely on the hinges, I would suggest putting some tape over the hinges. Before I put the middle deck in, I'll likely put some super glue on the pin head to keep it in place.

OK, all eight lanterns in place, hanging from the little eye hooks I made.

View attachment 226202


View attachment 226203
Nothing else to do for now other than drink some rum.

This morning is where all the fun starts. I refuse to take on stormy seas....yes, its solder time.
"What, me worry?"
View attachment 226204

4 1/2 hours later with only a surprising few number of goofs for me,we have lights.
View attachment 226205

The belly of the beast:
View attachment 226206

I have a brief video that I want to upload that shows the lights working with the on/off switch which I attached to the barrel. For some reason the video won't upload.
Time to take a weekend away from this build as we now have completed through Step 79, which is 29% competition of the First Pole.

Ahoy all!
Congratulations on the lights! I had to upload my video to Vimeo and then link it by url.
 
Fantastic Rick! Those sure are some tiny lanterns - and beautifully put together! Congratulations on the lighting accomplishment as well - it will add a lot to this model.
Thank you, Paul! I look forward to reading your build this weekend and I’m now following you too! I’m sure I can learn a lot from you! :)
 
Congratulations on the lights! I had to upload my video to Vimeo and then link it by url.
Thanks, Vic! It went easier than I thought for me with solder! i think the key was buying a new fine tip and a much thinner solder (.6mm). I’ll get the short video up today...linking must be the key!
 
Back
Top